Firewall
What is Firewall?
A firewall is an access control policy that monitors ingress and egress traffic of VPC vRouters and decides whether to allow or block specific traffic based on the associated rule sets and rules.
Concepts
- Firewall rule set: A firewall rule set is a set of rules that a firewall uses
to defend against network attacks. You need to associate a rule set with the egress
or ingress flow direction of VPC vRouter NICs to make the rule set take
effect.
- You can associate a rule set with the egress or ingress flow direction
of VPC vRouter NICs:
- Ingress: applies to the traffic that flows into the specified VPC vRouter via a network.
- Egress: applies to the traffic that flows out of the specified VPC vRouter via a network.
- You can associate a rule set with the egress or ingress flow direction
of VPC vRouter NICs:
- Firewall rule: A firewall rule is an access control entry associated with
the egress or ingress flow direction of VPC vRouter NICs to defend against network
attacks. A firewall rule includes rule priority, match condition, and
behavior.
- You can associate a rule with the egress or ingress flow direction of
VPC vRouter NICs:
- Ingress: applies to the traffic that flows into the specified VPC vRouter via a network.
- Egress: applies to the traffic that flows out of the specified VPC vRouter via a network.
- Firewall rules can be categorized into custom rules and system rules:
- Custom rules: rules that you customize. You can select the
ingress or egress direction that the rules take effect and
configure the rule priorities, match conditions, and
behaviors.
- Rule priority: the priority of a rule to be matched and
take effect when compared with other firewall rules.
Valid values: 1001 to 2999.
- Generally, a rule with a higher priority is primarily matched when compared to a rule with a lower priority. Priorities are represented by using numbers. A smaller number indicates a higher priority.
- Generally, the more specific the match condition that you configure for a rule is, the higher priority you shall configure for the rule.
- Match condition: the condition based on which traffic
flowing into or out of a VPC network is matched. It
includes source IP address, destination IP address,
source port, destination port, packet status, and
protocol.
- You can specify one or more source and destination IP addresses. These IP addresses can be static IP addresses, IP ranges, CIDR blocks, or a mix of the three.
- If you specify multiple entries, which include one or more CIDR blocks, the netmask of the CIDR block must be 24. If you specify only one CIDR block, the netmask of the CIDR block is not limited.
- You can enter a maximum of ten entries, with each entry separated by a comma (,).
- Behavior: the action to be applied to traffic that meets
the match condition. Valid values: accept, drop, and
reject.
- Accept: accepts the traffic that flows in or out of the specified VPC vRouter.
- Drop: drops the traffic that flows in or out of the specified VPC vRouter and does not respond to the client.
- Reject: rejects the traffic that flows in or out of the specified VPC vRouter and responds to the client.
- Rule priority: the priority of a rule to be matched and
take effect when compared with other firewall rules.
Valid values: 1001 to 2999.
- System rules: rules predefined to support system services. The
system predefines the direction that the rules take effect, and
the priority, match condition, and behavior of the rules.
- The priority of system rules ranges from 1 to 1000 or from 4000 to 9999.
- ZStack Cloud has predefined the
following system rules:
- Firewall rules that take effect on the ingress
direction of VPC vRouter NICs:
- Rule 1: The priority is 4000, and the behavior and match condition combination determines to allow established or related data packets from any IP address/port, with any protocol, or to any IP address/port, to flow into the specified VPC vRouter via a network.
- Rule 2: The priority is 9999, and the behavior and match condition combination determines to allow new data packets from any IP address/port, with any protocol, or to any IP address/port, to flow into the specified VPC vRouter via a network.
- Rule 3: the default rule with a priority of 10000. The behavior and match condition combination determines to reject data packets from any IP address/port, with any protocol, in any status, or to any IP address/port, from flowing into the specified VPC vRouter via a network. You can modify the behavior of the rule. Valid values: accept, drop, and reject.
- Firewall rules that take effect on the egress
direction of VPC vRouter NICs:
- Rule 1: the default rule with a priority of 10000. The behavior and match condition combination determines to reject data packets from any IP address/port, with any protocol, in any status, or to any IP address/port, from flowing into the specified VPC vRouter via a network. You can modify the behavior of the rule. Valid values: accept, drop, and reject.
- System rules cannot be modified, except the behavior of the default rule.
- System rules cannot be created or deleted.
- Firewall rules that take effect on the ingress
direction of VPC vRouter NICs:
- Custom rules: rules that you customize. You can select the
ingress or egress direction that the rules take effect and
configure the rule priorities, match conditions, and
behaviors.
- You can associate a rule with the egress or ingress flow direction of
VPC vRouter NICs:
- Rule template: A rule template is a template that you can select when you add rules to a rule set or a firewall.
- IP/Port set: An IP or port set is a set of IP addresses or ports that you can select when you add rules to a rule set or a firewall.
Fundamentals
ZStack Cloud allows you to associate rule sets and rules with the ingress and egress direction of VPC vRouter NICs. Then traffics that flow in or out of the VPC vRouter NICs are filtered based on the rule priority, match condition, behavior, and the effect direction. This ensures the security of data communications across VPC networks, of VPC vRouters, and of user business operations.
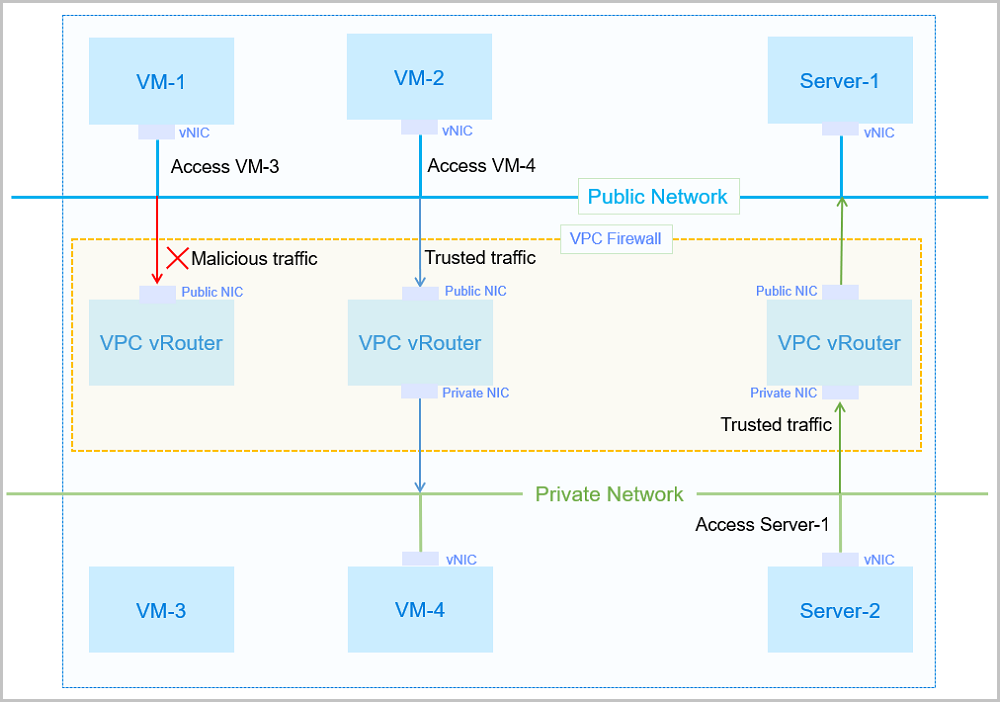
- When VM-1 attempts to access VM-3: The traffic from VM-1 will match the inbound rule set of the public NIC on the VPC vRouter. If malicious traffics are detected, the access is denied.
- When VM-2 attempts to access VM-4: The traffic from VM-2 will match the inbound rule of the public NIC on the VPC vRouter, and then will match the outbound rule set of the private NIC on the VPC vRouter. If trusted traffics are detected, the access is allowed.
- When Server-2 attempts to access Server-1: The traffic from Sever-2 will match the inbound rule set of the private NIC on the VPC vRouter, and then will match the outbound rule set of the public NIC on the VPC vRouter. If trusted traffics are detected, the access is allowed.
Firewall vs Security
| Item | Security Group | Firewall |
|---|---|---|
| Application scope | VM NIC | The entire VPC network |
| Deployment mode | Distributed | Centralized |
| Deployment location | VM instance | VPC vRouter |
| Configuration policy | Supports only Allow and Reject policies | Allows you to customize Accept, Drop, or Reject policies as needed |
| Priority | Allows you to customize priorities | Allows you to customize priorities |
| Match condition | Source IP/security group, destination IP/security group, source port, destination port, and protocol | Source IP address, source port, destination IP address, destination port, protocol, and packet status |
Create a Firewall
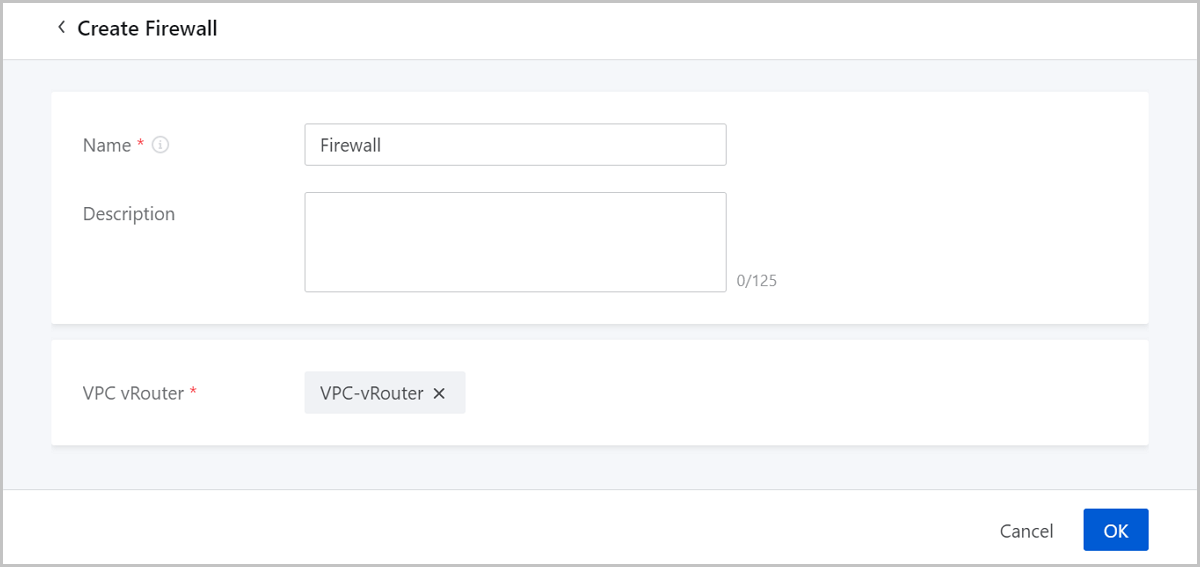
On the main menu of ZStack Cloud, choose . On the Firewall page, click Create Firewall. Then, the Create Firewall page is displayed.
- Name: Enter a name for the firewall.
- Description: Optional. Enter a description for the firewall.
- VPC vRouter: Select a VPC vRouter that you want to defend
against attacks .
 Note: The VPC vRouter that you select must be in running state
and is not associated with a firewall.
Note: The VPC vRouter that you select must be in running state
and is not associated with a firewall.
After you create a firewall, you can add firewall rules on the details page to defend the VPC vRouter against attacks.
Manage a Firewall
On the main menu of ZStack Cloud, choose . Then, the Firewall page is displayed.
| Action | Description |
|---|---|
| Create Firewall | Create a firewall. |
| Delete Firewall | Delete a firewall. |
Firewall Details
Add a Firewall Rule
On the main menu of ZStack Cloud, choose . Then, the Firewall page is displayed. You can add a firewall rule on the details page of Firewall or Rule Set.
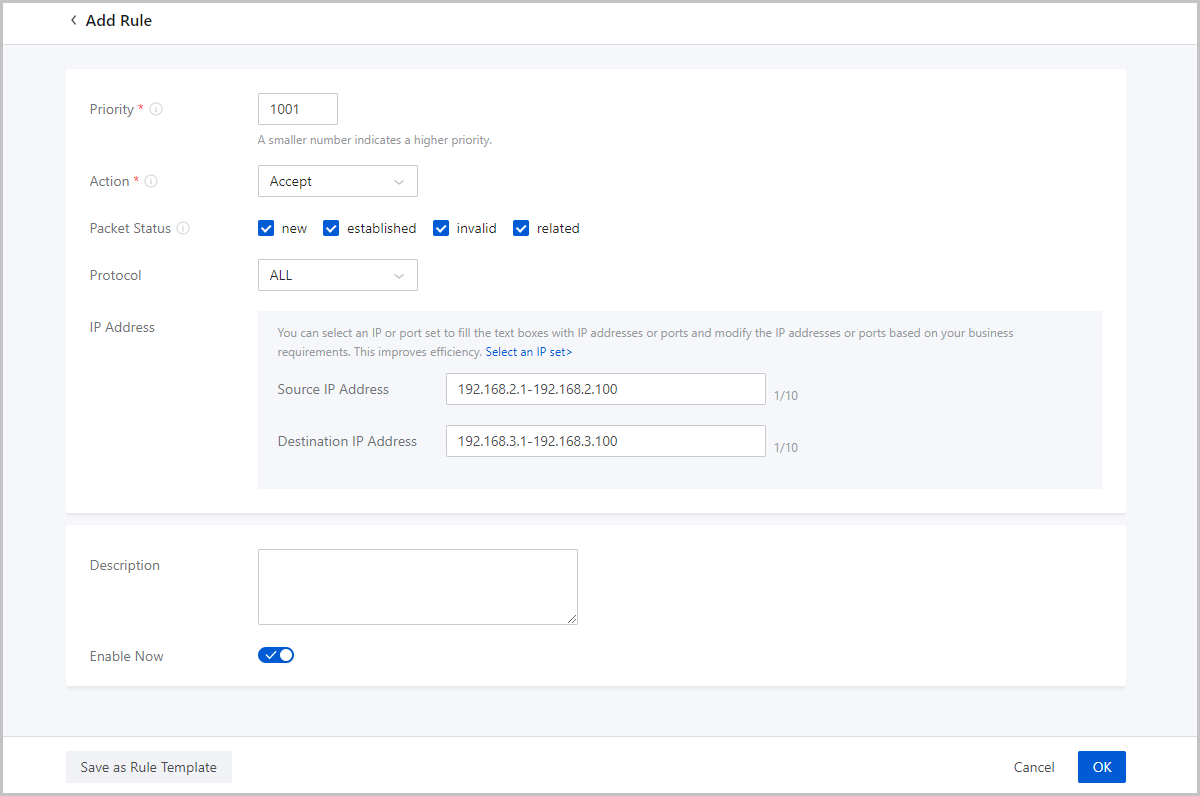
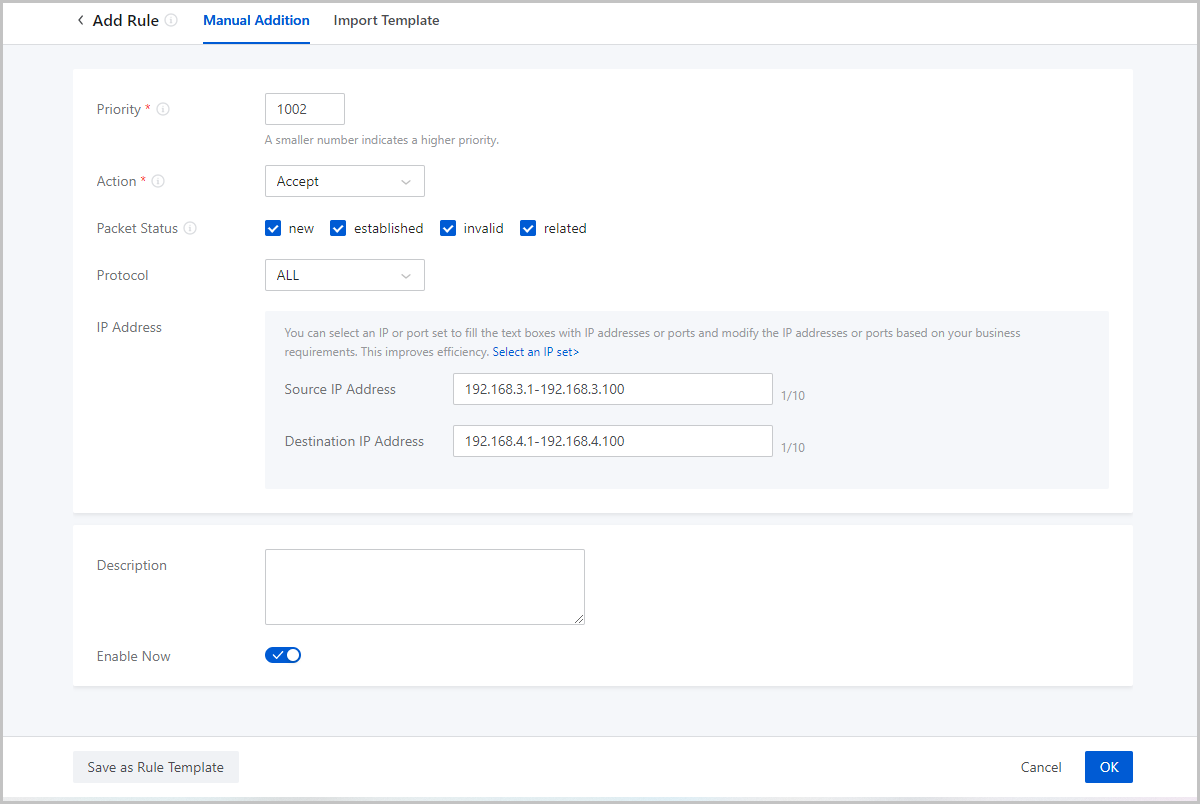
If you choose to add a firewall rule from the details page of Firewall, click Add Rule. Then, the Add Rule page is displayed.
- Priority: Set the priority of a rule.Note:
- A smaller number indicates a higher priority. Valid values: 1001 to 2999.
- Priorities that range from 1 to 1000 and 4000 to 9999 are for the preset rules of system service. You cannot add, edit, or delete a system rule. However, you can modify the behavior of default rules.
- The priority of a rule in a rule set must be unique.
- Action: Select a method to handle incoming network
requests. Valid values: Accept, Drop, and Reject.
- Accept: Accept the traffic that flows in or out of the specified VPC vRouter.
- Drop: Drop the traffic that flows in or out of the specified VPC vRouter and does not respond to the client.
- Reject: Reject the traffic that flows in or out of the specified VPC vRouter and responds to the client.
- Packet Status: Optional. Select a packet status for the
rule that a VPC firewall needs to match. For example, if you select new, then
all new packets will be processed according the actions set in the current
rule.
- new: new connection requests
- established: established connections
- invalid: unidentifiable connections
- related: new connection requests that are associated with existing connections
- Protocol: Select a protocol for the firewall rule. For example, if you select TCP, then all requests of TCP protocol will be processed according the actions set in the current rule.
- IP Address: Optional. Set a source IP address and
destination IP address for the rule.
- You can specify an IP address, IP range, or CIDR block. If you specify an IP range, use a hyphen (-) to indicate the range, for example, 192.168.0.1-192.168.0.100.
- You can specify up to 10 source/destination IP addresses. If you specify an IP address, IP range or a mix of IP/netmask format, separate them with a comma (,).
- If you specify multiple IP address and one or more CIDR formats, you can set the netmask of the CIDR blocks only to /24. If you specify only one CIDR block, you can set a random netmask.
- You can select an IP/port set to quickly fill in the IP address.
- Description: Optional. Enter a description for the rule.
- Enable Now: Specify whether to enable rules after the rules are added to the Cloud. If not specified, the rules are disabled after they are added to the Cloud. You need to manually enable these rules to take effect.
- Save as Rule Template: Save the current rule configuration as a rule template.
- Manual addition
- Import template
Manual Addition
With this method, you can specify individual IP address or an IP range to add rules. You can add a maximum of 1998 rules to the Cloud in a batch.
- Priority: Set the priority of a rule.Note:
- A smaller number indicates a higher priority. Valid values: 1001 to 2999.
- Priorities that range from 1 to 1000 and 4000 to 9999 are for the preset rules of system service. You cannot add, edit, or delete a system rule. However, you can modify the behavior of default rules.
- The priority of a rule in a rule set must be unique.
- Action: Select a method to handle incoming network
requests. Valid values: Accept, Drop, and Reject.
- Accept: Accept the traffic that flows in or out of the specified VPC vRouter.
- Drop: Drop the traffic that flows in or out of the specified VPC vRouter and does not respond to the client.
- Reject: Reject the traffic that flows in or out of the specified VPC vRouter and responds to the client.
- Packet Status: Optional. Select a packet status for the
rule that a VPC firewall needs to match. For example, if you select new, then
all new packets will be processed according the actions set in the current
rule.
- new: new connection requests
- established: established connections
- invalid: unidentifiable connections
- related: new connection requests that are associated with existing connections
- Protocol: Select a protocol for the firewall rule. For example, if you select TCP, then all requests of TCP protocol will be processed according the actions set in the current rule.
- IP Address: Optional. Set a source IP address and
destination IP address for the rule.
- You can specify an IP address, IP range, or CIDR block. If you specify an IP range, use a hyphen (-) to indicate the range, for example, 192.168.0.1-192.168.0.100.
- You can specify up to 10 source/destination IP addresses. If you specify an IP address, IP range or a mix of IP/netmask format, separate them with a comma (,).
- If you specify multiple IP address and one or more CIDR formats, you can set the netmask of the CIDR blocks only to /24. If you specify only one CIDR block, you can set a random netmask.
- You can select an IP/port set to quickly fill in the IP address.
- Description: Optional. Enter a description for the rule.
- Enable Now: Specify whether to enable rules after the rules are added to the Cloud. If not specified, the rules are disabled after they are added to the Cloud. You need to manually enable these rules to take effect.
- Save as Rule Template: Save the current rule configuration as a rule template.
Import Template
With this method, you can add some or all ingress/egress rules of other firewalls to the current firewall. If you need to modify or add a large number of rules in the template, we recommend that you can use Manual Addition, which is more convenient and easy to use.
- Go to the details page of the current/other firewall and rule set and export
the added rules into a CSV-formatted template file.
Figure 3. Template File 
- Fill in the rule information according to the specified format.Set the following parameters in the template:
- Priority: Set the priority of a rule.Note:
- A smaller number indicates a higher priority. Valid values: 1001 to 2999.
- Priorities that range from 1 to 1000 and 4000 to 9999 are for the preset rules of system service. You cannot add, edit, or delete a system rule.
- The priority of a rule in a rule set must be unique.
- Protocol: Optional. You can specify multiple protocols, including ALL, TCP, UDP, ICMP, GRE, ESP, AH, IPIP, VRRP, IPENCAP, PIM, OSPF, IGMP. If you do, separate each protocol with a semicolon (;). If you do not specify this parameter, the system specifies ALL.
- Creation Time: Optional. This parameter is available only in the template file that exported from the details page of a rule set.
- Associated Rule Set: Optional. This parameter is available only in the template file that exported from the details page of a firewall.
- Action: Select a method to handle
incoming network requests. Valid values: Accept, Drop, and
Reject.
- Accept: Accept the traffic that flows in or out of the specified VPC vRouter.
- Drop: Drop the traffic that flows in or out of the specified VPC vRouter and does not respond to the client.
- Reject: Reject the traffic that flows in or out of the specified VPC vRouter and responds to the client.
- State: Optional. Specifies whether to
enable the rules after the rules are added to the Cloud.
- If you do not specify this parameter or set the parameter to disable, the rules are disabled after they are added to the Cloud.
- If you set the parameter to enable, the rules are enabled after they are added to the Cloud.
- Packet Status: Optional. You can specify
multiple status. If you do, separate each status with a
semicolon (;). The following packet status are supported:
- new: new connection requests
- established: established connections
- invalid: unidentifiable connections
- related: new connection requests that are associated with existing connections
- TCP flag: Optional. This parameter is available only when you set the parameter to TCP. You can specify multiple flags, including SYN, ACK, FIN, RST, URG, and PSH. If you do, separate each flag with a semicolon (;).
- ICMP Type: Optional. This parameter is available only when you set the parameter to ICMP. Supported ICMP types: echo-reply, echo-request, destination-unreachable, source-quench, redirect, router-advertisement, router-solicitation, time-exceeded, parameter-problem, timestamp-reply, timestamp-request, address-mask-request, and address-mask-reply
- Source Port: Optional. The source port is
available only when you set the parameter to TCP or UDP.
- You can specify a port or port range. If you specify a port range, use a hyphen (-) to indicate the range, for example, 1-100.
- You can specify a maximum of 10 entries. If you do, separate each entry with a semicolon(;).
- Destination Port: Optional. The
destination port is available only when you set the parameter to
TCP or UDP.
- You can specify a port or port range. If you specify a port range, use a hyphen (-) to indicate the range, for example, 1-100.
- You can specify a maximum of 10 entries. If you do, separate each entry with a semicolon(;).
- Source IP Address: Optional. You can
specify an IP address, IP range, or CIDR block for the source IP
address.
- If you specify an IP range, use a hyphen (-) to indicate the range, for example, 192.168.0.1-192.168.0.100.
- If you specify multiple CIDR blocks, or a mix of CIDR blocks and other formats of entries, you can set the netmask of the CIDR blocks only to /24. If you specify only one CIDR block, you can set a random netmask. You can specify a maximum of 10 entries. If you do, separate each entry with a semicolon (;).
- Destination IP Address: Optional. You can
specify an IP address, IP range, or CIDR block for the
destination IP address.
- If you specify an IP range, use a hyphen (-) to indicate the range, for example, 192.168.0.1-192.168.0.100.
- If you specify multiple CIDR blocks, or a mix of CIDR blocks and other formats of entries, you can set the netmask of the CIDR blocks only to /24. If you specify only one CIDR block, you can set a random netmask. You can specify a maximum of 10 entries. If you do, separate each entry with a semicolon (;).
- Description: Optional. Enter a description for the rule.
- Priority: Set the priority of a rule.
- Upload the configuration file.
After you fill in the configuration information, verify that the syntax is correct, and then upload the file to the Cloud.
Figure 4. Import Template 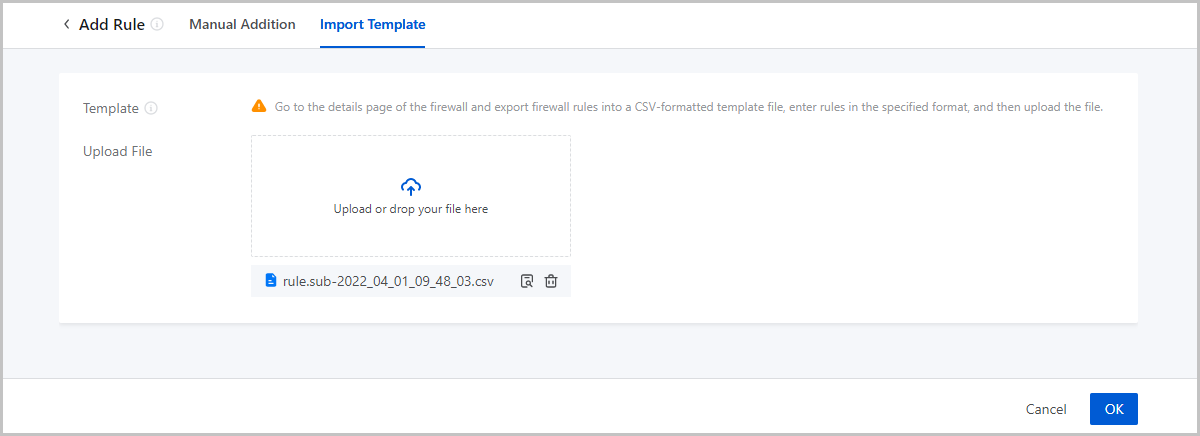
Note: You need to synchronize configurations of the rule set to make
configurations take effect after importing a template.
Manage a Firewall Rule
On the main menu of ZStack Cloud, choose . Then, the Firewall page is displayed. You can manage a firewall rule on the details page of Firewall or Rule Set.
| Action | Description |
|---|---|
| Enable Firewall Rule | Enable a disabled firewall rule. |
| Disable Firewall Rule | Disable an enabled firewall rule. |
| Edit Rule | Edit the rule of a firewall rule.Note:
|
| Delete Firewall Rule | Delete a firewall rule.Note: You cannot delete a
system rule. |
| Export CSV | Export firewall rules in the CSV format. |
Rule Set
Create a Rule Set
On the main menu of ZStack Cloud, choose . On the Firewall page, click the Rule Set tab. On the tab, click Create Rule Set. Then, the Create Rule Set page is displayed.
- Name: Enter a name for the rule set.
- Description: Optional. Enter a description for the rule set.
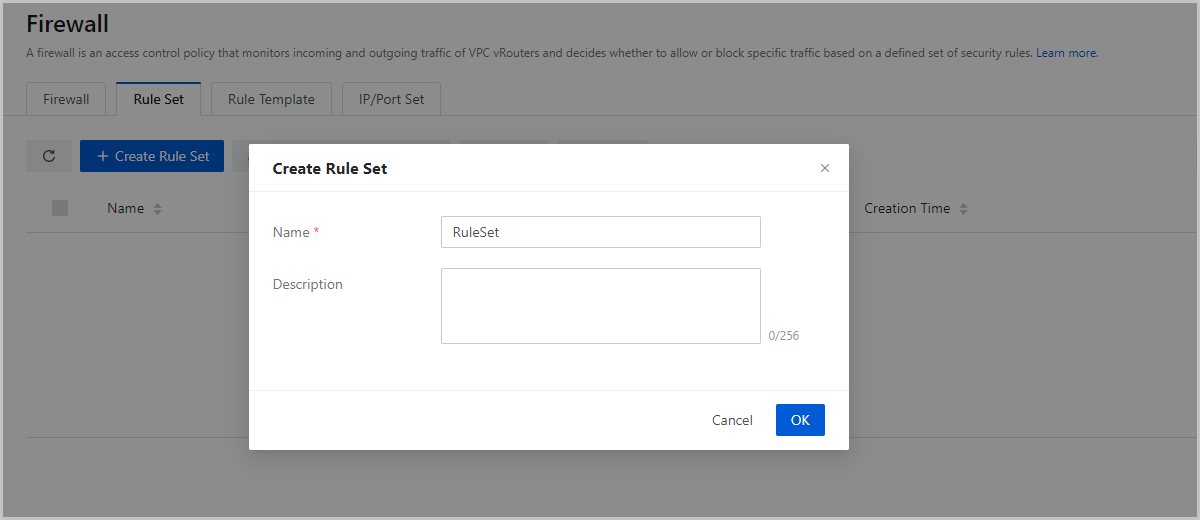
After you create a rule set, you can add rules on the details page and associate the rules on the egress or ingress direction of a VPC vRouter NIC to defend the VPC vRouter against attacks.
Manage a Rule Set
On the main menu of ZStack Cloud, choose . On the Firewall page, click the Rule Set tab. Then, the Rule Set tab is displayed.
| Action | Description |
|---|---|
| Create Rule Set | Create a rule set. |
| Edit Rule Set | Edit the name and description of a rule set. |
| Synchronize Configurations | Synchronize configurations to make rule modifications in the rule set take effect. |
| Add Rule | Add a rule to a rule set. |
| Associate Network | Associate a network for a rule set. |
| Disassociate Network | Disassociate a network from a rule set. |
| Delete Rule Set | Delete a rule set. |
Rule Template
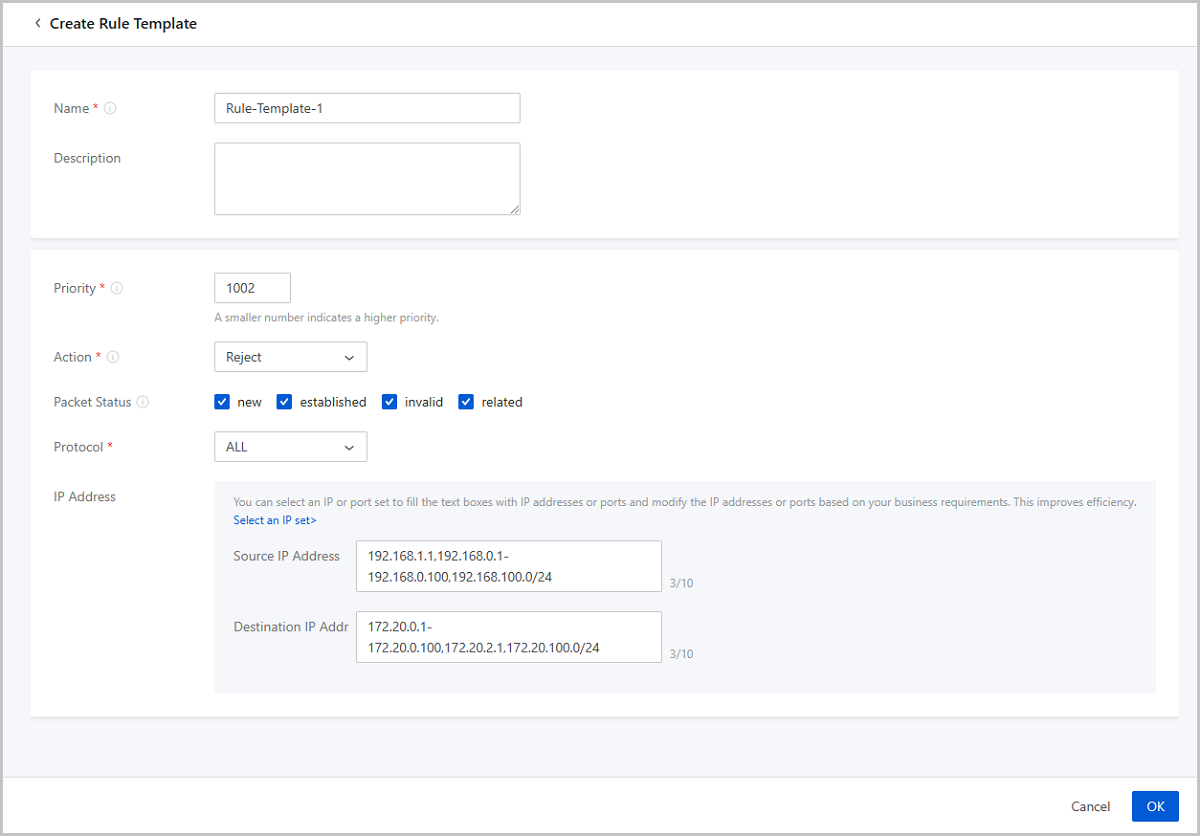
On the main menu of ZStack Cloud, choose . On the Firewall page, click the Rule Template tab. On the tab, click Create Rule Template. Then, the Create Rule Template page is displayed.
- Name: Enter a name for the rule template.
- Description: Optional. Enter a description for the rule set.
- Priority: Set the priority of a rule.Note:
- A smaller number indicates a higher priority. Valid values: 1001 to 2999.
- Priorities that range from 1 to 1000 and 4000 to 9999 are for the preset rules of system service. You cannot add, edit, or delete a system rule. However, you can modify the behavior of default rules.
- The priority of a rule in a rule set must be unique.
- Action: Select a method to handle incoming network
requests. Valid values: Accept, Drop, and Reject.
- Accept: Accept the traffic that flows in or out of the specified VPC vRouter.
- Drop: Drop the traffic that flows in or out of the specified VPC vRouter and does not respond to the client.
- Reject: Reject the traffic that flows in or out of the specified VPC vRouter and responds to the client.
- Packet Status: Optional. Select a packet status for the
rule that a VPC firewall needs to match. For example, if you select new, then
all new packets will be processed according the actions set in the current
rule.
- new: new connection requests
- established: established connections
- invalid: unidentifiable connections
- related: new connection requests that are associated with existing connections
- Protocol: Select a protocol for the firewall rule. For example, if you select TCP, then all requests of TCP protocol will be processed according the actions set in the current rule.
- IP Address: Optional. Set a source IP address and
destination IP address for the rule.
- You can specify an IP address, IP range, or CIDR block. If you specify an IP range, use a hyphen (-) to indicate the range, for example, 192.168.0.1-192.168.0.100.
- You can specify up to 10 source/destination IP addresses. If you specify an IP address, IP range or a mix of IP/netmask format, separate them with a comma (,).
- If you specify multiple IP address and one or more CIDR formats, you can set the netmask of the CIDR blocks only to /24. If you specify only one CIDR block, you can set a random netmask.
- You can select an IP/port set to quickly fill in the IP address.
IP/Port Set
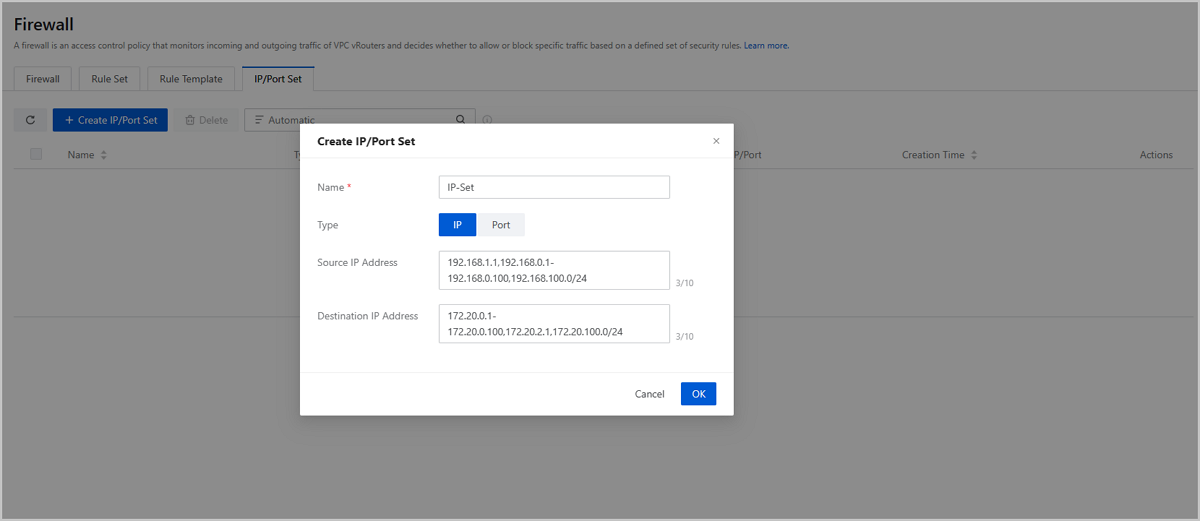
On the main menu of ZStack Cloud, choose . On the Firewall page, click the IP/Port Set tab. On the tab, click Create IP/Port Set. Then, the Create IP/Port Set dialogue box is displayed.
- Name: Enter a name for the IP/port set.
- Type: Specify the type of the set. Valid values: IP and
Port.If you choose IP, set the following parameters:
- Source IP Address: Enter the source IP address to be integrated.
- Destination IP Address: Enter the destination IP address to be integrated.
Note:
- You can specify a static IP address, IP range, or CIDR block. If you specify an IP range, use a hyphen (-) to indicate the range, for example, 192.168.0.1-192.168.0.100.
- You can specify up to 10 source/destination IP addresses. If you specify an IP address, IP range or a mix of IP/netmask format, separate them with a comma (,).
- If you specify multiple IP address and one or more CIDR formats, you can set the netmask of the CIDR blocks only to /24. If you specify only one CIDR block, you can set a random netmask.
If you choose Port, set the following parameters:- Source Port: Enter the source port to be integrated.
- Destination Port: Enter the destination port to be integrated.
Note:
- You can enter ports or port ranges. A port range is formatted by using a hyphen (-), for example, 1-100.
- You can specify up to 10 source/destination ports. If you enter a mix of port and port range, separate them with comma (,).