L3 Network
- A network range includes an IP range (start IP and end IP), netmask, and gateway. For example, you can specify the IP range from 172.20.12.2 to 172.20.12.255, set the netmask to 255.255.0.0, and set the gateway to 172.20.0.1. In addition, you can use a CIDR to specify a network range, such as 192.168.1.0/24.
- DNS provides DNS resolution services used for configuring VM networks.
Concepts
- Public network: Generally, a public network is a logical network that is
connected to the Internet. However, in an environment that has no access to the
Internet, you can also create a public network.
- A public network can be used in the flat network environment to create VM instances.
- A public network can be used in the VPC network environment to create VM instances that work with public networks.
- Flat network: A flat network is connected to the network where the host
is located and has direct access to the Internet. VM instances in a flat network can
access public networks by using elastic IP addresses.
- A flat network supports multiple network services, including DHCP, User Data, EIP, security group, and port mirroring.
- The network services provided by a flat network use the distributed DHCP and the distributed EIP structure.
- The DHCP service provided by a flat network also includes the DNS feature.
- The network model used in the wizard is a flat network.
- The flat network architecture based on VxlanNetwork or HardwareVxlanNetwork is supported.
- VPC network: A VPC network is a private network where VM instances can
be created. A VM instance in a VPC network can access the Internet through a VPC
vRouter.
- A VPC network provides the following network services: DHCP, User Data, DNS, SNAT, route table, EIP, port forwarding, load balancing, IPsec tunnel, security group, dynamic routing, multicast routing, VPC firewall, port mirroring, and netflow.
- The DHCP service of the VPC network uses DHCP by default.
- VPC networks mainly use custom Linux VM instances as VPC vRouters to provide network services.
- Network services can act on multiple subnets of a VPC at the same time, further improving network efficiencies.
- Supports VxlanNetwork-based VPC network architecture.
- Supports distributed routing, optimizing east-west network traffic and effectively reducing network latency.
- Dedicated network:
- Management network: A management network is used to manage physical resources
in the Cloud. For example, you can create a management network to manage access to
hosts, primary storage, image storage, and VPC vRouters.
 Note: When you create a VPC vRouter, you need an IP address
that can be interconnected between the management nodes of the
VPC vRouter. With this IP address, you can deploy an agent and
obtain messages returned by the agent.
Note: When you create a VPC vRouter, you need an IP address
that can be interconnected between the management nodes of the
VPC vRouter. With this IP address, you can deploy an agent and
obtain messages returned by the agent. - Flow network: A flow network is a dedicated network for port mirror transmission. You can use a flow network to transmit the mirrors of data packets of NIC ports to the target ports. A flow network cannot be used for other purposes, such as creating VM instances.
- Management network: A management network is used to manage physical resources
in the Cloud. For example, you can create a management network to manage access to
hosts, primary storage, image storage, and VPC vRouters.
- Specific network scenarios:
- Storage network: A storage network is the network specified by the shared storage. You can use a storage network to check the health state of a VM instance. We recommend that you plan for an independent storage network in advance to avoid potential risks.
- VDI network: When you create a cluster, you can specify CIDR for the VDI network in the cluster. In the VDI scenario, the network traffics generated by the protocol communication between the server side and client side use the VDI network. If you do not make any configuration to the VDI network, notice that the management network will be used by default.
- Migration network: When you create a cluster, you can specify CIDR for the migration network in the cluster. The migration network is used to migrate VM instances in the Cloud. If you do not make any configuration to the migration network, notice that the management network will be used for VM migrations.
- Image synchronization network: An image synchronization network is
used to synchronize images among ImageStore image storage in the
same management node.
- If you deployed an independent network for synchronizing images, you can specify CIDR for the image synchronization network when you add an ImageStore image storage.
- If you do not make any configuration to the image synchronization network, notice that the management network will be used by default.
- If you set an image synchronization network for both the source ImageStore image storage and target one, only the image synchronization network in the target ImageStore image storage takes effect.
- Data network: A data network is the network where data can transfer
between a compute node and an image storage.
- Using an independent data network can avoid network congestion and improve the data transfer rate.
- If you do not make any configuration to the data network, notice that the management network will be used by default.
- Backup network: If you are using the Backup Service or the
Continuous Data Protection (CDP) service, in the local backup
scenario,both the data backup and recovery are implemented by using
the backup network.
- If you deploy an independent network for local backups, you can specify CIDR for the backup network when you add a local backup server.
- Using an independent backup network can avoid network congestion and improve the data transfer rate.
- If you do not make any configuration to the backup network, notice that the management network will be used for local backup by default.
Note:
The Backup Service and the CDP Service are separately provided in a separate module. To use this feature, purchase both the Base License and the Plus License. Note that a Base License is required before you can install a Plus License.
Considerations
- When you create a VM instance, you can specify multiple L3 networks, including flat networks, VPC networks, or a combination of flat networks and VPC networks.
- The Cloud supports multi-layer networks. In addition, the L2 networks of multi-layer networks can intercommunicate. Therefore, you need to pay a special attention to avoid the conflict of IP address spaces.
- You can use an L2 network to create multiple L3 networks. However, we recommend that unless necessary you do not create multiple L3 networks from an L2 network. This may cause the DHCP services of these L3 networks unable to work as expected.
- The network services and features supported by an L3 network are related to the
network architecture model (flat network, VPC network) and the configured
network protocol version (IPv4, IPv6). If a network is configured with both IPv4
and IPv6 protocols, servers of these two protocol types are loaded at the same
time to provide corresponding services.
IPv4 IPv6 Flat network Supported network services: DHCP, User Data, EIP, security group, and port mirroring Supported network services: DHCP, DNS, EIP, and security group VPC network Supported network services: DHCP, User Data, DNS, SNAT, route table, EIP, port forwarding, load balancing, IPsec tunnel, security group, dynamic routing, multicast routing, VPC firewall, port mirroring, and Netflow Supported network services: DHCP, DNS, and security group Supported network service: VPC vRouter HA group Supported network service: VPC vRouter HA group
Public Network
Create a Public Network
On the main menu of ZStack Cloud, choose . On the Public Network page, click Create Public Network. The Create Public Network page appears.
- Create an IPv4 public network
- Create an IPv6 public network
Create IPv4 Public Network
- Name: Enter a name for the public network.
- Description: Optional. Enter a description for the public network.
- L2 Network: Select an L2 network for the public
network.Note: ZStack Cloud allows you to use
an L2 network to create multiple L3 networks. However, we recommend that
you do not use an L2 network to create multiple L3 networks if not for
specific business needs.On the Select L2 Network page, two tabs are displayed:
- Recommended: lists L2 networks in the current zone that are not attached to an L3 network.
- All: lists all L2 networks in the current zone.
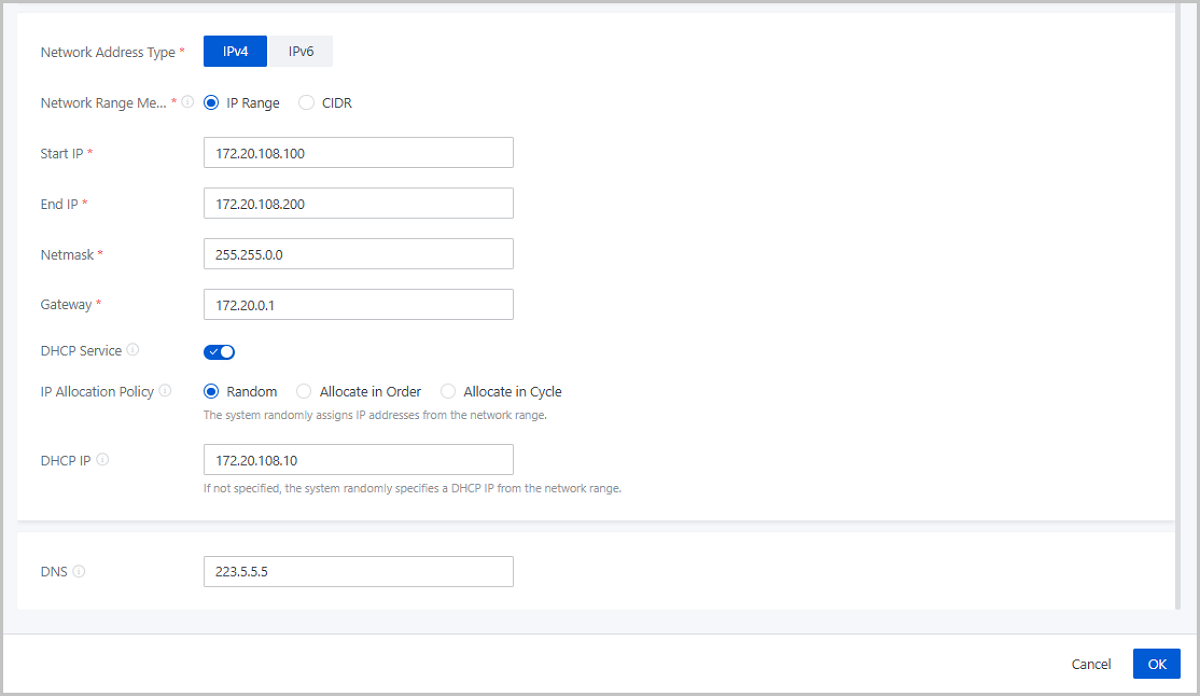
- Network Address Type: Select IPv4.
- Network Range Method: Select a method to add a
network range for the public network. You can select IP Range or CIDR.If you select IP Range, you need to set the following parameters:
- Start IP: Set a start IP address for the network range, for example, 172.20.108.100.
- End IP: Set an end IP address for the network range, for example, 172.20.108.200.
- Netmask: Set a netmask for the network range, for example, 255.255.0.0.
- Gateway: Set a gateway for the network range, for example, 172.20.0.1.
- DHCP Service: Choose
whether to enable the DHCP service.Note:
- The DHCP service is a built-in distributed service of the Cloud, which assigns IP addresses only to resources in the Cloud and does not conflict with your existing DHCP server.
- By default, the DHCP service is enabled so that the NICs using this L3 network acquire IP addresses in a DHCP mode. You can customize a DHCP IP or use the DHCP IP that the system assigned according to the IP allocation policy.
- If you disable this option, NICs using this L3 network acquire IP addresses in a Static mode. The Cloud does not assign IP addresses to NICs automatically. If the NICs need IP addresses, you need to configure IP addresses for them manually. In addition, you cannot specify a DHCP IP. Neither can the system allocate one.
- IP Allocation Policy: Optional.
If the DHCP service is enabled, IP addresses can be
assigned according to the following three allocation
policies:
- Random: The system randomly assigns IP addresses from the network range.
- Allocate in Order:
- The system assigns all available IP addresses from the network range in ascending order. Released IP addresses are assigned in the next allocation.
- Example: Assume that the network range is 192.168.0.101~192.168.0.120, within which 192.168.0.101~192.168.0.108 are allocated. If 192.168.0.106 is released, it will be assigned first in the next allocation.
- Allocate in Cycle:
- The system assigns available IP addresses to VM instances from the network range in ascending order. Released IP addresses are assigned when currently available IP addresses are used up.
- Example: Assume that the network range is 192.168.0.101~192.168.0.120, within which 192.168.0.101~192.168.0.108 are allocated. If 192.168.0.106 is released, it will be assigned after 192.168.0.120 is used.
- DHCP IP:
Optional. Set an IP address for the DHCP server, for
example, 172.20.108.10.Note:
- A DHCP IP is an IP address used by the DHCP service to assign IP addresses to resources that use this L3 network.
- If you create an L3 network for the first time with the DHCP service enabled, or if you add the first network range to an L3 network with the DHCP service enabled, you can customize the DHCP IP.
- If the L3 network has a DHCP IP, you cannot customize the DHCP IP when you add a network range.
- The DHCP IP can be in or outside the added IP range, but it must be an unoccupied IP address in the CIDR block of the added IP range
- The IP range determined by the start IP and end IP cannot contain the link-local address 169.254.0.0/16.
- If you select random as the IP allocation policy and this field is left blank, the system randomly assigns IP addresses from the added network range.
- If you select allocate in order/allocate in cycle as the IP allocation policy and this field is left blank, the system uses the start IP address in the network range as the DHCP IP.
- DNS: Add a DNS server to provide domain name resolution services for the public network. You can specify 223.5.5.5, 8.8.8.8, or 114.114.114.114.
Note: When you add an IP range for an IPv4 L3 network, note that:- The IP range cannot contain gateway IP addresses, broadcast addresses, or network addresses.
- The IP range of a private network cannot overlap with the IP range of a public network used to create a vRouter offering or of a management network.
Figure 1. Create IPv4 Public Network Using IP Range 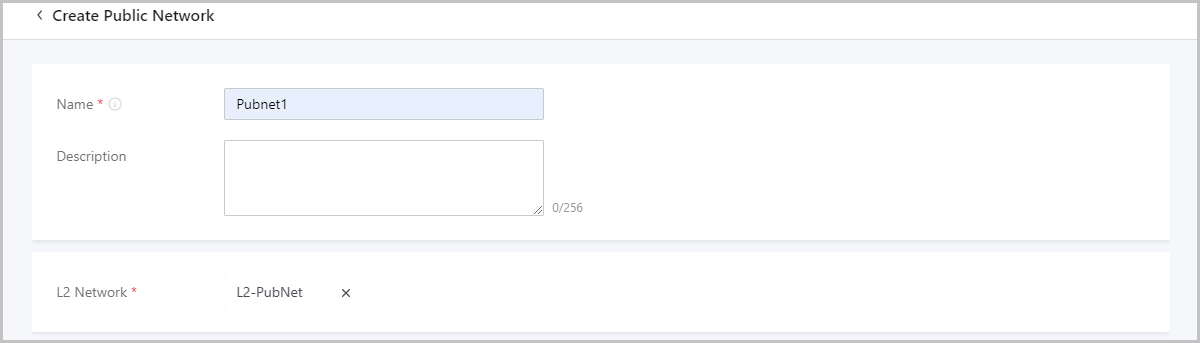
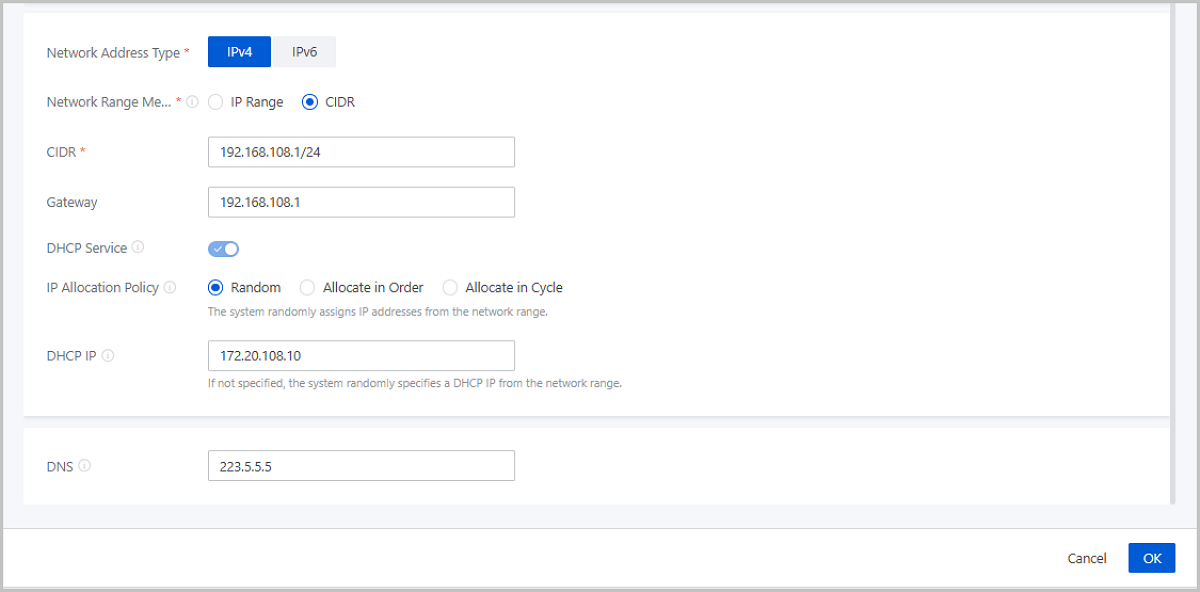
If you select CIDR, you need to set the following parameters:- CIDR: Set a CIDR block for the public network, for example, 192.168.108.1/24.
- Gateway: Set a gateway for the public
network, for example, 192.168.108.1.Note:
- We recommend that you use the first or last IP address in the specified CIDR block as the gateway.
- If left blank, the first IP address in the specified CIDR block is used as the gateway.
- DHCP Service: Choose whether to enable
the DHCP service.Note:
- The DHCP service is a built-in distributed service of the Cloud, which assigns IP addresses only to resources in the Cloud and does not conflict with your existing DHCP server.
- By default, the DHCP service is enabled so that the NICs using this L3 network acquire IP addresses in a DHCP mode. You can customize a DHCP IP or use the DHCP IP that the system assigned according to the IP allocation policy.
- If you disable this option, NICs using this L3 network acquire IP address in a Static mode. The Cloud does not assign IP addresses automatically. If the NICs need IP addresses, you need to configure IP addresses for them manually. In addition, you cannot specify a DHCP IP. Neither can the system allocate one.
- IP Allocation Policy: Optional.
If the DHCP service is enabled, IP addresses can be
assigned according to the following three allocation
policies:
- Random: The system randomly assigns IP addresses from the network range.
- Allocate in Order:
- The system assigns all available IP addresses from the network range in ascending order. Released IP addresses are assigned in the next allocation.
- Example: Assume that the network range is 192.168.0.101~192.168.0.120, within which 192.168.0.101~192.168.0.108 are allocated. If 192.168.0.106 is released, it will be assigned first in the next allocation.
- Allocate in Cycle:
- The system assigns available IP addresses to VM instances from the network range in ascending order. Released IP addresses are assigned when currently available IP addresses are used up.
- Example: Assume that the network range is 192.168.0.101~192.168.0.120, within which 192.168.0.101~192.168.0.108 are allocated. If 192.168.0.106 is released, it will be assigned after 192.168.0.120 is used.
- DHCP IP: Optional. Set an IP
address for the DHCP server, for example,
172.20.108.10.Note:
- A DHCP IP is an IP address used by the DHCP service to assign IP addresses to resources that use this L3 network.
- If you create an L3 network for the first time with the DHCP service enabled, or if you add the first network range to an L3 network with the DHCP service enabled, you can customize the DHCP IP.
- If the L3 network has a DHCP IP, you cannot customize the DHCP IP when you add a network range.
- The DHCP IP can be in or outside the added IP range, but it must be an unoccupied IP address in the CIDR block of the added IP range
- The IP range determined by the start IP and end IP cannot contain the link-local address 169.254.0.0/16.
- If you select random as the IP allocation policy and this field is left blank, the system randomly assigns IP addresses from the added network range.
- If you select allocate in order/allocate in cycle as the IP allocation policy and this field is left blank, the system uses the start IP address in the network range as the DHCP IP.
- DNS: Add a DNS server to provide domain name resolution services for the public network. You can specify 223.5.5.5, 8.8.8.8, or 114.114.114.114.
Note: When you add a CIDR block for an IPv4 L3 network, note that:- The CIDR block cannot contain the link-local address 169.254.0.0/16.
- The CIDR block of a private network cannot overlap with the IP range of a public network used to create a vRouter offering or of a management network.
Figure 2. Create IPv4 Public Network Using CIDR Block
Create IPv6 Public Network
- Name: Enter a name for the public network.
- Description: Optional. Enter a description for the public network.
- L2 Network: Select an L2 network for the public
network.Note: ZStack Cloud allows you to use
an L2 network to create multiple L3 networks. However, we recommend that
you do not use an L2 network to create multiple L3 networks if not for
specific business needs.On the Select L2 Network page, two tabs are displayed:
- Recommended: lists L2 networks in the current zone that are not attached to an L3 network.
- All: lists all L2 networks in the current zone.
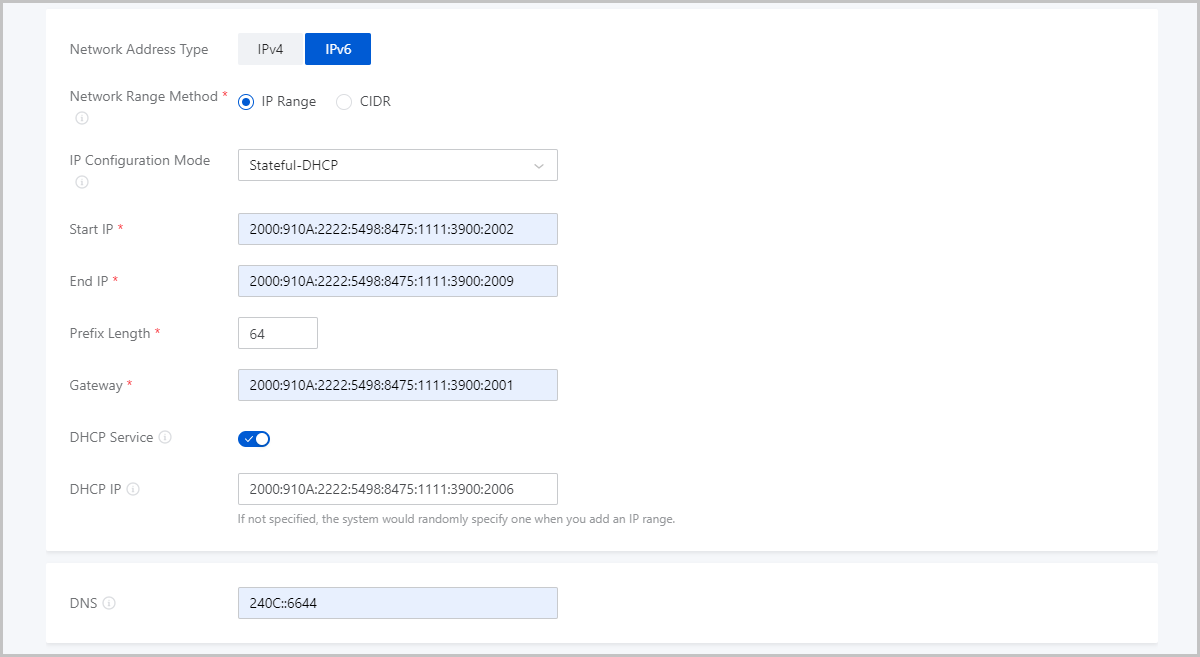
- Network Address Type: Select IPv6.
- Network Range Method: Select a method to add a
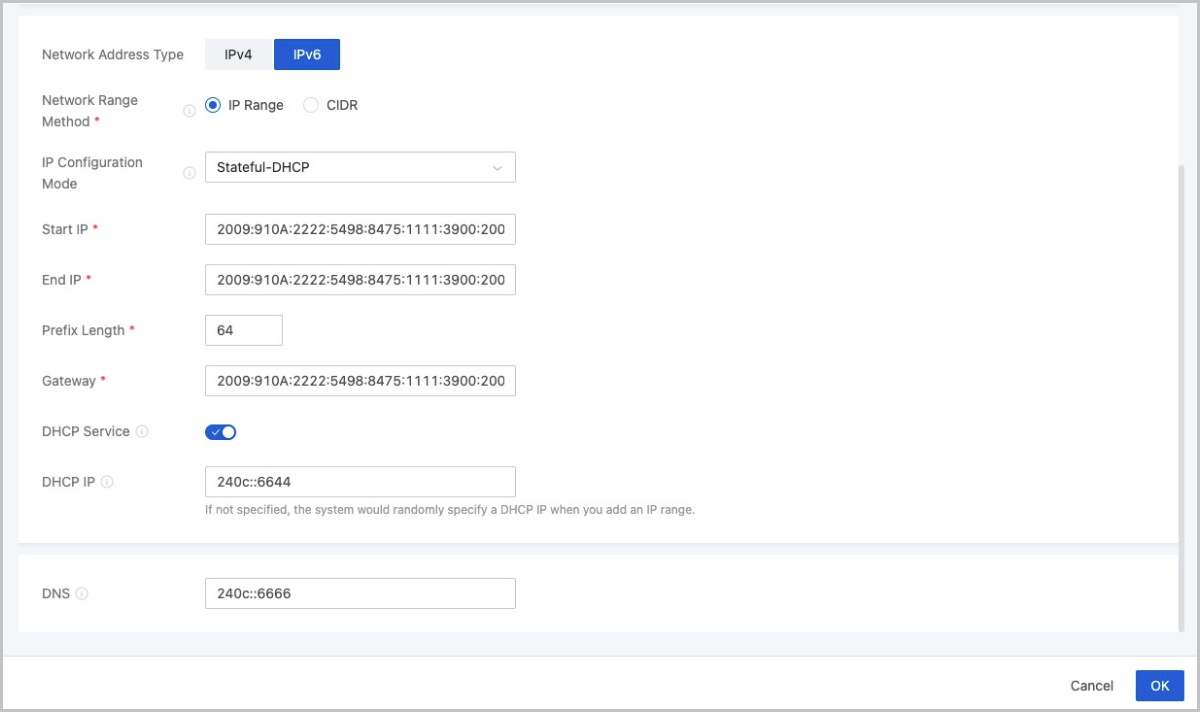
network range for the public network. You can select IP Range or CIDR.If you select IP Range, you need to set the following parameters:
- IP Configuration Mode: Select the IP
distribution mode:
- Stateful-DHCP: The interface address and other parameters are all configured through DHCP. The IP range method supports stateful DHCP.
- Start IP: Set a start IP address for the network range, for example, 2000:910A:2222:5498:8475:1111:3900:2002.
- End IP: Set an end IP address for the network range, for example, 2000:910A:2222:5498:8475:1111:3900:2009.
- Prefix Length: Set a prefix length for
the network range, for example, 64.Note: The prefix length
ranges from 64 to 126. If you set a length smaller than 64,
VM creation may fail.
- Gateway: Set a gateway for the network range, for example, 2000:910A:2222:5498:8475:1111:3900:2001.
- DHCP Service: Choose whether to enable
the DHCP service.Note:
- The DHCP service is a built-in distributed service of the Cloud, which assigns IP addresses only to resources in the Cloud and does not conflict with your existing DHCP server.
- By default, the DHCP service is enabled so that the NICs using this L3 network acquire IP addresses in a DHCP mode. You can customize a DHCP IP or use the DHCP IP that the system assigned according to the IP allocation policy.
- If you disable this option, NICs using this L3 network acquire IP address in a Static mode. The Cloud does not assign IP addresses to NICs automatically. If the NICs need IP addresses, you need to configure IP addresses for them manually. In addition, you cannot specify a DHCP IP. Neither can the system allocate one.
- DHCP IP: Optional. Set an IP
address for the DHCP server, for example,
2000:910A:2222:5498:8475:1111:3900:2006.Note:
- When you create an L3 network and enable the DHCP service for the first time, or when you add the first network range for an L3 network that has the DHCP service enabled, you can specify an IP address for the DHCP server.
- If a DHCP IP is specified for an L3 network, you cannot specify another DHCP IP when you add a network range for the network.
- The DHCP IP can be within or out of the added IP range. However, the IP address must be within the CIDR block to which the added IP range belongs and must not be in use.
- The IP range determined by the start IP and end IP cannot contain the link-local address fe80::/10.
- If not specified, the system would randomly specify a DHCP IP within the added IP range for the DHCP server.
- DNS: Add a DNS server to provide domain name resolution services for the public network. You can specify 240C::6644 or 240C::6666.
Note: When you add an IP range for an IPv6 L3 network, note that:- The IP range cannot contain gateway IP addresses.
- The IP range determined by the start IP and end IP cannot contain the link-local address fe80::/10.
- The IP range of a private network cannot overlap with the IP range of a public network used to create a vRouter offering or of a management network.
Figure 3. Create IPv6 Public Network Using IP Range
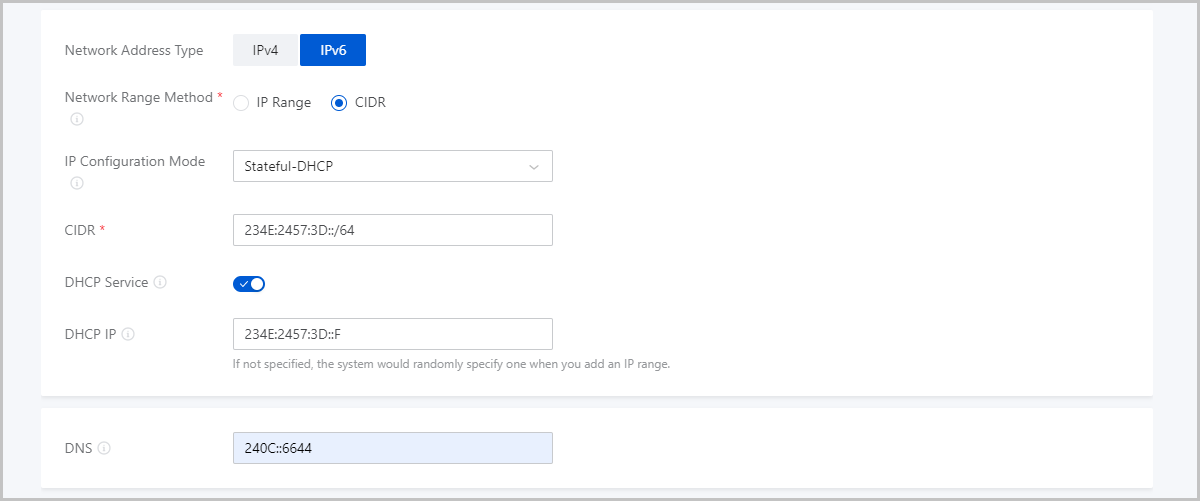
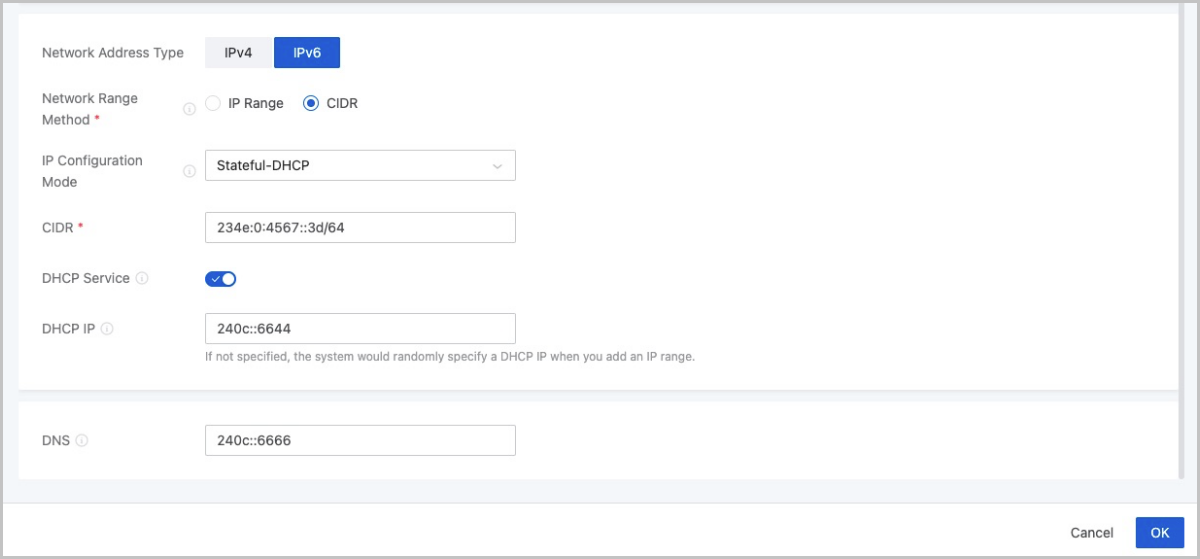
If you select CIDR, you need to set the following parameters:- IP Configuration Mode: Select the IP
distribution mode:
- Stateful-DHCP: The interface address and other parameters are all configured through DHCP. The IP range method supports stateful DHCP.
- Stateless-DHCP: The interface address is automatically derived from the route advertisement prefix and the interface MAC address. Other parameters are configured through DHCP.
- SLAAC: The interface address is automatically derived from the prefix of the route advertisement that also contains other parameters.
- CIDR: Set a CIDR block for the public network, for example, 234E:2457:3D::/64.
- DHCP Service: Choose
whether to enable the DHCP service.Note:
- The DHCP service is a built-in distributed service of the Cloud, which assigns IP addresses only to resources in the Cloud and does not conflict with your existing DHCP server.
- By default, the DHCP service is enabled so that the NICs using this L3 network acquire IP addresses in a DHCP mode. You can customize a DHCP IP or use the DHCP IP that the system assigned according to the IP allocation policy.
- If you disable this option, NICs using this L3 network acquire IP address in a Static mode. The Cloud does not assign IP addresses to NICs automatically. If the NICs need IP addresses, you need to configure IP addresses for them manually. In addition, you cannot specify a DHCP IP. Neither can the system allocate one.
- DHCP IP: Optional. Set an IP
address for the DHCP server, for example,
234E:2457:3D::F.Note:
- When you create an L3 network and enable the DHCP service for the first time, or when you add the first network range for an L3 network that has the DHCP service enabled, you can specify an IP address for the DHCP server.
- If a DHCP IP is specified for an L3 network, you cannot specify another DHCP IP when you add a network range for the network.
- The DHCP IP must be within the CIDR block and must not be in use.
- If not specified, the system would randomly specify a DHCP IP within the added IP range for the DHCP server.
- The first IP address in the CIDR block is predefined as the default gateway and cannot be used as a DHCP server IP.
- DNS: Add a DNS server to provide domain name resolution services for the public network. You can specify 240C::6644 or 240C::6666.
Note: When you add a CIDR block for an IPv6 L3 network, note that:- The first IP address in the CIDR block is used as the default gateway.
- The CIDR block cannot contain the link-local address fe80::/10.
- The IP range of a private network cannot overlap with the IP range of a public network used to create a vRouter offering or of a management network.
Figure 4. Create IPv6 Public Network Using CIDR Block
- IP Configuration Mode: Select the IP
distribution mode:
Considerations
Make sure that the network range of the public network is connected to the external networks. Otherwise, VPC vRouters may not work as expected.
Manage a Public Network
On the main menu of ZStack Cloud, choose . The Public Network page appears.
| Action | Description |
|---|---|
| Create Public Network | Create a public network. |
| Add IPv4 Range | Add a range of IPv4 addresses.
|
| Add IPv6 Range | Add a range of IPv6 addresses.
|
| Reserve IPv4 Range | Specify a reserved network range of IPv4 addresses. After
specified, the system will not assign these addresses to your newly
created resources.
|
| Reserve IPv6 Range | Specify a reserved network range of IPv6 addresses. After
specified, the system will not assign these addresses to your newly
created resources.
|
| Modify DHCP Service | Set whether to enable DHCP service, modify DHCP IP, or modify IP
allocation policy. Enable DHCP service
Disable DHCP service
For more information about how to install GuestTools, see VM GuestTools. |
| Add DNS | Add an IPv4 or IPv6 DNS server address:
|
| Set Sharing Mode | Set the sharing mode of a public network. The platform provides
the following sharing modes:
Note:
|
| Delete Public Network | Delete a public network.Note: Deleting a public network detaches
the VM NICs that are using this network and deletes the network
services, vRouter offerings, load balancer instance offerings,
SDN instance offerings, advanced monitoring server offerings
using this network, and associated instances. Proceed with
caution. |
Flat Network
Create a Flat Network
On the main menu of ZStack Cloud, choose . On the Flat Network page, click Create Flat Network. The Create Flat Network page appears.
- Create an IPv4 flat network
- Create an IPv6 flat network
- Create a flat network disabled with IP Address Management
Create IPv4 Flat Network
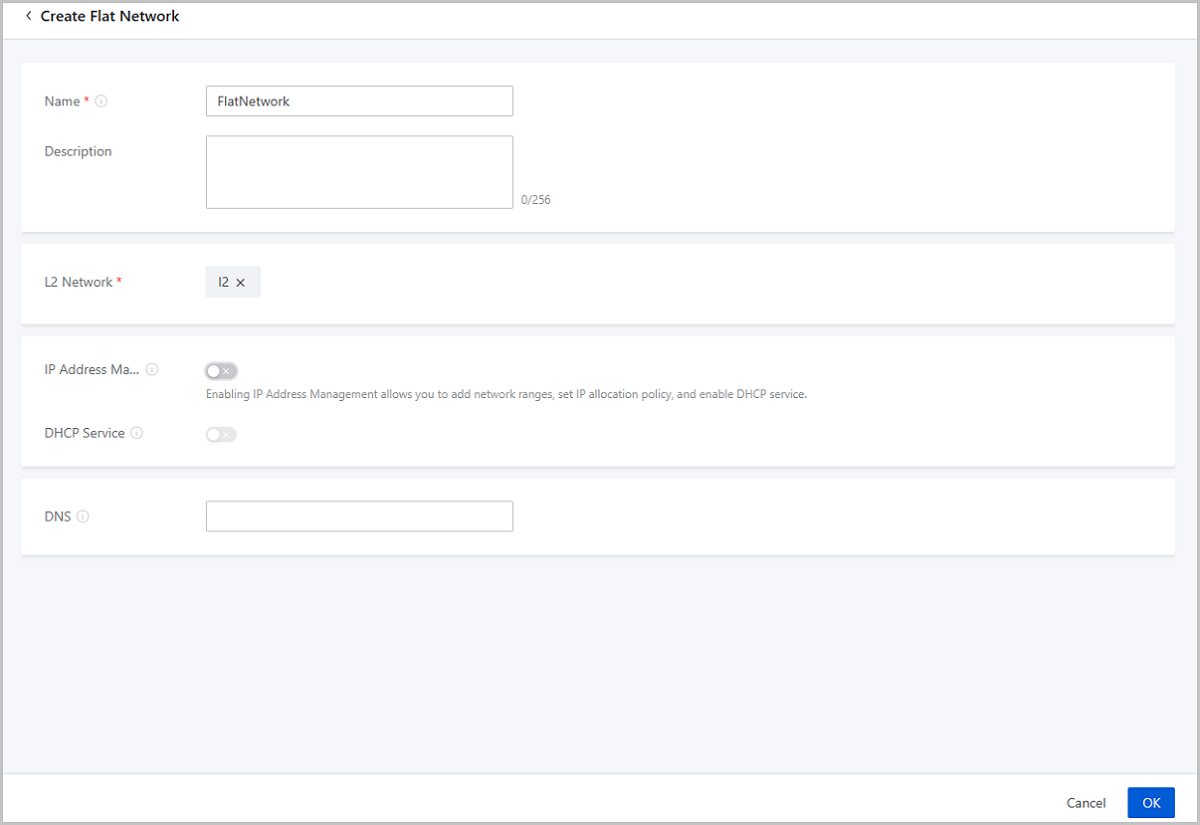
- Name: Enter a name for the flat network.
- Description: Optional. Enter a description for the flat network.
- L2 Network: Select an L2 network for the flat
network.Note: ZStack Cloud allows you to use
an L2 network to create multiple L3 networks. However, we recommend that
you do not use an L2 network to create multiple L3 networks if not for
specific business needs.On the Select L2 Network page, two tabs are displayed:
- Recommended: lists L2 networks in the current zone that are not attached to an L3 network.
- All: lists all L2 networks in the current zone.
- IP Address Management: Choose whether to enable the IP Address Management (IPAM) service for the L3 network. If you enable IPAM, you can add network ranges to the L3 network and enable the DHCP service. Enable IPAM here.
- Network Address Type: Select IPv4.
- Network Range Method: Select a method to add a
network range for the flat network. You can select IP Range or CIDR.If you select IP Range, you need to set the following parameters:
- Start IP: Set a start IP address for the network range, for example, 172.20.108.100.
- End IP: Set an end IP address for the network range, for example, 172.20.108.200.
- Netmask: Set a netmask for the network range, for example, 255.255.0.0.
- Gateway: Set a gateway for the network range, for example, 172.20.0.1.
- DHCP Service: Choose
whether to enable the DHCP service.Note:
- The DHCP service is a built-in distributed service of the Cloud, which assigns IP addresses only to resources in the Cloud and does not conflict with your existing DHCP server.
- By default, the DHCP service is enabled so that the NICs using this L3 network acquire IP addresses in a DHCP mode. You can customize a DHCP IP or use the DHCP IP that the system assigned according to the IP allocation policy.
- If you disable this option, NICs using this L3 network acquire IP address in a Static mode. The Cloud does not assign IP addresses to NICs automatically. If the NICs need IP addresses, you need to configure IP addresses for them manually. In addition, you cannot specify a DHCP IP. Neither can the system allocate one.
- IP Allocation Policy: Optional.
If the DHCP service is enabled, IP addresses can be
assigned according to the following three allocation
policies:
- Random: The system randomly assigns IP addresses from the network range.
- Allocate in Order:
- The system assigns all available IP addresses from the network range in ascending order. Released IP addresses are assigned in the next allocation.
- Example: Assume that the network range is 192.168.0.101~192.168.0.120, within which 192.168.0.101~192.168.0.108 are allocated. If 192.168.0.106 is released, it will be assigned first in the next allocation.
- Allocate in Cycle:
- The system assigns available IP addresses to VM instances from the network range in ascending order. Released IP addresses are assigned when currently available IP addresses are used up.
- Example: Assume that the network range is 192.168.0.101~192.168.0.120, within which 192.168.0.101~192.168.0.108 are allocated. If 192.168.0.106 is released, it will be assigned after 192.168.0.120 is used.
- DHCP IP:
Optional. Set an IP address for the DHCP server, for
example, 172.20.108.10.Note:
- A DHCP IP is an IP address used by the DHCP service to assign IP addresses to resources that use this L3 network.
- If you create an L3 network for the first time with the DHCP service enabled, or if you add the first network range to an L3 network with the DHCP service enabled, you can customize the DHCP IP.
- If the L3 network has a DHCP IP, you cannot customize the DHCP IP when you add a network range.
- The DHCP IP can be in or outside the added IP range, but it must be an unoccupied IP address in the CIDR block of the added IP range
- The IP range determined by the start IP and end IP cannot contain the link-local address 169.254.0.0/16.
- If you select random as the IP allocation policy and this field is left blank, the system randomly assigns IP addresses from the added network range.
- If you select allocate in order/allocate in cycle as the IP allocation policy and this field is left blank, the system uses the start IP address in the network range as the DHCP IP.
- DNS: Add a DNS server to provide domain name resolution services for the flat network. You can specify 223.5.5.5, 8.8.8.8, or 114.114.114.114.
Note: When you add an IP range for an IPv4 L3 network, note
that:- The IP range cannot contain gateway IP addresses, broadcast addresses, or network addresses.
- The IP range of a flat network cannot overlap with the IP range of a public network used to create a vRouter offering or of a management network.
Figure 1. Create IPv4 Flat Network Using IP Range 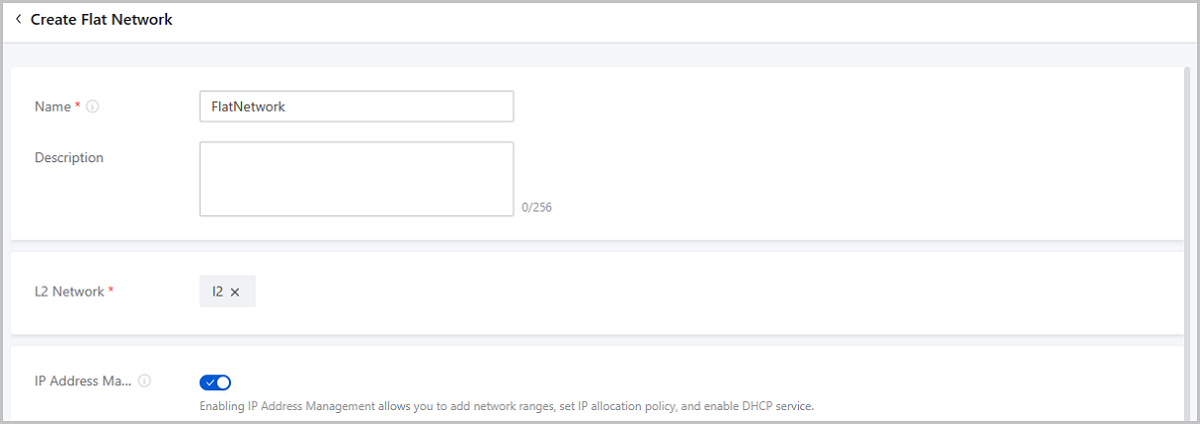
If you select CIDR, you need to set the following parameters:- CIDR: Set a CIDR block for the flat network, for example, 192.168.108.1/24.
- Gateway: Set a gateway for the flat
network, for example, 192.168.108.1.Note:
- We recommend that you use the first or last IP address in the specified CIDR block as the gateway.
- If left blank, the first IP address in the specified CIDR block is used as the gateway.
- DHCP Service: Choose whether to enable
the DHCP service.Note:
- The DHCP service is a built-in distributed service of the Cloud, which assigns IP addresses only to resources in the Cloud and does not conflict with your existing DHCP server.
- By default, the DHCP service is enabled so that the NICs using this L3 network acquire IP addresses in a DHCP mode. You can customize a DHCP IP or use the DHCP IP that the system assigned according to the IP allocation policy.
- If you disable this option, NICs using this L3 network acquire IP address in a Static mode. The Cloud does not assign IP addresses to NICs automatically. If the NICs need IP addresses, you need to configure IP addresses for them manually. In addition, you cannot specify a DHCP IP. Neither can the system allocate one.
- IP Allocation Policy: Optional.
If the DHCP service is enabled, IP addresses can be
assigned according to the following three allocation
policies:
- Random: The system randomly assigns IP addresses from the network range.
- Allocate in Order:
- The system assigns all available IP addresses from the network range in ascending order. Released IP addresses are assigned in the next allocation.
- Example: Assume that the network range is 192.168.0.101~192.168.0.120, within which 192.168.0.101~192.168.0.108 are allocated. If 192.168.0.106 is released, it will be assigned first in the next allocation.
- Allocate in Cycle:
- The system assigns available IP addresses to VM instances from the network range in ascending order. Released IP addresses are assigned when currently available IP addresses are used up.
- Example: Assume that the network range is 192.168.0.101~192.168.0.120, within which 192.168.0.101~192.168.0.108 are allocated. If 192.168.0.106 is released, it will be assigned after 192.168.0.120 is used.
- DHCP IP: Optional. Set an IP
address for the DHCP server, for example,
172.20.108.10.Note:
- A DHCP IP is an IP address used by the DHCP service to assign IP addresses to resources that use this L3 network.
- If you create an L3 network for the first time with the DHCP service enabled, or if you add the first network range to an L3 network with the DHCP service enabled, you can customize the DHCP IP.
- If the L3 network has a DHCP IP, you cannot customize the DHCP IP when you add a network range.
- The DHCP IP can be in or outside the added IP range, but it must be an unoccupied IP address in the CIDR block of the added IP range
- The IP range determined by the start IP and end IP cannot contain the link-local address 169.254.0.0/16.
- If you select random as the IP allocation policy and this field is left blank, the system randomly assigns IP addresses from the added network range.
- If you select allocate in order/allocate in cycle as the IP allocation policy and this field is left blank, the system uses the start IP address in the network range as the DHCP IP.
- DNS: Add a DNS server to provide domain name resolution services for the flat network. You can specify 223.5.5.5, 8.8.8.8, or 114.114.114.114.
Note: When you add a CIDR block for an IPv4 L3 network, note
that:- The CIDR block cannot contain the link-local address 169.254.0.0/16.
- The CIDR block of a flat network cannot overlap with the IP range of a public network used to create a vRouter offering or of a management network.
Figure 2. Create IPv4 Flat Network Using CIDR Block
Create IPv6 Flat Network
- Name: Enter a name for the flat network.
- Description: Optional. Enter a description for the flat network.
- L2 Network: Select an L2 network for the flat
network.Note: ZStack Cloud allows you to use
an L2 network to create multiple L3 networks. However, we recommend that
you do not use an L2 network to create multiple L3 networks if not for
specific business needs.On the Select L2 Network page, two tabs are displayed:
- Recommended: lists L2 networks in the current zone that are not attached to an L3 network.
- All: lists all L2 networks in the current zone.
- IP Address Management: Choose whether to enable the IP Address Management (IPAM) service for the L3 network. If you enable IPAM, you can add network ranges to the L3 network and enabled the DHCP service. Enable IPAM here.
- Network Address Type: Select IPv6.
- Network Range Method: Select a method to add a
network range for the flat network. You can select IP Range or CIDR.If you select IP Range, you need to set the following parameters:
- IP Configuration Mode: Select the IP
distribution mode:
- Stateful-DHCP: The interface address and other parameters are all configured through DHCP. The IP range method supports stateful DHCP.
- Start IP: Set a start IP address for the network range, for example, 2000:910A:2222:5498:8475:1111:3900:2002.
- End IP: Set an end IP address for the network range, for example, 2000:910A:2222:5498:8475:1111:3900:2009.
- Prefix Length: Set a prefix length for
the network range, for example, 64.Note: The prefix length
ranges from 64 to 126. If you set a length smaller than 64,
VM creation may fail.
- Gateway: Set a gateway for the network range, for example, 2000:910A:2222:5498:8475:1111:3900:2001.
- DHCP Service: Choose whether to enable
the DHCP service.Note:
- The DHCP service is a built-in distributed service of the Cloud, which assigns IP addresses only to resources in the Cloud and does not conflict with your existing DHCP server.
- By default, the DHCP service is enabled so that the NICs using this L3 network acquire IP addresses in a DHCP mode. You can customize a DHCP IP or use the DHCP IP that the system assigned according to the IP allocation policy.
- If you disable this option, NICs using this L3 network acquire IP address in a Static mode. The Cloud does not assign IP addresses to NICs automatically. If the NICs need IP addresses, you need to configure IP addresses for them manually. In addition, you cannot specify a DHCP IP. Neither can the system allocate one.
- DHCP IP: Optional. Set an IP
address for the DHCP server, for example,
2000:910A:2222:5498:8475:1111:3900:2006.Note:
- When you create an L3 network and enable the DHCP service for the first time, or when you add the first network range for an L3 network that has the DHCP service enabled, you can specify an IP address for the DHCP server.
- If a DHCP IP is specified for an L3 network, you cannot specify another DHCP IP when you add a network range for the network.
- The DHCP IP can be within or out of the added IP range. However, the IP address must be within the CIDR block to which the added IP range belongs and must not be in use.
- The IP range determined by the start IP and end IP cannot contain the link-local address fe80::/10.
- If not specified, the system would randomly specify a DHCP IP within the added IP range for the DHCP server.
- DNS: Add a DNS server to provide domain name resolution services for the public network. You can specify 240C::6644 or 240C::6666.
Note: When you add an IP range for an IPv6 L3 network, note
that:- The IP range cannot contain gateway IP addresses.
- The IP range determined by the start IP and end IP cannot contain the link-local address fe80::/10.
- The IP range of a flat network cannot overlap with the IP range of a public network used to create a vRouter offering or of a management network.
Figure 3. Create IPv6 Flat Network Using IP Range
If you select CIDR, you need to set the following parameters:- IP Configuration Mode: Select the IP
distribution mode:
- Stateful-DHCP: The interface address and other parameters are all configured through DHCP. The IP range method supports stateful DHCP.
- Stateless-DHCP: The interface address is automatically derived from the route advertisement prefix and the interface Mac address. Other parameters are configured through DHCP.
- SLAAC: The interface address is automatically derived from the prefix of the route advertisement that also contains other parameters.
- CIDR: Set a CIDR block for the flat network, for example, 234E:2457:3D::/64.
- DHCP Service: Choose whether to enable
the DHCP service.Note:
- The DHCP service is a built-in distributed service of the Cloud, which assigns IP addresses only to resources in the Cloud and does not conflict with your existing DHCP server.
- By default, the DHCP service is enabled so that the NICs using this L3 network acquire IP addresses in a DHCP mode. You can customize a DHCP IP or use the DHCP IP that the system assigned according to the IP allocation policy.
- If you disable this option, NICs using this L3 network acquire IP address in a Static mode. The Cloud does not assign IP addresses to NICs automatically. If the NICs need IP addresses, you need to configure IP addresses for them manually. In addition, you cannot specify a DHCP IP. Neither can the system allocate one.
- DHCP IP: Optional. Set an IP
address for the DHCP server, for example,
234E:2457:3D::F.Note:
- When you create an L3 network and enable the DHCP service for the first time, or when you add the first network range for an L3 network that has the DHCP service enabled, you can specify an IP address for the DHCP server.
- If a DHCP IP is specified for an L3 network, you cannot specify another DHCP IP when you add a network range for the network.
- The DHCP IP must be within the CIDR block and must not be in use.
- If not specified, the system would randomly specify a DHCP IP within the added IP range for the DHCP server.
- The first IP address in the CIDR block is predefined as the default gateway and cannot be used as a DHCP server IP.
- DNS: Add a DNS server to provide domain name resolution services for the public network. You can specify 240C::6644 or 240C::6666.
Note: When you add a CIDR block for an IPv6 L3 network, note
that:- The first IP address in the CIDR block is used as the default gateway.
- The CIDR block cannot contain the link-local address fe80::/10.
- The IP range of a flat network cannot overlap with the IP range of a public network used to create a vRouter offering or of a management network.
Figure 4. Create IPv6 Flat Network Using CIDR Block
- IP Configuration Mode: Select the IP
distribution mode:
Create an Flat Network Disabled with IP Address Management
- Name: Enter a name for the flat network.
- Description: Optional. Enter a description for the flat network.
- L2 Network: Select an L2 network for the flat
network.Note: ZStack Cloud allows you to use
an L2 network to create multiple L3 networks. However, we recommend that
you do not use an L2 network to create multiple L3 networks if not for
specific business needs.On the Select L2 Network page, two tabs are displayed:
- Recommended: lists L2 networks in the current zone that are not attached to an L3 network.
- All: lists all L2 networks in the current zone.
- IP Address Management: Choose whether to enable the
IP Address Management (IPAM) service for the L3 network. Disable IPAM here.Note:
- If you disable IPAM for an L3 network, you cannot add network ranges or enable DHCP service for the L3 network. The system does not assign IP addresses to resources on this network automatically. You can configure and manage IP addresses for the NICs on this L3 network by yourself.
- You can disable IPAM only for flat networks.
- DHCP Service: The DHCP service is disabled by default after you disable IPAM and cannot be enabled.
- DNS: Optional. Add a DNS server to provide the DNS service for the L3 network.
Manage a Flat Network
On the main menu of ZStack Cloud, choose . The Flat Network page appears.
| Action | Description |
|---|---|
| Create Flat Network | Create a flat network. |
| Add IPv4 Range | Add a range of IPv4 addresses.
|
| Add IPv6 Range | Add a range of IPv6 addresses.
|
| Reserve IPv4 Range | Specify a reserved network range of IPv4 addresses. After
specified, the system will not assign these addresses to your newly
created resources.
|
| Reserve IPv6 Range | Specify a reserved network range of IPv6 addresses. After
specified, the system will not assign these addresses to your newly
created resources.
|
| Modify DHCP Service | Set whether to enable DHCP service, modify DHCP IP, or modify IP
allocation policy. Enable DHCP service
Disable DHCP service
For more information about how to install GuestTools, see VM GuestTools. |
| Add DNS | Add an IPv4 or IPv6 DNS server address:
|
| Set Sharing Mode | Set the sharing mode of a flat network. The platform provides the
following sharing modes:
Note:
|
| Delete Flat Network | Delete a flat network.Note: Deleting a flat network also detaches
the VM NICs that are using this network, and deletes the
corresponding vRouters, network services, and vRouter offerings.
Proceed with caution. |
VPC Network
Create a VPC Network
On the main menu of ZStack Cloud, choose . On the VPC Network page, click Create VPC Network. The Create VPC Network page appears.
- Create an IPv4 VPC network
- Create an IPv6 VPC network
Create IPv4 VPC Network
- Name: Enter a name for the VPC network.
- Description: Optional. Enter a description for the VPC network.
- L2 Network: Select an L2 network for the VPC
network.Note: ZStack Cloud allows you to use
an L2 network to create multiple L3 networks. However, we recommend that
you do not use an L2 network to create multiple L3 networks if not for
specific business needs.On the Select L2 Network page, two tabs are displayed:
- Recommended: lists L2 networks in the current zone that are not attached to an L3 network.
- All: lists all L2 networks in the current zone.
- VPC vRouter: Optional. You can specify a VPC vRouter when you create a VPC network or attach a VPC vRouter after you create the VPC network.Note:
- This parameter will not be displayed if the selected L2 network is created based on H3C VCFC R6506.
- This parameter will not be displayed if the selected L2 network is created based on the HUAWEI SDN controller. In addition, you need to configure the Logical Router parameter.
- Network Address Type: Select IPv4.
- Network Range Method: Select a method to add a
network range for the VPC network. You can select IP Range or CIDR.If you select IP Range, you need to set the following parameters:
- Start IP: Set a start IP address for the network range, for example, 172.20.108.100.
- End IP: Set an end IP address for the network range, for example, 172.20.108.200.
- Netmask: Set a netmask for the network range, for example, 255.255.0.0.
- Gateway: Set a gateway for the network range, for example, 172.20.0.1.
- DHCP Service: Choose
whether to enable the DHCP service.Note:
- The DHCP service is a built-in distributed service of the Cloud, which assigns IP addresses only to resources in the Cloud and does not conflict with your existing DHCP server.
- By default, the DHCP service is enabled so that the NICs using this L3 network acquire IP addresses in a DHCP mode. You can customize a DHCP IP or use the DHCP IP that the system assigned according to the IP allocation policy.
- If you disable this option, NICs using this L3 network acquire IP address in a Static mode. The Cloud does not assign IP addresses to NICs automatically. If the NICs need IP addresses, you need to configure IP addresses for them manually. In addition, you cannot specify a DHCP IP. Neither can the system allocate one.
- IP Allocation Policy: Optional.
If the DHCP service enabled, IP addresses can be
assigned according to the following three allocation
policies:
- Random: The system randomly assigns IP addresses from the network range.
- Allocate in Order:
- The system assigns all available IP addresses from the network range in ascending order. Released IP addresses are assigned in the next allocation.
- Example: Assume that the network range is 192.168.0.101~192.168.0.120, within which 192.168.0.101~192.168.0.108 are allocated. If 192.168.0.106 is released, it will be assigned first in the next allocation.
- Allocate in Cycle:
- The system assigns available IP addresses to VM instances from the network range in ascending order. Released IP addresses are assigned when currently available IP addresses are used up.
- Example: Assume that the network range is 192.168.0.101~192.168.0.120, within which 192.168.0.101~192.168.0.108 are allocated. If 192.168.0.106 is released, it will be assigned after 192.168.0.120 is used.
- DHCP IP:
Optional. Set an IP address for the DHCP server, for
example, 172.20.108.10.Note:
- A DHCP IP is an IP address used by the DHCP service to assign IP addresses to resources that use this L3 network.
- If you create an L3 network for the first time with the DHCP service enabled, or if you add the first network range to an L3 network with the DHCP service enabled, you can customize the DHCP IP.
- If the L3 network has a DHCP IP, you cannot customize the DHCP IP when you add a network range.
- The DHCP IP can be in or outside the added IP range, but it must be an unoccupied IP address in the CIDR block of the added IP range
- The IP range determined by the start IP and end IP cannot contain the link-local address 169.254.0.0/16.
- If you select random as the IP allocation policy and this field is left blank, the system randomly assigns IP addresses from the added network range.
- If you select allocate in order/allocate in cycle as the IP allocation policy and this field is left blank, the system uses the start IP address in the network range as the DHCP IP.
- DNS: Provide DNS services for an L3 network. If you do not specify a DNS address manually, the VPC network uses its gateway address as the DNS address by default. This DNS cannot be deleted and prohibits you from adding other DNS after the creation.
Note: When you add an IP range for an IPv4 L3 network, note
that:- The IP range cannot contain gateway IP addresses, broadcast addresses, or network addresses.
- The IP range of a VPC network cannot overlap with the IP range of a public network used to create a vRouter offering or of a management network.
Figure 1. Create IPv4 VPC Network Using IP Range 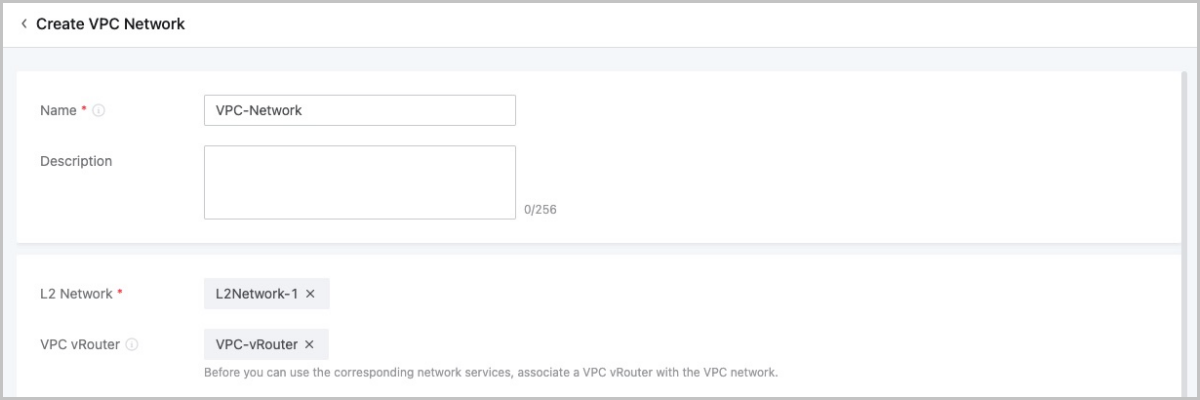

If you select CIDR, you need to set the following parameters:- CIDR: Set a CIDR block for the VPC network, for example, 192.168.108.1/24.
- Gateway: Set a gateway for the VPC
network, for example, 192.168.108.1.Note:
- We recommend that you use the first or last IP address in the specified CIDR block as the gateway.
- If left blank, the first IP address in the specified CIDR block is used as the gateway.
- DHCP Service: Choose
whether to enable the DHCP service.Note:
- The DHCP service is a built-in distributed service of the Cloud, which assigns IP addresses only to resources in the Cloud and does not conflict with your existing DHCP server.
- By default, the DHCP service is enabled so that the NICs using this L3 network acquire IP addresses in a DHCP mode. You can customize a DHCP IP or use the DHCP IP that the system assigned according to the IP allocation policy.
- If you disable this option, NICs using this L3 network acquire IP address in a Static mode. The Cloud does not assign IP addresses to NICs automatically. If the NICs need IP addresses, you need to configure IP addresses for them manually. In addition, you cannot specify a DHCP IP. Neither can the system allocate one.
- IP Allocation Policy: Optional.
If the DHCP service is enabled, IP addresses can be
assigned according to the following three allocation
policies:
- Random: The system randomly assigns IP addresses from the network range.
- Allocate in Order:
- The system assigns all available IP addresses from the network range in ascending order. Released IP addresses are assigned in the next allocation.
- Example: Assume that the network range is 192.168.0.101~192.168.0.120, within which 192.168.0.101~192.168.0.108 are allocated. If 192.168.0.106 is released, it will be assigned first in the next allocation.
- Allocate in Cycle:
- The system assigns available IP addresses to VM instances from the network range in ascending order. Released IP addresses are assigned when currently available IP addresses are used up.
- Example: Assume that the network range is 192.168.0.101~192.168.0.120, within which 192.168.0.101~192.168.0.108 are allocated. If 192.168.0.106 is released, it will be assigned after 192.168.0.120 is used.
- DHCP IP: Optional. Set an IP
address for the DHCP server, for example,
172.20.108.10.Note:
- A DHCP IP is an IP address used by the DHCP service to assign IP addresses to resources that use this L3 network.
- If you create an L3 network for the first time with the DHCP service enabled, or if you add the first network range to an L3 network with the DHCP service enabled, you can customize the DHCP IP.
- If the L3 network has a DHCP IP, you cannot customize the DHCP IP when you add a network range.
- The DHCP IP can be in or outside the added IP range, but it must be an unoccupied IP address in the CIDR block of the added IP range
- The IP range determined by the start IP and end IP cannot contain the link-local address 169.254.0.0/16.
- If you select random as the IP allocation policy and this field is left blank, the system randomly assigns IP addresses from the added network range.
- If you select allocate in order/allocate in cycle as the IP allocation policy and this field is left blank, the system uses the start IP address in the network range as the DHCP IP.
- DNS: Provide DNS services for an L3 network. If you do not specify a DNS address manually, theVPC network uses its gateway address as the DNS address by default. This DNS cannot be deleted and prohibits you from adding other DNS after the creation.
Note: When you add a CIDR block for an IPv4 L3 network, note
that:- The CIDR block cannot contain the link-local address 169.254.0.0/16.
- The CIDR block of a VPC network cannot overlap with the IP range of a public network used to create a vRouter offering or of a management network.
Figure 2. Create IPv4 VPC Network Using CIDR Block
Create IPv6 VPC Network
- Name: Enter a name for the VPC network.
- Description: Optional. Enter a description for the VPC network.
- L2 Network: Select an L2 network for the VPC
network.Note: ZStack Cloud allows you to use
an L2 network to create multiple L3 networks. However, we recommend that
you do not use an L2 network to create multiple L3 networks if not for
specific business needs.On the Select L2 Network page, two tabs are displayed:
- Recommended: lists L2 networks in the current zone that are not attached to an L3 network.
- All: lists all L2 networks in the current zone.
- VPC vRouter: Optional. You can specify a VPC vRouter when you create a VPC network or attach a VPC vRouter to a created VPC network.Note:
- This parameter will not be displayed if the selected L2 network is created based on H3C VCFC R6506.
- This parameter will not be displayed if the selected L2 network is created based on the HUAWEI SDN controller. In addition, you need to configure the Logical Router parameter.
- Network Address Type: Select IPv6.
- Network Range Method: Select a method to add a
network range for the VPC network. You can select IP Range or CIDR.If you select IP Range, you need to set the following parameters:
- IP Configuration Mode: Select the IP
distribution mode:
- Stateful-DHCP: The interface address and other parameters are all configured through DHCP. The IP range method supports stateful DHCP.
- Start IP: Set a start IP address for the network range, for example, 2000:910A:2222:5498:8475:1111:3900:2002.
- End IP: Set an end IP address for the network range, for example, 2000:910A:2222:5498:8475:1111:3900:2009.
- Prefix Length: Set a prefix length for
the network range, for example, 64.Note: The prefix length
ranges from 64 to 126. If you set a length smaller than 64,
VM creation may fail.
- Gateway: Set a gateway for the network range, for example, 2000:910A:2222:5498:8475:1111:3900:2001.
- DHCP Service: Choose whether to enable
the DHCP service.Note:
- The DHCP service is a built-in distributed service of the Cloud, which assigns IP addresses only to resources in the Cloud and does not conflict with your existing DHCP server.
- By default, the DHCP service is enabled so that the NICs using this L3 network acquire IP addresses in a DHCP mode. You can customize a DHCP IP or use the DHCP IP that the system assigned according to the IP allocation policy.
- If you disable this option, NICs using this L3 network acquire IP address in a Static mode. The Cloud does not assign IP addresses to NICs automatically. If the NICs need IP addresses, you need to configure IP addresses for them manually. In addition, you cannot specify a DHCP IP. Neither can the system allocate one.
- DHCP IP: Optional. Set an IP
address for the DHCP server, for example,
2000:910A:2222:5498:8475:1111:3900:2006.Note:
- When you create an L3 network and enable the DHCP service for the first time, or when you add the first network range for an L3 network that has the DHCP service enabled, you can specify an IP address for the DHCP server.
- If a DHCP IP is specified for an L3 network, you cannot specify another DHCP IP when you add a network range for the network.
- The DHCP IP can be within or out of the added IP range. However, the IP address must be within the CIDR block to which the added IP range belongs and must not be in use.
- The IP range determined by the start IP and end IP cannot contain the link-local address fe80::/10.
- If not specified, the system would randomly specify a DHCP IP within the added IP range for the DHCP server.
- DNS: Provide DNS services for an L3 network. If you do not specify a DNS address manually, the VPC network uses its gateway address as the DNS address by default. This DNS cannot be deleted and prohibits you from adding other DNS after the creation.
Note: When you add an IP range for an IPv6 L3 network, note
that:- The IP range cannot contain gateway IP addresses.
- The IP range determined by the start IP and end IP cannot contain the link-local address fe80::/10.
- The IP range of a VPC network cannot overlap with the IP range of a public network used to create a vRouter offering or of a management network.
Figure 3. Create IPv6 VPC Network Using IP Range
If you select CIDR, you need to set the following parameters:- IP Configuration Mode: Select the IP
distribution mode:
- Stateful-DHCP: The interface address and other parameters are all configured through DHCP. The IP range method supports stateful DHCP.
- Stateless-DHCP: The interface address is automatically derived from the route advertisement prefix and the interface Mac address. Other parameters are configured through DHCP.
- SLAAC: The interface address is automatically derived from the prefix of the route advertisement that also contains other parameters.
- CIDR: Set a CIDR block for the VPC network, for example, 234E:2457:3D::/64.
- DHCP Service: Choose whether to enable
the DHCP service.Note:
- The DHCP service is a built-in distributed service of the Cloud, which assigns IP addresses only to resources in the Cloud and does not conflict with your existing DHCP server.
- By default, the DHCP service is enabled so that the NICs using this L3 network acquire IP addresses in a DHCP mode. You can customize a DHCP IP or use the DHCP IP that the system assigned according to the IP allocation policy.
- If you disable this option, NICs using this L3 network acquire IP address in a Static mode. The Cloud does not assign IP addresses to NICs automatically. If the NICs need IP addresses, you need to configure IP addresses for them manually. In addition, you cannot specify a DHCP IP. Neither can the system allocate one.
- DHCP IP: Optional. Set an IP
address for the DHCP server, for example,
234E:2457:3D::F.Note:
- When you create an L3 network and enable the DHCP service for the first time, or when you add the first network range for an L3 network that has the DHCP service enabled, you can specify an IP address for the DHCP server.
- If a DHCP IP is specified for an L3 network, you cannot specify another DHCP IP when you add a network range for the network.
- The DHCP IP must be within the CIDR block and must not be in use.
- If not specified, the system would randomly specify a DHCP IP within the added IP range for the DHCP server.
- The first IP address in the CIDR block is predefined as the default gateway and cannot be used as a DHCP server IP.
- DNS: Provide DNS services for an L3 network. If you do not specify a DNS address manually, the VPC network uses its gateway address as the DNS address by default. This DNS cannot be deleted and prohibits you from adding other DNS after the creation.
Note: When you add a CIDR block for an IPv6 L3 network, note
that:- The first IP address in the CIDR block is used as the default gateway.
- The CIDR block cannot contain the link-local address fe80::/10.
- The IP range of a VPC network cannot overlap with the IP range of a public network used to create a vRouter offering or of a management network.
Figure 4. Create IPv6 VPC Network Using CIDR Block
- IP Configuration Mode: Select the IP
distribution mode:
Manage a VPC Network
On the main menu of ZStack Cloud, choose . The VPC Network page appears.
| Action | Description |
|---|---|
| Create VPC Network | Create a VPC network. |
| Reserve IPv4 Range | Specify a reserved network range of IPv4 addresses. After
specified, the system will not assign these addresses to your newly
created resources.
|
| Reserve IPv6 Range | Specify a reserved network range of IPv6 addresses. After
specified, the system will not assign these addresses to your newly
created resources.
|
| Set Sharing Mode | Set the sharing mode of a VPC network. The platform provides the
following sharing modes:
Note:
|
| Attach VPC vRouter | Attach a VPC vRouter to the VPC network. |
| Detach VPC vRouter | Detach a VPC vRouter from the VPC network. |
| Delete VPC Network | Delete a VPC network.Note: Deleting a VPC network also detaches
the VM NICs that are using this network. |
Management Network
Create a Management Network
On the main menu of ZStack Cloud, choose . On the Management Network page, click Create Management Network. Then, the Create Management Network page is displayed.
Create Management Network
- Name: Enter a name for the management network.
- Description: Optional. Enter a description for the management network.
- L2 Network: Select an L2 network for the management
network.Note: ZStack Cloud allows you to use
an L2 network to create multiple L3 networks. However, we recommend that
you do not use an L2 network to create multiple L3 networks if not for
specific business needs.On the Select L2 Network page, two tabs are displayed:
- Recommended: lists L2 networks in the current zone that are not attached to an L3 network.
- All: lists all L2 networks in the current zone.
- Network Range Method: Select a method to add a
network range for the management network. You can select IP Range or
CIDR.If you select IP Range, you need to set the following parameters:
- Start IP: Set a start IP address for the network range, for example, 172.20.108.100.
- End IP: Set an end IP address for the network range, for example, 172.20.108.200.
- Netmask: Set a netmask for the network range, for example, 255.255.0.0.
- Gateway: Set a gateway for the network range, for example, 172.20.0.1.
Note: When you add an IP range for an L3 network, note that:- The IP range cannot contain gateway IP addresses in the format of xxx.xxx.xxx.1, broadcast addresses in the format of xxx.xxx.xxx.255, or network addresses in the format of xxx.xxx.xxx.0.
- The IP range of a private network cannot overlap with the IP range of a public network used to create a vRouter offering or of a management network.
Figure 1. Create Management Network Using IP Range 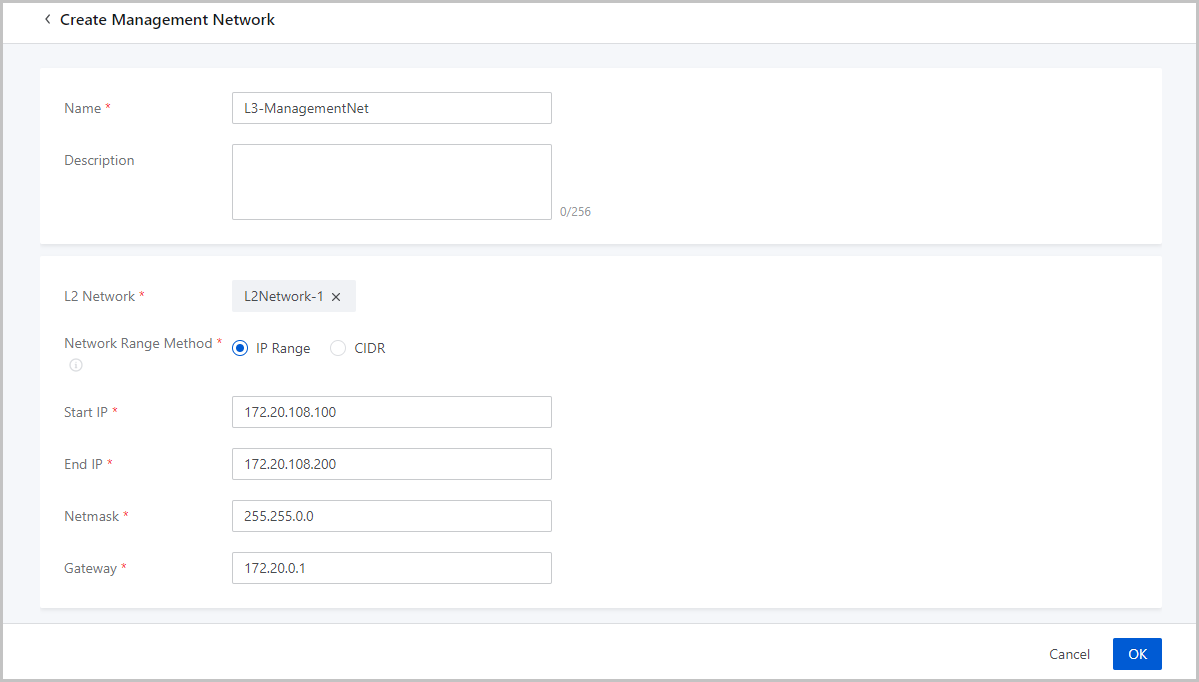
If you select CIDR, you need to set the following parameters:- CIDR: Set a CIDR block for the management network, for example, 192.168.1.1/24.
- Gateway: Set a gateway for the management
network, for example, 192.168.1.1.Note:
- We recommend that you use the first or last IP address in the specified CIDR block as the gateway.
- If left blank, the first IP address in the specified CIDR block is used as the gateway.
Note: When you add a CIDR block for an L3 network, note that:- The CIDR block cannot contain the link-local address 169.254.0.0/16.
- The CIDR block of a private network cannot overlap with the IP range of a public network used to create a vRouter offering or of a management network.
Figure 2. Create Management Network Using CIDR Block 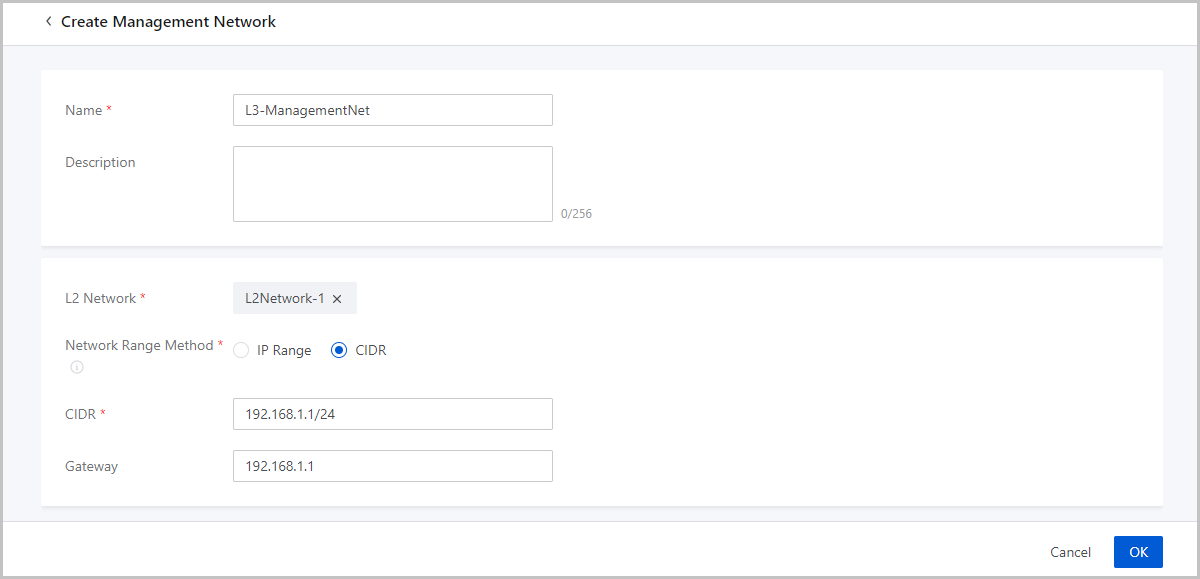
Considerations
Make sure that the network range of the public network is different from the network range of the management network when you create a vRouter offering.
Manage a Management Network
On the main menu of ZStack Cloud, choose . Then, the Management Network page is displayed.
| Action | Description |
|---|---|
| Create Management Network | Create a management network. |
| Delete Management Network | Delete a management network.Note: Deleting a management network
detaches the VM NICs that are using this network and deletes the
network services, vRouter offerings, load balancer instance
offerings, SDN instance offerings, advanced monitoring server
offerings using this network, and associated instances. Proceed
with caution. |
Flow Network
Create a Flow Network
On the main menu of ZStack Cloud, choose . On the Flow Network page, click Create Flow Network. Then, the Create Flow Network page is displayed.
Create a Flow Network
- Name: Enter a name for the flow network.
- Description: Optional. Enter a description for the flow network.
- L2 Network: Select an L2 network for the flow
network.Note: ZStack Cloud allows you to use
an L2 network to create multiple L3 networks. However, we recommend that
you do not use an L2 network to create multiple L3 networks if not for
specific business needs.On the Select L2 Network page, two tabs are displayed:
- Recommended: lists L2 networks in the current zone that are not attached to an L3 network.
- All: lists all L2 networks in the current zone.
- Network Range Method: Select a method to add a
network range for the flow network. You can select IP Range or CIDR.If you select IP Range, you need to set the following parameters:
- Start IP: Set a start IP address for the network range, for example, 172.20.108.100.
- End IP: Set an end IP address for the network range, for example, 172.20.108.200.
- Netmask: Set a netmask for the network range, for example, 255.255.0.0.
- Gateway: Set a gateway for the network range, for example, 172.20.0.1.
Note: When you add an IP range for an L3 network, note that:- The IP range cannot contain gateway IP addresses in the format of xxx.xxx.xxx.1, broadcast addresses in the format of xxx.xxx.xxx.255, or network addresses in the format of xxx.xxx.xxx.0.
- The IP range of a private network cannot overlap with the IP range of a public network used to create a vRouter offering or of a management network.
Figure 1. Create Flow Network Using IP Range 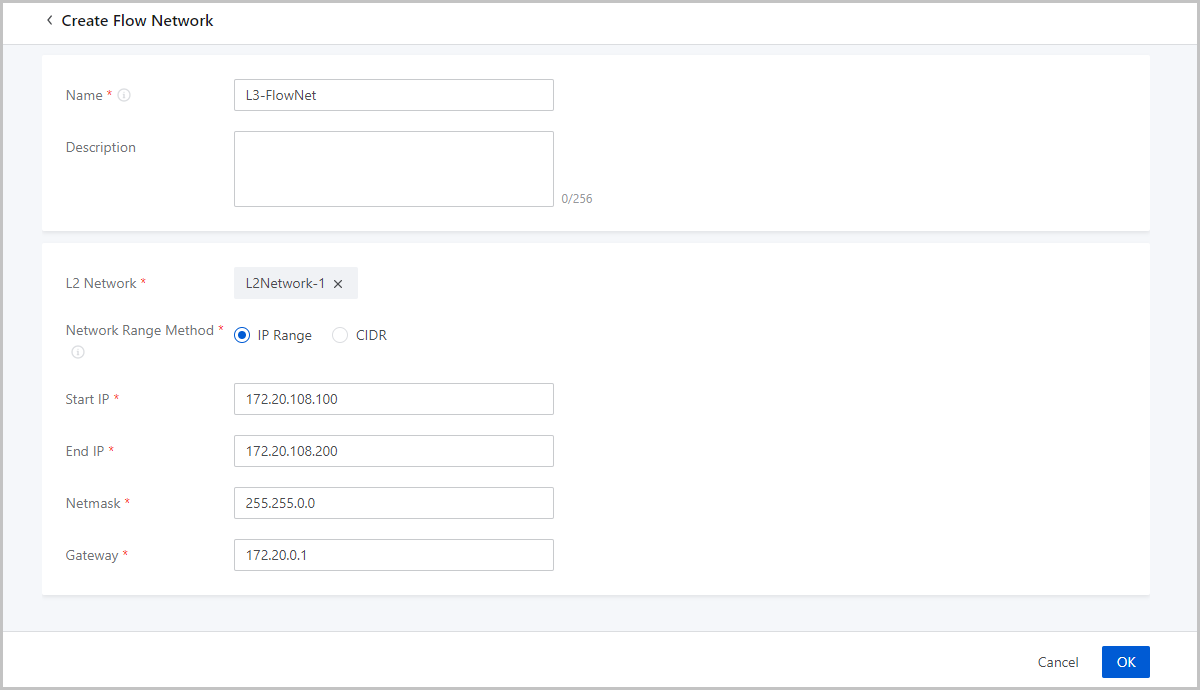
If you select CIDR, you need to set the following parameters:- CIDR: Set a CIDR block for the flow network, for example, 192.168.1.1/24.
- Gateway: Set a gateway for the flow
network, for example, 192.168.1.1.Note:
- We recommend that you use the first or last IP address in the specified CIDR block as the gateway.
- If left blank, the first IP address in the specified CIDR block is used as the gateway.
Note: When you add a CIDR block for an L3 network, note that:- The CIDR block cannot contain the link-local address 169.254.0.0/16.
- The CIDR block of a private network cannot overlap with the IP range of a public network used to create a vRouter offering or of a management network.
Figure 2. Create Flow Network Using CIDR Block 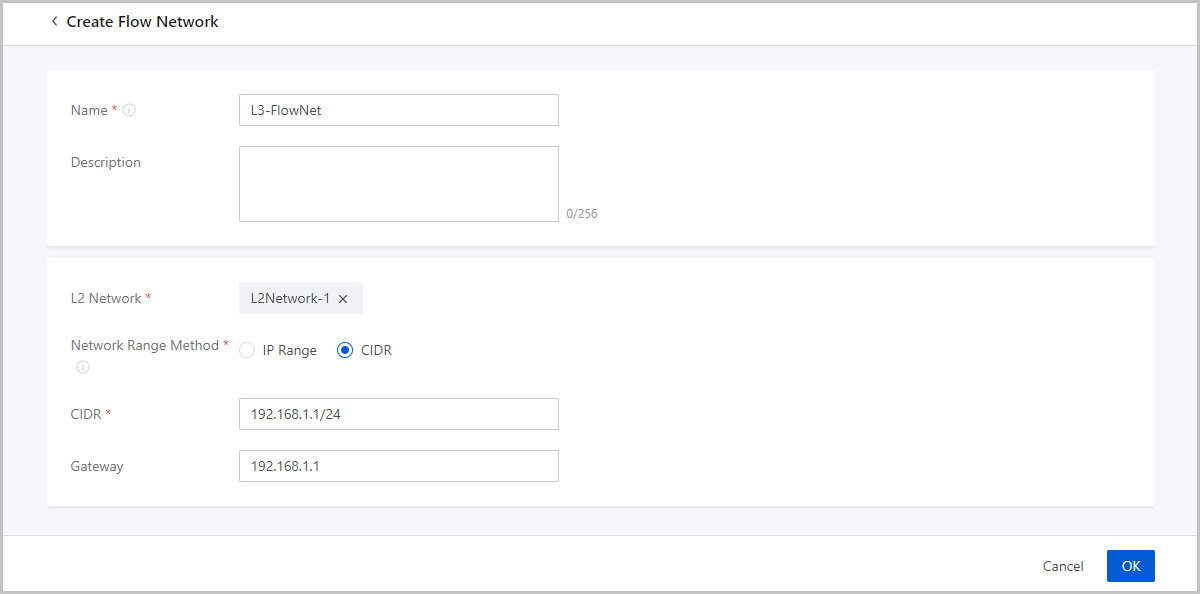
Manage a Flow Network
On the main menu of ZStack Cloud, choose . Then, the Flow Network page is displayed.
| Action | Description |
|---|---|
| Create Flow Network | Create a flow network. |
| Delete Flow Network | Delete a flow network.Note: Deleting a flow network also deletes
the associated VPC vRouter. |
Use ZNS Networks
ZNS networks provide ZNS-based L2 networks, flat networks, VPC networks, and VM instance network access in ZStack Cloud. ZStack Cloud administrators can use connected ZNS network resources in network resource and VM instance creation workflows to provide orchestrated and isolated network connectivity for service VM instances.
- Confirm that the ZNS SDN Controller is automatically registered in ZStack Cloud and is connected.
- Create a ZNS L2 network based on the service scenario.
- Create a flat network or VPC network based on the ZNS L2 network.
- Select the target ZNS network when creating a VM instance, and configure the ZNS NIC Type.
- View network status as needed, and determine network connectivity or isolation in multi-ZStack Cloud scenarios based on the selected ZNS Router.
Note: Before using ZNS networks, make sure that basic ZNS resources such as Fabric, Compute Manager, Transport Zone, IP Pool, Profile, Edge Cluster, Tier-0 Gateway, and Tier-1 Gateway have been prepared by a ZNS administrator in ZNS Network Center.Understand ZNS Networks
Using ZNS networks in ZStack Cloud involves the following resources:
| Resource | Description |
|---|---|
| ZNS SDN Controller | After ZNS is connected to ZStack Cloud, the corresponding controller object is automatically registered on the SDN Controller page. Before creating ZNS network resources, a ZStack Cloud administrator must verify that the controller vendor is ZNS and that its status is normal. |
| ZNS L2 network | An L2 network whose switch type is ZNS. Depending on the network type, it can be used to create a flat network or a VPC network. |
| Flat network | Created based on a ZNS L2 network of the L2NoVlanNetwork or L2VlanNetwork type. It is used for NoVLAN or VLAN flat network scenarios. |
| VPC network | Created based on a ZNS L2 network of the L2GeneveNetwork type. It is used for Geneve overlay scenarios. When creating a VPC network, you must select a ZNS Router. |
| VM instance | A VM instance can connect to a created ZNS flat network or ZNS VPC network during the creation workflow. After you select a ZNS network, the page displays the ZNS NIC Type configuration item. |
- NoVLAN/VLAN flat network scenario: ZNS SDN Controller -> ZNS L2 network -> flat network -> VM instance.
- Geneve/VPC network scenario: ZNS SDN Controller -> ZNS Geneve L2 network -> VPC network -> VM instance.
Prerequisites
Before using ZNS network capabilities, complete the following preparations:
- ZNS has been deployed and connected to the current ZStack Cloud.
- A ZNS administrator has prepared basic resources in ZNS Network Center, including Compute Manager, Transport Zone, uplink mapping, IP Pool, Profile, Transport Node Profile, and Edge Cluster.
- To use Geneve/VPC networks, a ZNS administrator has prepared selectable ZNS Routers. This resource corresponds to Tier-1 Gateway planning on the ZNS side.
- An SDN Controller whose vendor is ZNS and whose status is normal is visible in ZStack Cloud.
- Network address planning has been completed, including the network type, CIDR or IP range, gateway, DNS, DHCP Service, and VM instance NIC type.
Network Type Planning
Select the corresponding ZNS network type based on the service scenario:
| Scenario | ZNS L2 Network Type | L3 Network Type | Description |
|---|---|---|---|
| NoVLAN flat network | L2NoVlanNetwork | Flat network | Applies to flat network scenarios that do not use a VLAN ID. |
| VLAN flat network | L2VlanNetwork | Flat network | Applies to flat network scenarios that use a VLAN ID to isolate L2 broadcast domains. |
| Geneve/VPC network | L2GeneveNetwork | VPC network | Applies to VPC network scenarios that use Geneve overlay. When creating a VPC network, you must select a ZNS Router. |
Planning for Multiple ZStack Cloud Environments
When multiple ZStack Cloud environments are connected to the same ZNS deployment, the selected ZNS Router affects network connectivity between VM instances in different ZStack Cloud environments:
- If VPC networks in multiple ZStack Cloud environments select the same ZNS Router and the VM instance network CIDRs do not overlap, this configuration can be used for service scenarios that require L3 connectivity.
- If VPC networks in multiple ZStack Cloud environments select different ZNS Routers and no connectivity path across ZNS Routers is configured, this configuration can be used for service scenarios that require network isolation.
Note: ZNS Router creation, connectivity, and uplink policies are planned and maintained by a ZNS administrator in ZNS Network Center. When creating a VPC network, the ZStack Cloud administrator selects the corresponding ZNS Router according to the service plan.Confirm the ZNS SDN Controller
About this task
After ZNS is connected to ZStack Cloud, the system automatically registers the corresponding ZNS SDN Controller. Before creating ZNS network resources, confirm that the ZNS SDN Controller exists and is connected.
Procedure
- In the ZStack Cloud main menu, choose . The SDN Controller page is displayed.
- In the SDN Controller list, verify that the Vendor of the target controller is ZNS.
-
Verify that the Status of the target controller is Connected or another normal state.
Note: If no SDN Controller whose vendor is ZNS is displayed, or if the controller status is abnormal, contact a ZNS administrator to check the connection between ZNS and the current ZStack Cloud.
Results
After confirming that the ZNS SDN Controller is normal, you can continue to create a ZNS L2 network.
Create ZNS Network Resources
About this task
When creating ZNS network resources, create a ZNS L2 network first, and then create a flat network or VPC network based on the L2 network. Use a flat network for NoVLAN/VLAN scenarios and a VPC network for Geneve scenarios.
Procedure
-
Create a ZNS L2 network.
Note: If the L2 network is not attached to any cluster, the corresponding L3 networks cannot be used to create VM instances.
-
Create the corresponding L3 network based on the ZNS L2 network type.
Scenario Operation Entry Configuration Highlights NoVLAN/VLAN flat network Click Create Flat Network, select a ZNS L2 network whose type is L2NoVlanNetwork or L2VlanNetwork, and configure parameters such as IP Address Management, Network Address Type, network range, Gateway, DHCP Service, and DNS. Geneve/VPC network Click Create VPC Network, and select a ZNS L2 network whose type is L2GeneveNetwork. After you select a ZNS Geneve L2 network, the required ZNS Router field is displayed. Select a ZNS Router, and then configure parameters such as Network Address Type, network range, Gateway, DHCP Service, and DNS. Note: In the Select L2 Network dialog, the system lists L2 networks in the current zone. Select the correct L2 network type based on the target scenario: for a flat network, select L2NoVlanNetwork or L2VlanNetwork; for a VPC network, select L2GeneveNetwork.Note: The ZNS segment required in Geneve/VPC scenarios is automatically generated when ZStack Cloud creates a ZNS L2 network or VPC network. You do not need to create a segment separately in ZNS Network Center.
Results
After the configuration is complete, ZStack Cloud generates a flat network or VPC network that VM instances can select.
Create a VM Instance and Connect It to a ZNS Network
About this task
After creating a ZNS flat network or ZNS VPC network, you can select the network when creating a VM instance, and configure the ZNS NIC Type based on the forwarding mode on the ZNS host side.
Procedure
- In the ZStack Cloud main menu, choose . The VM Instance page is displayed.
- Click Create VM Instance.
- On the Basic Configuration page, configure information such as the VM instance name, quantity, group, instance offering, image, and data volume, and then click Next.
- On the Resource Configurations page, find the Network Configuration area, and click Select Network.
-
In the Select Network dialog, select the target ZNS network.
- NoVLAN/VLAN scenario: Select the ZNS flat network created earlier.
- Geneve/VPC scenario: Select the ZNS VPC network created earlier.
-
Select ZNS NIC Type.
The options are Kernel and DPDK.
Note: Make sure that the ZNS NIC Type of the VM instance is consistent with the forwarding mode configured by the ZNS administrator in the host switch profile. If you are not sure whether the current cluster should use Kernel or DPDK, contact the ZNS administrator for confirmation. -
Complete other resource configurations as needed, such as Cluster, Storage Allocation Policy, Host, vDrive, GPU, and CPU Pin, and then finish the wizard.
Note: Before submitting the creation request, check the selected network, ZNS NIC Type, and other resource configurations on the Preview page to make sure that they meet the service plan.
Results
After the VM instance is created, it is connected to the selected ZNS network. If DHCP Service is enabled for the network, the VM instance NIC can obtain an IP address through DHCP.
View and Handle ZNS Network Status
After creating and using ZNS network resources, you can view the status of the ZNS SDN Controller, L2 networks, L3 networks, and VM instances in ZStack Cloud. If the status is not as expected, use the following information to troubleshoot the issue.
| Issue or Symptom | Check Item | Recommended Action |
|---|---|---|
| ZNS SDN Controller is not displayed | Choose , and check whether a controller whose vendor is ZNS exists. | Contact a ZNS administrator to check whether ZNS has been connected to the current ZStack Cloud. |
| ZNS SDN Controller status is abnormal | Check the Status of the target controller. | Contact a ZNS administrator to check the ZNS management cluster, Compute Manager connection status, and network connectivity. |
| A ZNS L2 network cannot be used to create an L3 network | Confirm that the ZNS L2 network has been attached to a cluster, and select the correct network type based on the target scenario. | For a flat network, select L2NoVlanNetwork or L2VlanNetwork. For a VPC network, select L2GeneveNetwork. |
| ZNS Router cannot be found when creating a VPC network | Confirm that a ZNS L2 network of the L2GeneveNetwork type has been selected. After you select a ZNS Geneve L2 network, the ZNS Router field is displayed. | If no ZNS Router is available, contact a ZNS administrator to confirm whether the corresponding Tier-1 Gateway resource has been prepared and synchronized to the current ZStack Cloud. |
| Network is not selectable when creating a VM instance | Confirm that the target flat network or VPC network has been created, that its network address range is available, and that the resource scope of the VM instance can use the network. | Return to the network resource page to check the network status and address utilization. If necessary, adjust the network plan or contact an administrator for handling. |
| Unsure whether to select Kernel or DPDK for ZNS NIC Type | After you select a ZNS network when creating a VM instance, the Resource Configurations page displays ZNS NIC Type. | Contact a ZNS administrator to confirm the forwarding mode of the host switch profile for the target cluster, and select the matching NIC type. |
| Network connectivity in a multi-ZStack Cloud scenario is not as expected | For each ZStack Cloud, check whether the ZNS Router selected by VPC networks matches the plan, and confirm whether the VM instance network CIDRs overlap. | If connectivity is required, select the same ZNS Router and avoid CIDR overlap. If isolation is required, select different ZNS Routers and do not configure a connectivity path across ZNS Routers. |