Quick Start Wizard
Quick Start Wizard helps you use the rich functions of Hybrid Cloud Management in an efficient way.
- Create ECS Instance
- Establish VPN Connection
- Create Alibaba Cloud Express Connect
Create ECS Instance
On the Quick Start Wizard page, click the Create button below the Create ECS Instance card. Then, you begin to create an ECS instance with the quick start wizard.
- Select RegionIn the Select Region section, set the following parameters:
- Region: Select a region can be accessed with your Alibaba Cloud AccessKey.
- Zone: Select an availability zone in the region.
 Note:
Note:
- If you have added no region or zone can be accessed with the current AccessKey to local, you can click the link below the selection box to add corresponding resources.
- After you add regions and zones, ZStack Cloud synchronizes resources in these regions and zones to local.
Figure 1. Select Region 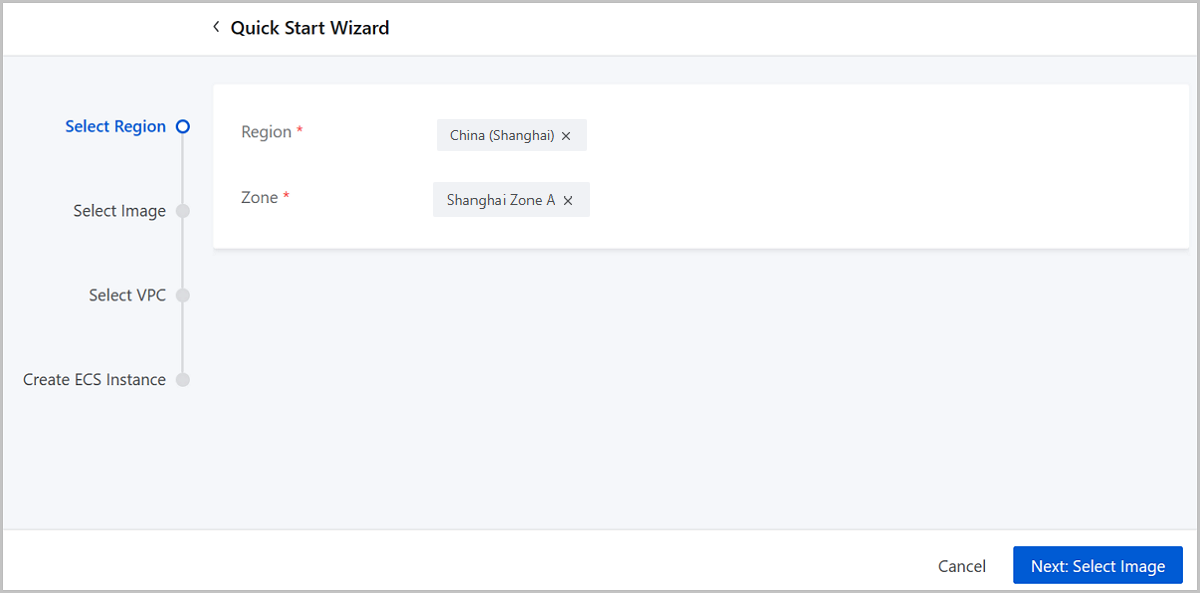
- Select ImageIn the Select Image section, set the following parameters:
- Add Type: Choose to use an Alibaba Cloud
system image or a custom image.
- If you are creating an ECS instance for the first time and pursuing a high creation efficient, we recommend that you use an Alibaba Cloud system image.
- To use a custom image, you need to upload it to Alibaba Cloud via OSS, which takes a relatively long time.
- Image: Select an image in Alibaba Cloud servers.
Figure 2. Select Image 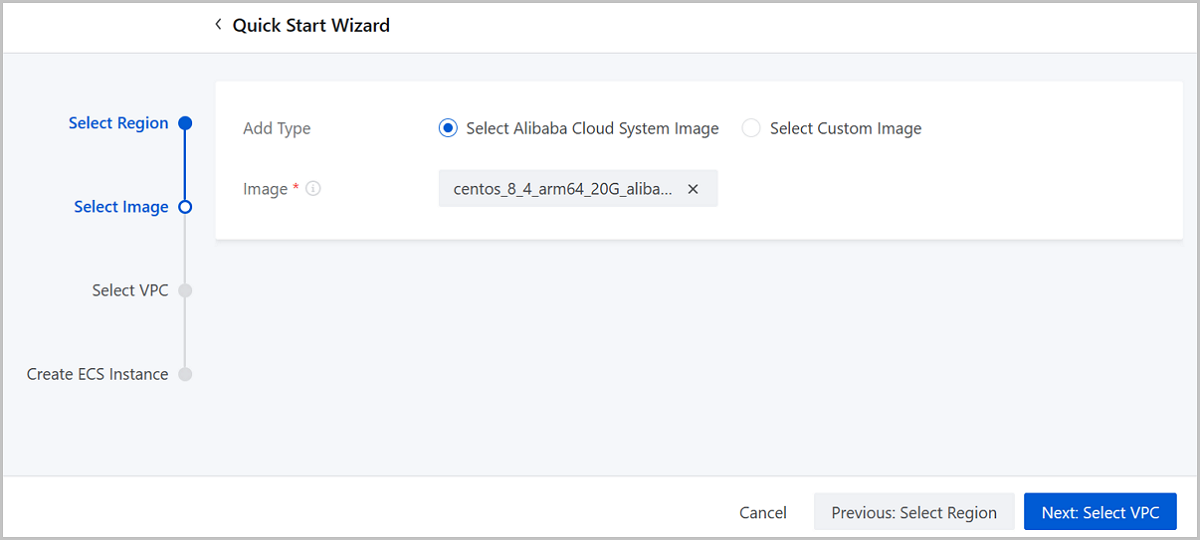
- Add Type: Choose to use an Alibaba Cloud
system image or a custom image.
- Select VPCIn the Select VPC section, set the following parameters:
- VPC: Select a VPC for the ECS instance.
- vSwitch: Select a vSwitch associated with the
VPC.Note: You can select a vSwitch in the zone you selected in
the first step.
- Security Group: Select a security group according to actual requirements. Make sure that the security group port or protocol allows the private network on ZStack Cloud Private Cloud to pass it.
Figure 3. Select VPC 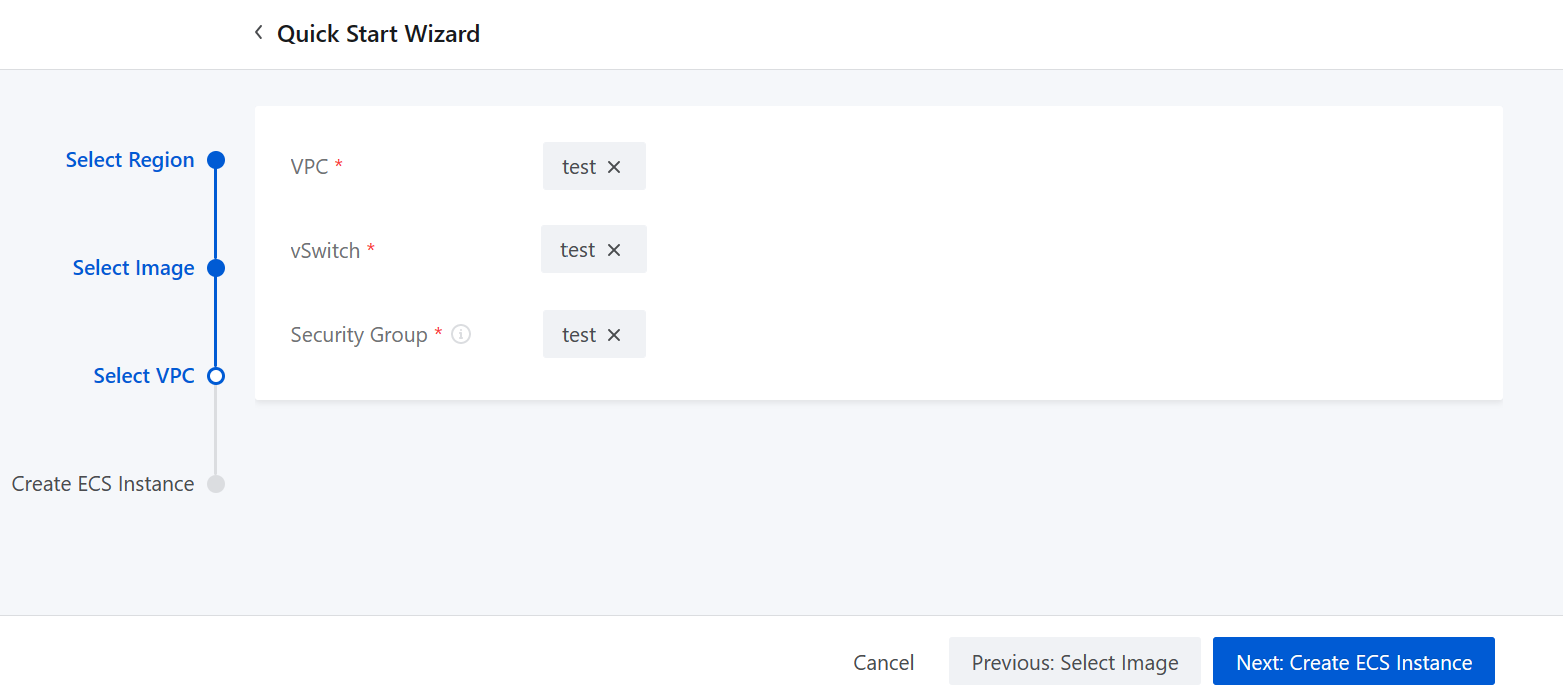
- Create ECS InstanceIn the Create ECS Instance section, set the following parameters:
- Name: Enter a name for the ECS instance.
- Description: Optional. Enter a description for the ECS instance.
- Image: Displays the image you select in the step 2.
- Security Group: Displays the security group you select in the step 3.
- vSwitch: Displays the vSwitch you select on the step 3.
- Instance Offering: Select an instance offering for the ECS instance. An instance offering is a unit of definitions on ECS instance CPU and memory synchronized from Alibaba Cloud.
- Private IP: Optional. Specify a static IP
address on the private network for the ECS instance.
- The IP address you enter cannot be used by existing ECS instances.
- Below this input box, ZStack Cloud displays the CIDR of the vSwithch you select and the number of available IP addresses for your reference.
- Public IP: Optional. Choose whether to allocate the ECS instance with a public IP. Defalut: Not Allocate. If you set it to Allocate, set a network bandwidth for the ECS instance.
- Console Password: Enter a 6-character long password that contains digits, lower-case, and upper-case letters.
- System User Password: Enter a system user
password for the ECS instance. The password must be 8 to 30
characters in length and contain at least 3 character types of
upper-case letters, lower-case letters, digits, and special characters.Note:
By default, the system user name of a Linux-based ECS instance is root; the system user name of a Windows-based ECS instance is administrator. To log in to the ECS instance, you need to enter the system user name and the password you set here.
Figure 4. Create ECS Instance 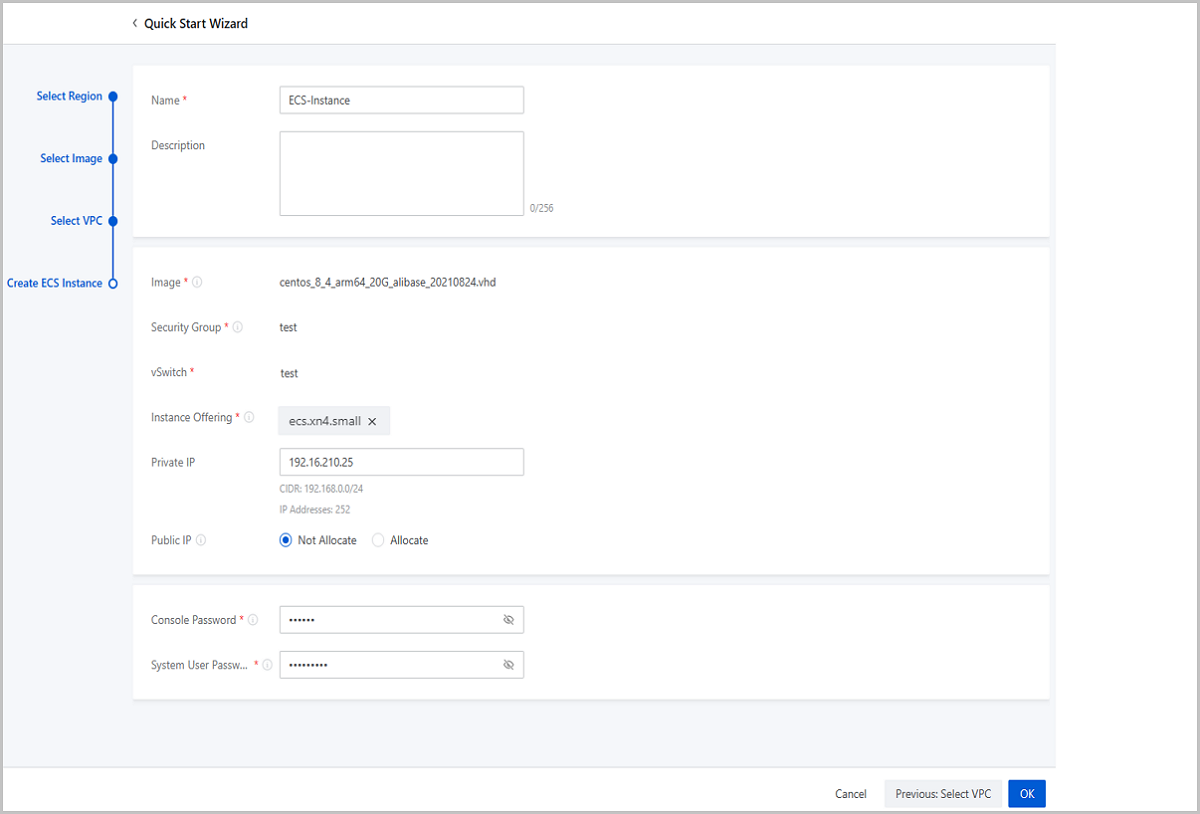
Establish VPN Connection
On the Quick Start Wizard page, click the Create button under the Establish VPN Connection card. Then, you begin to create a VPN connection with the quick start wizard.
- Select Alibaba Cloud Network
In the Select Alibaba Cloud section, set the following parameters:
- VPN Gateway (Alibaba Cloud): Choose a VPN gateway
purchased on Alibaba Cloud Console.Note: If no VPN gateway is available
in the selected region, you need to purchase one on Alibaba Cloud
Console.
Figure 1. Select Alibaba Cloud Network 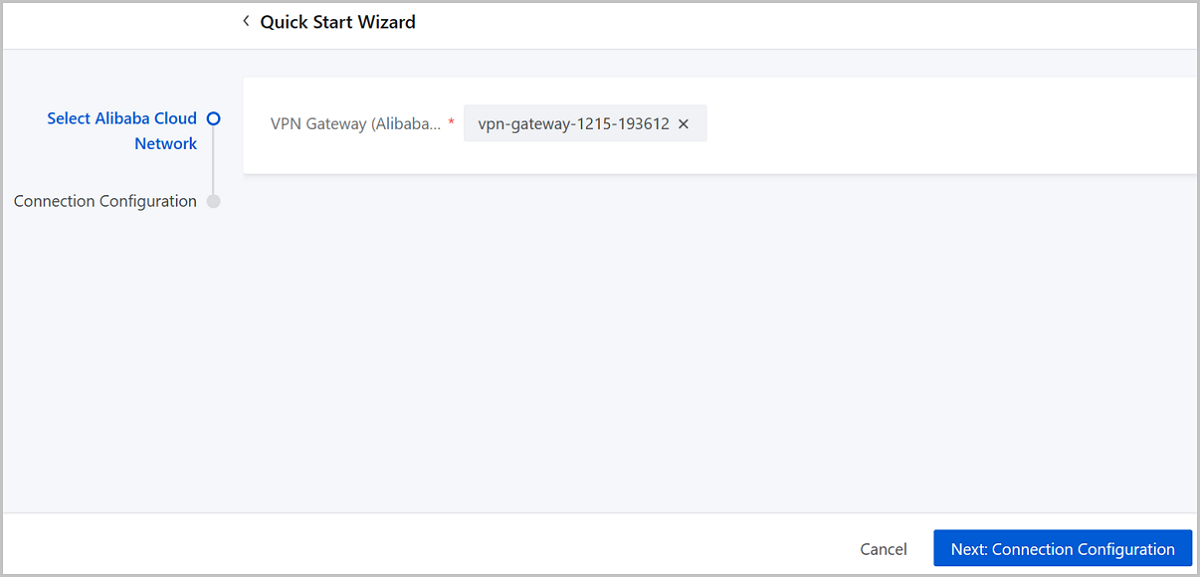
- VPN Gateway (Alibaba Cloud): Choose a VPN gateway
purchased on Alibaba Cloud Console.
- Connection ConfigurationIn the Connection Configuration section, set the following parameters:
- Name: Enter a name for the VPN connection.
- Description: Optional. Enter a description for the VPN connection.
- IKE Preshared Key: We recommend that you set a strong key.
- VPC vRouter (ZStack): Select a VPC vRouter to create the VPN connection.
- Public Network (ZStack): Select the public network the VPC vRouter attached to.
- NAT Device: Choose whether an NAT device is
used in your local network environment.
- If an NAT device is used, set the following parameters:
- Pre-NAT IP: A public network IP used to create the IPsec tunnel. Enter an IP address that can be used to access the public network.
- Post-NAT IP: The IP address of the VPN customer gateway used to create the IPsec tunnel. Enter an IP address that is transformed from the source IP address (Pre-NAT IP) and can access the Internet directly.
Note: Make sure that the post-NAT IP is the definite
transformation result of the pre-NAT IP (source IP
address) in your local network environment. - If no NAT device is used, set the following parameters:
- IP Address: Optional. An available public network IP for the IPsec tunnel. Enter an IP address of the public Internet. If you do not set it, the system allocates an available public network IP randomly to create the IPsec tunnel.
- If an NAT device is used, set the following parameters:
- Private Network (ZStack): Select L3 networks attached to the VPC vRouter. You can select up to 3 L3 networks.
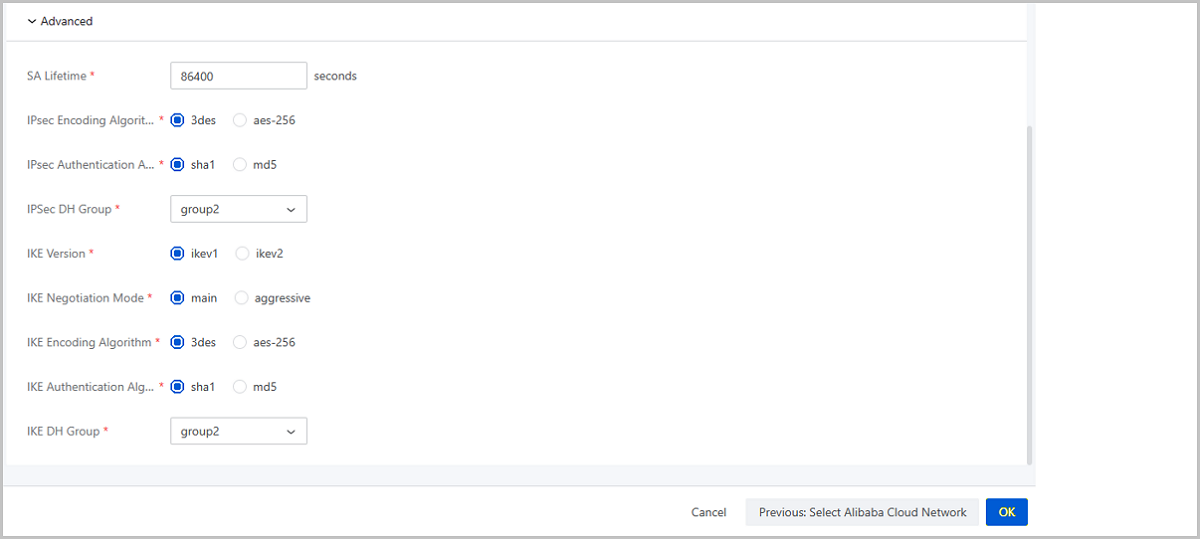
- Advanced: We recommend that you do not modify the advanced
parameters for the default values can ensure the IPsec
connectivity.
- SA Lifetime (Second): 86400 (Default). Unit: second.
- IPsec Encoding Algorithm: 3des (Default).
- IPsec Authentication Algorithm: sha1 (Default).
- IPsec DH Group: group2 (Default).
- IKE Version: ikev1 (Default).
- IKE Negotiation Mode: main (Default).
- IKE Encoding Algorithm: 3des (Default).
- IKE Authentication Algorithm: sha1 (Default).
- IKE DH Group: group2 (Default).
Figure 2. Connection Configuration 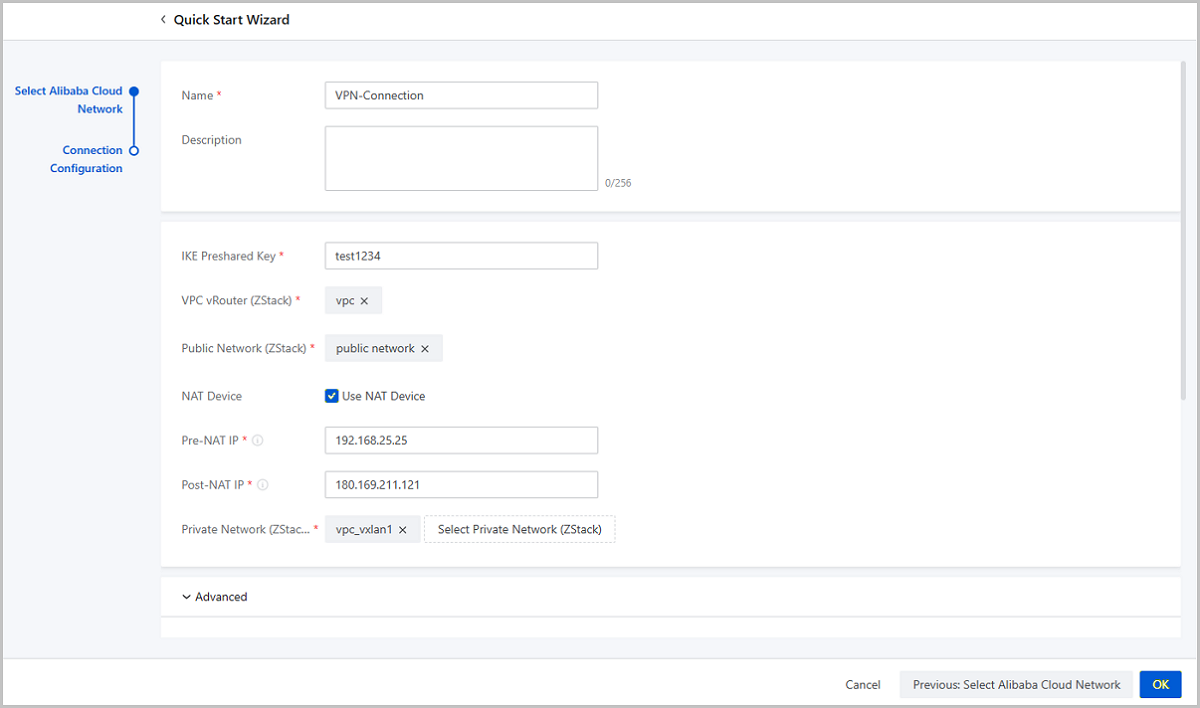
Check Connectivity
ping the ECS
instance. Then, log into the ECS instance and check whether it can ping
the local VM instance.Note:
- Check whether the local VIP used to create the IPsec connection is occupied. If it is occupied, delete this VIP.
- Check whether an Alibaba Cloud VPN exists. If so, delete the VPN connection both from local and from Alibaba Cloud.
- Check whether the Alibaba Cloud VPN customer gateway is allocated with a duplicated IP address. If so, delete the IP address both from local and from Alibaba Cloud.
- Check whether the Alibaba Cloud VPC virtual router is configured with a route rule corresponding to the VPC network of ZStack CloudPrivate Cloud. If so, delete the route rule.
Create Alibaba Cloud Express Connect
- PreparationBefore you create an Alibaba Cloud express connect, configure networks on CPE IP, ZStack CloudPrivate Cloud, and Alibaba Cloud Public Cloud.
- CPE IP Network Configuration
To create an Alibaba Cloud express connect, you need to prepare a physical circuit leased from an operator. The operator is responsible to create a virtual border router and configure router interfaces.
After configurations, you can obtain the following information:- Virtual Border Router (VBR): A router locating between the CPE device and the virtual router in Alibaba Cloud VPC.
- VBR Interfaces: VBR interfaces consist of one interface connecting ZStack Cloud and one interface connecting Alibaba Cloud.
- VPC vRouter Interface: The interface of the VPC vRouter.
- CPE IP: The IP address of the CPE device provided by the ISP.
- ZStack Cloud
Private Cloud Network ConfigurationBefore you configure the network on ZStack CloudPrivate Cloud, prepare following network CIDRs:
- Private network CIDR: The private network CIDR manages the ZStack Cloud VM instance with the VPC vRouter.
- Management network CIDR: The management network CIDR manages the VPC vRouter with the management node.
- Public network CIDR: The public network CIDR is attached to the VPC vRouter to enable it to access the Internet.
- Physical circuit CIDR: The physical circuit CIDR connects the VPC network, CPE IP, and Alibaba Cloud.
Note: The public network can use a same CIDR with the
management network.After preparing the CIDRs, you can configure networks on ZStack CloudPrivate Cloud.- Create an L2 private network.
- Create an L3 private network (VPC network).
- Create an L2 management network.
- Create an L3 management network (public network).
- Create an L2 public network.
- Create an L3 public network (public network).
- Create a VM instance on ZStack CloudPrivate Cloud.
- Create a VPC vRouter and attach it to the public network.
- Create an L2 physical circuit network.
- Create an L3 physical circuit network.
- Attach the physical circuit network to the VPC vRouter.
After you finish configurations on ZStack CloudPrivate Cloud, configure routes on the CPE device.
- Alibaba Cloud Public Cloud Network
ConfigurationMake sure that you have following resources on Alibaba Cloud before you make configurations:
- VPC.
- vSwitch associated with the VPC.
- ECS instance.
With these resources, you can make network configurations on Alibaba Cloud.- Create an ECS instance with the vSwitch associated with
the VPC.Note: For more information, see Alibaba Cloud Help
Center.
- CPE IP Network Configuration
- Configure ZStack Cloud Network
On the Quick Start Wizard page, click the Create button under the Create Alibaba Cloud Express Connect card. Then, you begin to create an Alibaba Cloud express connect with the quick start wizard.
Set the following parameters:- VPC vRouter: Select a local VPC vRouter.
- Public Network: Select a network that can connect the local data center with the VBR interface.
- VPC Network: Select a local VPC network.
- Configure Alibaba Cloud NetworkSet the following parameters:
- VPC: Select a VPC.
- Virtual Border Router: Select a virtual border router. The virtual border router is created and configured with routes by the ISP.
- CPE IP (ISP): The IP address of the client device that is provided by the ISP and used to connect the physical circuit to the local data center.
During the express connect creation, ZStack Cloud automatically configures the following 4 routes:- VPC Custom Route1: The destination address is ZStack Cloud Private Network CIDR. The next hop is the interface of the VPC virtual router.
- VBR Custom Route1: The destinaion address is ZStack Cloud Private Network CIDR. The next hop is the VBR interface connecting ZStack CloudPrivate Cloud.
- VBR Custom Route2: The destination address is ECS VPC CIDR. The next hop is the VBR interface connecting Alibaba Cloud.
- VPC Custom Route2: The destination address is ECS VPC CIDR. The next hop is the IP address of the CPE device.
- Configure routes on CPE device.You need to manually configure two routes on the CPE device.
- CPE Custom Route1: The destination address is ZStack Cloud Private Network CIDR. The next hop is the physical circuit IP of the VPC vRouter.
- CPE Custom Route2: The destination address is ECS VPC CIDR. The next hop is the physical circuit address.
Check the connectivity.
Log in to the local VM instance and check whether it can ping the ECS
instance. Then, log in to the ECS instance and check whether it can
ping the local VM instance. If the local VM instance and the ECS
instance can ping each other, it means that the Alibaba Cloud express
connect is created successfully.