Object Storage
Overview
Object Storage:The object storage function delivers secure and efficient storage and management service for massive amounts of unstructured data.
Related Definitions
- Storage Policy: A storage policy is a set of rules governing resource allocation sources for storage buckets, data storage formats, and more.
- Object Gateway: The object gateway consists of high-availability object gateways and S3 gateways. The S3 gateway provides an S3-compatible object storage service for accessing storage clusters, while the high-availability object gateway offers high-availability services and load balancing for object storage.
- Object User: An object user is an account for a consumer of object storage services, containing information such as permissions, key pairs, and user quotas.
- Bucket: A bucket is a logical storage space allocated to an object user, where user data is stored in the form of objects.
Initialize Object Storage
To get the object storage service provided by ZStack ZStone, you need to initialize object storage first.
Prerequisites
- You have purchased the license for the Object Storage module and the license status is valid.
- On the platform exist one or more storage pools that meet the following
requirements:
- The type of the storage pool is Object Storage.
- The role of the storage pool is Index Pool or Compound Pool.
- The data redundancy type is Replicas.
 Note: If there are no storage pools that meet the requirements above,
you can create the needed resources step by step according to the prompt
messages when initializing object storage.
Note: If there are no storage pools that meet the requirements above,
you can create the needed resources step by step according to the prompt
messages when initializing object storage.
Initialize Object Storage
- On the main menu of ZStack ZStone, choose . Then, the Uninitialized Object Storage page is displayed.
- Click the Initialize Object Storage button.Set the following parameters:
- Storage Pool: Select a storage pool for
initializing object storage.You can select a storage pool that meets the following requirements:
- The type of the storage pool is Object Storage.
- The role of the storage pool is Index Pool or Compound Pool.
- The data redundancy type is Replicas.
Note:
- The initialization action involves creating an object storage system resources pool so as to preserve the metadata of object storage.
- The system resources pool and the selected storage pool share the same data disk and data redundancy type.
- Storage Pool: Select a storage pool for
initializing object storage.
- Click OK and the initialization will begin.Note: Once
the initialization is completed, we recommend you create the storage
policy, object gateway, object user, and bucket in sequence as shown on
the sub-menu of Object Storage so as to get the object storage service
properly.
Storage Policy
Create a Storage Policy
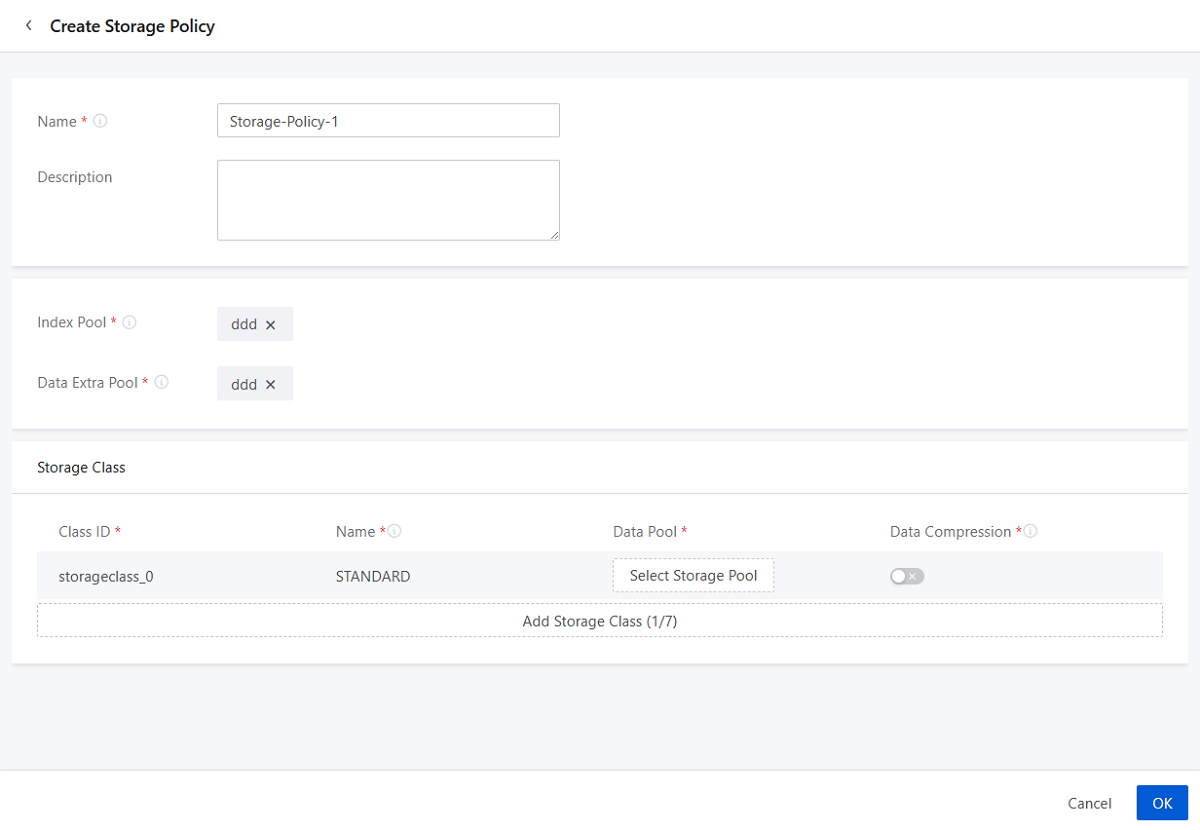
On the main menu of ZStack ZStone, choose . On the Storage Policy page, click Create Storage Policy.
- Name: Set the name for the storage policy.The following rules apply for naming a storage policy:
- The storage policy name must be globally unique.
- The name must be 1 to 16 characters in length and can contain letters, digits, underscores (_), or hyphens (-). The name cannot start or end with a space.
- Description: Optional. You can enter related notes in this field.
- Index Pool: Store the index information of objects.You can select a storage pool that meets the following requirements:
- The type of the storage pool is Object Storage.
- The role of the storage pool is Index Pool or Compound Pool.
- The data redundancy type is Replicas.
- Data Extra Pool: Store intermediate data when uploading
multi-part objects and help you resume from breakpoints and collect garbage
data.You can select a storage pool that meets the following requirements:
- The type of the storage pool is Object Storage.
- The role of the storage pool is Index Pool or Compound Pool.
- The data redundancy type is Replicas
- Storage Class: 7 storage classes are supported. Object data
defaults to the STANDARD class. You can specify storage classes on the client to
meet diverse storage needs.
- Class ID: Specify the storage policy class ID
(storageclass_0 to storageclass_6).Note: By default, the first class ID
in a storage policy is storageclass_0 with
the name STANDARD. Customizing a name and
deleting the name are not supported.
- Name: Enter a name for the storage class.The following rules apply for naming a storage class:
- The storage class name must be unique within the storage policy. The storage class name can be duplicated in different storage policies.
- The name must be 1 to 16 characters in length and can contain letters, digits, underscores (_), or hyphens (-). The name cannot start or end with a space.
Note: The storage class name is used as a unique identifier
when specifying a storage class and cannot be changed once being
set. - Data Pool: Select the storage pool for storing
object data.Note: A storage class can be attached to only one data
pool.
- Data Compression: If enabled, when you upload an
object to a bucket that uses this storage policy, the object data is
automatically compressed before being stored. By default, this option is disabled.Note:
- Enabling data compression occupies the CPU resources of the storage gateway server. We recommend that you use a storage gateway server with high-configuration CPUs.
- If you copy cross-bucket objects in buckets that use different storage policies, the data compression service will be in accordance with the setting of the original bucket.
- Class ID: Specify the storage policy class ID
(storageclass_0 to storageclass_6).
Manage a Storage Policy
On the main menu of ZStack ZStone, choose . Then, the Storage Policy page is displayed.
| Action | Description |
|---|---|
| Create Storage Policy | Create a storage policy. |
| Edit Description | Modify the description of the storage policy. |
| Set as Default Policy | Set the selected storage policy as the default policy. |
| Set Data Compression | Enable or disable Data Compression. If enabled,
when you upload an object to a bucket that uses this storage policy,
the object data is automatically compressed before being stored.Note:
|
| Delete | Delete the selected storage policy.Note:
|
Further Details About Storage Policy
Storage Class
Add a Storage Class
On the Create Storage Policy page, click Add Storage Class.
- Class ID: Specify the storage policy class ID
(storageclass_0 to storageclass_6).Note: By default, the first class ID in a
storage policy is storageclass_0 with the name
STANDARD. Customizing a name and deleting the
name are not supported.
- Name: Enter a name for the storage class.The following rules apply for naming a storage class:
- The storage class name must be unique within the storage policy. The storage class name can be duplicated in different storage policies.
- The name must be 1 to 16 characters in length and can contain letters, digits, underscores (_), or hyphens (-). The name cannot start or end with a space.
Note: The storage class name is used as a unique identifier
when specifying a storage class and cannot be changed once being
set. - Data Pool: Select the storage pool for storing object
data.Note: A storage class can be attached to only one data
pool.
- Data Compression: If enabled, when you upload an
object to a bucket that uses this storage policy, the object data is
automatically compressed before being stored. By default, this option is disabled.Note:
- Enabling data compression occupies the CPU resources of the storage gateway server. We recommend that you use a storage gateway server with high-configuration CPUs.
- If you copy cross-bucket objects in buckets that use different storage policies, the data compression service will be in accordance with the setting of the original bucket.
Manage a Storage Class
| Action | Description |
|---|---|
| Add Storage Class | Add a new storage class. |
| Set Data Compression | Enable or disable Data Compression.Note:
|
| Delete | Delete the selected storage class.Note: The
storage class called storageclass_0 cannot be
deleted. |
Object Gateway
Create an S3 Gateway
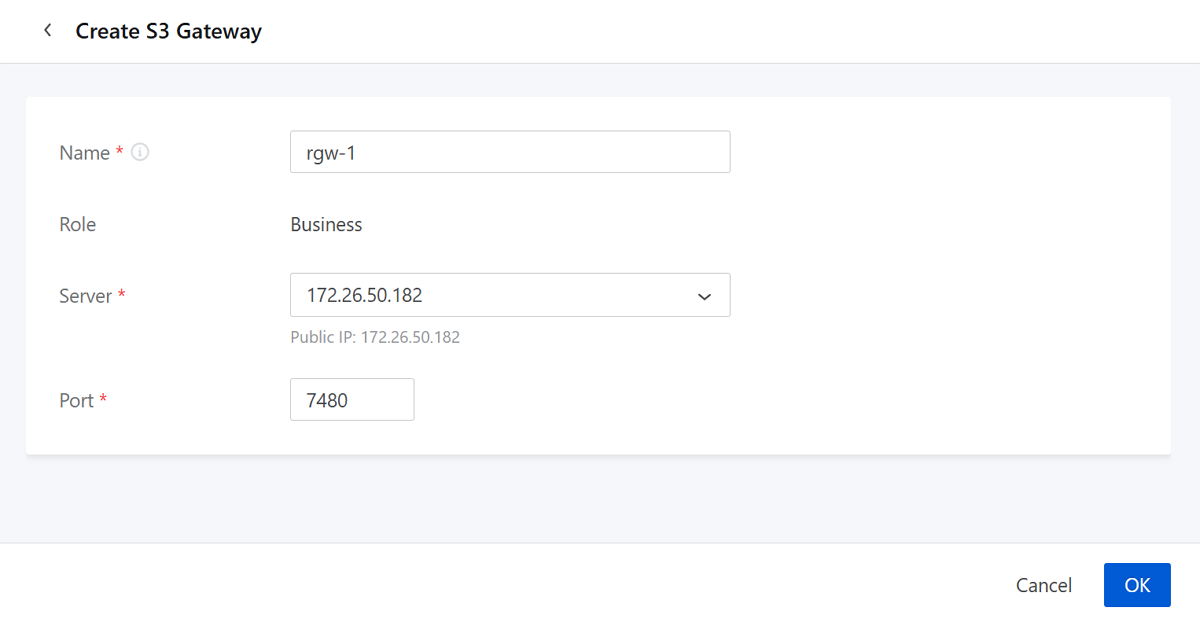
On the main menu of ZStack ZStone, choose. On the S3 Gatewaypage, click Create S3 Gateway.
- Name: Set the name for the S3 Gateway.
Naming rules: 1-128 characters long. A name can contain letters (a-z, A-Z), digits, underscores (_), or hyphens (-). The name cannot start or end with a space.
- Role: The default role is Business, which means addressing business requirements.
- Server: Select a server as the S3 Gateway. By default,
the options are shown in the form of server IPs.Note:
- You can select the Connected server with the role of Object Storage Gateway.
- Those servers already added as an object gateway cannot be added again.
- Port: Specify the port of the object gateway. Valid range: 7480~7489.
Manage an S3 Gateway
On the main menu of ZStack ZStone, choose. Then, the S3 Gateway page is displayed.
| Action | Description |
|---|---|
| Create S3 Gateway | Create S3 gateways. |
| Enable | Enable the S3 gateway in the stopped state. |
| Disable | Disable the S3 gateway in the healthy state. |
| Delete | Delete the selected S3 gateway.Note:
|
Create an HA Object Gateway
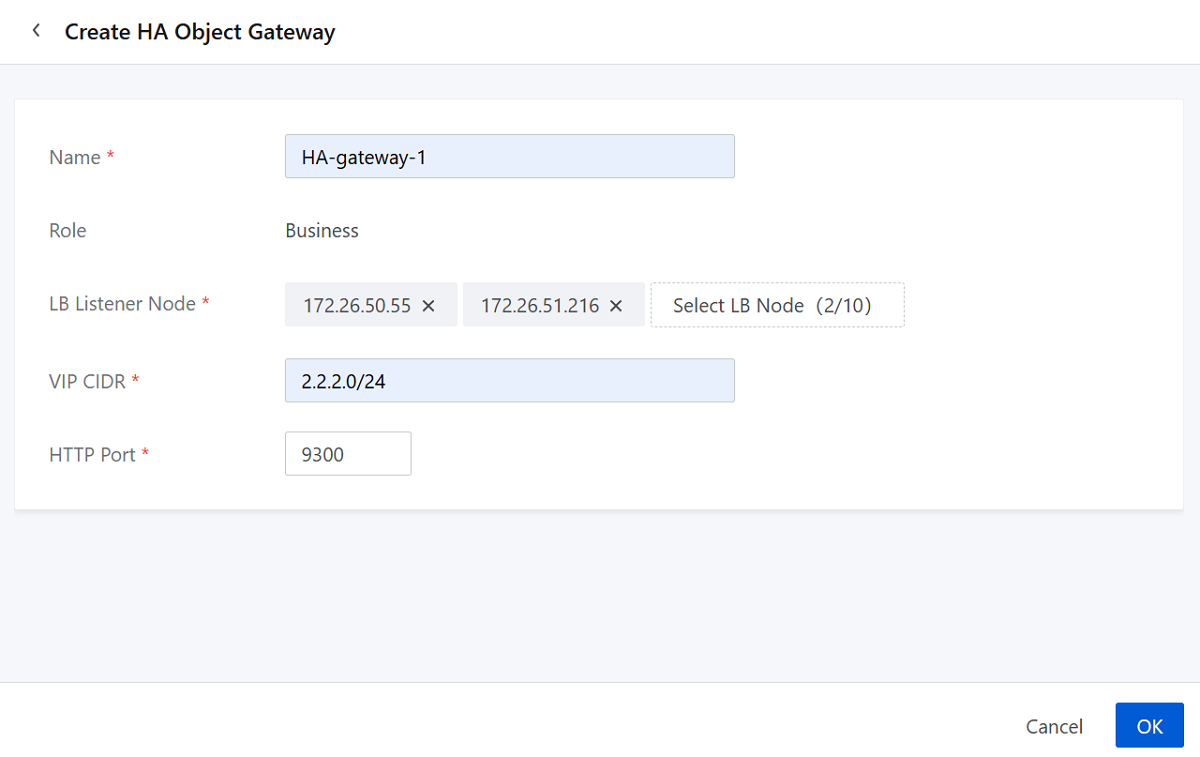
On the main menu of ZStack ZStone, choose . On the HA Object Gateway page, click Create HA Object Gateway.
- Name: Set the name for the HA object gateway.
Naming rules: 1-128 characters long. A name can contain letters (a-z, A-Z), digits, underscores (_), or hyphens (-).The name cannot start or end with a space.
- Role: The default role is Business, which means addressing business requirements.
- LB Listener Node: You can add up to 10 nodes, each running
one load balancer listener.Note: Only the servers with Object Storage
Gateway role can be selected as listener nodes.
- VIP CIDR: Enter the VIP CIDR that allocates Public IPs (NICs) for load balancer listener nodes.
- HTTP Port: Enter the HTTP port (Valid range: 9300-9399).
Manage an HA Object Gateway
On the main menu of ZStack ZStone, choose . Then, the HA Object Gateway page is displayed.
| Action | Description |
|---|---|
| Create HA Object Gateway | Create HA object gateways. |
| Add Listener | Add listeners to the HA object gateway.
|
| Remove Listener | Remove listeners from the HA object gateway.
|
| Delete | Deleting an HA object gateway may result in the inability to access the object storage service. Proceed with caution. |
Object User
Create an Object User
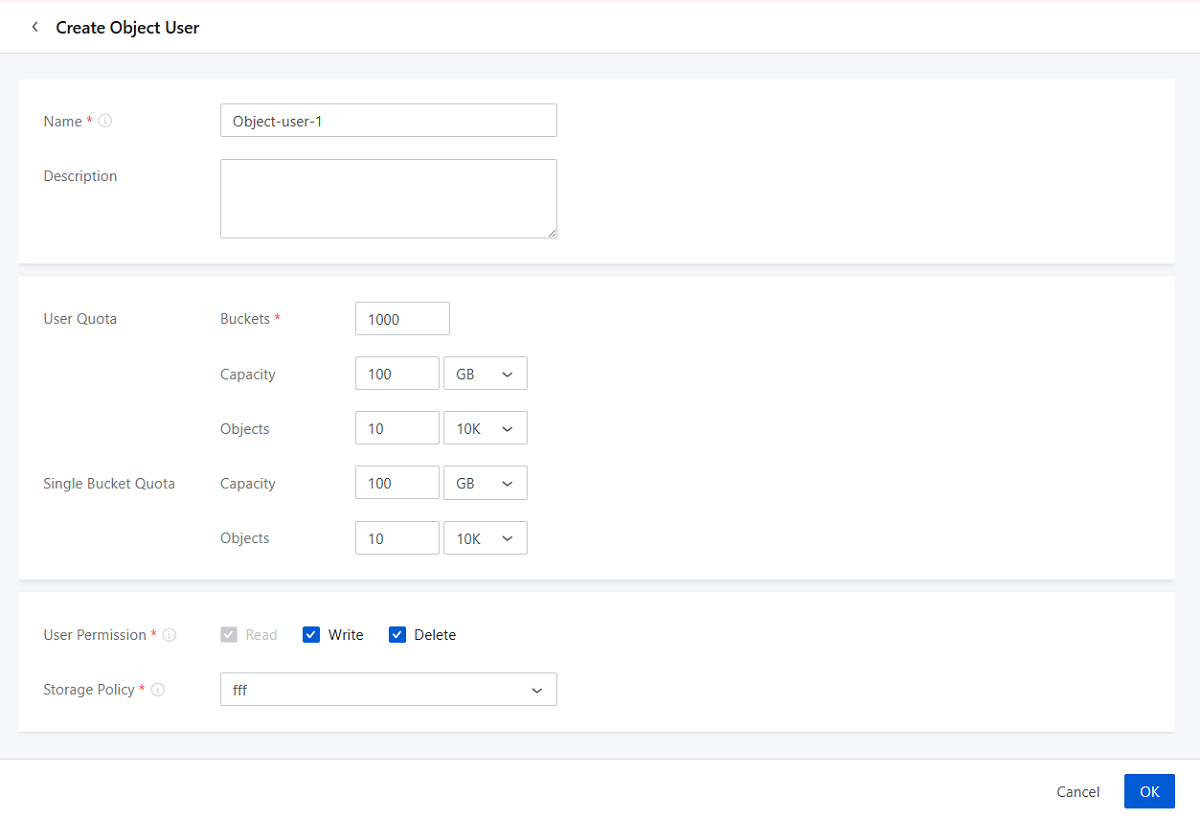
On the main menu of ZStack ZStone, choose. On the Object User page, click Create Object User.
- Name: Set the name for the object user.
Naming rules: 1-64 characters long. A name can contain letters (a-z, A-Z), digits, underscores (_), hyphens (-),or periods (.). The name cannot start or end with a space.
Note: After an object user is created, its name cannot be
changed. - Description: Optional. You can add related notes in this field.
- User Quota: Set the number of buckets that object users
can create and use as well as capacity and the number of objects.
- Buckets: Set the bucket quota. The default is 1000. Valid range: 1-10000, integer.
- Capacity: Set the capacity quota. This field includes KB, MB, TB, and PB for capacity. Valid range: 1 KB-1024 PB, integer.
- Objects: Set the object quota. This field
includes Objects, 10K, 100M, T, 10Qa for objects. Valid range: 1
object–99 10Qa, integer.Note: When you upload an object in multiple
parts, each part will occupy one object quota. Yet, when the
multi-part upload is completed and a new object is thus created, the
new object still occupies one quota.
- Single Bucket Quota: Set the capacity and object quota
that the current object user can use in each bucket.
- Capacity: Set the capacity quota that the current object user can use in each bucket. This field includes KB, MB, TB, and PB for capacity. Valid range: 1 KB-1024 PB, integer.
- Objects: Set the object quota that the current
object user can use in each bucket. This field includes Objects, 10K,
100M, T, 10Qa for objects. Valid range: 1 Object-99 10Qa,
integer.Note: When you upload an object in multiple parts, each part
will occupy one object quota. Yet, when the multi-part upload is
completed and a new object is thus created, the new object still
occupies one quota.
- User Permission: Grant an object user with bucket/object
access permissions. By default, an object user is granted with Read, Write, and
Delete permissions. You can flexibly combine the three permissions according to
business needs, For example, Read Only, Read+Write, Read+Delete, and Read+Write+Delete.Note:
- Read: Allows grantee to read the bucket ACL, list and download the objects in the bucket. You cannot deselect this permission.
- Write: Allows grantee to create buckets, modify the bucket ACL, upload objects, and so on.
- Delete: Allows grantee to delete buckets, delete objects, and so on.
- Storage Policy: Associate a storage policy with an object
user.Note: After you associate a storage policy, if you select the object
user as the bucket owner when creating a bucket, the bucket will use the
storage policy associated with the object user by default.
Manage an Object User
On the main menu of ZStack ZStone, choose . Then, the Object User page is displayed.
| Action | Description |
|---|---|
| Create Object User | Create Object Users. |
| Enable | Enable the object user in the disabled state. |
| Disable | Disable the object user in the enabled
state.Note: After being disabled, the object user cannot access
the object storage service. |
| Edit Description | Edit the description of the object user. |
| Modify User Quota | Modify the quota for the object user, including User Quota and Single Bucket Quota. |
| Modify User Permission | Modify the bucket/object access permissions of
the object user.Note: You cannot deselect the
Read permission. |
| Modify Storage Policy | Modify the storage policy associated with the
object user.Note: After you associate a storage policy, if you
select the object user as the bucket owner when creating a
bucket, the bucket will use the storage policy associated with
the object user by default. |
| Delete | Delete the selected object user.Note:
|
Further Details About Object User
User Key Pair
User Key Pair: A user key pair, consisting of Access Key ID and Secret Access Key, is used for identity authentication when accessing object storage resources. The system automatically generates a key pair upon successful object user creation.
Generate a Key Pair
On the User Key Pair page, click Generate Key Pair and a key pair will be automatically generated.
Manage a Key Pair
| Action | Description |
|---|---|
| Generate Key Pair | Generate key pairs. |
| Delete | Delete one or more key pairs.Note:
|
Bucket
Create a Bucket
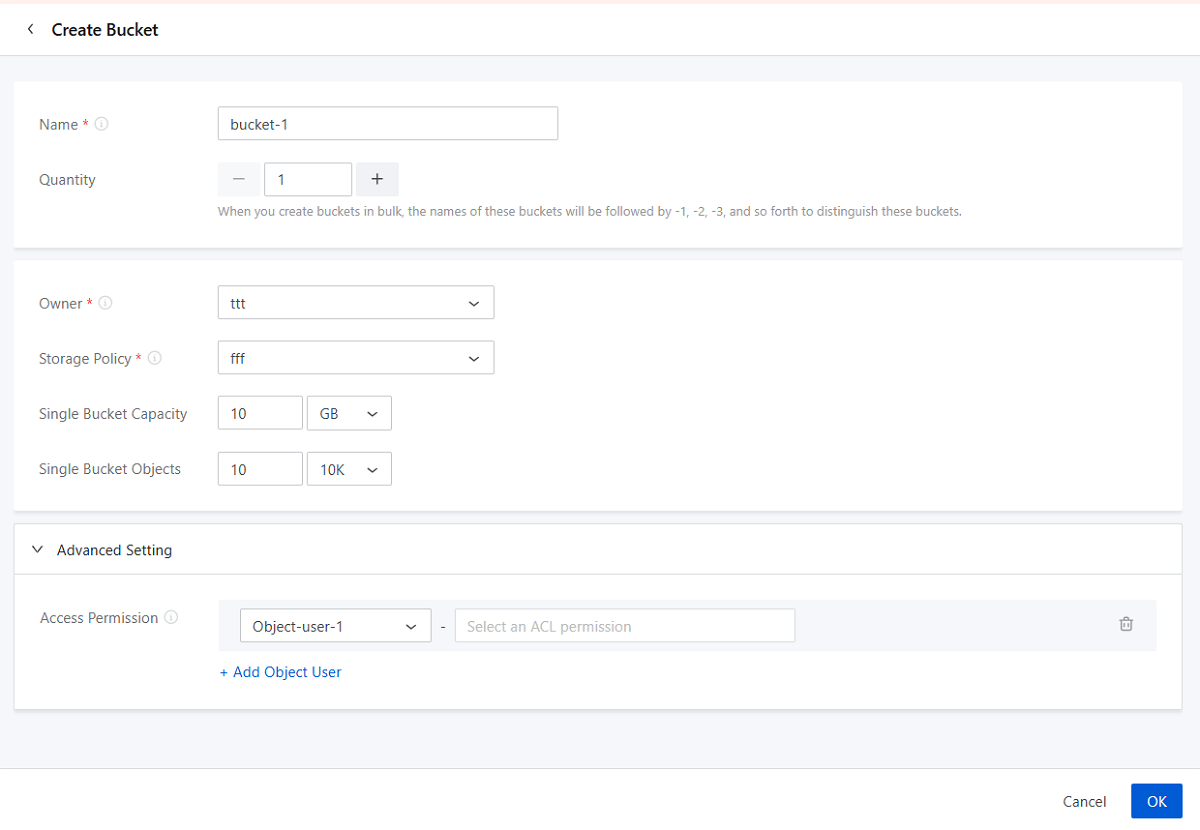
On the main menu of ZStack ZStone, choose . On the Bucket page, click Create Bucket.
- Name: Set the name for the bucket.The following rules apply for naming a bucket:
- A bucket name must be globally unique.
- A bucket name must be 3 to 63 characters in length.
- A bucket name can consist only of lower-case letters, numbers, hyphens (-), or periods (.).
- A bucket name must begin and end with a lower-case letter or number.
- A bucket name must not be formatted as an IP address, for example, 192.168.0.1.
- A bucket name must consist of one or more labels. Adjacent labels are separated by a single period (.).
- You cannot use "admin" as the bucket name.
Note: Once the bucket name is set, it cannot be
modified. - Quantity: Set the number of buckets. You can create
buckets in bulk.Note: Valid range: 1-100, integer.
- Owner: Set a bucket owner. A bucket can only have one
owner.You can select an object user that meets the following requirements:
- The state of the object user is enabled.
- The object user has Read and Write permissions.
- Storage Policy: Specify a storage policy for the bucket.
The parameter enables bucket to store object data according to the specified
storage policy.Note: By default, the bucket uses the storage policy associated
with the bucket owner. You can also specify a different storage
policy.
- Single Bucket Capacity: Set the capacity quota for each bucket. This field includes KB, MB, TB, and PB for capacity. Valid range: 1 KB-1024 PB, integer.
- Single Bucket Objects: Set the object quota for each
bucket. This field includes Objects, 10K, 100M, T, 10Qa for objects. Valid
range: 1 Object-99 10Qa, integer.Note: When you upload an object in multiple
parts, each part will occupy one object quota. Yet,when the multi-part
upload is completed and a new object is thus created, the new object still
occupies one quota.
- Advanced Setting:
- Access Permission: You can grant specified ACL
permissions to an object user.
- READ: Allows grantee to list the objects in the bucket and read the object.
- WRITE: Allows grantee to create, delete, or overwrite objects in the bucket.
- READ_ACP: Allows grantee to read the bucket ACL.
- WRITE_ACP: Allows grantee to write the ACL rules.
- FULL_CONTROL: Allows grantee the READ, WRITE, READ_ACP, and WRITE_ACP permissions.
Note:
- By default, a bucket owner is granted the FULL_CONTROL permission and cannot be modified.
- A bucket can have up to 100 ACL grants.
- Bucket owners and object users with READ permission can only download objects they have uploaded.
- User-level permissions have priority over ACL permissions. For example, if object user A only has Read permission, the user cannot upload objects to Bucket B even when granted WRITE ACL permission.
- Access Permission: You can grant specified ACL
permissions to an object user.
Manage a Bucket
On the main menu of ZStack ZStone, choose . Then, the Bucket page is displayed.
| Action | Description |
|---|---|
| Create Bucket | Create buckets. |
| Modify Bucket Quota | Modify the capacity and object quota for buckets.Note:
|
| Add Object User | Add an object user and grant specified ACL
permissions to the user.Note: On the Bucket
page, select a bucket and its details page is displayed. Choose
Authorized Object User on the top row.
Then, the Authorized Object User page is
displayed wherein you can add or remove object users as well as
modify certain user's access permissions. |
| Remove Object User | Remove the selected object user. After being
removed, the object user cannot access the bucket. Proceed with
caution.Note: If the selected object user is a bucket owner, it
cannot be deleted. |
| Clear Configuration | Clear the access logging configurations for this bucket. |
| Delete | Delete the selected bucket.Note: This option will
delete all object data in the bucket and the deletion is
irrecoverable. Proceed with caution. |
Further Details About Bucket
Authorized Object User
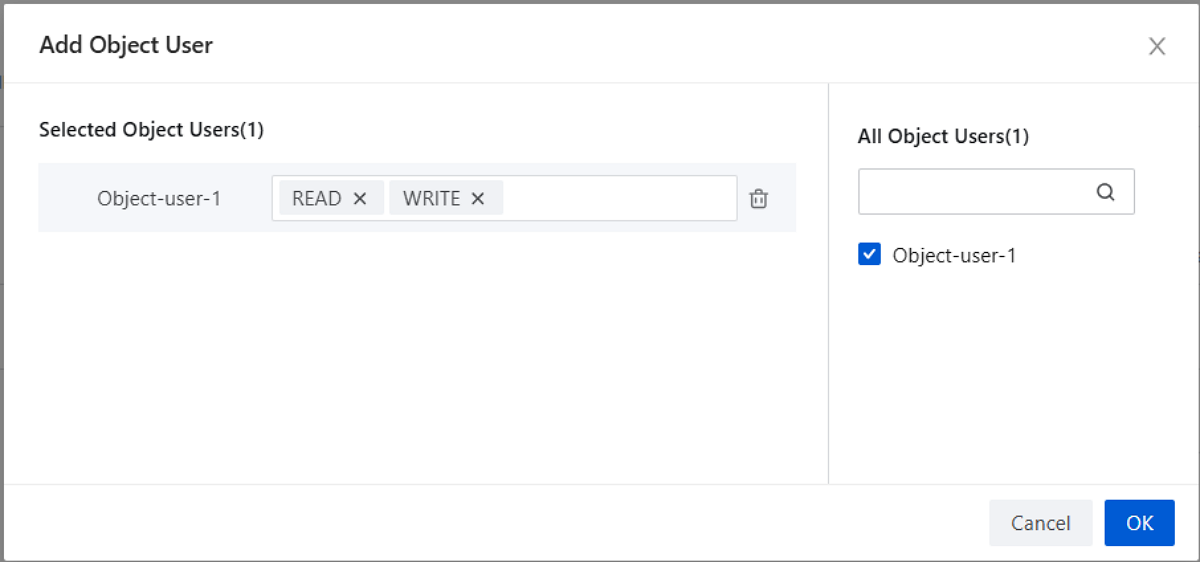
Add an Object User
- Select the object user to add in the All Object Users list on the right.
- Grant specified ACL permissions to the object user in the Selected Object Users list on the left.
- Click OK to add the object user.
Manage an Authorized Object User
| Action | Description |
|---|---|
| Add Object User | Add object users. |
| Modify Access Permission | Modify the ACL permissions for the object user.Note:
|
| Remove Object User | Remove the selected object user. After being
removed, the object user cannot access the bucket. Proceed with
caution.Note: If the selected object user is a bucket owner,
it cannot be deleted. |
Advanced Object Storage
ZStack ZStone supports managing third-party advanced object storage to meet the needs in complex object scenarios.
Prerequisites
- Ensure that the managed platform has authorized the license for the Object Storage module.
- Obtain the user name and password of the managed platform in advance.
- Verify the license for Block Storage on ZStack ZStone is in the valid status.
- Ensure an effective and two-way communication between ZStack ZStone and the managed platform.
Operational Procedures
- On the main menu of ZStack ZStone, choose .
- Choose the Multi-Platform Addition item and click Edit.
- On the Multi-Platform Addition pop-up, select Enable and then enter Platform IP & Port, User Name, and Password.