Bare Metal Management
Overview
ZStack ZSphere Bare Metal Management Service provides dedicated physical servers for your critical applications, delivering high performance and stability.
After completing server installation and basic setup, you can rapidly deploy bare metal chassis and create bare metal instances on the UI. The service supports unattended OS installation through bare metal templates, significantly improving operational efficiency. You can flexibly configure business networks for bare metal instances to meet different application requirements.
Concepts
- Bare metal template: With bare metal templates, preconfigured files can be quickly generated to achieve unattended bulk OS installation for bare metal instances.
- Bare metal cluster: A bare metal cluster consists of bare metal chassis.
- Deployment server: An independent server used for providing PXE services and console proxies for bare metal chassis.
- Bare metal chassis: Bare metal chassis is used to create bare metal instances and can be universally identified by the BMC interface and IPMI configuration.
- Bare metal instance: A virtualized instance of bare metal chassis.
Advantages
- Dedicated physical resources
Provides dedicated physical servers for your critical applications, ensuring high performance and stability.
- Efficient batch deployment
- You can add bare metal chassis in batches on the UI through manual addition or template import. You can batch configure IPMI addresses for multiple chassis at once, quickly building bare metal clusters.
- You can use bare metal templates for unattended OS installation, significantly improving operational efficiency.
- Flexible OS support
Compatible with mainstream Linux distributions (RHEL/CentOS series, Debian/Ubuntu series, and SUSE/openSUSE series) and custom platform OS versions, meeting you customized installation requirements.
- High-availability deployment architecture
Supports dual management node HA scenarios. It is recommended to attach separate deployment server for each bare metal cluster to avoid single points of failure and DHCP conflicts.
Scenarios
- High-security regulated environments
The financial and insurance industries that have high requirements over business deployment compliance and data security. In these scenarios, you can use Bare Metal Management to secure dedicated resources, data isolation, easy management, and operation-tracking. This way, you can ensure the reliability and security compliance of your key business system and data.
- High-performance computing
In supercomputing, genome sequencing, and other high-performance computing scenarios, the requirements over the computing performance, stability, and timeliness of the server are very high. The Bare Metal Management feature is fitting for these scenarios. In addition, the feature can be used for scenarios that require high throughput or high computing performance that can accommodate changing access requests and scenarios. Virtualization and hyperthreading may compromise some performance. Deploying a reasonable number of bare metal clusters can meet the high-performance computing requirements.
- Mission-critical databases
To meet business requirements, you may not want to deploy some key databases on virtual machines while want to deploy the databases on physical servers that feature dedicated resources, network isolation, and guaranteed performance. In these scenarios, you can use Bare Metal Management to provide dedicated high-performance physical servers for your applications.
Preparation
License
To use the ZStack ZSphere Bare Metal Management service, you need to purchase an individual plus license.
Network Planning
- Plan the deployment network.Make sure the PXE NIC of bare metal chassis connects to the deployment server's (PXE server) DHCP listening NIC through the deployment network.
- Access the bare metal chassis BIOS to confirm the NIC connecting to the deployment network has PXE enabled.
For some models, make sure the PXE NIC is the first boot NIC or disable PXE on all NICs with higher boot priority.
- No manual BIOS boot order adjustment is needed (typically HDD boot first). The system will automatically trigger a one-time PXE boot.
- For high availability, we recommend using independent deployment servers.
- The deployment server's DHCP listening NIC must be a dedicated NIC with IP address to provide stable DHCP service.
- Ensure no other DHCP services exist in the deployment network.
- Plan IP address allocation for each bare metal instance according to your production environment.
- Access the bare metal chassis BIOS to confirm the NIC connecting to the deployment network has PXE enabled.
- Configure bare metal chassis IPMI and plan IPMI network.Two configuration scenarios exist:
- For out-of-band control, ensure each bare metal chassis has BMC interface with pre-configured IPMI address, port, username and password. Plan IPMI network to connect management nodes to BMC interfaces.
- If devices support BMC ShareLink Management Port, disable it in BIOS to ensure only one IPMI address exists.
Figure 2. Disable BMC ShareLink Management Port 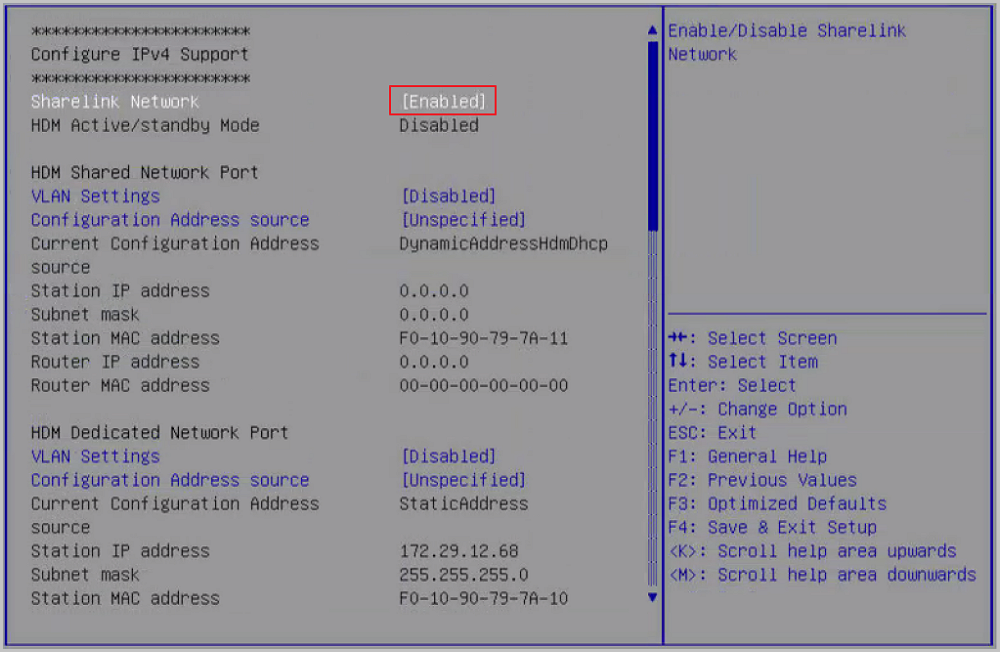
- Plan management and business networks.
- Plan management network to connect image storage and deployment servers to management nodes.
- For bare metal instance business networks, attach distributed switches to the corresponding bare metal cluster in advance.
Software Preparation
- The bare metal instance supports both custom platform OS and mainstream Linux distributions, including RHEL/CentOS series, Debian/Ubuntu series, and SUSE/openSUSE series.
- Only ISO format images are supported.
Quick Start Guide
- (Optional) Add custom bare metal templates.
Use templates to generate pre-configured files for unattended batch OS installation on bare metal instances. You can use either system templates or custom templates. For more information, see Bare Metal Template.
- Create a new bare metal cluster.
Provides dedicated cluster management for bare metal devices. For more information, see Bare Metal Cluster.
- Add bare metal chassis.
You can add bare metal chassis by manual addition or template import. For more information, see Bare Metal Chassis.
- Create bare metal instances.
For more information, see Bare Metal Instance.
Bare Metal Template
Template Syntax Rules
Bare metal templates include both system variables and custom variables to support various unattended deployment scenarios.
System templates only contain predefined system variables. Custom templates include both system variables and your custom variables.
REPO_URL
# Installation source URL created from selected ISO
# Can be commented out and manually specified via --url

USERNAME
# System username
# Default is root for RHEL/CentOS or SUSE/openSUSE (only password required)
# Required for Debian/Ubuntu systems

PASSWORD
# Password for the system user

NETWORK_CFGS
# NIC UUID and network UUID from UI
# Replaced after IP assignment (automatic or manual)

FORCE_INSTALL
# Whether to overwrite existing disk data automatically

PRE_SCRIPTS
# Pre-installation scripts

POST_SCRIPTS
# Post-installation scriptshostname
# Hostname
keyboard
# Keyboard
timezone
# Timezone- For kickstart templates: Refer to Red Hat official documentation.
- For preseed or autoinstall templates: Refer to Ubuntu official documentation.
- For autoyast templates: Refer to SUSE official documentation.
System Preconfigured Templates
| Template Name | Description |
|---|---|
| cloud_host_x86_64_v3 | For unattended deployment of ZStack ZSphere management node via the bare metal module. |
| cloud_expert_x86_64_v2 | For unattended deployment of ZStack ZSphere expert mode. Note: Expert Mode installation skips copying ISO files from /opt/zstack-dvd and does not generate Note: Expert Mode installation skips copying ISO files from /opt/zstack-dvd and does not generate zstack-local.repo in /etc/yum.repos.d/, significantly reducing installation time. |
| centos_7_x86_64_mini_v1 | For unattended deployment of CentOS 7 systems via the bare metal module. |
| centos_7_aarch64_min_v1 | |
| kylin_10_x86_64_min_v1 | For unattended deployment of Kylin V10 systems via the bare metal module. |
| kylin_10_aarch64_min_v1 | |
| openEuler_20_aarch64_min_v1 | For unattended deployment of openEuler 20 systems via the bare metal module. |
| opensuse_15_x86_64_mini_v1 | For unattended deployment of openSUSE 15 systems via the bare metal module. |
| ubuntu_16_x86_64_mini_v2 | For unattended deployment of Ubuntu 16 systems via the bare metal module. |
| ubuntu_18_x86_64_mini_v1 | For unattended deployment of Ubuntu 18 systems via the bare metal module. |
| ubuntu_20_live_server_x86_64_mini_v1 | For unattended deployment of Ubuntu 20 and Ubuntu 22 systems via the bare metal module. |
Add a Custom Template
Upload UTF-8 encoded custom bare metal template files for complex unattended deployment scenarios.
Before you begin
- Custom template file size must not exceed 50 KB.
- Custom template files must strictly follow syntax rules for their template type. For more information, see Template Syntax Rules.
Procedure
- In the navigation pane, choose .
- Select the root node.
- On the root node details page, click Customized Configuration.
- On the Customized Configuration tab, click Add Bare Metal Template.
-
On the Add Bare Metal Template dialog, set the following parameters:
- Name: Set a name for the bare metal template.
- Description: Optional. Enter a description.
- Operating System: Select the operating system for unattended deployment.
Supports both custom platform OS and mainstream Linux distributions, including RHEL/CentOS series, Debian/Ubuntu series, and SUSE/openSUSE series.
- Template Type: Select template type matching the OS.
- Custom platform-optimized OS: Select kickstart.
- RHEL/CentOS series: Select kickstart.
- Debian/Ubuntu series: Select preseed.
- Ubuntu Live: Select autoinstall.
- SUSE/openSUSE series: Select autoyast.
- Template Import: Upload an UTF-8 encoded custom template file.Note: Custom bare metal templates must strictly follow the syntax rules of the corresponding selected template type.
- Review the configuration and click OK.
Bare Metal Cluster
New Bare Metal Cluster
Before you begin
- The bare metal cluster requires a deployment server to provide PXE services for bare metal instances in the cluster.
- Each bare metal cluster supports only one deployment server, but one deployment server can be attached to multiple clusters.
- The bare metal cluster can attach distributed switches to provide networks for bare metal instances.
Procedure
- In the navigation pane, choose .
- Select the target data center.
- On the data center details page, click Bare Metal Management.
- On the Bare Metal Management tab, click .
-
In the New Bare Metal Cluster dialog, set the following parameters:
- Name: Set a name for the bare metal cluster.
- Description: Optional. Enter a description.
- Attach Deployment Server: Choose whether to attach a deployment server.
- Server Source: Select either a new or existing deployment server.If you select New Deployment Server, set the following parameters:
- Deployment Server Name: Set a name for the deployment server.
- DHCP Listening NIC: Enter the NIC device number connected to the deployment network.Note:
- This NIC must be connected to the deployment network of the bare metal chassis and have a configured IP address.
- The network where this NIC resides must not have any other DHCP services.
- Storage Path: Enter the local directory for PXE deployment images.
- Deployment Server IP: Enter the deployment server IP address.
- SSH Port: Default: 22.
- Username: Default: root. You can enter a regular user.
- Password: Enter corresponding user password.
- DHCP Start IP: Used for traversing IP ranges of DHCP services.
- DHCP End IP: Used for traversing IP ranges of DHCP services.Note: If not specified, the system will detect and filter used IP address as IP ranges according to this NIC IP addresses.
If you select Existing Deployment Server, select a deployment server.
- Server Source: Select either a new or existing deployment server.
- Review the configuration and click OK.
Deployment Server Management
Procedure
- In the navigation pane, choose .
- Select the target bare metal cluster.
- On the bare metal cluster Overview details page, you can check the configuration information of the attached deployment server.
-
On the bare metal cluster details page, click Actions.
- To attach a deployment server, choose Attach Deployment Server.
- To reconnect a deployment server, choose Reconnect Deployment Server.
- To detach the deployment server from the bare metal cluster, choose Detach Deployment server.
Delete a Bare Metal Cluster
Procedure
- In the navigation pane, choose .
- Select the target bare metal cluster.
- On the bare metal cluster details page, click .
Results
Deleting bare metal clusters will delete all bare metal chassis and bare metal instances in the cluster. Proceed with caution.Bare Metal Chassis
Add a Bare Metal Chassis
Manually Add a Bare Metal Chassis
Add single or multiple bare metal chassis by specifying an IPMI address or IPMI range.
Before you begin
Make sure bare metal chassis are connected according to the planned network topology. For more information, see Preparation.Procedure
- In the navigation pane, choose .
- Right-click the target bare metal cluster and choose Add Bare Metal Chassis.
- In the Select Bare Metal Chassis Addition Type dialog, select Manual Addition.
- Click Next.
-
In the Add Bare Metal Chassis dialog, set the following parameters:
- Name: Set a name for the bare metal chassis.
- Description: Optional. Enter a description.
- Bare Metal Cluster: Select the target bare metal cluster where the bare metal chassis reside.
- Addition Method: Choose a method to add IPMI addresses. Options include IPMI address and IPMI range.
- IPMI Address/Range: Enter an IPMI address or the start and end IP of an IPMI range.
- Port: Enter the IPMI port. Default: 623.
- Username: Enter the IPMI username.
- Password: Enter the IPMI password.
- Reboot Bare Metal Chassis: Choose whether to reboot the bare metal chassis to automatically obtain the hardware information. Default: unselected.
- Review the configuration and click OK.
Import a Bare Metal Chassis from a Template
Use a CSV configuration file. Enter bare metal chassis information in the specified format and upload the file to import bare metal chassis.
Before you begin
- Make sure bare metal chassis are connected according to the planned network topology. For more information, see Preparation.
- The template includes a header row and an example row. Delete or overwrite the example row when editing.
- Parameters marked with * are required.
- You can enter a single IPMI address or IPMI range.
For IP ranges, use commas to separate addresses and use ^ to exclude a range. Example: 127.0.0.1-127.0.0.10,^127.0.0.2-127.0.0.3
- Bare metal reboot option:
- Auto-reboot to obtain hardware information: Enter YES/Yes/yes/Y/y.
- Manual reboot: Enter NO/No/no/N/n or leave blank.
Procedure
- In the navigation pane, choose .
- Right-click the target bare metal cluster and choose Add Bare Metal Chassis.
- In the Select Bare Metal Chassis Addition Type dialog, select Template Import.
- Click Next.
-
In the Add Bare Metal Chassis dialog, set the following parameters:
- Template: Click Download Template and fill in bare metal chassis configuration according to the required format.
- Upload Template File: Upload the file.
- Click OK.
Bare Metal Chassis Status Management
| Deployment Status | Description |
|---|---|
| Unknown Hardware Info | The system failed to collect the hardware information of the bare metal chassis.Note:
|
| PXE Booting | The deployment server (PXE server) is remotely instructing the bare metal chassis to boot from the PXE NIC and assigning a dynamic IP. |
| PXE Boot Failed | The bare metal chassis failed to boot from the PXE NIC.Note: Check these requirements:
|
| Available | The bare metal chassis is ready for creating bare metal instances. |
| Allocated | The bare metal chassis has been used to create a bare metal instance. |
| Rebooting | The bare metal chassis is rebooting. |
| Status | Power Status |
|---|---|
Status includes:
|
Power status includes:
|
Access a Bare Metal Chassis
Procedure
- In the navigation pane, choose .
- Select the target bare metal chassis.
-
On the bare metal chassis details page, click Launch Console.
The system redirects to the IPMI management interface of the bare metal chassis.
- On the IPMI management interface, enter the configured IPMI username and password to log in.
Delete a Bare Metal Chassis
Procedure
- In the navigation pane, choose .
- Select the target bare metal chassis.
- On the bare metal chassis details page, click .
Results
Note: Deleting bare metal chassis will also delete bare metal instances created from these bare metal chassis. Proceed with caution.Bare Metal Instance
New Bare Metal Instance
Procedure
- In the navigation pane, choose .
- Select the target bare metal chassis.
- On the bare metal chassis details page, click .
-
In the New Bare Metal Instance dialog, set the following parameters to complete the basic information:
- Name: Set a name for the bare metal instance.
- Description: Optional. Enter a description.
- Bare Metal Chassis: Displays the bare metal chassis.
- Platform: Only Linux is supported.
- Image: Select an image for installing the OS.Note:
- ISO format only.
- You need to upload the image to the standalone image storage in advance.
- Supports both custom platform OS and mainstream Linux distributions, including RHEL/CentOS series, Debian/Ubuntu series, and SUSE/openSUSE series.
- Bare Metal Template: Select a bare metal template to quickly generate pre-configured files for unattended batch OS installation. For more information, see Bare Metal Template.
- Auto Overwrite Data: Choose whether to enable automatic data overwrite.Note:
- When enabled, the original data will be automatically overwritten when bare metal instances are deployed.
- Otherwise, the installation of operating systems may pause. You need to access the console to manually configure disks.
- Click Next.
-
Set the following parameters to complete system and network configurations:
You can configure system and network information for bare metal instances either individually or in batches.
- Operating System: Displays the selected OS.
- Username: Set a username. For batch configuration, default username is root.
- Password: Set a password.
- Network Device: Configure a business network for the bare metal instance.
- Device Type: Choose NIC or NIC Bond.
- NIC Bond Name: Set a name for the NIC bond, when selecting NIC bond as the device type.
- NIC Bond Type: Select bond mode when selecting NIC bond as the device type. Options include Mode 1 (Active-Backup) and Mode 4 (LACP).
- NIC: Select an NIC.
- Distributed Port Group: Select a distributed port group.
- Review the configuration and click OK.
Bare Metal Instance Status Management
| State | Deployment Status |
|---|---|
State includes:
|
Deployment status includes:
|
Delete a Bare Metal Instance
Before you begin
(Optional) The platform provides deletion protection for bare metal instances. You can define how resources are deleted by customizing the deletion policy in system parameters. By default, the platform adopts a never delete policy for bare metal instances. Deleted resources are first moved to the recycle bin and retained until you manually expunge them. For more information, see System Parameters.
Procedure
- In the navigation pane, choose .
- Select the target bare metal instance.
-
On the bare metal instance details page, click .
To delete multiple bare metal instances at once, go to the Bare Metal Management tab of the data center details page. Select the bare metal instances that you want to delete, then click .The delete button label changes based on the Bare Metal Instance Deletion Policy. When the deletion policy is set to immediate deletion, the button appears as "Delete". When the deletion policy is set to never delete, the button appears as "Move to Recycle Bin".
- In the confirmation dialog, acknowledge the risk and click OK.