Overview
This tutorial introduces how to install and deploy ZStack Cube Virtualization Edition.
Planning and Prerequisites
Configure Network Environment
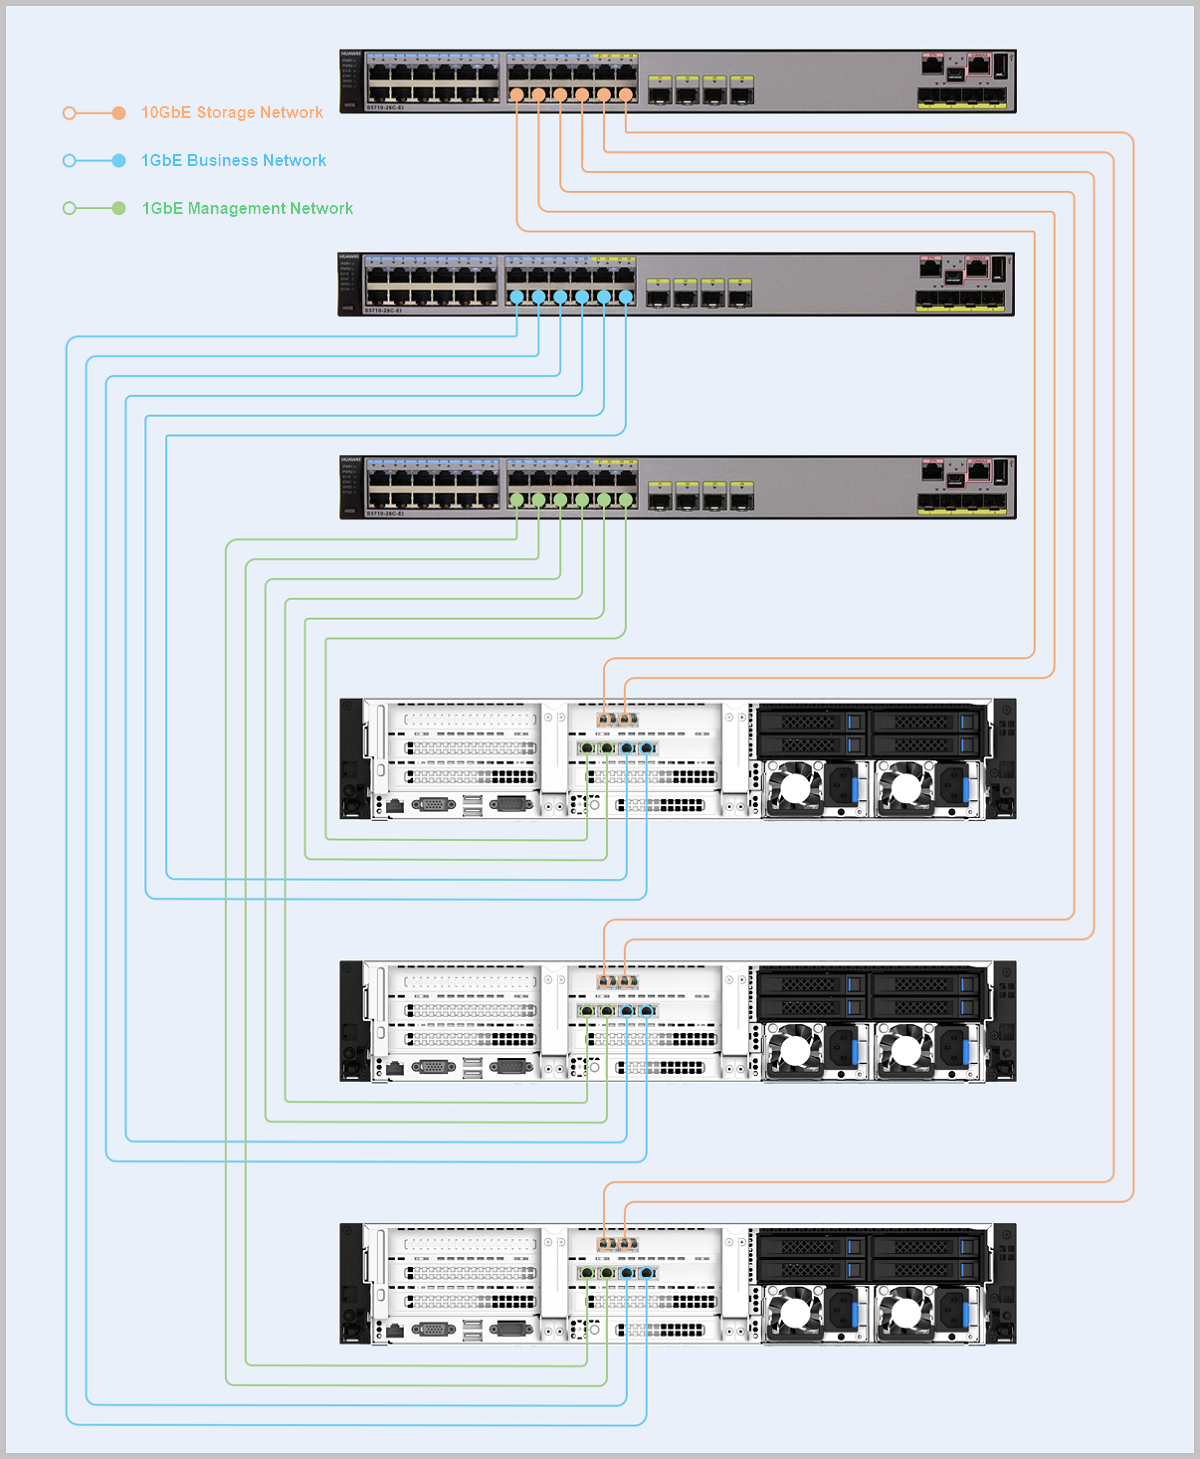
This section describes the network planning and switch connection requirements for deploying ZStack Cube Virtualization Edition.
Network Planning
- Management network: Used for managing and controlling the hardware resources of the platform. It is recommended to configure at least dual 1GbE networks.
- Storage network: Used for providing storage services and carrying storage traffic. It is recommended to configure a dual 10GbE network.
- Service network: The network used by virtual machines to provide application services externally. It is recommended to configure at least dual 1GbE networks.
- Migration network: A dedicated network for VM migration, which is recommended to be configured separately. If not configured, the management network will be used for VM migration by default.
 Note: During network deployment, it is recommended to ensure redundancy for
switches, NICs, and other equipment to meet high availability requirements and
avoid single points of failure.
Note: During network deployment, it is recommended to ensure redundancy for
switches, NICs, and other equipment to meet high availability requirements and
avoid single points of failure.Switch Connections
Note: The switch connection process for HCI appliances of different models may vary
slightly. Please proceed according to the specific model.- Configure switch ports in Trunk mode when you need to specify VLAN networks.
- Configure switch ports in Access mode when you don't need VLAN specification.
- Management network: Configure switch ports in Access mode.
- Service network: Configure switch ports in Trunk mode.
- Storage network: Configure switch ports in Access mode.
(Optional) Prepare Installation Package
The HCI appliance comes pre-installed with the ISO package, so you can skip this section. If you need to replace the ISO, follow the instructions in this section.
Procedure
-
Contact the official technical support team to obtain the installation
package.
Note: After downloading the software, verify the checksum using an MD5
verification tool to ensure package integrity.
-
Burn ISO using Fedora Media Writer.
-
After selecting the ISO image, keep the other options at their default
settings and click Write Disk.
Note: Burning the image will format the data on the USB drive. If you
have important data on your USB drive, make sure to back it up
before formatting.
-
After selecting the ISO image, keep the other options at their default
settings and click Write Disk.
What to do next
After the burning process completes, you can use the USB drive as a boot disk. The platform supports booting in Legacy mode or UEFI mode.Install Operating System
About this task
To install the operating system on each server, follow these steps:- Check server BIOS configurations.
- Select a boot device.
- Proceed with automated installation.
- Perform post-installation self-check.
- Confirm the OS version.
Procedure
-
Check server BIOS configurations.
The following BIOS settings are pre-configured before delivery and require no manual setup. Check these settings:
- Make sure the hardware clock matches local time zone.
- Confirm CPU VT and Hyper-Threading (HT) are enabled.
- Confirm automatic restart after power failure is enabled.
- Confirm CPU C State is disabled.
- In RAID controller configuration:
- Confirm two 480 GB SDD are configured in RAID1 for system disk.
- Confirm remaining disks are in JBOD passthrough mode.
- Confirm system boot disk is set as the first boot device.
-
Select a boot device.
Enter the BIOS system boot interface, select the prepared USB drive and begin installing the operating system.
图 1. System Boot 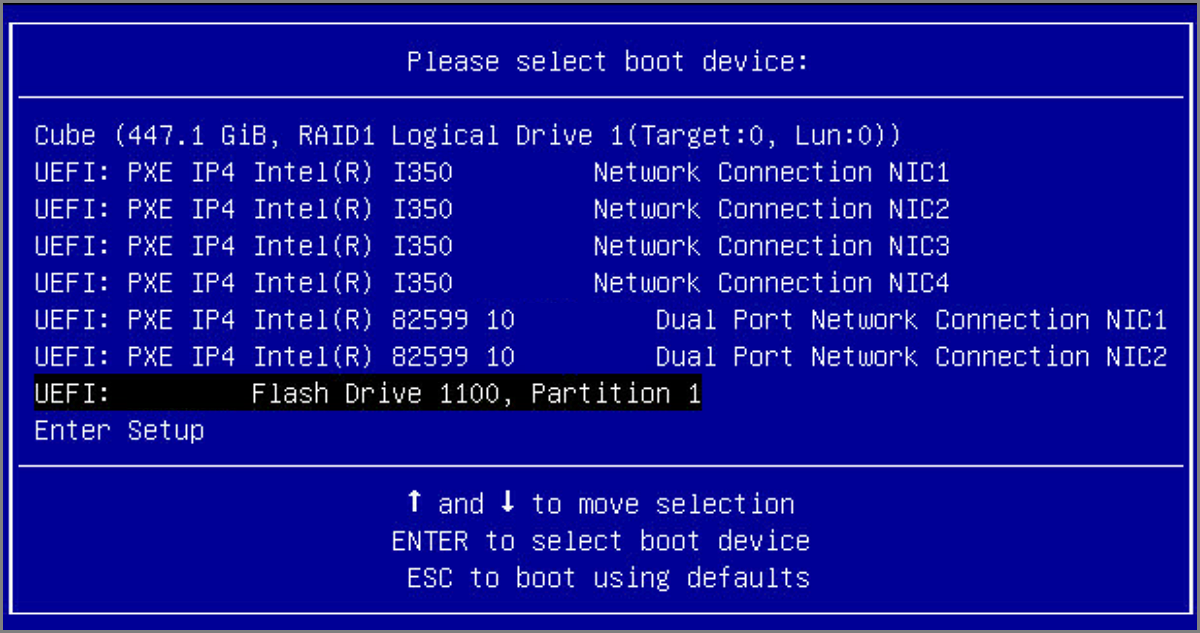
-
Proceed with automated installation.
Power on all network devices and servers. The installation process will begin automatically after all servers boot into the operating system.Note: The
installation will format all disks. Proceed with caution.
图 2. Install OS 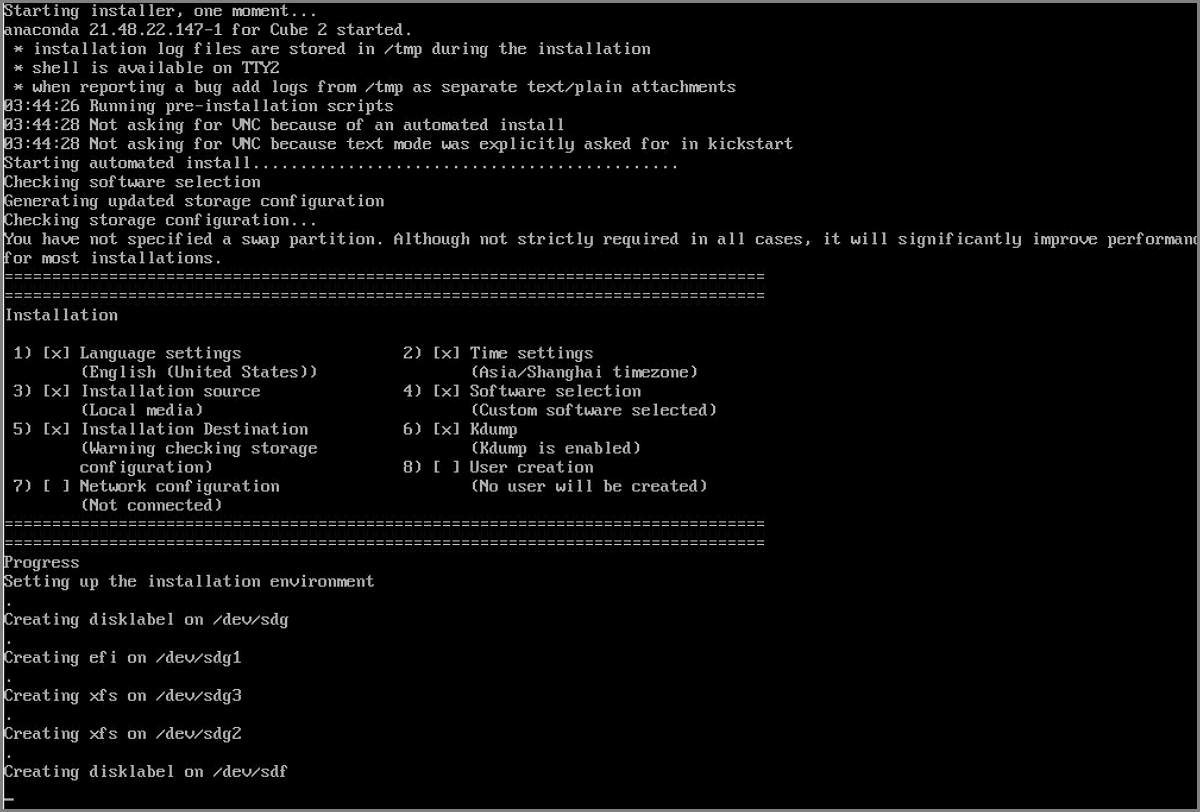
-
Perform post-installation self-check.
After the automatic installation is completed, the system verifies the following items:
Hyper_Converged_file: Check hyper-converged configuration files.Bootstrap_IP: Check the bootstrap deployment IP address.Bootstrap_Agent: Check thehyperconverged-bootstrap.servicestatus.Storage_path: Check storage-related files.License_path: Check license-related files.Serial_Number: Check the machine serial number.Data_Disk_Size: Check disk specifications.
Note: If the self-check fails, a red error message will appear,
indicating issues during the OS installation process. Please contact
official technical support for verification.图 3. Self-Check 
-
Confirm the OS version.
Log in to the server operating system and run
bootstrap
                        version
to check and confirm the OS version.
Start bootstrap_ui Service
After completing network connections and powering on all hosts in the HCI appliance,
select one server for environment deployment. Before deploying the platform through the UI,
configure the bootstrap deployment IP and start the bootstrap_ui
service.
Procedure
- Log in to the management node system as root. The default password for the root account is cube_password.
-
Run
bootstrap init_uito configure the bootstrap deployment IP and start thebootstrap_uiservice.When you run this command, the system automatically scans all NICs. After the scanning is completed, select one NIC from management network/storage network/other network segment to start the
bootstrap_uiservice. It is recommended to use the management network for bootstrap service. After saving the configuration, the system successfully starts thebootstrap_uiservice.[root@localhost ~]# bootstrap init_ui //Configure bootstrap_ui Step 1: Choose Network Interface //Choose interface for bootstrap IP configuration ---------------------------------------------------------------- Please select an interface (enter the number) //Select network interface Step 2: Network Configuration for Selected Interface //Network interface settings --------------------------------------------------------------- 1) Enter IP Address (default: xxx.xx.xx.xxx) //Set IP address (recommended: management network IP) 2) Enter Subnet Mask (default: xxx.xxx.x.x) //Set netmask 3) Enter Gateway (leave blank if none) //Set gateway (optional) 4) Enter VLAN ID [1-4096] (leave blank if none) //Set VLAN ID (must match switch configuration) Step 3: Confirmation //Confirm settings -------------------------------------------------------------- Choose an option 1) Confirm configuration 2) Modify configuration 3) Exit without applying changes
Deploy HCI Platform
Enter Welcome Page
Procedure
-
After successfully starting the
bootstrap_uiservice, connect your laptop to the business network switch.Configure your laptop with an IP address in the same subnet as thebootstrap_uiIP. For example, if the configuredbootstrap_uiIP is 172.26.30.242, set your laptop IP to 172.26.30.245. -
Open the URL http://172.26.30.242:18080 in your browser to access the
HCI deployment wizard.
图 1. Enter Welcome Page 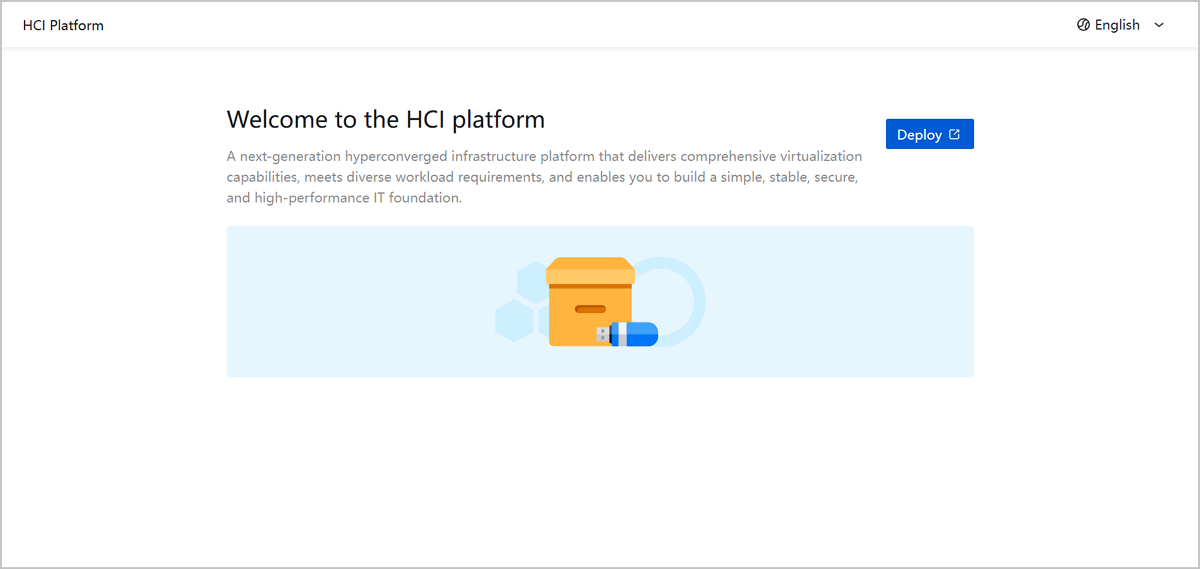
- On the wizard page, click Deploy.
Discover Hosts
The system automatically scans and displays host hardware information. Select at least three hosts for deployment.
Before you begin
- It is recommended to select hosts with the same version or upgrade the selected hosts to the same version before the deployment.
- The selected host must have at least one 10GbE NIC with the same name and in UP status.
- The disk types of the selected hosts must be consistent. For example, all hosts should have either all SSD disks or a mix of SSD and HDD disks.
Procedure
-
On the Discover Host page, select the hosts you want to
deploy.
Note: To scan for newly added hosts, click Rescan.
-
Confirm your selection and click Next.
图 1. Discover Host 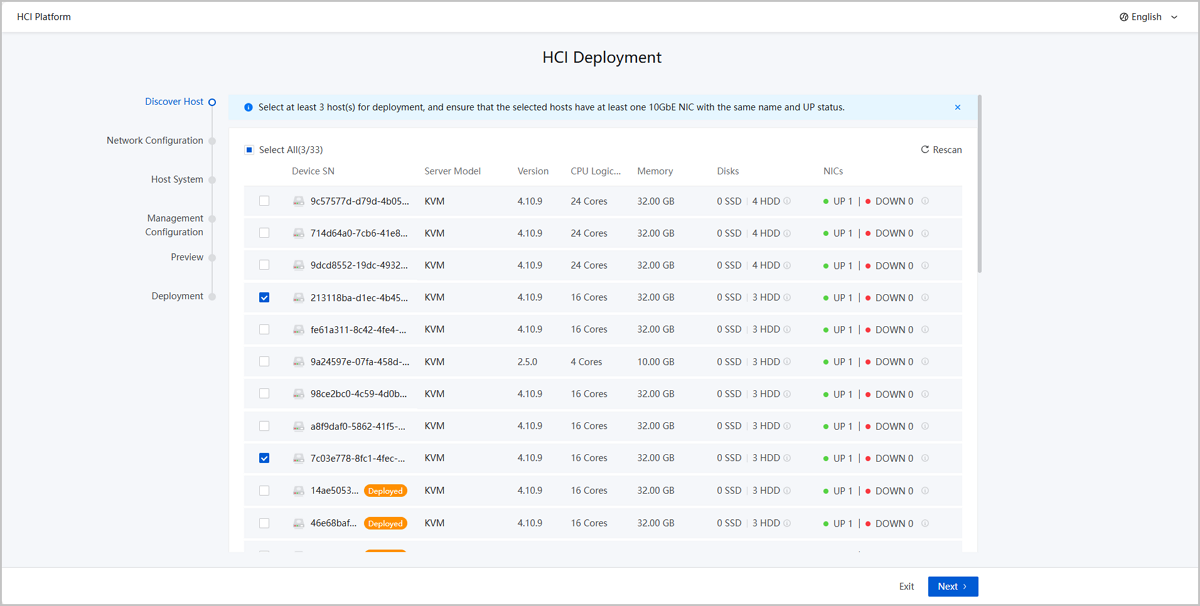
Configure Networks
Configure the management network, storage network, business network, and BMC network according to your network plan.
Procedure
-
Configure management network.
Set the following parameters:
- NIC: Select one or two NICs with the same speed for Bond configuration.
- Bond Mode: Supports Link Aggregation and
Active-Backup mode.Note:
- Management or business network Bond mode must match switch configuration. Use Link Aggregation mode only when the switch is configured for dynamic/static LACP. Use Active-Backup mode when the switch has no link aggregation.
- When configuring a single NIC, only Active-Backup mode is supported.
- IP Range: Set the management network IP range.
- Netmask: Configure the management network netmask.
- Gateway: Specify the gateway address
- VLAN ID: Optional. Enter VLAN ID if the
management network uses VLAN.Note:
- When switch ports are in Access mode, the HCI platform must be configured as NoVLAN network and leave VLAN ID blank.
- When switch ports are in Trunk mode, the HCI platform must be configured as VLAN network and enter the corresponding VLAN ID.
图 1. Configure Management Network 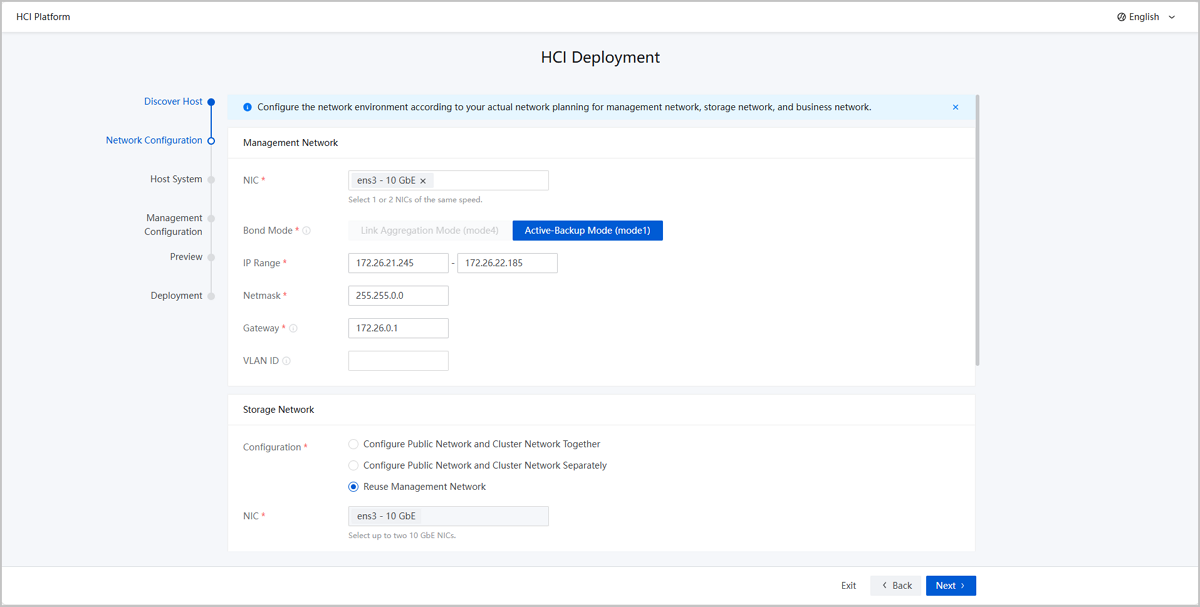
-
Configure storage network.
Set the following parameters:
- Configuration:
- Configure Public Network and Cluster Network Together: Shares the same configuration between public network and cluster network, including NICs, Bond mode, IP range, netmask, and VLAN ID.
- Configure Public Network and Cluster Network Separately: Requires independent configuration for public network and cluster network, including NICs, Bond mode, IP range, netmask, and VLAN ID.
- Reuse Management Network: Applies management network configuration to both storage networks. Any management network changes will automatically update the storage networks.
Note:
- When configuring a single NIC, only Active-Backup mode is supported.
- When switch ports are in Access mode, the HCI platform must be configured as NoVLAN network and leave VLAN ID blank.
- When switch ports are in Trunk mode, the HCI platform must be configured as VLAN network and enter the corresponding VLAN ID.
- Storage networks require 10GbE NICs. You cannot reuse 1GbE management NICs for storage networks.
图 2. Configure Storage Network 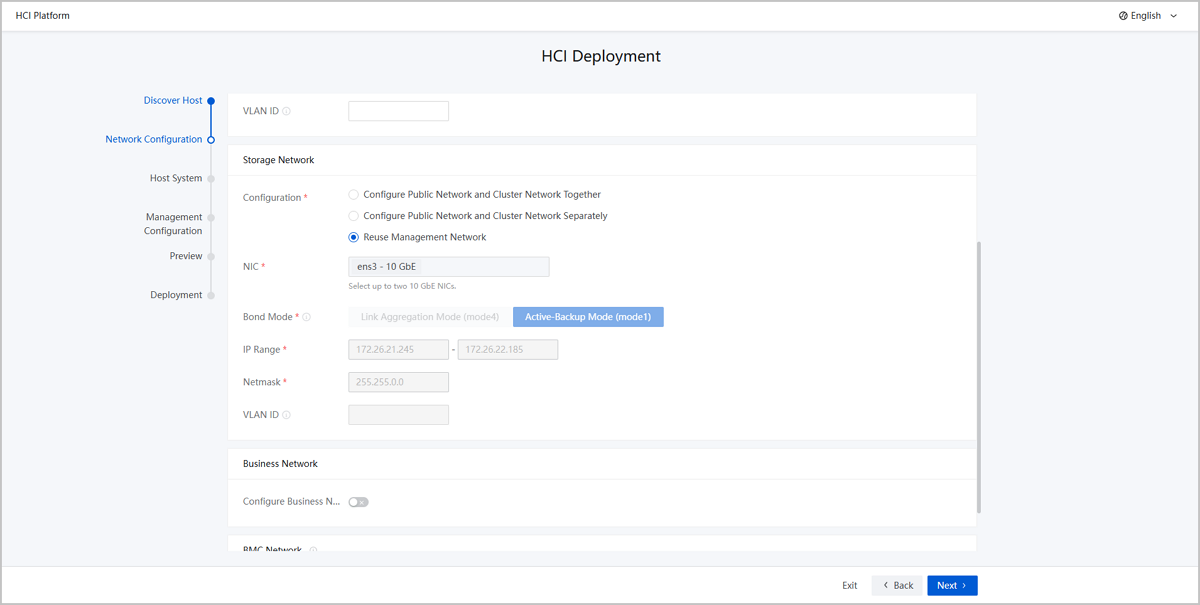
- Configuration:
-
(Optional) Configure business network.
Set the following parameters:
- Configure Business Network: Choose whether to configure business network. By default, this switch is enabled.
- NIC: Select one or two NICs with the same speed for Bond configuration.
- Bond Mode: Supports Link Aggregation and
Active-Backup mode.Note:
- Management or business network Bond mode must match switch configuration. Use Link Aggregation mode only when the switch is configured for dynamic/static LACP. Use Active-Backup mode when the switch has no link aggregation.
- When configuring a single NIC, only Active-Backup mode is supported.
- IP Range: Specify the business network IP range.
- Netmask: Set the business network netmask.
- VLAN ID: Optional. Enter VLAN ID if the
business network uses VLAN.Note:
- When switch ports are in Access mode, the HCI platform must be configured as NoVLAN network and leave VLAN ID blank.
- When switch ports are in Trunk mode, the HCI platform must be configured as VLAN network and enter the corresponding VLAN ID.
图 3. Configure Business Network 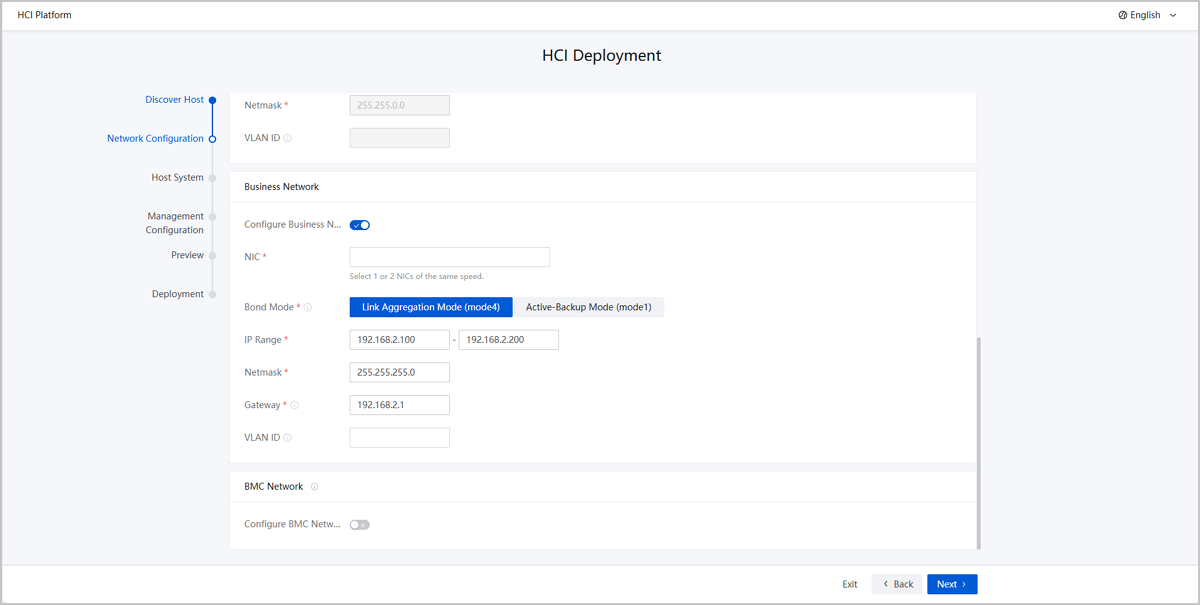
-
(Optional) Configure BMC network.
Set the following parameters:
- Configure BMC Network: Choose whether to
configure BMC network for host IPMI remote connection and
management. By default, this switch is disabled.Note: Before
configuration, make sure each host has a BMC NIC
attached.
- IP Range: Specify the BMC network IP address range.
- Netmask: Set the BMC network netmask.
- Gateway: Configure the gateway address.
图 4. Configure BMC Network 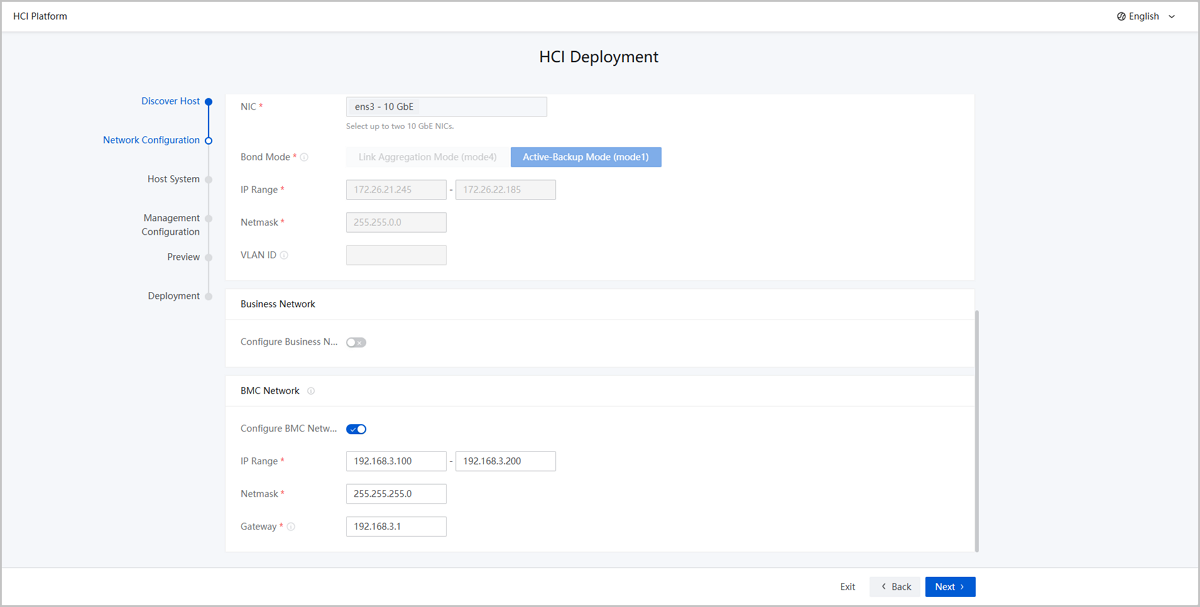
- Configure BMC Network: Choose whether to
configure BMC network for host IPMI remote connection and
management. By default, this switch is disabled.
- Confirm the configuration and click Next.
Configure Host System Information
Configure system information in bulk, including hostnames and root passwords, with support for modifying individual host configurations.
Procedure
-
Set host information in batch.
Set the following parameters:
- Hostname: Set the hostname and starting sequence number for the first host. Subsequent hosts will automatically generate hostnames based on this sequence.
- Root Password: Set a root password for all hosts.
- Confirm Root Password: Re-enter the root password for verification.
-
(Optional) Adjust host configurations.
The Host System page displays all host information including device SN, hostname, management IP, and storage IP. You can sort by device SN and modify hostname and IP address.Note:
- When starting the
bootstrap_uiservice, if the bootstrap IP is configured on the management network or storage network segment, and this IP address is set as the host's management or storage network IP, then this IP address cannot be modified or reordered. - When the storage network and management network are shared, only the management IP can be modified manually. The storage network will update automatically.
- When Public Network and Cluster Network are shared, only the Public IP can be modified manually. The Cluster IP will update automatically.
- When starting the
-
Confirm the configuration and click Next.
图 1. Configure Host System Information 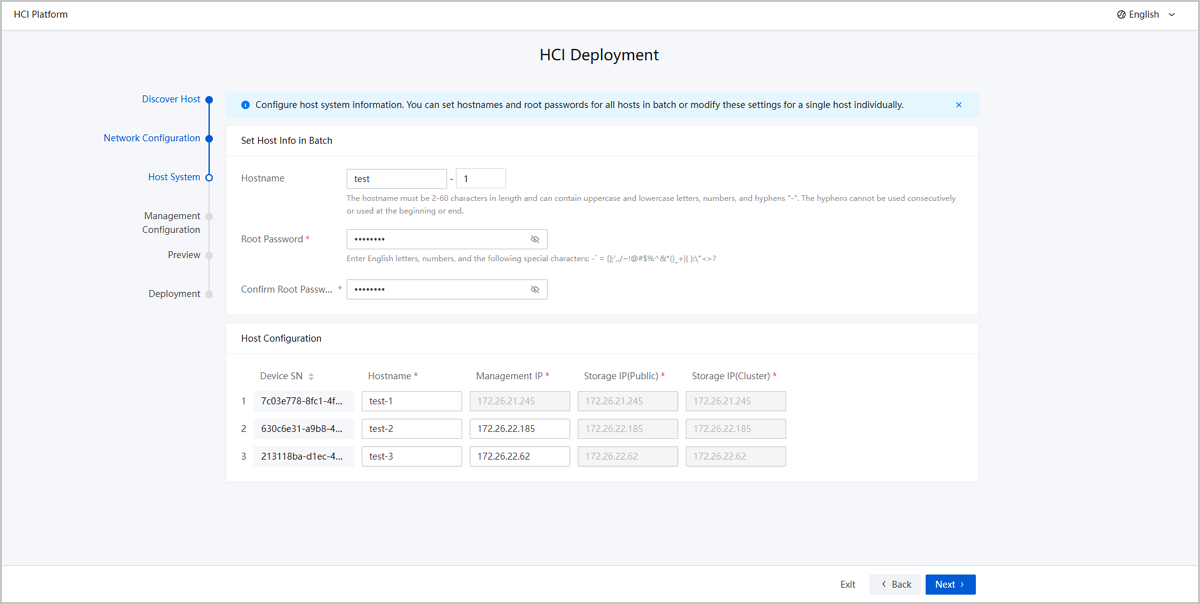
Configure Management Node
Configure the HCI platform management node and distributed storage.
Procedure
-
Configure the HCI platform management node.
Set the following parameters:
- Management Node: Select two hosts with identical versions as HCI platform management nodes.
- Management Node VIP: Enter the virtual IP address for management nodes.
- DNS Server: Optional. Choose whether to configure DNS server for network resolution services.
- NTP Server: Set NTP server address, supporting both internal and external NTP servers. By default, the system uses an internal NTP server, indicating the use of a node as the internal time source. If you have an NTP server address, you can set it to an external NTP server.
-
Configure distributed storage.
Set the following parameters:
- Storage System: Select your distributed storage product based on actual conditions.
- Management Monitor Role: Select three hosts to serve as both monitoring and management nodes for the distributed storage system.
- Replicas: Displays the current replica count for distributed storage.
- Deployment Mode: Determined by the type of disks
mounted on each host.
- All-Flash pool: When all hosts use SSD disks.
- Normal pool: When all hosts use HDD disks.
- Hybrid pool: When hosts use both SSD and HDD disks.
-
Confirm the configuration and click Next.
图 1. Configure Management Node 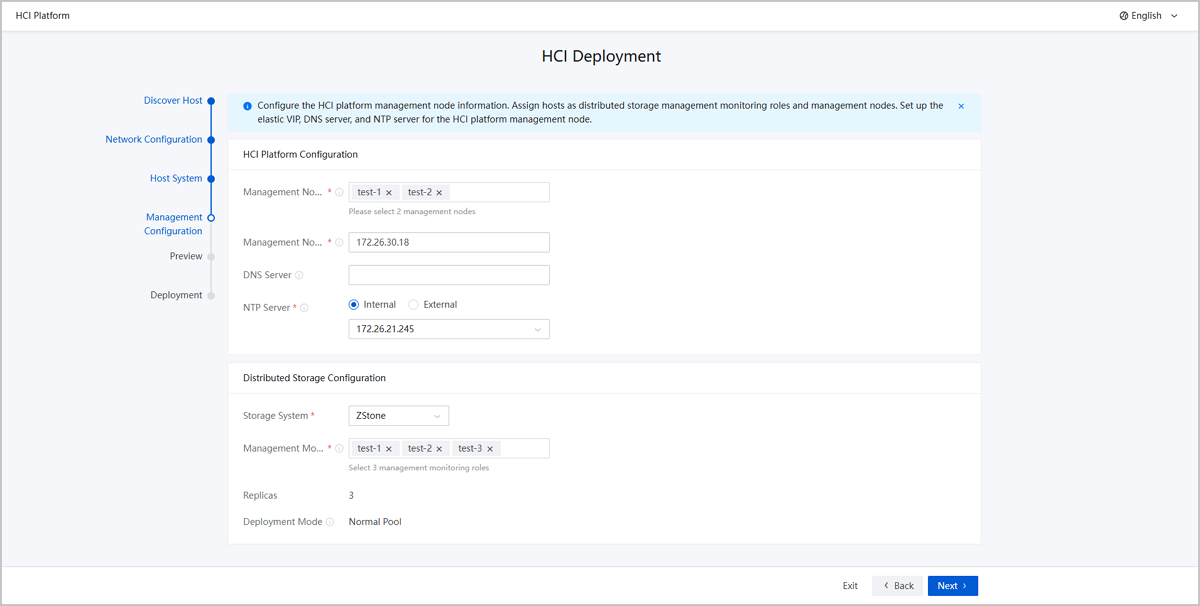
Preview
Procedure
- The interface displays all completed configurations, which you can view either by Device or by Batch Configuration.
-
Confirm the configuration and click Next to begin
deployment.
图 1. Preview 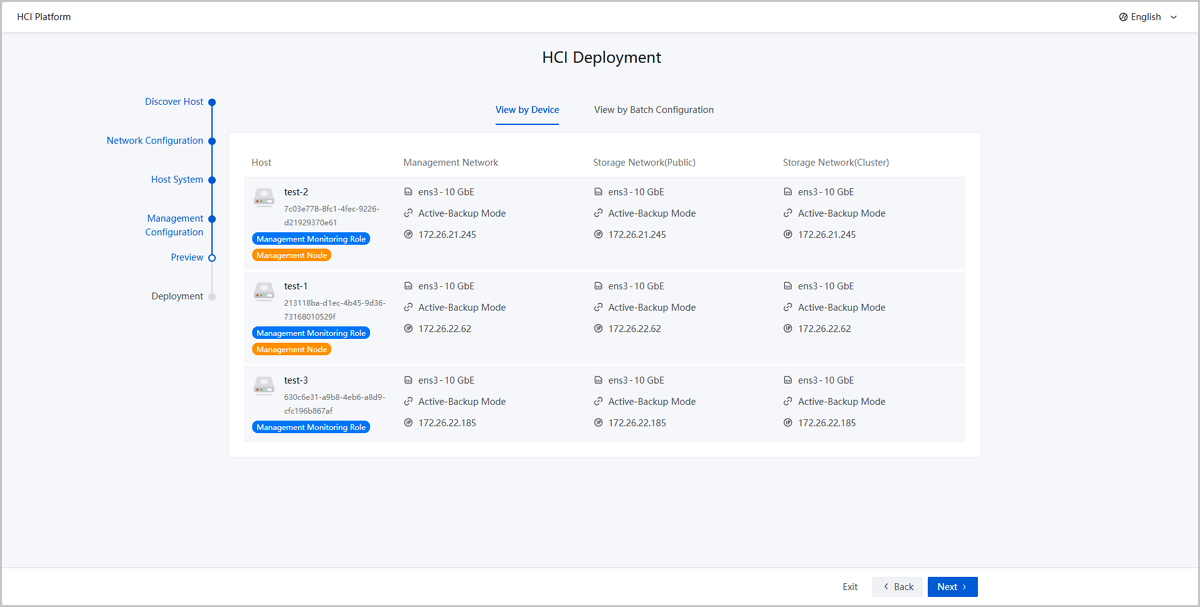
Deploy HCI Platform
Procedure
-
Wait for the deployment to complete.
The deployment page displays real-time progress for each host in list format, with options to view logs and export configuration.Note: If the deployment
fails, click Retry Now to reinstall affected
hosts.
图 1. Deploy Host 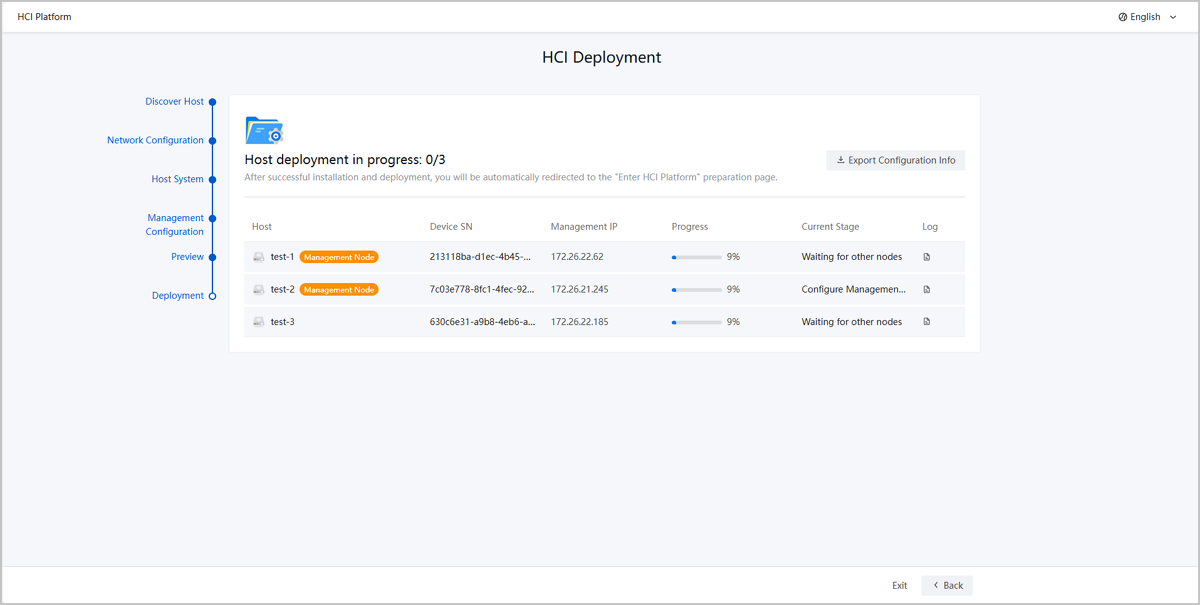
-
After successful deployment, click Enter HCI Platform to
log in to the platform.
图 2. Enter HCI Platform 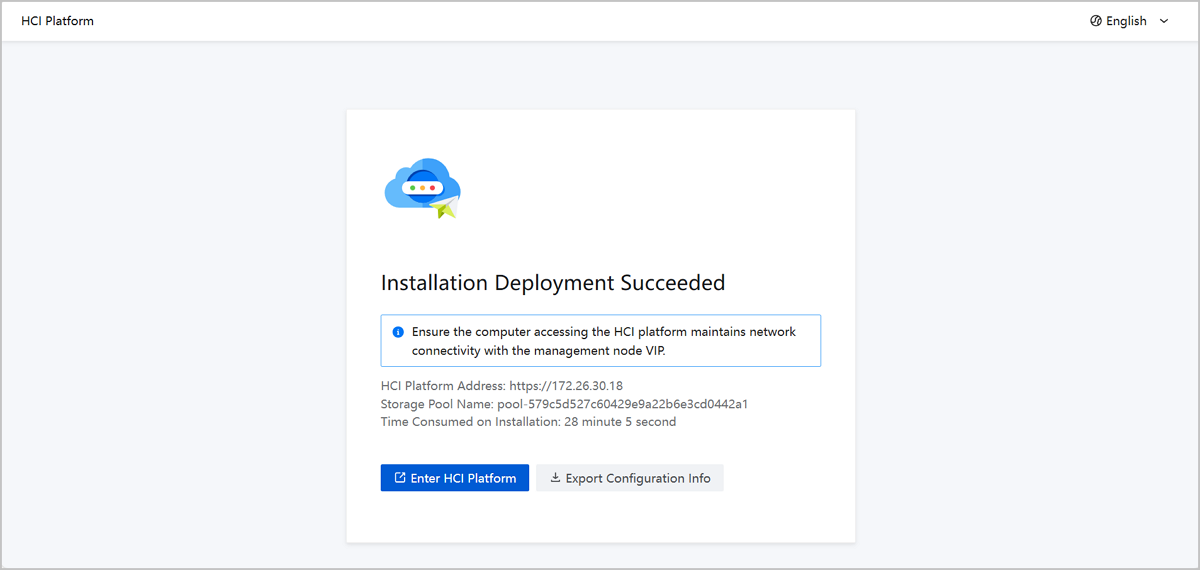
What to do next
- The system provides comprehensive bootstrap CLI tools for additional
configuration tasks, including database inspection and firewall rule management.
Run
bootstrap -hto view available commands. - After logging in to the HCI platform, follow the wizard to complete initial environment configuration.
- Starting from ZStack Cube Virtualization Edition 2.4.10.20, for ZCE-X distributed storage, if you need to access the distributed storage management interface directly, the default login credentials are admin/Admin@123