Storage Service
You can rapidly deploy a distributed storage cluster or seamlessly take over an external distributed storage system. You can centrally manage and utilize distributed storage within the platform, maximizing existing storage resources. The platform provides storage monitoring capabilities, allowing direct access to distributed storage overviews, node details, performance metrics, and disk health status.
Deploy Distributed Storage in 3 Steps
Step 1: Upload Installation Package
Before you begin
- You have prepared the installation package of the distributed storage software.
- The platform management node must be added as a host.
- At least 2 distributed storage nodes have been added as hosts to the platform, and the storage network has been configured for storage nodes using Kernel adapters from hosts or distributed port groups. For more information about configuring storage network, see Create a Kernel Adapter.
- To ensure the distributed storage can achieve MN HA together with the platform, we recommend setting up management node HA in MN Ops before deploying the distributed storage. For more information about setting up management node HA, see Installation and Upgrade Tutorial.
Procedure
- In the navigation pane, choose .
- On the Storage Overview page, click Upload.
-
In the Upload Installation Package dialog, set the following parameters:
- Server IP: Display the IP address of the current management node.
In a dual management node environment, this filed displays the IP address of the node where the VIP resides.
- Storage Path: Specify a directory path on the server to store uploaded installation packages and their extracted files.
 Note:
Note:
- Ensure the directory has sufficient available space. Otherwise, installation may fail.
- Do not use system directories such as /, /dev, /proc, /sys, /usr/bin, /bin, or /opt. Using system directories may cause server instability.
- Upload By: Select how to upload an installation package. Options include URL and Local File.
- Server IP: Display the IP address of the current management node.
- Click OK.
Step 2: Deploy Management Service
Procedure
- On the Storage Overview page, click Install.
-
In the Deploy Management Service dialog, set the following parameters:
- VIP: Displays the management node IP address in a single management node environment, or the VIP address in a dual management node environment.
- MN IP: Displays the IP address of single or dual management nodes. Enter the management node SSH port and password.
- Database Password: If left blank, the initial database password will be used by default. If the password has been changed, enter the new password here.
- Review the configuration and click OK.
Step 3: Initialize Distributed Storage
Before you begin
Before proceeding, you need to set up the storage network for distributed storage nodes using Kernel adapters from hosts or distributed port groups. For more information about configuring storage network, see Create a Kernel Adapter.Procedure
- On the Storage Overview page, click Initialize.
- In the Initialize Distributed Storage dialog, complete the initialization and storage configurations.
-
For Initialization, set the following parameters:
- Storage MN IP: Select the management node IP of the distributed storage.
- Cluster: Display the cluster location.
- Admin Network: Enter the admin network CIDR to manage and configure the storage cluster.
- Cluster Network: Enter the cluster network CIDR to monitor data disks and synchronizing replicas among nodes in the storage cluster.
- Public Network: Enter the public network CIDR for the storage cluster to provide external services.
- Time Sync Server IP: This parameter is displayed based on the storage service type detected by the system. Enter the time synchronization server IP to ensure time synchronization between all nodes in the storage cluster.
- Gateway Network: This parameter is displayed based on the storage service type detected by the system. Enter the gateway network to allow user services to access storage resources through this network.
- Review the configuration and click Next.
- For Storage Configuration, click Add to add distributed storage nodes.
-
Configure manager and monitor roles.
For data security, we recommend assigning the manager (Mgr) and monitor (Mon) role to 3 nodes.
-
Specify a hostname for the distributed storage node.
Note:
- Length: 2 to 60 characters.
- Allowed characters: Uppercase and lowercase letters, numbers, and hyphens (-).
- No consecutive hyphens, nor start or end with a hyphen.
- When adding nodes, a suffix (-1, -2, -3, and so on) is automatically appended to ensure uniqueness.
- Review the configuration and click OK.
What to do next
- For ZCE-X v6.4.200.1, the default login credentials are admin/Admin@123
- For ZCE-X v5, the default login credentials remain admin/password
Take Over Existing Distributed Storage
Take Over Distributed Storage
Once the storage package installation, network configuration, and system initialization are complete on the server, or if the distributed storage is already running and in use, you can choose this way to take over the distributed storage.
Procedure
- In the navigation pane, choose .
- On the Storage Overview page, click Take Over Existing Storage.
-
In the Take Over Distributed Storage dialog, set the
following parameters:
- Storage MN IP: Enter the management node IP of the distributed storage to be taken over.
- Storage Service Check: Click Check to check if storage services exist and whether the connection can be established successfully.
- Username: Enter the username for logging into the distributed storage platform.
- Password: Enter the login password.
- Access Token: Fill in this parameter as needed based on the detected storage service type.
- Confirm the configuration and click OK.
What to do next
- For ZCE-X v6.4.200.1, the default login credentials are admin/Admin@123
- For ZCE-X v5, the default login credentials remain admin/password
Cancel Takeover of Distributed Storage
Canceling the takeover of distributed storage will not affect any stored data, but you will no longer be able to manage the distributed storage system.
Procedure
- In the navigation pane, choose .
- On the Storage Overview page, click Cancel Takeover.
- In the confirmation dialog, read the risk warning and click OK after you acknowledge the risk.
Distributed Storage Resource Management
Storage Pool
Create a General Purpose Pool
On the main menu of ZStack Cube Virtualization Edition, choose . On the Storage Pool page, click Create Storage Pool.
- Block Storage Pool
- Object Storage Pool
- File Storage Pool
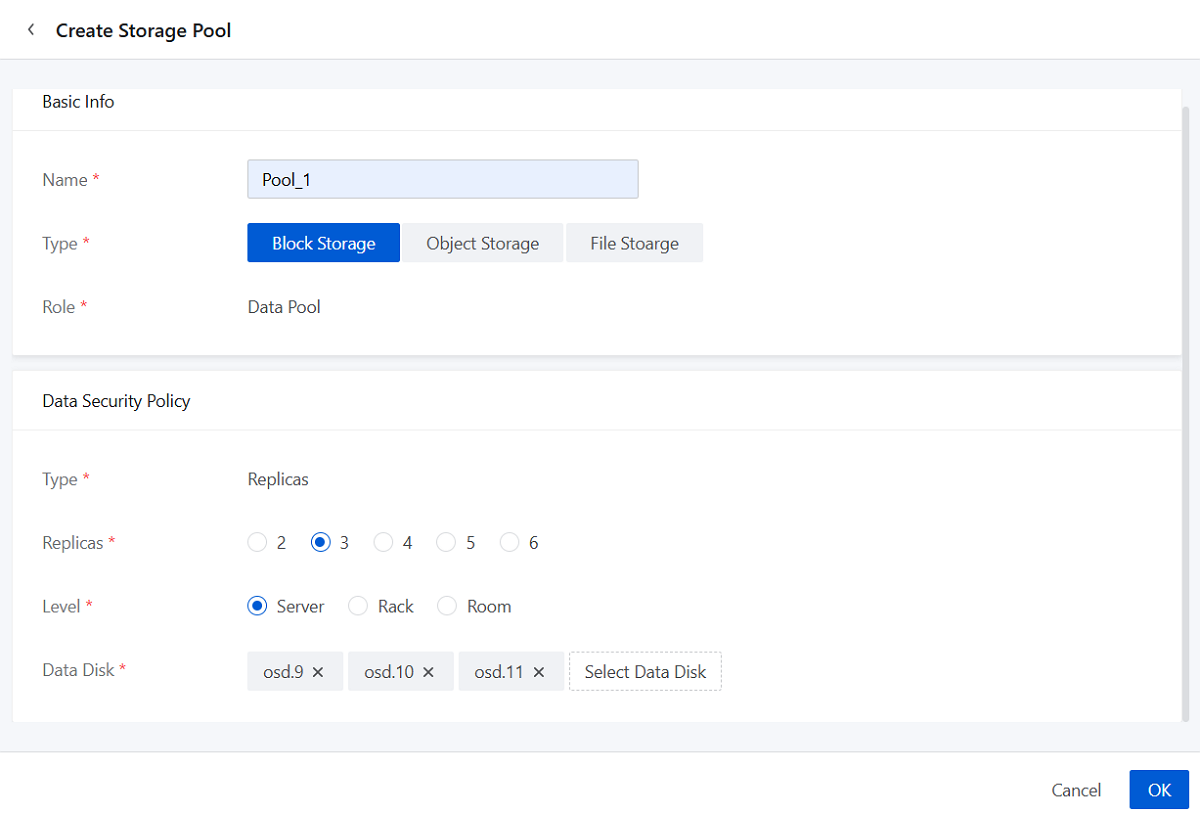
Create a Block Storage Pool
- Name: Set the name for the storage pool.
Naming rules: 1-1288 characters long. A name can contain Chinese characters, letters, digits, spaces, hyphens (-), underscores (_), periods (.), parenthesis (), colons (:), and plus signs (+).
- Type: Select Block Storage.
- Role: The default role is Data Pool and does not support modification.
- Data Security Policy:
- Type: The default type is Replicas and does not support modification.
- Replicas: Set the number of replicas for the
storage pool in the 2-6 value range.Note: In production
environments, we recommend setting at least 3 replicas to ensure
data security.
- Level: Select the level of the failure domain (Server/Rack/Room) according to your topology plan.
- Data Disk: Select data disks based on the topology canvas.Note:
- Selected data disks must meet the redundancy level requirements.
- Select data disks of similar sizes if possible.
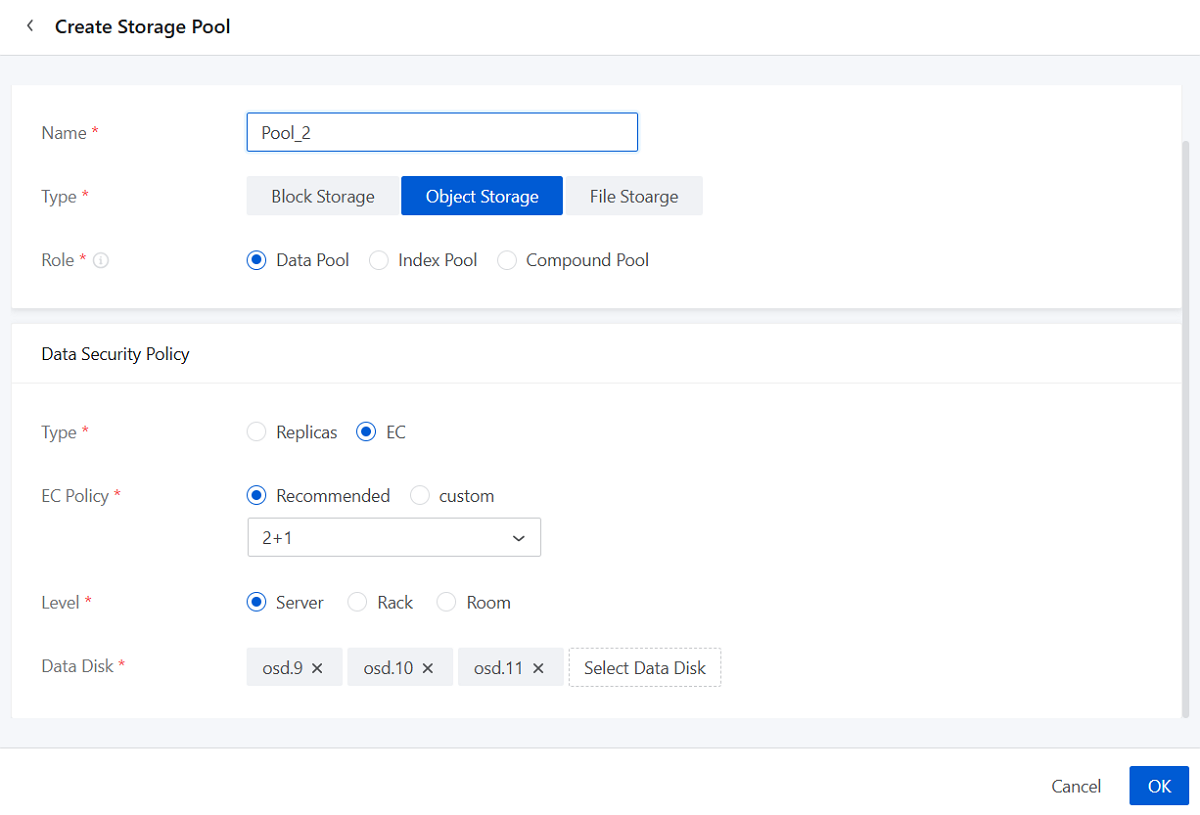
Create an Object Storage Pool
- Name: Set the name for the storage pool.
Naming rules: 1-128 characters long. A name can contain Chinese characters, letters, digits, spaces, hyphens (-), underscores (_), periods (.), parenthesis (), colons (:), and plus signs (+).
- Type: Select Object Storage.
- Role: Select the role of the storage pool (Data Pool,
Index Pool, and Compound Pool).Note:
- Data Pool: Stores data.
- Index Pool: Stores the index information of stored objects.
- Compound Pool: Supports multi-purpose resuse and can be selected as an Index Pool or a Data Extra Pool in Storage Policy.
- Data Security Policy:
- Type: Select data redundancy type
(Replicas/EC).
- If you select Replicas, set the following parameters:
- Replicas: Set the number of replicas for the storage pool in the 2-6 value range.
Note:
- Storage pools with Index Pool or Compound Pool role only support one redundancy policy, that is, Replicas.
- In production environments, we recommend setting at least 3 replicas to ensure data security.
- If you select EC, set the following parameters:
- EC Policy: Set the EC policy
for storage (Recommended/Custom).
- Recommended: Select from six recommended values: 2+1, 4+2, 8+3, 4+2:1, 8+2:1, 16+2:1.
- Custom: Customize the
EC policy. Enter the number of data and parity
blocks.Note: Positive integers only. Make sure
that the number of data blocks is greater than the
number of parity blocks, and parity blocks do not
exceed 4.
Note:
- An EC policy consists of data blocks and parity blocks. Data blocks indicate the number of data shards, while parity blocks indicate the number of parity shards generated through the algorithm. Taking the 4+2 EC policy on the server level as an example. This policy ensures data availability even when 2 servers fail.
- Disk Utilization is displayed in real time. The formula for calculating disk utilization: data blocks/(data blocks + parity blocks).
- EC Policy: Set the EC policy
for storage (Recommended/Custom).
- If you select Replicas, set the following parameters:
- Level: Select the level of the failure domain (Server/Rack/Room) according to your topology plan.
- Data Disk: Select data disks to add based on the
topology canvas.Note:
- Selected data disks must meet the failure domain requirements of the data security policy.
- Select data disks of similar sizes if possible.
- Type: Select data redundancy type
(Replicas/EC).
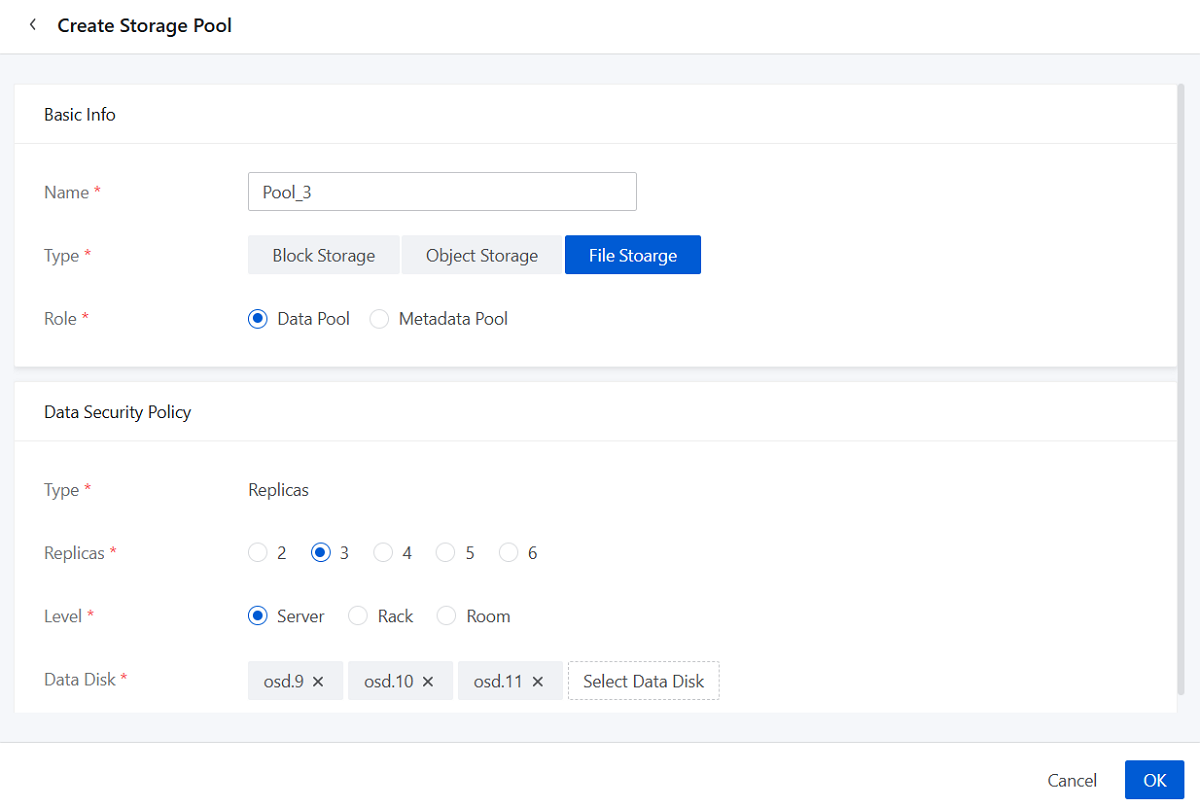
Create a File Storage Pool
- Name: Set the name for the storage pool.
Naming rules: 1-1288 characters long. A name can contain Chinese characters, letters, digits, spaces, hyphens (-), underscores (_), periods (.), parenthesis (), colons (:), and plus signs (+).
- Type: Select File Storage.
- Role: Select the role of the storage pool (Data Pool/Metadata Pool).
- Data Security Policy:
- Type: The Replicas type has been selected by default and you cannot modify it.
- Replicas: Set the number of replicas for the
storage pool in the 2-6 value range.Note: In production
environments, we recommend setting at least 3 replicas to ensure
data security.
- Level: Select the level of the failure domain (Server/Rack/Room) according to your topology plan.
- Data Disk: Select data disks to add based on
the topology canvas.Note:
- Selected data disks must meet the data redundancy level requirements.
- Select data disks of similar sizes if possible.
- To create a Metadata Pool, you need to use a raw SSD data disk.
Manage a General Purpose Pool
On the main menu of ZStack Cube Virtualization Edition, choose . Then, the Storage Pool page is displayed.
| Action | Description |
|---|---|
| Create Storage Pool | Create storage pools. |
| Add Data Disk | Add one or more data disks to the storage pool. |
| Remove Data Disk | Remove a data disk to break the association with
the storage pool. Hence a reduced storage pool capacity. Removing
data disks may cause data losses. Proceed with caution. Note
that you cannot remove data disks if:
|
| Set Recovery QoS | Choose the type of Recovery QoS for storage
pools: Static QoS (Low Speed), Static QoS (Mid Speed), Static QoS
(High Speed). When recovering the pool data, you can check data to
recover, recovery rate, and remaining time on the General
Purpose Pool page.
|
| Check Data Consistency | Set check policy to execute data consistency
checks in the storage pool. We support two check policies:
Note:
|
| Rebalance Data Blocks | Manually rebalance the data blocks in the storage pool.Note:
|
| Modify Data Security Policy | Modify the data security policy for storage
pools. You are not provided with an option that does not meet the
data security requirements.
Note:
|
| Delete | Delete the existing storage pools. Deleting a
storage pool detaches all data disks from the pool. After deletion,
the storage pool data cannot be recovered. Proceed with caution.Note:
Delete the storage pools of Block Storage type:
Delete the storage pool of Object Storage type:
Delete the storage pool of File Storage type:
|
Storage Node
Add a General Purpose Storage Server
On the main menu of ZStack Cube Virtualization Edition, choose . On the Server page, click Add Server.
Adding a general purpose storage server involves five steps. Set the following parameters to complete the server configurations.
Step One: Basic Configurations
- Server IP Address: Enter the server IP address. You can specify either a single IP address or IP address range. We support adding multiple servers in bulk.
- Type: Select server type. Two server types are
supported:
- Storage Server:
- Provides storage pools with hard disks that can be used as data disks.
- Supports five roles: Management, Monitor, Block Storage Gateway, Object Storage Gateway, and File Storage Gateway.
- Storage Gateway Server:
- Hosts various interfaces and clients. The system only manages the server gateways and does not manage hard disks on the server.
- Supports only one role: Block Storage Gateway.
- Storage Server:
- Role: Configure the role of servers. Five roles are
supported:
- Admin Role (Management):
- Responsible for the collection and management of the runtime status of the cluster and manages the distributed storage cluster as the management node in multiple ways, such as GUI and API.
- We recommend that you deploy at least 2 admin roles to meet the high availability requirement.
- Monitor Role:
- Responsible for monitoring the cluster storage data and maintaining overall status of the cluster, including metadata such as data mapping and cluster authentication.
- We recommend that you deploy an odd number of monitor roles (3+2*N, N≥0) to meet the high availability requirement.
- Block Storage Gateway:
- Responsible for the access between the server and the storage cluster through Block interface.
- By default, this role is selected for a storage server.
- By default, this role is selected for a gateway server. And a storage gateway server only supports this role.
- Object Storage Gateway:
- Responsible for the access between the server and the storage cluster through Object interface.
- To use object storage service, you need to select this role.
- On an object storage gateway server, you can turn on the object gateway to provide the S3 protocol and gateway services.
- File Storage Gateway:
- To use file storage service, you need to select this role.
- On a file storage gateway server, you can create a file gateway to provide file storage access protocols such as SMB and NFS.
Note:
- When you add a server for the first time, three roles including Management, Monitor, and Block Storage Gateway, are selected by default. The Block Storage Gateway role can be deselected, while Management and Monitor roles are required.
- For subsequent server additions, you can add storage servers without roles.
- Deploy at least three storage servers with Management, Monitor, and Block Storage Gateway roles in a cluster.
- Admin Role (Management):
Step Two: Environment Configurations
- SSH Username: Enter the SSH username for the server. Default: root.
- SSH Password: Enter the SSH password. The system uses this password only for password-free login configurations and does not store the password.
- Port: Enter the server port number. Default port: 22.
- Server Name: (Optional) Specify a server
name.
Naming rules: 1-63 characters long. The name can contain lower-case letters (a-z), digits (0-9), periods (.), and hyphens (-). Avoid starting with a hyphen or number as well as ending with a hyphen.
Note:
- If you do not set a server name, ensure the server name-to-IP mapping is preconfigured in /etc/hosts file. The system uses the existing server name after server addition.
- If you set a new server name, it overwrites the existing name-to-IP mapping in /etc/hosts file.
- When you add servers in bulk, the names of these servers will end with a suffix, that is, the last part of their IP address (0-254), to distinguish these servers, for example, server-24.
- Time Sync Service: Choose to enable or disable the
time synchronization service.
If you enable this setting, the system synchronizes the newly-added server's clock with other servers in the cluster.
- Password-Free Login: If you enable this setting, the system configures password-free logins to the server with the SSH username and password.

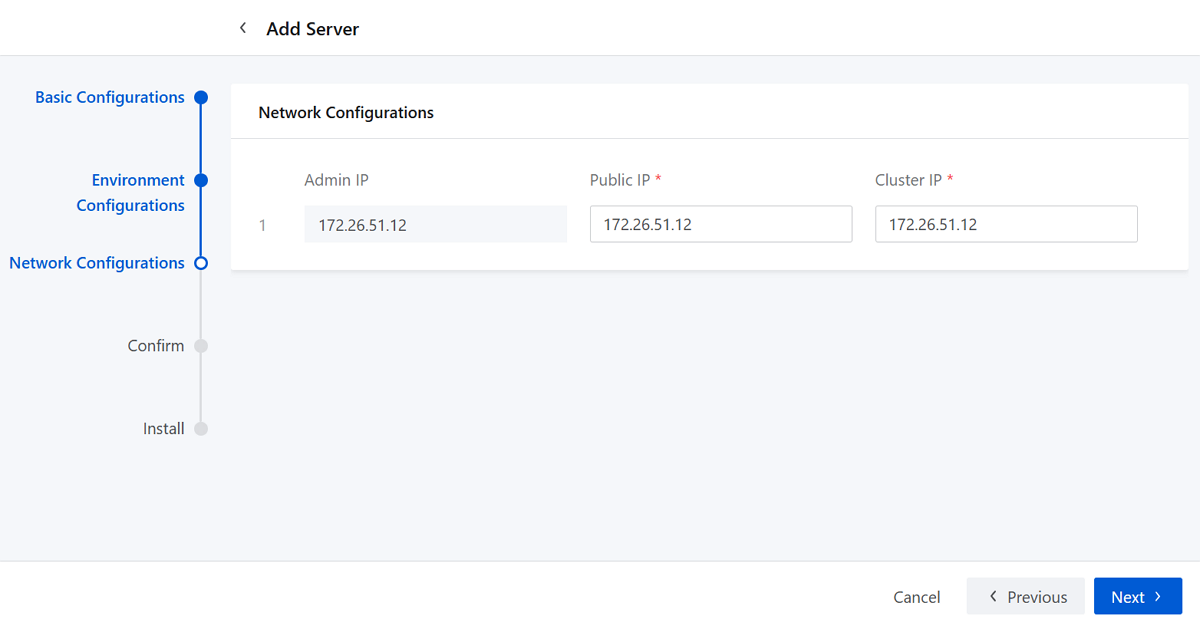
Step Three: Network Configurations
- Admin IP: Sets the IP address the management network which manages and configures storage clusters. The default admin IP is the server IP address.
- Public IP: Sets the IP address of the public cluster network which facilitates interaction between block storage gateways and storage pools.
- Cluster IP: Sets the IP address of the cluster
internal network which monitors data disks across cluster servers and
synchronizes replicas.Note: Skip setting Cluster IP when you add a storage
gateway server.
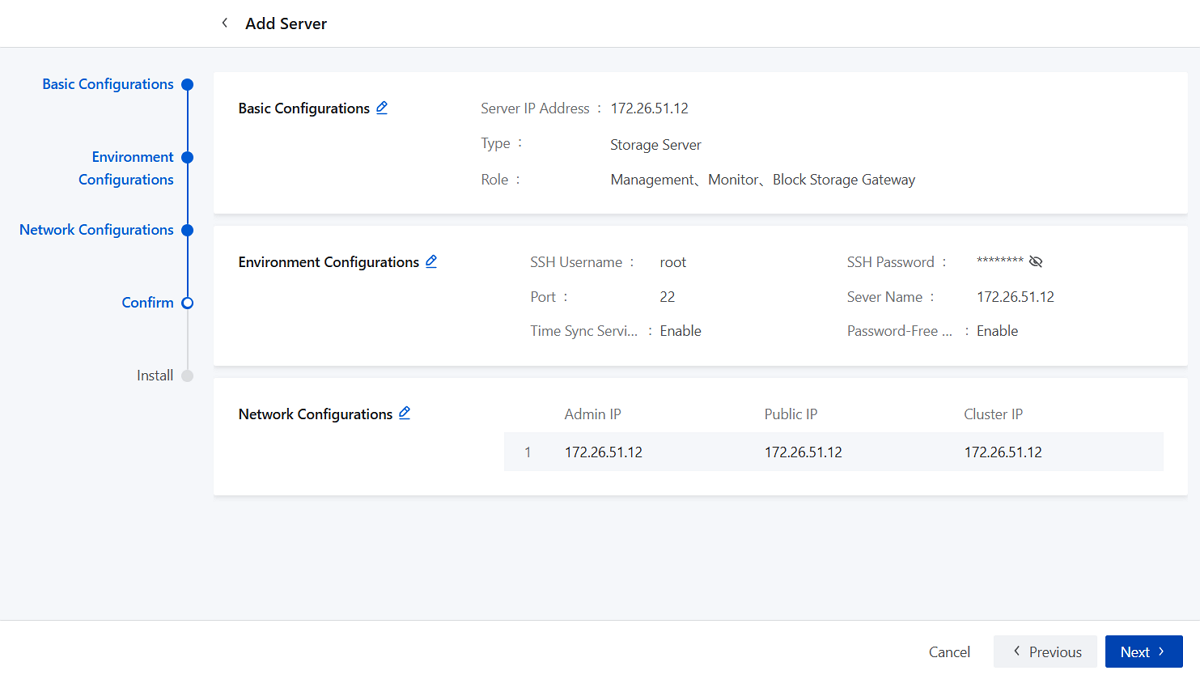
Step Four: Confirm
Review the information of the server to add. You can navigate back to modify configuration details if needed.
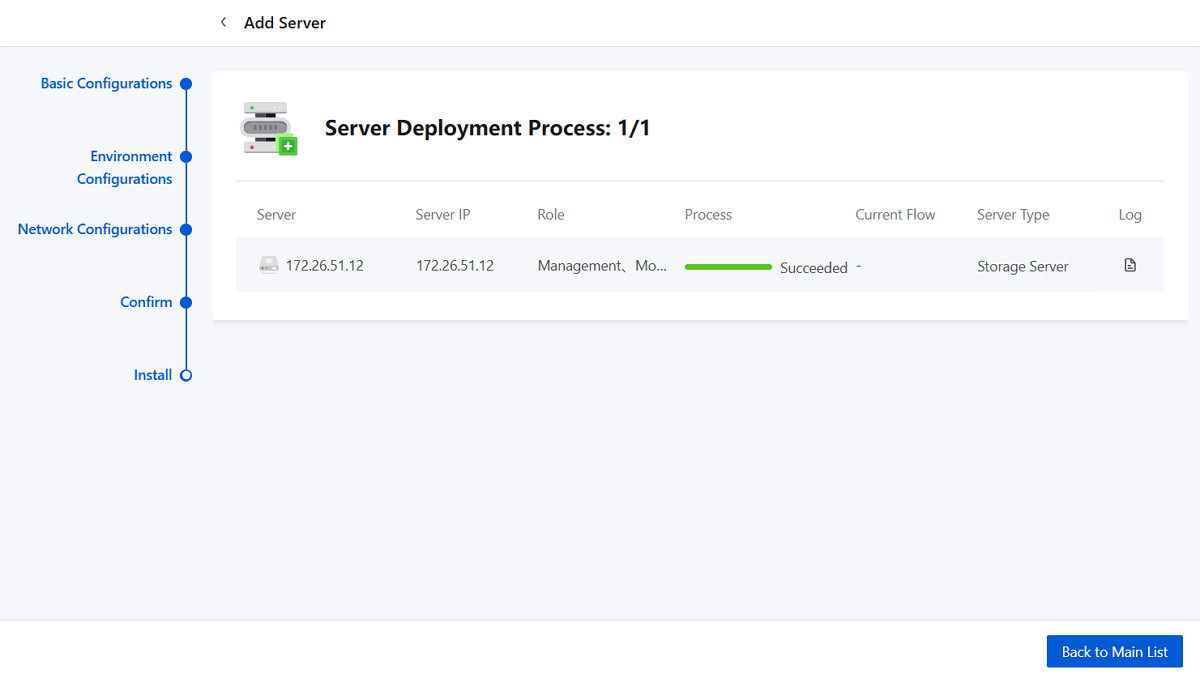
Step Five: Install
Note:
- You cannot exit the page when adding a server for the first time.
- Avoid refreshing the browser when adding a server for the first time.
Manage a General Purpose Storage Server
On the main menu of ZStack Cube Virtualization Edition, choose . Then, the General Purpose Node page is displayed.
| Action | Description |
|---|---|
| Add Server | Add one or more servers.Note: If a monitoring
server in the disconnected state exists
in the cluster, you cannot add a new server. |
| Delete Server | Deleting a server stops the services provided by
the server and deletes all relevant data. Deleted data cannot be
recovered. Proceed with caution.Note: To delete a server requires
meeting the following requirements:
|
Data Disk
Create a Data Disk on General Purpose Node
On the main menu of ZStack Cube Virtualization Edition, choose . On the Data Disk page, click Create Data Disk.
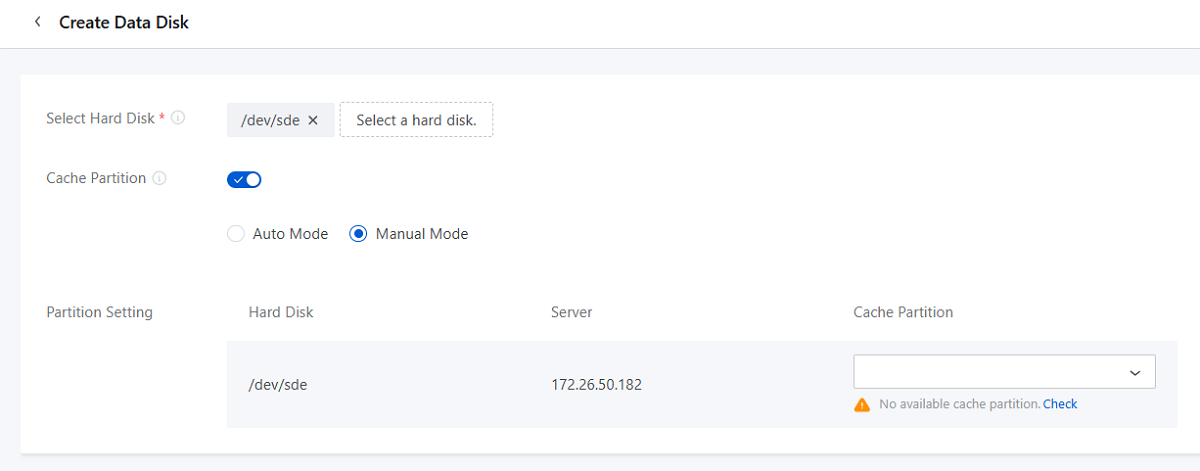
- Select Hard Disk: Select the hard disk to add as a data
disk.Note: You can add hard disks that are healthy, free, and of at least 25
GB size as data disks.
- Cache Partition: Choose whether to set cache partition
for data disks.
- Auto Mode: If you select auto mode, the system automatically attaches cache partitions provided by servers to the selected hard disks.
- Manual Mode: If you select manual mode, you can manually select cache partitions for each hard disk that has been selected.
Note: If available cache partitions are insufficient for the selected hard
disks when you enable this parameter, part of the hard disks fail to be
added as data disks.
Manage a Data Disk on General Purpose Node
On the main menu of ZStack Cube Virtualization Edition, choose . Then, the Data Disk page is displayed.
| Action | Description |
|---|---|
| Create Data Disk | Create one or more data disks. |
| Set Maintenance Mode | Enable or disable the maintenance mode for data
disks. A data disk in the maintenance mode is not involved in data
block rebalances.Note:
|
| Delete | Deleting a data disk stops services provided by
the data disks and deletes all relevant data. The deleted data
cannot be recovered. Proceed with caution.Note: To delete a data
disk requires meeting these requirements:
|
Physical Hard Disk
Scan Hard Disks on General Purpose Node
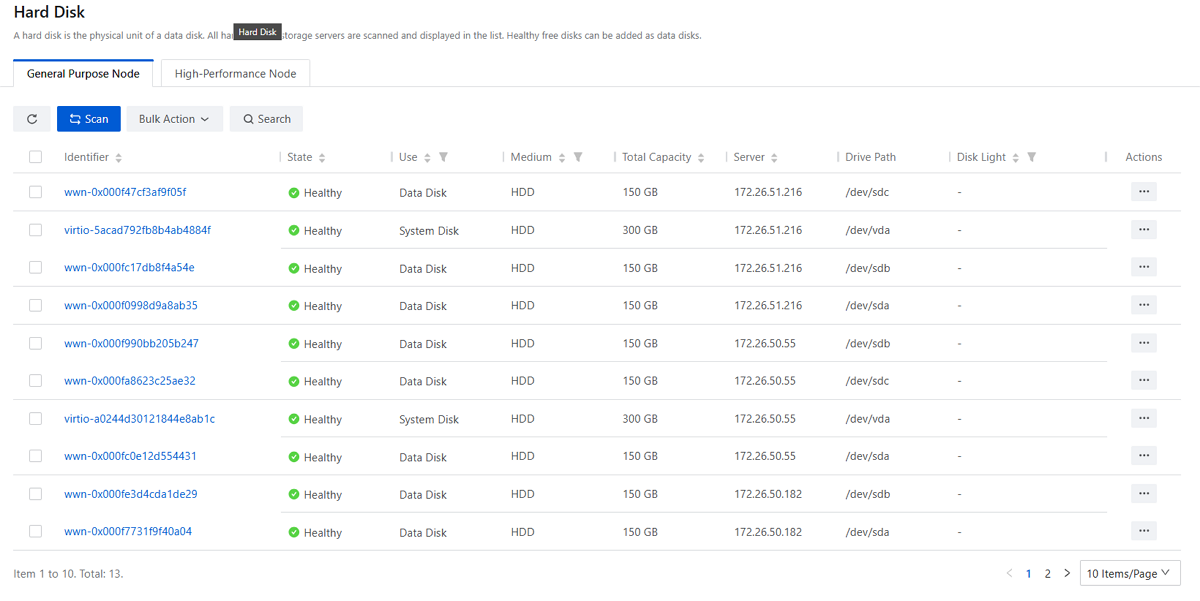
On the main menu of ZStack Cube Virtualization Edition, choose . On the Hard Disk page, click Scan and all hard disks on storage servers and their information will be displayed in the list.
 Note:
Note:
- Healthy free disks can be used for cache partitioning (SSD recommended) or added as data disks. If you set cache partition, ensure that each partition has a minimum capacity of 50 GB.
- A scanned unknown disk implies that the disk contains unrecognized
partitions.
- For ZStack Cube Virtualization Edition 4.2.0 and earlier versions,
run the
wipefs -af /dev/sdXcommand to manually clean up partitions before rescanning the disk. - For ZStack Cube Virtualization Edition 4.2.0 and later versions, go to the Hard Disk page and click Initialize Hard Disk to clean up partitions directly.
- For ZStack Cube Virtualization Edition 4.2.0 and earlier versions,
run the
- In some hardware environments, newly-added hard disks may not be detected. Reboot the server or contact official technical support for assistance.
Manage Hard Disks on General Purpose Node
On the main menu of ZStack Cube Virtualization Edition, choose . Then, the Hard Disk page is displayed.
| Action | Description |
|---|---|
| Scan | Scan and list all hard disks in the server and their use. |
| Set Cache Partition | You can set cache partitions for one or more
healthy free disks.Note:
|
| Clean up Cache | We support cleaning up cache for cache disks in
the healthy state.Note:
|
| Initialize Hard Disk | Initialize one or more disks in the healthy state
whose use is unknown.Note:
|
| Disk Light | Enable or disable the disk light to quickly
locate the hard disk.Note:
|