Installation and Deployment
Installation and Deployment Overview
ZStack Cloud Foundation (ZCF) supports the following installation and initialization methods:
- Install by using the ZCF Installer (Installer).
- Install from the ZStack Cloud Application Market.
Before installing ZCF, prepare an available ZStack Cloud platform. To manage storage, container, or network resources in ZCF, prepare infrastructure components such as ZStack ZStone and ZStack Zaku, and extension capabilities such as ZStack ZNS (ZCF Network Service) as planned.
When setting up a ZCF environment for the first time, complete the installation and deployment in the following order:
| Stage | Description |
|---|---|
| Prepare ZStack Cloud | Before installing ZCF, prepare an available ZStack Cloud platform. |
| Prepare infrastructure components (optional) | To manage storage or container resources in ZCF, prepare infrastructure components such as ZStack ZStone and ZStack Zaku as planned. |
| Install ZCF |
You can install ZCF by using one of the following methods:
After installation, the Unified Portal and ZCF Observability capabilities become available. |
| Perform post-deployment checks | Verify that ZStack Cloud UI, Global Management, ZCF Cloud Federation, Dashboards & Reports, and Operations are accessible. |
| Connect infrastructure components (optional) | After ZCF is deployed, use ZCF Cloud Federation to connect product environments such as ZStack Cloud, ZStack ZStone, and ZStack Zaku, providing the foundation for cross-product access, resource collection, and observability analysis. |
| Install extension components (optional) | After access to the ZStack Cloud UI is verified, install extension components from the ZStack Cloud Application Market, such as ZStack Network Service (ZNS). |
This section describes the basic workflow for pre-deployment preparation, ZCF installation, infrastructure component connection, extension capability installation, and post-deployment checks. For production deployments, verify node specifications, network planning, component scope, domain names, VIP, and security policies according to the plan.
Prepare ZStack Cloud
Before installing ZCF, make sure that a usable ZStack Cloud platform has been installed and that the ZStack Cloud management node is accessible. ZStack Cloud provides the base environment for ZCF installation, resource connection, and subsequent management.
ZStack Cloud plays the following roles in different installation methods:
- When ZCF is installed by using the Installer, the Installer connects to the ZStack Cloud management node and completes ZStack Cloud access during installation.
- When ZCF is installed from the ZStack Cloud Application Market, administrators start ZCF installation from the Application Market in the ZStack Cloud UI and complete installation parameter configuration as prompted.
For ZStack Cloud installation, refer to ZStack Cloud Documentation.
Prepare Infrastructure Components (Optional)
To view and manage storage, container, and other resources in ZCF, prepare infrastructure components such as ZStack ZStone and ZStack Zaku as planned. After these infrastructure components are prepared and ZCF is deployed, you can connect them through ZCF Cloud Federation.
After the infrastructure components are deployed, verify that their management pages or services are accessible, and record the access addresses and account information required for later ZCF Cloud Federation connection.
Install ZCF
Deployment Methods
ZCF supports the following installation methods:
- Install by using the Installer: See Install by Using the Installer.
- Install from the ZStack Cloud Application Market: See Install from the ZStack Cloud Application Market.
Deployment Modes
ZCF supports single-node deployment and HA deployment. Before installation, select a deployment mode based on the environment purpose, availability requirements, and resource plan.
| Deployment Mode | Description |
|---|---|
| Single-node Deployment | Runs ZCF services on one ZCF instance. This mode is suitable for test, demo, or planned single-node environments. |
| HA Deployment | Runs ZCF services on three ZCF instances to provide high availability. This mode is suitable for production or HA environments. |
Install by Using the Installer
Installing ZCF by using the Installer applies to scenarios where ZCF is deployed from a standalone Installer node. In the Installer UI, you can select the deployment mode, enter node information, confirm the package source, select components, connect ZStack Cloud, configure the License Server, run preflight checks, and execute the deployment.
This section describes the detailed steps for installing ZCF by using the Installer.
Prepare the Installation Environment
Before installing ZCF by using the Installer, prepare nodes, deployment information, network, and installation media.
Node Description
The installation and deployment process involves the following node concepts:
| Node | Description |
|---|---|
| Installer Node | The server that runs the ZCF Installer package. It starts the Installer UI and serves as the deployment operation page. In http://<Installer Node IP>:8069, the IP address is the Installer node IP. |
| ZCF Service Node | The server where ZCF services are installed and run. Prepare one ZCF service node for single-node deployment, and three ZCF service nodes for HA deployment. |
| ZStack Cloud Management Node | The management node of ZStack Cloud. The Installer uses it to complete ZStack Cloud access during deployment. |
In single-node deployment, the Installer node can be the same server as the ZCF service node. In HA deployment, one ZCF service node can also run the Installer. Verify the node relationship before deployment.
Deployment Information Confirmation
Before deployment, prepare and verify the following information:
| Item | Information to Confirm |
|---|---|
| CPU Architecture | Confirm the CPU architecture of the Installer node and ZCF service nodes, and prepare the matching installation package. |
| ZCF Service Nodes | Prepare one server for single-node deployment or three servers for HA deployment, and confirm node IP addresses or FQDNs. |
| SSH Username and Port | The Installer uses this information to log in to ZCF service nodes and run deployment tasks. The user must have permission to install and manage services. |
| Local Package Directory | Stores ZCF installation packages. The Installer must be able to read this directory. |
| Deployment Components | Confirm the components to install, such as ZCF control plane, SSO, and ZMetis (ZCF Observability). |
| ZCF Service VIP | VIP address used to access ZCF services. |
| Domain Name or Access Point | If a domain name or unified access point is required, confirm DNS resolution and access policies in advance. |
| ZStack Cloud Management Node | Verify that a ZStack Cloud platform has been installed and is accessible. Record the IP address, access point, and connection information of the ZStack Cloud management node. |
| Administrator Password | Set the ZCF administrator password according to your password policy. |
Network Requirements
Before deployment, confirm at least the following access relationships:
| Access Relationship | Description |
|---|---|
| Client Machine to Installer Node | The browser can access the Installer UI. |
| Installer Node to ZCF Service Nodes | The Installer node can log in to all ZCF service nodes through SSH. |
| Installer Node to Local Package Directory | Installer can read the local package directory. |
| Installer Node to ZStack Cloud Management Node | The Installer can access the ZStack Cloud management node for ZStack Cloud access. |
| Network Access Policy | Firewall, security group, or bastion host policies do not block the access required during installation. |
Common ports are listed below. In actual environments, follow the network plan.
| Direction | Port | Purpose |
|---|---|---|
| Client machine -> Installer node | 8069 | Access to the Installer UI |
| Installer node -> ZCF service nodes | 22 | SSH remote deployment. The actual port depends on the environment. |
| Client machine / management network -> ZCF access point | Planned port | Access to the ZCF UI or service endpoints |
Installation Media
Prepare the following installation media before deployment:
- Prepare the ZCF Installer package. Select the package based on the server architecture. The actual package name is subject to the download page.
- x86 architecture: zcf-installer-bundle-1.1.2-x86_64.bin
- ARM architecture: zcf-installer-bundle-1.1.2-aarch64.bin
- Download: Click Here
- Prepare the local package directory. ZCF 1.1.2 deployment typically uses the local directory mode. Place the installation packages in a directory that the Installer node can read.
Start Installer
About this task
After pre-deployment preparation is complete, confirm the CPU architecture on the Installer node and start the Installer UI.
Procedure
-
Confirm the CPU architecture.
Run the following command on the Installer node to check the CPU architecture:
uname -mCommon command outputs and matching installation media are listed below:Server Architecture (Command Output) Installation Media Architecture x86_64x86_64aarch64aarch64 -
Start the Installer UI.
After uploading the ZCF Installer package to the Installer node, grant execution permission. The following example uses the x86 package:
chmod +x ./zcf-installer-bundle-1.1.2-x86_64.binRun the following command to start the Installer:./zcf-installer-bundle-1.1.2-x86_64.bin \ --pkg-dir /opt/zcf-packages \ --bind 0.0.0.0 \ --port 8069The parameters are described as follows:Parameter Description --pkg-dirSpecifies the local package directory that stores installation packages. --bindSpecifies the listening address of the Installer UI. When it is set to 0.0.0.0, client machines in the management network can access it.--portSpecifies the access port of the Installer UI. The example uses 8069.Keep the Installer process running after startup. After deployment is complete and the Installer is no longer required, stop the process. -
Access the Installer UI.
Access the Installer UI in a browser:
http://<Installer Node IP>:8069After the home page opens, check the Installer status and depot connection status. If you specified a valid local package directory by using--pkg-dirwhen starting the Installer and the depot connection is healthy on the home page, click Start Installation Wizard directly.The home page also provides the following entries: Depot Configuration and Import JSON Config File. Use Depot Configuration to confirm, adjust, or reconfigure the depot. Use Import JSON Config File to reuse an existing configuration.图 1. Installer Home Page 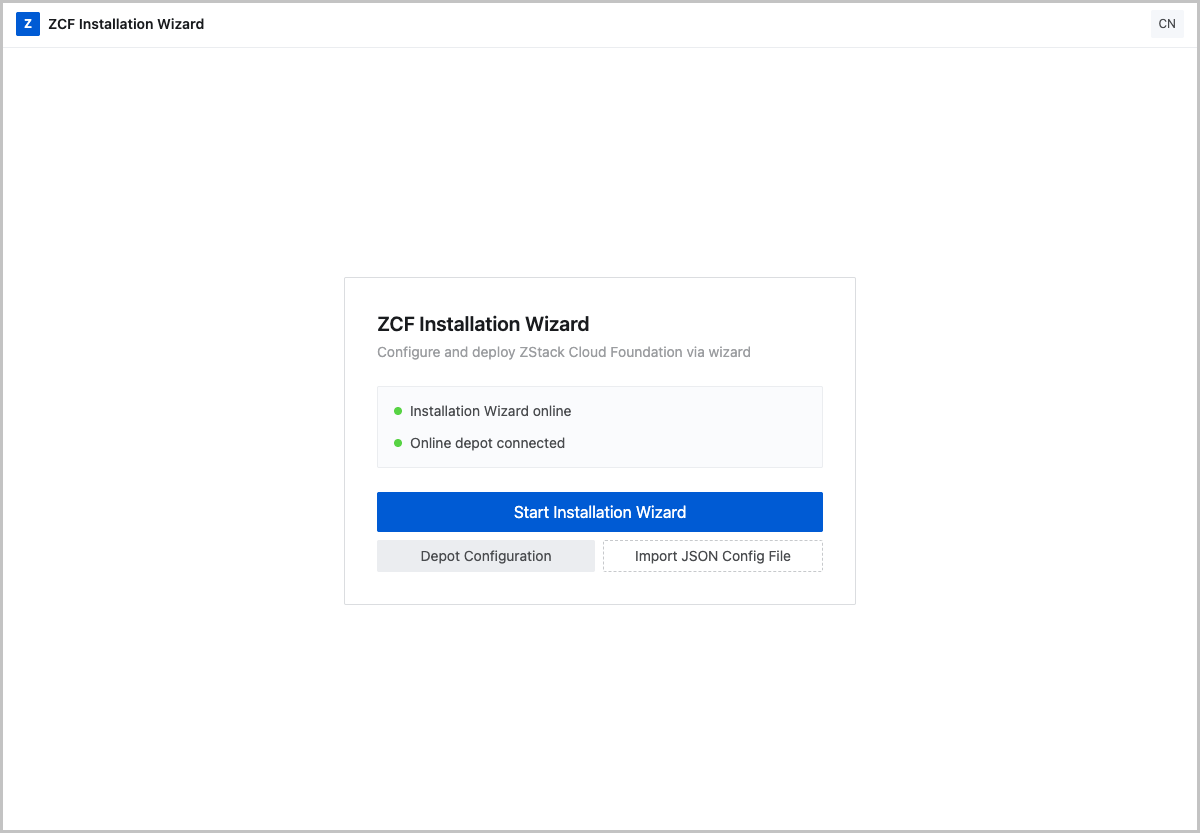
Configure Installer
In the Installer UI, check the depot, select deployment components, enter basic information, ZStack Cloud connection information, and License Server information, and run the preflight check on the Preview page.
Confirm the depot.
The depot contains the packages required to install ZCF. If the home page shows a healthy depot connection, you can continue in the Installer. If you need to adjust the depot or the home page shows an unhealthy connection status, go to the Configure Depot page.
On the Configure Depot page, select Online Repository or Local Directory for the current deployment environment, and configure the following information:
Configuration Item Description Depot Type Select Local Directory or Online Repository for the current deployment environment. ZCF 1.1.2 deployments typically use Local Directory. Local Directory Path Required when Local Directory is selected. It must be consistent with --pkg-dirin the Installer startup command.Test Connection Click Test Connection and verify that the connection succeeds. If the connection fails, check the depot, directory path, package files, package architecture, and read permissions of the Installer runtime user. After adjusting the configuration, perform the following steps:
- Click Test Connection.
- Verify that the page shows a successful connection message.
- Click Save Config.
- Return to Installer.
图 1. Depot Configuration 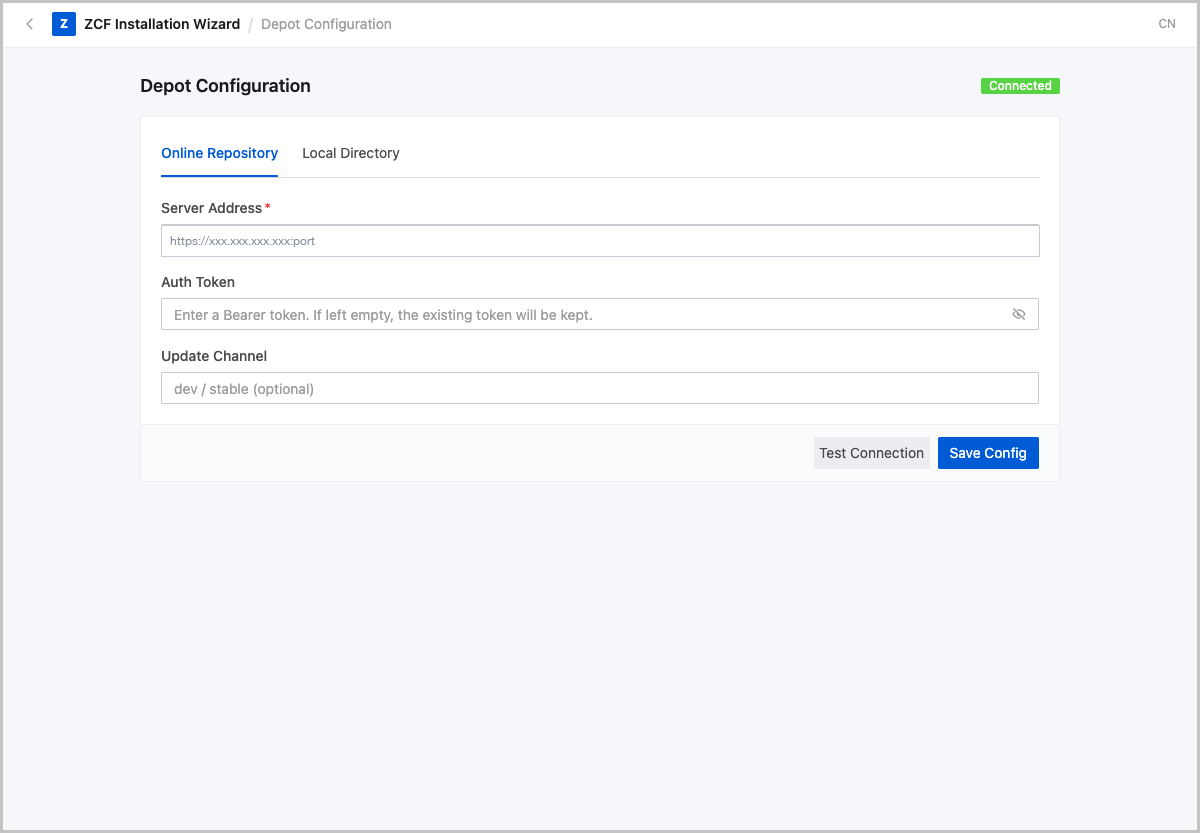
Select components.
On the home page, click Start Installation Wizard to enter the Select Component page.
Use this page to confirm the components to deploy and verify that the required packages are ready.
The main components are:
Component Description ZCF Control Plane Provides ZCF control-plane management, lifecycle management, and the main access point. ZIAM SSO Server / ZIAM UI Provides SSO services and SSO management capabilities. ZMetis (ZCF Observability) Provides observability capabilities such as monitoring, logs, dashboards, and reports. Confirm the following information on this page:
Configuration or Status Description Select Component Confirm the components to deploy. Required components are typically selected by default. Package Status Confirm that the packages for selected components are available. Package Architecture Confirm that the package architecture matches the CPU architecture of ZCF service nodes. Package Readiness Confirm that all selected packages are ready. After confirming that the component selection and package status are valid, click Next. If packages are missing, the architecture does not match, or the status is unhealthy, resolve the depot issue before continuing.
图 2. Select Component 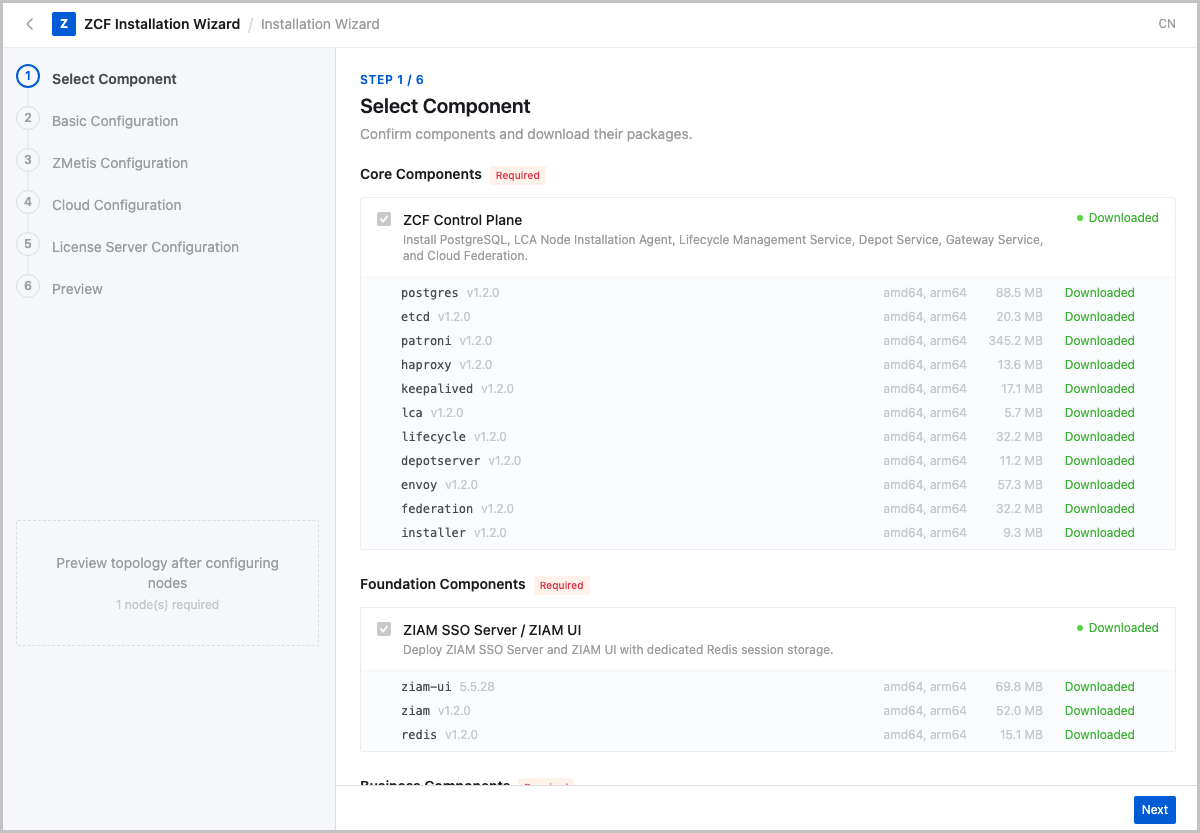
Configure basic information.
On the Basic Information page, configure deployment mode, VIP address, ZCF service nodes, and SSH information. The Installer uses the SSH information on this page to connect to ZCF service nodes and run deployment tasks.
Configuration Item Description Deployment Mode Select Single Node or HA (3 Nodes) based on the deployment plan. VIP Address Enter the planned access address or VIP. Hostname (FQDN) Enter the management IP address or resolvable FQDN of the ZCF service node. Enter one ZCF service node for single-node deployment and three ZCF service nodes for HA deployment. SSH Port Enter the SSH port of the ZCF service node. The default value is 22.SSH Username Enter a user with installation permissions. SSH Password Enter the SSH password or authentication information of the ZCF service node. After you complete the fields, click Test Port to verify that the Installer can access the SSH port of ZCF service nodes. For HA deployment, confirm that network connectivity, SSH ports, and access policies of all three ZCF service nodes are ready.
图 3. Configure Basic Info 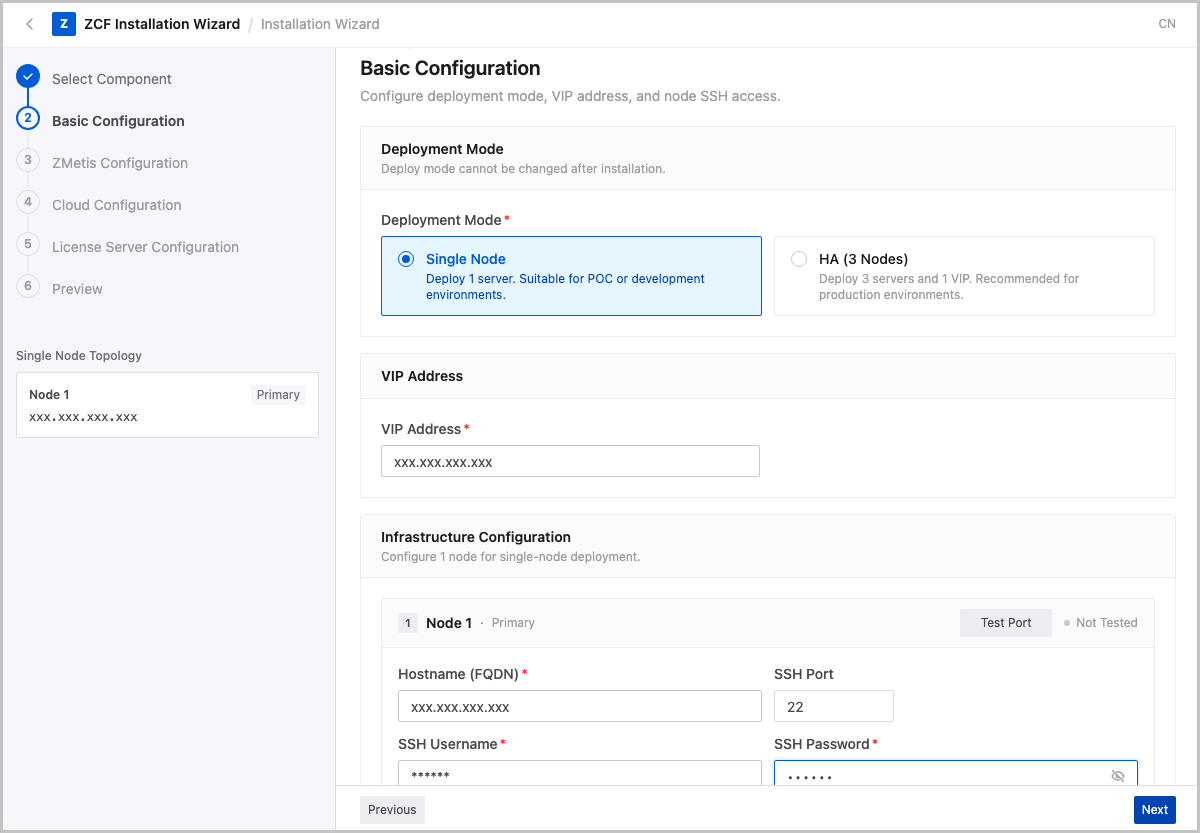
Configure ZMetis.
If ZMetis (ZCF Observability) is selected, confirm the deployment method on the ZMetis Configuration page. ZMetis is deployed on ZCF service nodes by default. If dedicated nodes are required for ZMetis, enable independent node configuration on this page.
Configuration Item Description Node Configuration Independent nodes are not enabled by default. ZMetis is deployed on ZCF service nodes. Dedicated ZMetis node If dedicated nodes are enabled, enter the IP address, SSH port, SSH username, and authentication information of the dedicated ZMetis node. Deployment Method For single-node or demo deployments, use the default configuration. For production or HA deployments, confirm the configuration according to capacity planning and observability requirements. If dedicated ZMetis deployment is not required, keep the default configuration and click Next. If dedicated deployment is required, confirm node planning, network connectivity, and SSH information before continuing.
图 4. Configure ZMetis 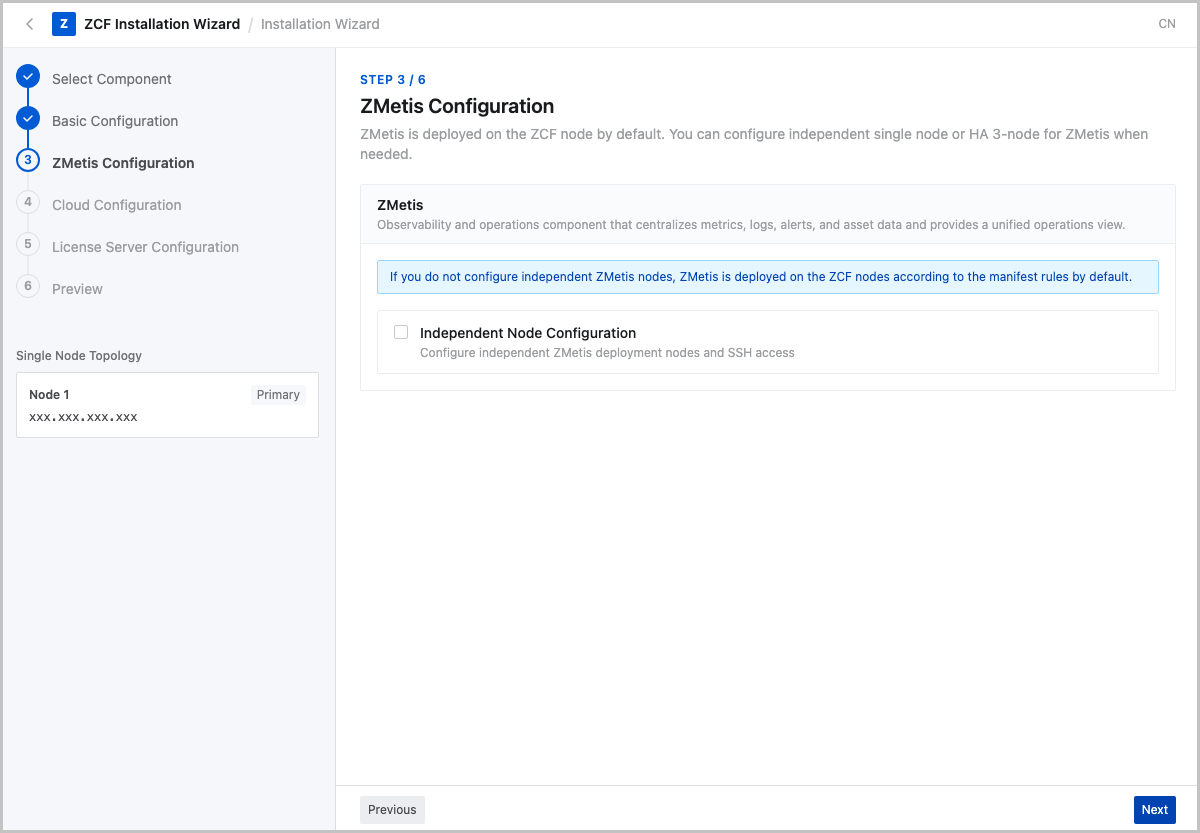
Configure ZStack Cloud.
On the Cloud Configuration page, enter the connection information of the ZStack Cloud management node to connect ZStack Cloud to ZCF.
Configuration Item Description Management Nodes Select the management node mode that matches the ZStack Cloud environment. IP Address Enter the IP address or FQDN of the ZStack Cloud management node. SSH Port Enter the SSH port of the ZStack Cloud management node. SSH Username Enter a user with configuration permissions. SSH Password Enter the SSH password or authentication information of the ZStack Cloud management node. After you complete the fields, verify that the Installer node can access the SSH port of the ZStack Cloud management node.
图 5. Configure ZStack Cloud 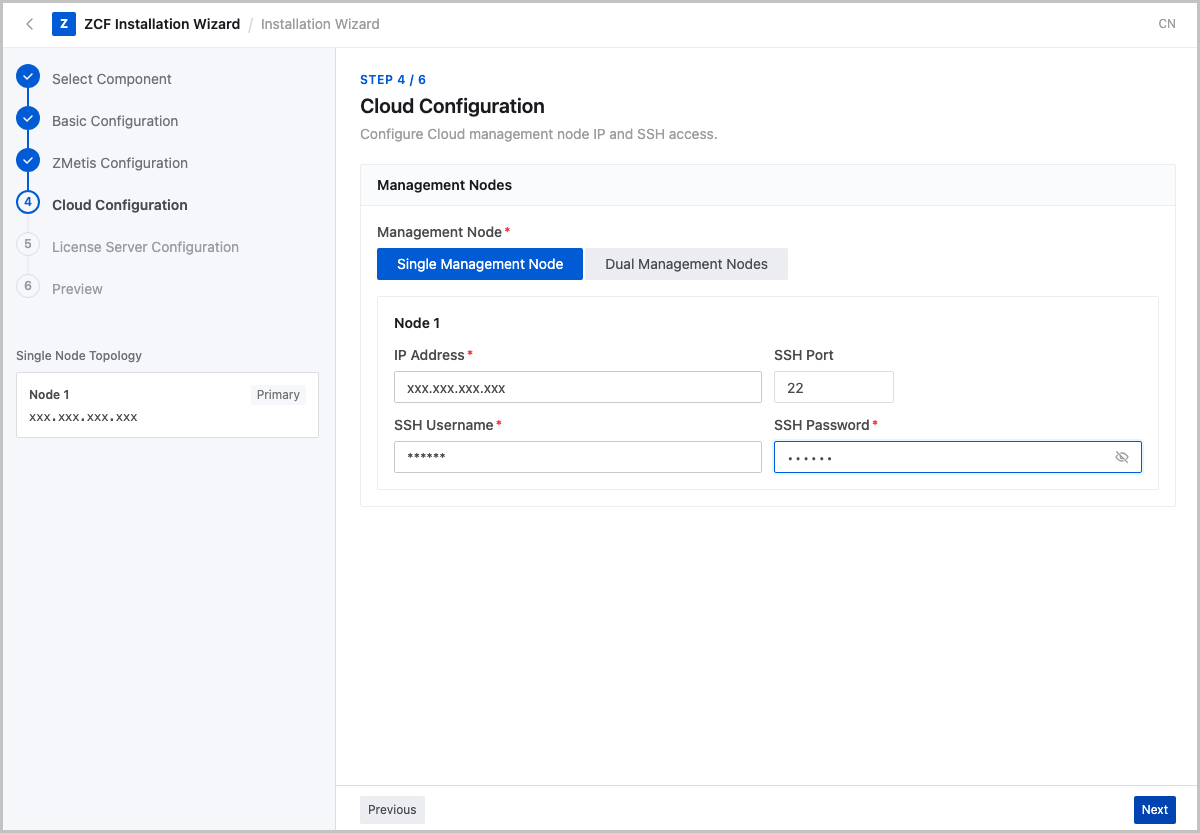
Configure the License Server.
On the License Server Configuration page, enter the License Server access information. Platform capability components that are deployed with ZCF, such as ZCF Cloud Federation, ZCF Observability, and ZCF Unified Portal, automatically connect to the License Server based on this configuration after deployment is complete.
Configuration Item Description Access Address Enter the IP address or domain name of the License Server. Do not include http://,https://, a port, or a path. In most cases, enter the ZStack Cloud management node IP address. In a dual-management-node environment, enter the management node VIP.HTTP Port Enter the License Server HTTP port. The default value is 8201. If the License Server port is not changed, keep the default value.After you complete the fields, click Next to go to the Preview page.
图 6. Configure the License Server 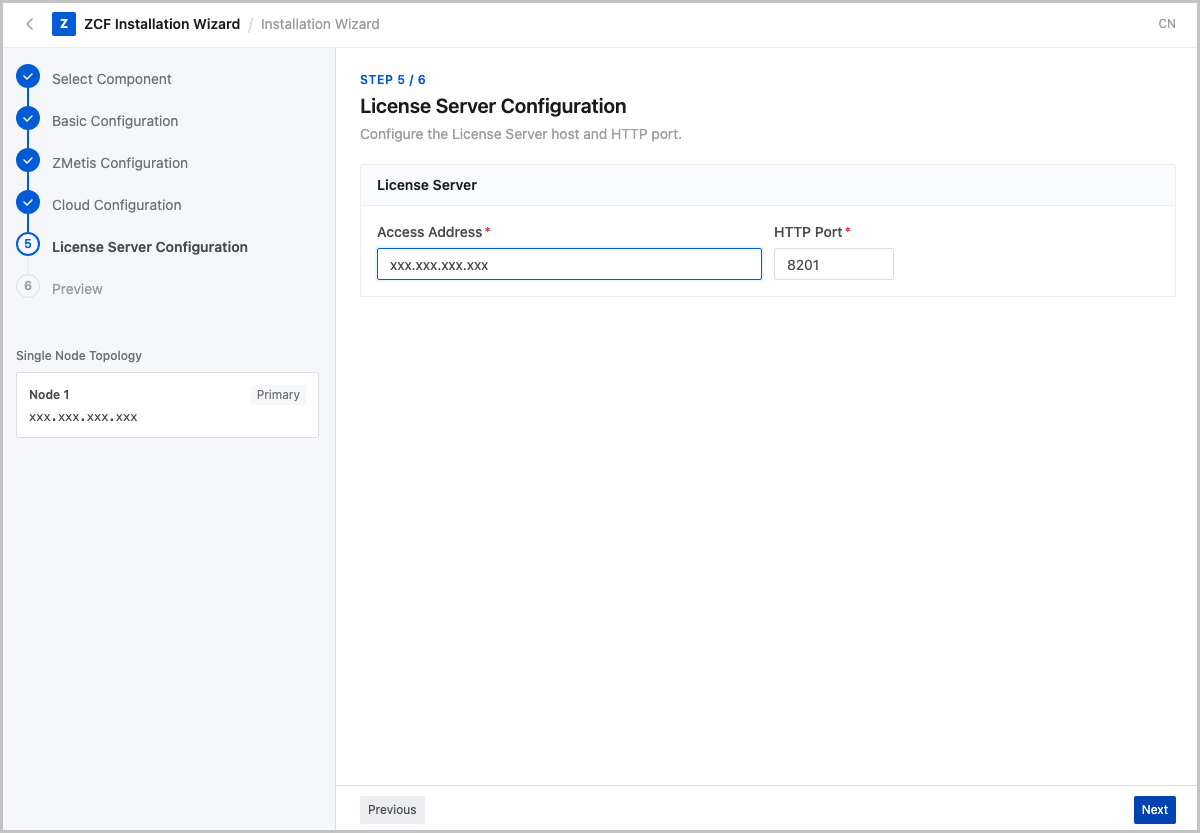
Preview configuration and run preflight checks.
The Preview page summarizes the component, node, connection, and License Server information that you entered in previous steps for final review before deployment.
After verifying the configuration, click Start Validation to run preflight checks. Main preflight check items include:
Preflight Check Item Description SSH Connectivity Checks whether the Installer can log in to ZCF service nodes. Node Resources Checks whether CPU, memory, disk, and other resources of ZCF service nodes meet requirements. Port Availability Checks whether key ports are available. Domain Name or VIP Checks HA or domain access configuration. ZStack Cloud Connectivity If ZStack Cloud access is configured, checks whether the ZStack Cloud management node is reachable. If validation fails, fix the failed items and run validation again. Start deployment only after validation passes.
图 7. Preview 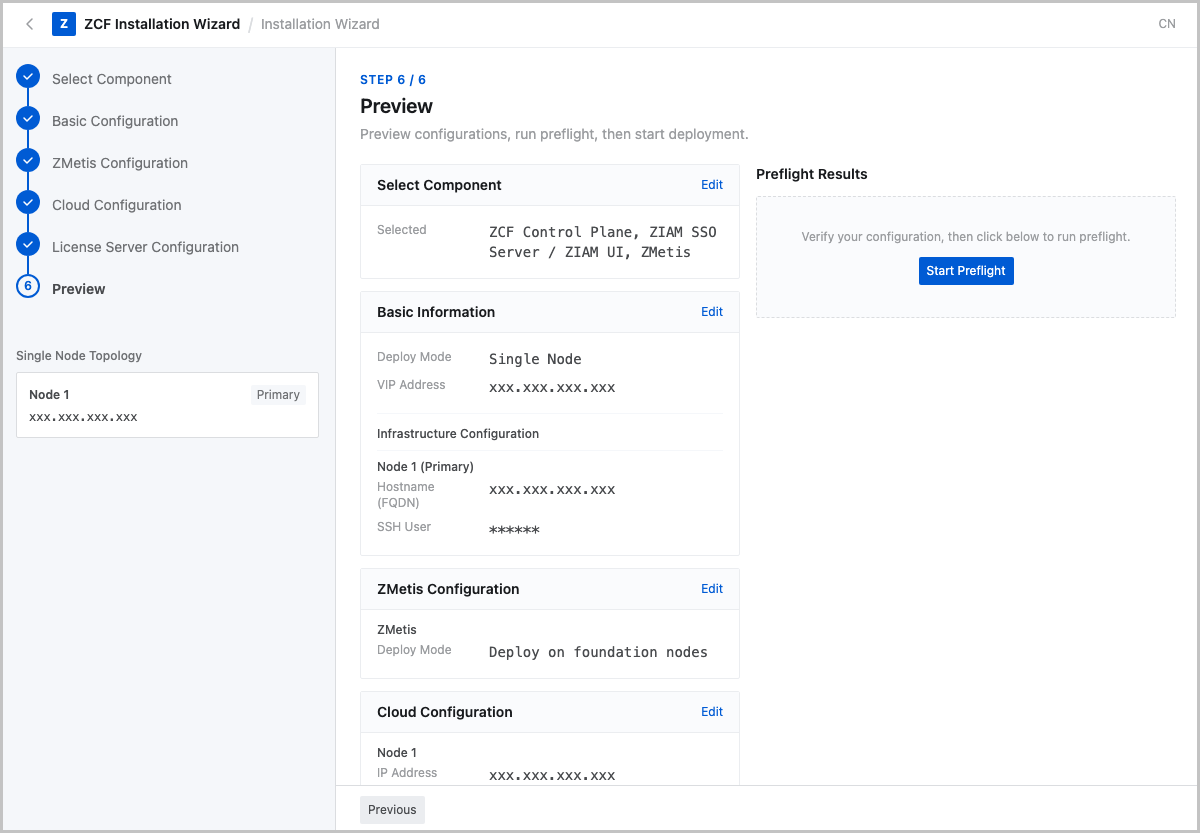
Execute deployment.
After the preflight check passes, click the deployment button to start deployment. During deployment, you can view the current stage, component progress, logs, and result on the page.
Monitor the following information during deployment:
- Current deployment progress.
- The component currently being installed.
- Error logs, if any.
- Whether deployment remains in the same stage for an extended period.
After deployment is complete, the page displays the result.
图 8. Deployment Result 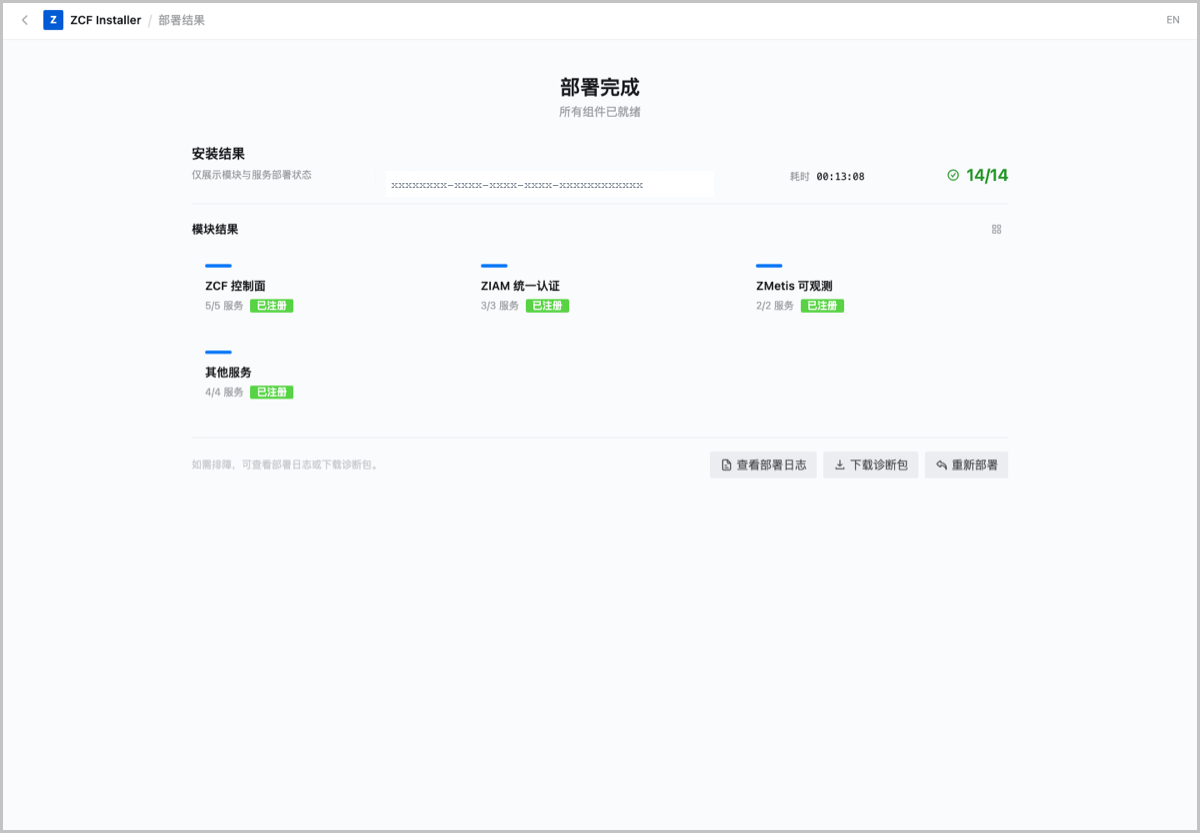
Install from the ZStack Cloud Application Market
In a deployed and accessible ZStack Cloud environment, you can install ZCF from the ZStack Cloud Application Market. This method follows the standard Application Market application installation workflow and applies to scenarios where ZCF installation and initialization are started from the ZStack Cloud UI.
Before installation, prepare the Application Market installation environment. After the environment is ready, go to Application Market in the ZStack Cloud UI, configure installation parameters, and run the installation.
Prepare the Installation Environment
Prerequisites
Before installing ZCF from Application Market, complete the following preparations:
- Make sure that the ZStack Cloud UI is accessible and Application Market is available.
- Make sure that the image storage, network, and primary storage resources required for deploying ZCF are available in ZStack Cloud.
- Prepare and upload the ZCF application image.
About this task
 Note: During Application Market installation, the application image is automatically downloaded from CDN. To speed up installation or support environments without Internet access, you can obtain the application image for the corresponding CPU architecture in advance and upload it to the management node and image repository.
Procedure
-
Prepare the ZCF image. Select the image based on the server architecture. The
actual image name is subject to the download page.
- x86_64:
zcf-installer-1.1.2-x86_64.qcow2 - aarch64:
zcf-installer-1.1.2-aarch64.qcow2 - Download: Click Here
- x86_64:
- Rename the image for the corresponding CPU architecture to image.qcow2.
-
Place image.qcow2 in the specified path on both the management node and image repository. Create the directory if it does not exist.
- x86_64: /opt/zstack-marketplace-repo/zstack_io_zcf/x86_64/1.1.2/image.qcow2
- aarch64: /opt/zstack-marketplace-repo/zstack_io_zcf/aarch64/1.1.2/image.qcow2
Install the ZCF Application
Procedure
-
Go to Application Market.
In the ZStack Cloud UI, choose . On the Default Application page, click Sync Application to refresh the application list. Switch to the All tab, find the ZStack Cloud Foundation Platform application card, and click Install Application to open the Install Application page.
-
Configure installation parameters.
On the Install Application page, enter or select the following parameters:
Configuration Item Description Name Enter the application name. In most cases, keep the default name ZStack Cloud Foundation Platform. CPU Architecture Select the CPU architecture that matches the deployment environment, such as x86_64oraarch64.Version Select the ZCF version to install. Enable HA Select whether to enable HA. If HA is not enabled, the system creates one VM to run ZCF. If HA is enabled, the system creates three VMs to run ZCF. CPU Select or enter the CPU specification of the ZCF VM. For small-scale environments, use at least 4 cores. If monitoring, log, or report data needs to be retained for a longer period, plan higher specifications based on the actual retention period.Memory Select or enter the memory specification of the ZCF VM. For small-scale environments, use at least 8 GB.Image Storage Select available image storage. During installation, the ZCF application image is loaded from the selected image storage. Network Select a public-service network that can communicate with the ZStack Cloud management node. IP Address Enter the planned ZCF VM IP address. If DHCP is enabled on the network, you can leave this field empty for automatic allocation. To use a fixed access address, specify an available IP address in the selected network. ZCF VIP Enter the ZCF access VIP. This VIP provides a unified access address for ZCF. If this field is left empty, the system automatically allocates a VIP. License Server Address Enter the IP address or domain name of the License Server. Do not include http://orhttps://. This address is used by components deployed with ZCF, such as ZCF Cloud Federation, ZCF Observability, and ZCF Unified Portal, to automatically connect to the License Server. If this field is left empty, the system uses the current ZStack Cloud management node IP address by default. In a dual-management-node environment, the system uses the management node VIP by default.License Server Port Enter the License Server port. The default value is 8201. If the License Server port is not changed, keep the default value.Root Volume Enter the root volume capacity of the ZCF VM. For small-scale environments, use at least 200 GB. If monitoring, log, or report data needs to be retained for a longer period, plan higher capacity based on the actual retention period.Root Primary Storage Select the primary storage used to create the root volume of the ZCF VM. The actual parameters depend on what is displayed on the current Application Market page. -
Run installation.
After confirming the installation parameters, click OK to submit the installation. During installation, you can click Task on the ZStack Cloud top navigation bar to view the installation progress and result.The installation duration depends on server and network configurations. The estimated installation time is 20 to 30 minutes. The actual duration may vary.After installation is complete, the application updates the ZStack Cloud UI configuration. Run
zstack-ctl stop_ui && zstack-ctl start_uion the management node as prompted to make the configuration take effect. In a dual-management-node environment, run the command on both management nodes. -
Verify the installation result.
After installation is complete, return to , check the ZCF application status on the Installed tab, and confirm that the installation task is complete.Restart the ZStack Cloud UI as prompted, and then log in to ZStack Cloud again. After the ZCF application status becomes normal, switch to Global Management in the upper-right corner of the main menu. Verify that the global home page, ZCF Cloud Federation, Dashboards & Reports, and Operations pages are accessible, and then continue with infrastructure component connection and post-deployment checks.
Post-deployment Check
After deployment is complete, check the installation result from the following aspects. If ZCF is installed from the ZStack Cloud Application Market, restart the ZStack Cloud UI as prompted before performing the checks.
| Check Item | Expected Result |
|---|---|
| Installation Result |
|
| Deployment Logs | No unhandled errors are reported. |
| ZStack Cloud UI |
|
| Global Management | Switch to Global Management in the upper-right corner of the main menu and confirm that the global home page is accessible. |
| ZCF Cloud Federation | In the Global Management view, confirm that Cloud Federation is accessible and that pages such as Platform Access, SSO, and Region Management can be viewed. |
| Dashboards & Reports | In the Global Management view, confirm that Dashboards & Reports is accessible and that Dashboards, Views, and Reports pages can be viewed. |
| Operations | In the Global Management view, confirm that Operations is accessible and that Metrics Center, Log Center, and Unified Assets pages can be viewed. |
| Resource Data | If no infrastructure component is connected, resource, metric, or log data may be empty. After connecting infrastructure components such as ZStack Cloud, ZStack ZStone, and ZStack Zaku, verify that resource collection and observability data are displayed as expected. |
Connect Infrastructure Components (Optional)
After ZCF is deployed, ZCF Cloud Federation, Unified Portal, and ZCF Observability capabilities become available. To manage infrastructure components such as ZStack Cloud, ZStack ZStone, and ZStack Zaku in ZCF, connect them through ZCF Cloud Federation. After infrastructure components are connected, ZCF can provide cross-product access, resource collection, observability analysis, and operations views based on the connection relationships.
Connection Description
Connecting infrastructure components is not required for the basic ZCF installation. If you want to view and manage compute, storage, container, and other resources in ZCF, or use the observability component to view resource status, metrics, logs, dashboards, and reports, connect the required infrastructure components after ZCF is deployed.
Main Pages
After switching to Global Management in the upper-right corner of the main menu, click Cloud Federation in the top navigation bar to open ZCF Cloud Federation pages. Infrastructure component connection mainly involves the following pages:
| Page | Description |
|---|---|
| Platform Access | Connect and manage product environments such as ZStack Cloud, ZStack ZStone, and ZStack Zaku. You can view platform type, connection status, collection configuration, and update time. |
| SSO | Manage ZIAM SSO configurations and deliver SSO configurations to connected platforms as needed. |
| Region Management | View the Default Region, bound platforms, asset quantity, and latest synchronization status. |
Post-Connection Check
After infrastructure components are connected, verify that the platform connection status is normal. As needed, check SSO configurations, resource synchronization status, and observability data. For detailed operations, see Connect Platforms.
Install Extension Components (Optional)
After ZCF is deployed and access to the ZStack Cloud UI is verified, you can install extension components from the ZStack Cloud Application Market. The current version supports installing ZStack Network Service (ZNS) from the ZStack Cloud Application Market. Additional extension components can be installed in the same way in later versions.
Install ZNS from Application Market
Prerequisites
Before installing ZNS, make sure that the following requirements are met:
- You have logged in to the ZStack Cloud UI as an administrator.
- An available image server has been prepared in the ZStack Cloud environment. The ZNS image is large. To reduce installation waiting time, upload the ZNS image to a local image server in advance.
- A management network for ZNS has been prepared, and the network can communicate with the ZStack Cloud management node.
- The ZNS VM IP address and ZNS VIP must be in the same L3 network. Single-node mode requires at least two available IP addresses, and three-node HA mode requires at least four available IP addresses.
- Available primary storage for the root volume has been prepared, and its capacity meets the requirements of the ZNS image and root volume.
- If ZNS needs to connect to the License Server, the License Server address and port have been obtained.
About this task
After ZCF is deployed and the ZStack Cloud UI is accessible, install ZStack ZNS Network Service from the ZStack Cloud Application Market. When installation is complete, ZNS is added to the ZStack Cloud UI and ZNS Network Center becomes available for subsequent configuration.
Procedure
-
Go to Application Market.
In the ZStack Cloud UI, choose .On the Default Application page, you can view the Installed and All tabs. If the application list is not refreshed, click Sync Application.
-
Open the ZNS installation page.
Switch to the All tab, find the ZStack ZNS Network Service application card, and click Install Application to open the Install Application page.
-
Configure ZNS installation parameters.
In the Basic Configuration area, enter or select the following parameters:
Configuration Item Description Name Enter the application name. In most cases, keep the default name ZStack ZNS Network Service. CPU Architecture Select the CPU architecture that matches the deployment environment, for example, x86_64.Version Select the ZNS version to install. Enable High Availability Select whether to enable HA. If HA is not enabled, the system creates one VM to run ZNS. If HA is enabled, the system creates three VMs to run ZNS. HA is recommended for production environments. CPU Select or enter the CPU specification of the ZNS VM. Memory Select or enter the memory specification of the ZNS VM. Image Server Select an available image server. During installation, the ZNS image is loaded from the selected image server. Management Network Select the ZNS management network. Make sure that the network can communicate with the ZStack Cloud management node and has enough available IP addresses reserved. Single-node IP For single-node deployment, enter the planned ZNS VM IP address. If this field is left empty, the system automatically allocates an IP address from the selected management network. ZNS VIP Enter the ZNS access VIP. Both single-node and HA modes require a VIP. If this field is left empty, the system automatically allocates a VIP from the selected management network. Root Volume Enter the root volume capacity of the ZNS VM. The default value on the page is 200 GB, and the value cannot be smaller than the minimum capacity required by the image.Primary Storage for Root Volume Select the primary storage used to create the root volume of the ZNS VM. ZStack Cloud URL Enter the API address of the ZStack Cloud management node in the format http://<ZStack Cloud management node IP>:8080.Note: Do not enter the ZStack Cloud UI address or the :5000port.ZStack Cloud Administrator Password Enter the password of the ZStack Cloud adminaccount. This password is used to register the Compute Manager in ZNS and create the SDN Controller in ZStack Cloud. -
Confirm and install ZNS.
After confirming that the installation parameters are correct, click Confirm to start installation. The installation duration depends on server and network configurations. Single-node deployment usually takes about 5 minutes, and three-node HA deployment usually takes about 15 minutes. The actual duration depends on the environment.Note: During installation, the system creates VMs for running ZNS. Do not delete these VMs. Otherwise, the ZNS application cannot work properly.
-
Check the installation result.
After installation is complete, return to Application Market and check the ZStack ZNS Network Service application card. When the application status changes to installed, you can view installation parameters and the corresponding ZNS VMs.After installation is complete, the ZNS menu is automatically loaded into the ZStack Cloud UI. Due to asynchronous UI restart, the menu might become visible after about 30 seconds.
-
Connect the License Server.
Log in to the ZNS service node and run
znscli --server http://{license_server_ip}:{port} license connect.In the command,{license_server_ip}is the ZStack Cloud management node IP address. In a dual-MN environment, use the management node VIP.{port}is the License Server port. The default port is8201. -
Go to ZNS Network Center.
After the ZNS menu is loaded, go to ZNS Network Center from the top navigation bar of the ZStack Cloud UI. You can then view ZNS menus and continue ZNS initialization and network resource configuration.After ZNS is installed from Application Market, the current ZStack Cloud environment is automatically registered as a compute manager in ZNS. After entering ZNS Network Center, you can view the automatic registration result on the Compute Manager page.