Image Storage
Image storage acts as a repository for storing image templates containing operating systems, as well as disk images. Through image storage, you can share image files across multiple data centers.
Image Storage Basic Operations
Add a Standalone Image Storage
A standalone image storage stores image files through image slices and supports incremental storage.
Procedure
- In the navigation pane, choose .
- Right-click the target data center and choose Add Image Storage.
- In the Select Image Storage Type dialog, choose Standalone Image Storage.
- Click Next.
-
In the Add Image Storage dialog, set the following parameters to complete basic configurations:
-
Click Next.
The system will test connectivity to the image storage IP.
-
Set the following parameters to complete storage configuration:
-
Set disk configurations.
- Addition Method: Supports Free Disk and Local Directory addition methods.When selecting Free Disk, configure the following parameter:
- Free Disk: Add the unmounted or unpartitioned disks on image storage.
 Note: Configuring a free disk will format the selected disk, completely clearing all partitions, file systems, and data on the disk.
- Free Disk: Add the unmounted or unpartitioned disks on image storage.
- Mount Path: Absolute path for mounting storage on image storage.Note: Do not use system directories such as /, /dev/, /proc/, /sys/, /usr/bin, /bin. Using system directories might cause image storage unable to work properly.
- Retrieve Existing Images: Default: disabled. If enabled, retrieves existing image files from the mount path in this image storage.
- Image Sync Network: The network CIDR used for image synchronization between standalone image storage within the same management node. If not specified, the management network is used by default. If both the source and target image storage set this parameter, only the image sync network of the target image storage takes effect.
- Data Network: The network CIDR used for data communication between compute nodes and the image storage. If not specified, the management network is used by default.
- Addition Method: Supports Free Disk and Local Directory addition methods.
-
Set disk configurations.
- Review the configuration and click OK.
Add a Distributed Image Storage
A distributed image storage stores image files through distributed block storage.
Procedure
- In the navigation pane, choose .
- Right-click the target data center and choose Add Image Storage.
- In the Select Image Storage Type dialog, choose Distributed Image Storage.
- Click Next.
-
In the Add Image Storage dialog, set the following parameters:
- Review the configuration and click OK.
Manage an Image Storage
Modify an Image Storage
- Navigate to .
- Right-click the image storage and select the action you want to perform from the list of actions that appears.
- If you need to edit the name and description of the image storage, select Edit Name and Description.
- If you need to modify the configuration information of the image storage, select Modify Configuration.
- If you need to update the password for the image storage, select Update Password. After updating, you need to manually reconnect the image storage for the changes to take effect.
View Image Storage Usage
Note: Deleting an image file completely and deleting virtual machines created using that image completely allows you to execute a data cleanup operation to release storage space on the image storage. During data cleanup, please avoid performing data write-related operations.Delete an Image Storage
If you need to delete an existing image storage, on the target image storage page, click to delete it. You can also delete image storage in bulk on the data center Image Storage sub-page.
Image Basic Operations
Add an Image
You can add various formats of system images or disk images to the image storage. When creating a virtual machine for the first time, the system will download the image to the data storage as an image cache. Using a URL or by uploading locally, you can add QCOW2, ISO, RAW, and VMDK image files to the image storage.
Procedure
- In the navigation pane, choose .
- Right-click the target image storage and choose Add Image.
-
In the Add Image dialog, set the following parameters:
- Image Storage: The current image storage
- Name: Image name
- Description: Image description
- Image Type: Image type, including system images and disk images
- Image Format: Different types of images support different image formats, including .qcow2, .iso, .raw, and .vmdk formats
- Image Path: Add an image through a URL path or by uploading a local file
- URL: Supports adding an image via HTTP/HTTPS/FTP/SFTP format or through an absolute path on a single-node image repository
- Upload File: Choose a file that matches the selected image format and is accessible by the current browser to upload directly
- Review the configuration and click OK.
Synchronize Images
About this task
Within the same management node, you can synchronize one or multiple images from a standalone image storage to the specified standalone image storage.
By default, image synchronization between image storage uses the management network. You can set a dedicated image sync network when adding an image storage or modifying image storage settings to reduce management network load. When both source and target image storage have set image sync networks, only the image sync network of the target image storage takes effect during the actual synchronization.
Procedure
- In the navigation pane, choose .
- Select the target image storage.
- On the image storage details page, click Image.
- On the Image tab, select target images.
- Click .
- In the Synchronize Image dialog, select the target standalone image storage.
- Click OK.
Migrate an Image
Before you begin
- You can migrate images between distributed image storage.
- Before migrating images, ensure the network connectivity between the monitoring nodes of the two distributed image storage.
- When migrating an ISO image across data centers, virtual machines using the ISO image need to detach the ISO image before they can start normally.
Procedure
- In the navigation pane, choose .
- Right-click the target image and choose Change Image Storage.
- In the Change Image Storage dialog, select the target distributed image storage.
- Click OK.
What to do next
After migration, the original image data remains in the image storage. You can manually clean up the data in the image storage. Once cleaned up, the data cannot be recovered. Proceed with caution.Delete an Image
Before you begin
(Optional) The platform provides deletion protection for images. You can define how resources are deleted by customizing the deletion policy in system parameters. By default, the platform adopts a delayed deletion for Image deletion policy (retained for 3 days). Deleted resources are first moved to the recycle bin and permanently deleted after the retention period. For more information, see System Parameters.Procedure
- In the navigation pane, choose .
- Select the target image.
-
On the image details page, click .
To delete multiple images, go to the image storage's image tab, select the VMs you want to delete, and then click .The delete button label changes based on the Image Deletion Policy. When the deletion policy is set to immediate deletion, the button appears as "Delete". When the deletion policy is set to delayed deletion or never delete, the button appears as "Move to Recycle Bin".
- After acknowledging the risk, click OK.
Image Cross-Platform Usage
Export Image
Select an image and export it. The exported image will appear in the Export List tab of the root node. Once an image has been exported, it cannot be exported again.
Procedure
- In the navigation pane, choose .
- Right-click the target image file, then select Export Image.
-
In the Export Image dialog, choose the export method, and then click OK.
Note:
- For large image files, it is recommended to select export only. After exporting, you can go to the export list page to view and download.
- For medium and small image files, you can directly choose to export and download.
Export VM as OVA Template
Export a virtual machine in the .ova file format to a standalone image storage within the same data center. The exported OVA template does not include ISO drives or GPU devices.
Before you begin
Before exporting an OVA template, ensure that the virtual machine is powered off.Procedure
- In the navigation pane, choose .
- Right-click the target virtual machine, then select .
-
In the Export OVA Template dialog, choose the export method and image storage, and then click OK.
Note:
- For large VM files, it is recommended to select export only. After exporting, you can go to the export list page to view and download.
- For medium and small VM files, you can directly choose to export and download.
- After the export completes, click .
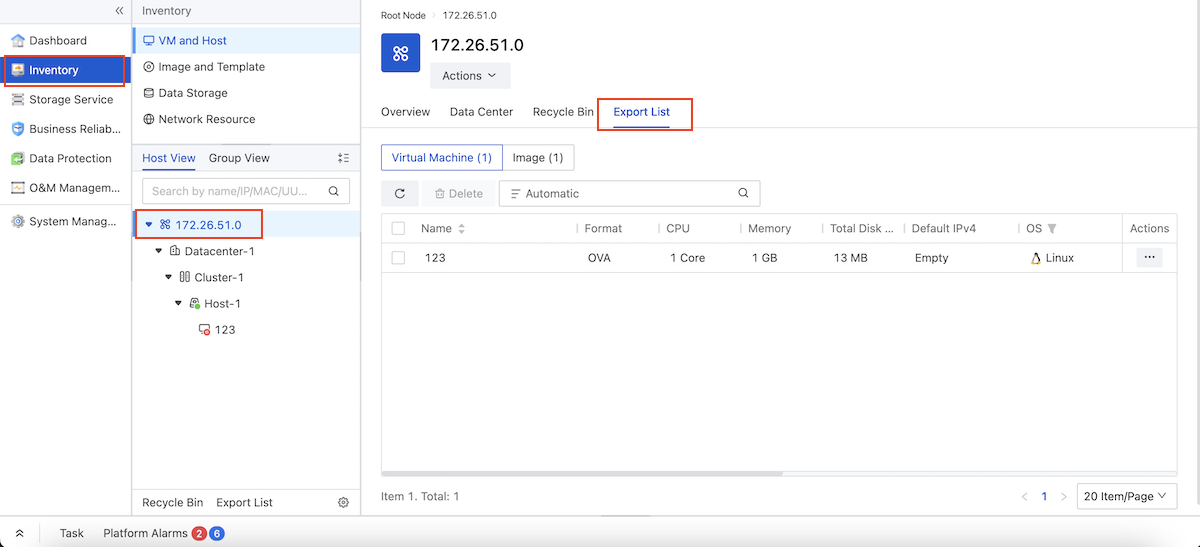
-
Click Export List to view the exported VM OVA template.
图 1. View the Exported VM OVA Template