Introduction
ZStack ZStone is a distributed storage software designed for modern infrastructure. You can deploy it on any standard server to build simple, reliable, and cost-efficient storage infrastructure quickly. This document explains how to install, deploy, and start using the ZStack ZStone distributed storage platform.
Installation
Preparation
Prepare Software Tools
- ISO (H76C, Expert Mode minimum requirement).
 Note:
Note:
- Versions before ZStack ZStone 4.2.0 require management node components including ZSHA2 (dual-management node mode) and MySQL.
- You can use Rufus (recommended) or UltraISO to burn the ISO image to a USB drive. For Rufus instructions, see Quick Installation Guide USB burning section.
- Enterprise Edition Toolkit: Contact technical support.
- Dual-Management Node HA Suite: Contact technical support.
- ZStack ZStone software package: Contact technical support.
Check Hardware Requirements
| Device | Component | Recommended Configuration |
|---|---|---|
| Server | CPU | 2*Intel® Xeon® Silver 4314 (16C 2.4GHz) |
| Memory | 4*32GB DDR4, up to 3200 MT/s | |
| System Disk | 2*Intel S4510/S4520 480GB (RAID1) | |
| Cache Disk | 2*Intel S5610/S4620 960GB (JBOD) | |
| Data Disk | 2/4/8/12/16TB HDD (JBOD) | |
| NIC | 4*1Gb+2*10Gb | |
| RAID Card | Supports both JBOD and RAID1 | |
| Network Switch | / | Equipped with at least a 1 GB switch and a 10 GB switch |
Verify Network Requirements
- Management network: No restrictions.
- Storage public network: We recommend 10GbE network cards. For small-scale deployments, you can share this with the storage cluster network. For large-scale deployments (10+ nodes), configure this separately from the storage cluster network.
- Storage cluster network: We recommend 10GbE network cards with LACP Bond configuration.
Install ZStack ZStone
- Default deployment: Use this mode when deploying in an existing environment.
- Hyper-converged deployment: When deploying ZStack Cube hyper-converged environment, ZStack ZStone comes pre-installed and requires no separate deployment.
Default Deployment
- Prepare your environment. The ZStack ZStone management service depends on management node services. Follow these steps:
- Deploy two in management nodes with HA
configuration. Note: These dual management nodes will also serve as
ZStack ZStone management
nodes.
- Deploy one in compute node or expert
mode. Note: This node will function as a ZStack ZStone storage server node along with the
dual management nodes.
- Deploy two in management nodes with HA
configuration.
- Download the ZStack ZStone software package to any management node.
- Extract the installation package.
# Check the obtained installation package [root@localhost ~]# ls ZStone-x86_64-installer-5.5.0.tar.gz # Decompress the installation package [root@localhost ~]# tar xf ZStone-x86_64-installer-5.5.0.tar.gz - Navigate to the zstone-installer directory after extraction.
[root@localhost ~]# cd zstone-installer - Open and edit the install.conf configuration file.
[root@localhost zstone-installer]# vim install.conf # Leave first manager IP if only one manager zstone_vip= //Enter the management VIP for the storage cluster. For a single management node, enter its IP address. For dual management nodes, enter the VIP address. # ZStone Manager hosts list zstone_management_host_ip= //Enter the IP addresses of the management nodes. If you have dual management nodes, separate the IP addresses with English commas. zstone_managerment_host_port= //Enter the SSH port of the management node. #password: ["password1","password2"] zstone_management_host_rootpw=["password"] //Enter the root password for the management node. # MySQL info zstone_db=zstone zstone_db_user=root zstone_db_port=3306 zstone_db_password=zstack.mysql.password # Log level: trace, debug, info, warning, error, fatal, panic log_level=debug # PostgreSQL info zstone_temporal_db_port=5432 #zstone account zstone_account_name=admin zstone_account_password=password #zbs zbs_install=false //Set this to true if you need to install high-performance block storage. - Run the following command to install the software package after saving your
configuration.
[root@localhost zstone-installer]# ./install.sh - After successful installation, you'll receive the ZStack ZStone UI access URL.
Hyper-Converged Deployment
When you deploy the hyper-converged environment, it includes ZStack ZStone distributed storage by default. You don't need to install it separately.
Quick Start
Cluster Initialization
Note:
- If the page fails to load, verify that both the management service and UI service are running properly.
- The system will time out after 2 hours of inactivity and log you out automatically.
Create a Cluster
On the ZStack ZStone guide page, click Start Initialization to enter the Cluster Initialization interface.
- Name: Enter a name for the cluster.
Naming rules: 1-128 characters long. The name can contain lowercase letters (a-z), numbers (0-9), periods (.), or hyphens (-). Avoid starting with a hyphen or a number as well as ending with a hyphen.
- Admin IP CIDR: Enter the CIDR of the management network which manages and configures storage clusters.
- Public IP CIDR: Enter the CIDR of the public cluster network which is used for access between block storage gateway and the storage pool, the communication between monitoring roles, and the communication between data disks and block storage gateways.
- Cluster IP CIDR: Enter the CIDR of the cluster internal
network which monitors data disks across cluster servers and synchronizes
replicas.Note: In a small-scale configuration scenario, you can reuse the
public IP. In a large-scale configuration scenario, for example, with more
than 10 servers, we recommend that you deploy a cluster IP separately from
the public IP.
- Time Sync Server IP: Enter the IP address of the time server.Note:
- The time server ensures clock synchronization across cluster nodes to maintain system health.
- We recommend placing the time server on the same CIDR as the management network.
Add a Server
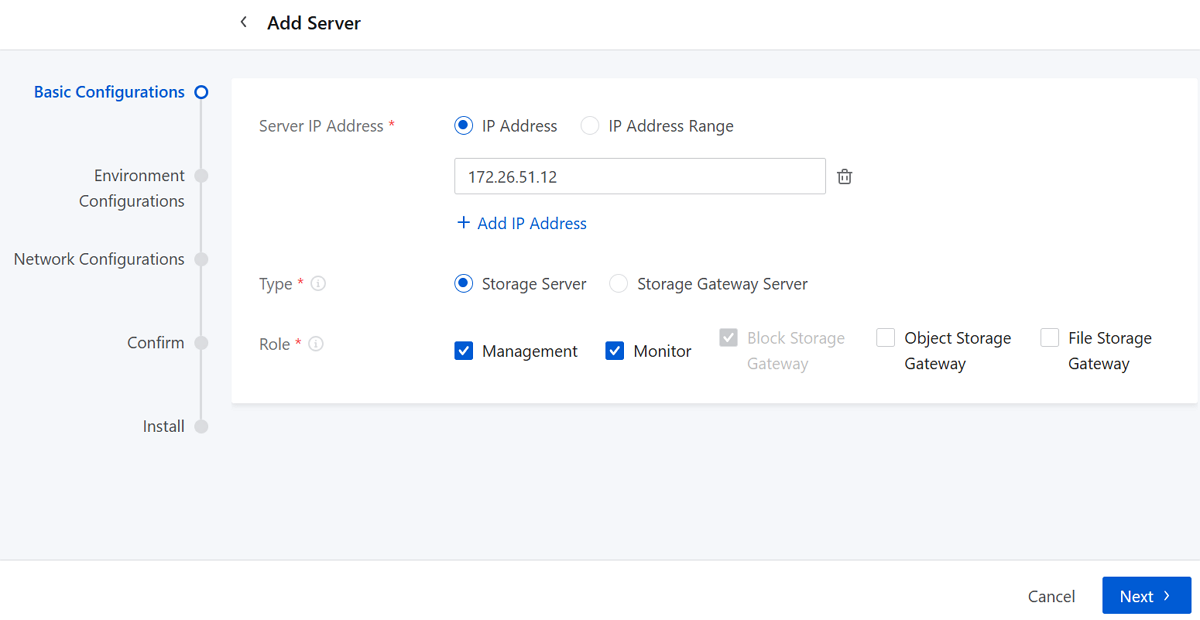
On the main menu of ZStack ZStone, choose . On the Server page, click Add Server.
Adding a general purpose storage server involves five steps. Set the following parameters to complete the server configurations.
Step One: Basic Configurations
- Server IP Address: Enter the server IP address. You can specify either a single IP address or IP address range. We support adding multiple servers in bulk.
- Type: Select server type. Two server types are
supported:
- Storage Server:
- Provides storage pools with hard disks that can be used as data disks.
- Supports five roles: Management, Monitor, Block Storage Gateway, Object Storage Gateway, and File Storage Gateway.
- Storage Gateway Server:
- Hosts various interfaces and clients. The system only manages the server gateways and does not manage hard disks on the server.
- Supports only one role: Block Storage Gateway.
- Storage Server:
- Role: Configure the role of servers. Five roles are
supported:
- Admin Role (Management):
- Responsible for the collection and management of the runtime status of the cluster and manages the distributed storage cluster as the management node in multiple ways, such as GUI and API.
- We recommend that you deploy at least 2 admin roles to meet the high availability requirement.
- Monitor Role:
- Responsible for monitoring the cluster storage data and maintaining overall status of the cluster, including metadata such as data mapping and cluster authentication.
- We recommend that you deploy an odd number of monitor roles (3+2*N, N≥0) to meet the high availability requirement.
- Block Storage Gateway:
- Responsible for the access between the server and the storage cluster through Block interface.
- By default, this role is selected for a storage server.
- By default, this role is selected for a gateway server. And a storage gateway server only supports this role.
- Object Storage Gateway:
- Responsible for the access between the server and the storage cluster through Object interface.
- To use object storage service, you need to select this role.
- On an object storage gateway server, you can turn on the object gateway to provide the S3 protocol and gateway services.
- File Storage Gateway:
- To use file storage service, you need to select this role.
- On a file storage gateway server, you can create a file gateway to provide file storage access protocols such as SMB and NFS.
Note:
- When you add a server for the first time, three roles including Management, Monitor, and Block Storage Gateway, are selected by default. The Block Storage Gateway role can be deselected, while Management and Monitor roles are required.
- For subsequent server additions, you can add storage servers without roles.
- Deploy at least three storage servers with Management, Monitor, and Block Storage Gateway roles in a cluster.
- Admin Role (Management):
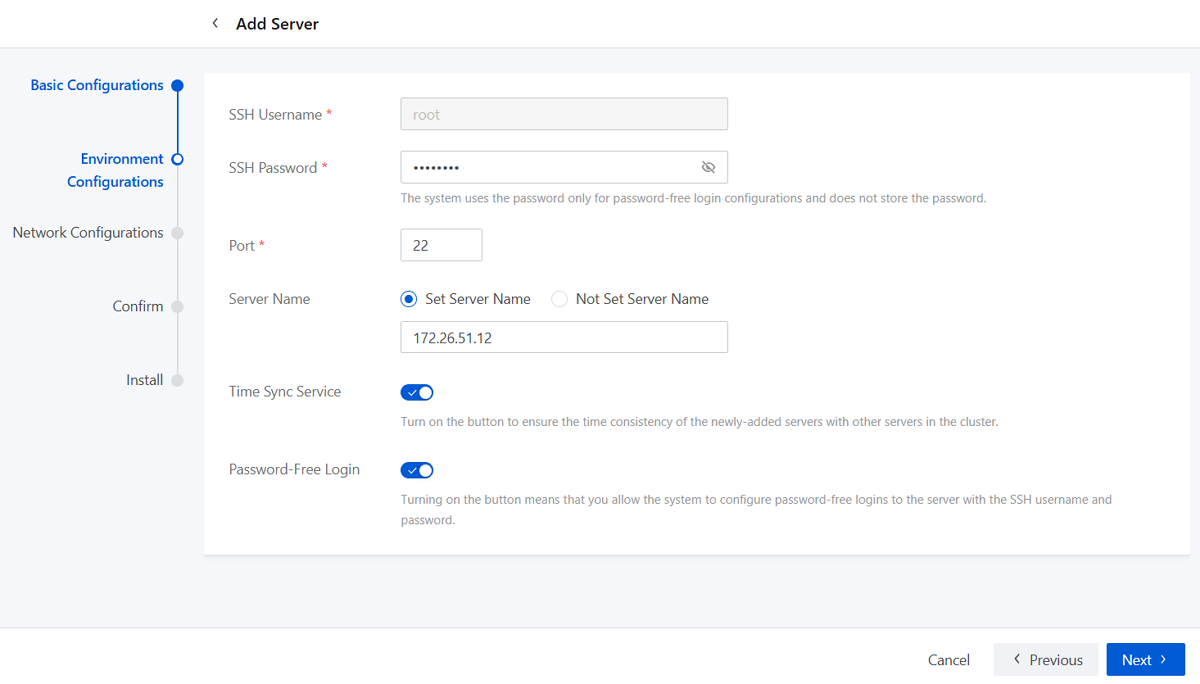
Step Two: Environment Configurations
- SSH Username: Enter the SSH username for the server. Default: root.
- SSH Password: Enter the SSH password. The system uses this password only for password-free login configurations and does not store the password.
- Port: Enter the server port number. Default port: 22.
- Server Name: (Optional) Specify a server
name.
Naming rules: 1-63 characters long. The name can contain lower-case letters (a-z), digits (0-9), periods (.), and hyphens (-). Avoid starting with a hyphen or number as well as ending with a hyphen.
Note:
- If you do not set a server name, ensure the server name-to-IP mapping is preconfigured in /etc/hosts file. The system uses the existing server name after server addition.
- If you set a new server name, it overwrites the existing name-to-IP mapping in /etc/hosts file.
- When you add servers in bulk, the names of these servers will end with a suffix, that is, the last part of their IP address (0-254), to distinguish these servers, for example, server-24.
- Time Sync Service: Choose to enable or disable the
time synchronization service.
If you enable this setting, the system synchronizes the newly-added server's clock with other servers in the cluster.
- Password-Free Login: If you enable this setting, the system configures password-free logins to the server with the SSH username and password.
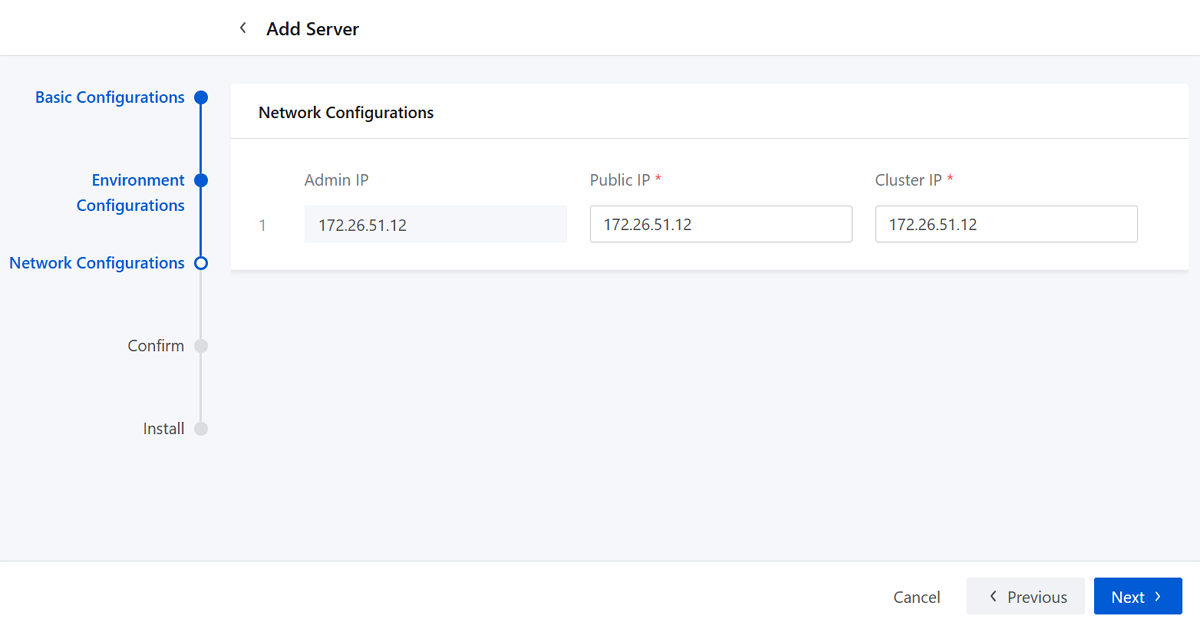
Step Three: Network Configurations
- Admin IP: Sets the IP address the management network which manages and configures storage clusters. The default admin IP is the server IP address.
- Public IP: Sets the IP address of the public cluster network which facilitates interaction between block storage gateways and storage pools.
- Cluster IP: Sets the IP address of the cluster
internal network which monitors data disks across cluster servers and
synchronizes replicas.Note: Skip setting Cluster IP when you add a storage
gateway server.
Step Four: Confirm
Review the information of the server to add. You can navigate back to modify configuration details if needed.

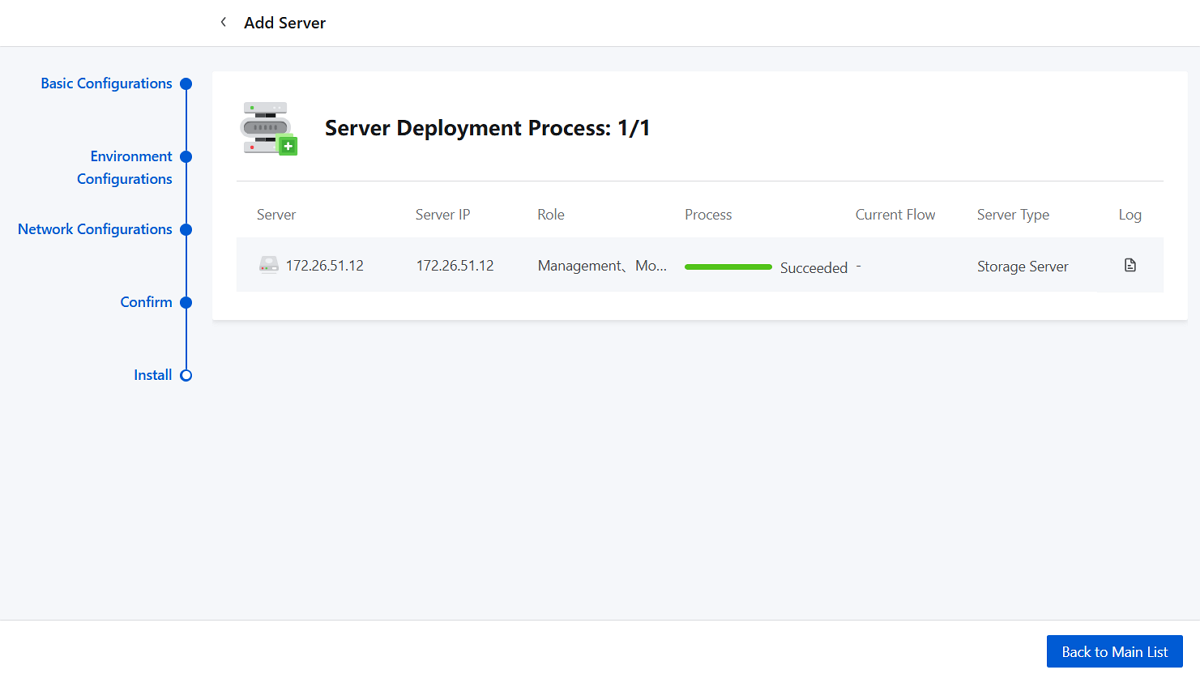
Step Five: Install
Note:
- You cannot exit the page when adding a server for the first time.
- Avoid refreshing the browser when adding a server for the first time.
Scan Hard Disks
On the main menu of ZStack ZStone, choose . On the Hard Disk page, click Scan and all hard disks on storage servers and their information will be displayed in the list.
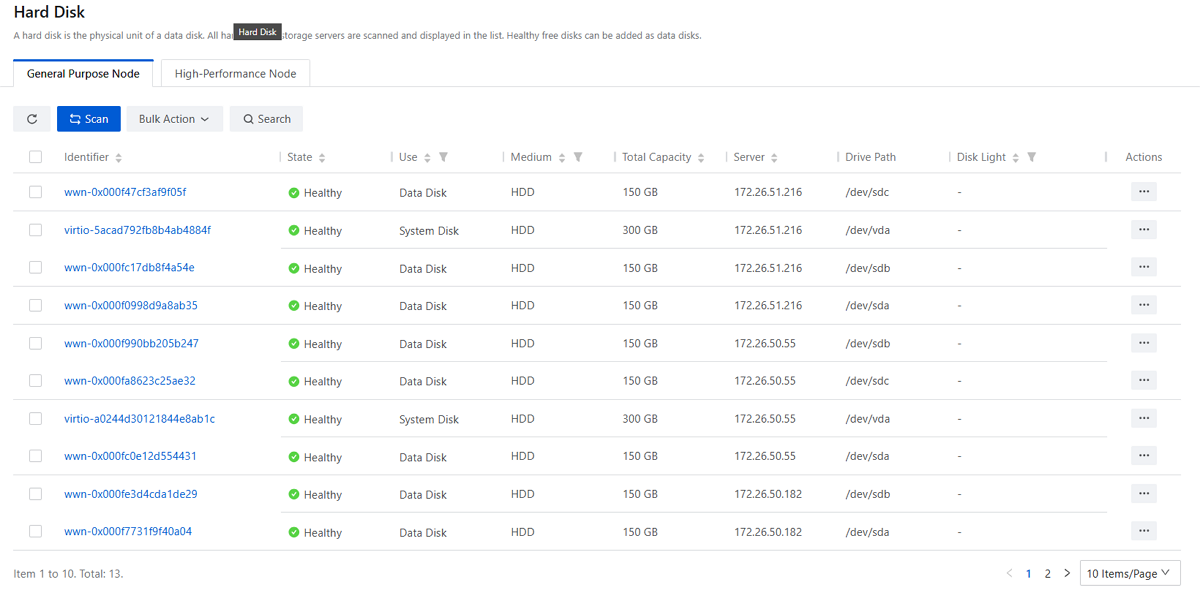 Note:
Note:
- Healthy free disks can be used for cache partitioning (SSD recommended) or added as data disks. If you set cache partition, ensure that each partition has a minimum capacity of 50 GB.
- A scanned unknown disk implies that the disk contains unrecognized
partitions.
- For ZStack ZStone 4.2.0 and earlier versions,
run the
wipefs -af /dev/sdXcommand to manually clean up partitions before rescanning the disk. - For ZStack ZStone 4.2.0 and later versions, go to the Hard Disk page and click Initialize Hard Disk to clean up partitions directly.
- For ZStack ZStone 4.2.0 and earlier versions,
run the
- In some hardware environments, newly-added hard disks may not be detected. Reboot the server or contact official technical support for assistance.
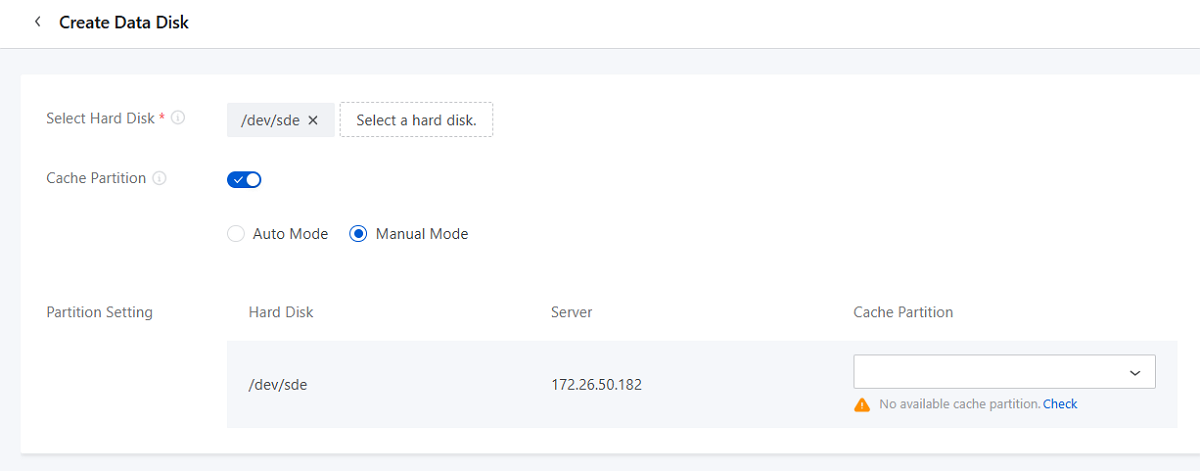
Create a Data Disk
On the main menu of ZStack ZStone, choose . On the Data Disk page, click Create Data Disk.
- Select Hard Disk: Select the hard disk to add as a data
disk.Note: You can add hard disks that are healthy, free, and of at least 25
GB size as data disks.
- Cache Partition: Choose whether to set cache partition
for data disks.
- Auto Mode: If you select auto mode, the system automatically attaches cache partitions provided by servers to the selected hard disks.
- Manual Mode: If you select manual mode, you can manually select cache partitions for each hard disk that has been selected.
Note: If available cache partitions are insufficient for the selected hard
disks when you enable this parameter, part of the hard disks fail to be
added as data disks.
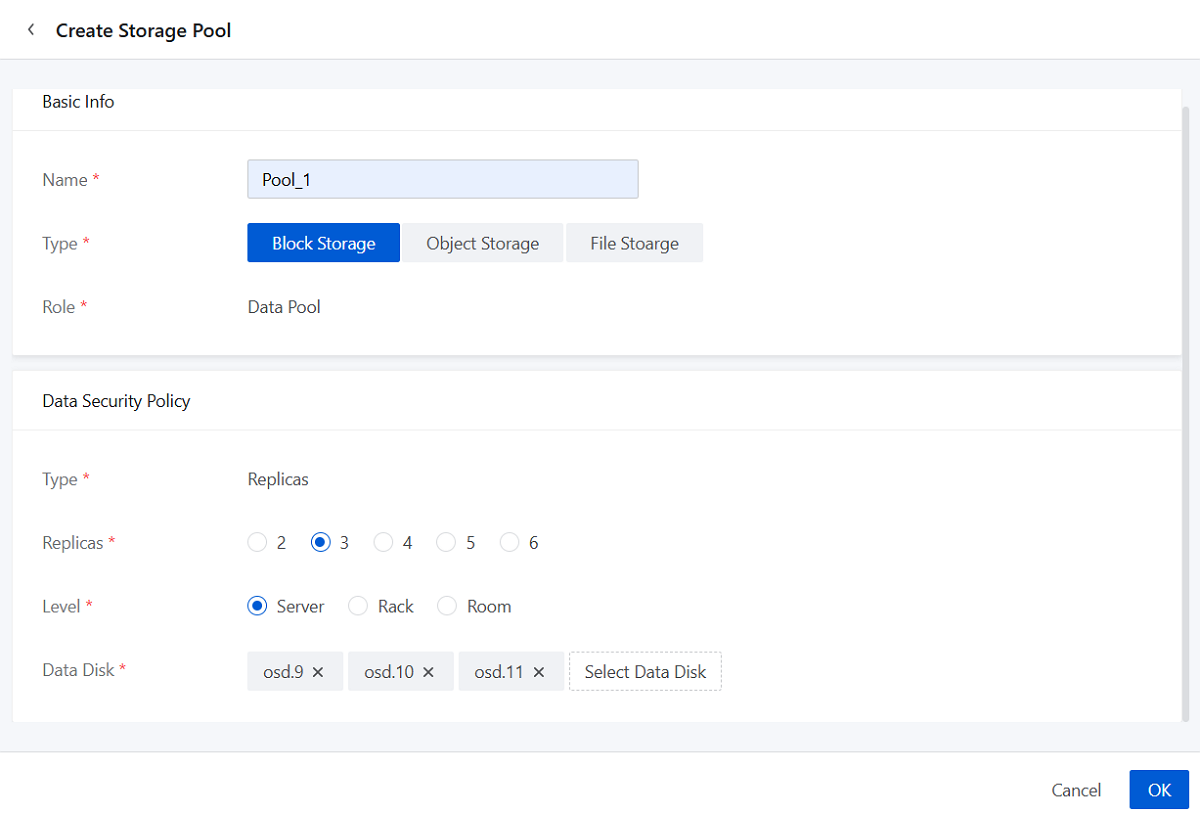
Create a Storage Pool
On the main menu of ZStack ZStone, choose . On the Storage Pool page, click Create Storage Pool.
- Block Storage Pool
- Object Storage Pool
- File Storage Pool
Create a Block Storage Pool
- Name: Set the name for the storage pool.
Naming rules: 1-1288 characters long. A name can contain Chinese characters, letters, digits, spaces, hyphens (-), underscores (_), periods (.), parenthesis (), colons (:), and plus signs (+).
- Type: Select Block Storage.
- Role: The default role is Data Pool and does not support modification.
- Data Security Policy:
- Type: The default type is Replicas and does not support modification.
- Replicas: Set the number of replicas for the
storage pool in the 2-6 value range.Note: In production
environments, we recommend setting at least 3 replicas to ensure
data security.
- Level: Select the level of the failure domain (Server/Rack/Room) according to your topology plan.
- Data Disk: Select data disks based on the topology canvas.Note:
- Selected data disks must meet the redundancy level requirements.
- Select data disks of similar sizes if possible.
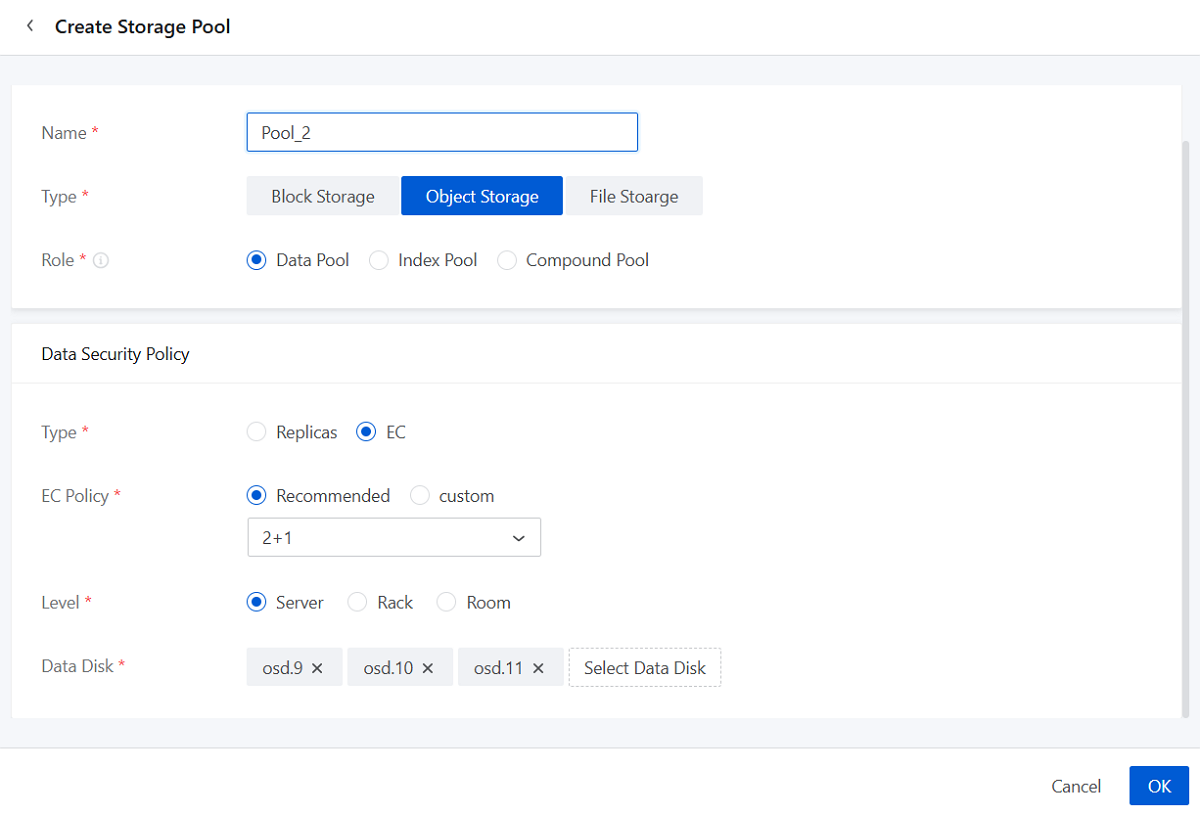
Create an Object Storage Pool
- Name: Set the name for the storage pool.
Naming rules: 1-128 characters long. A name can contain Chinese characters, letters, digits, spaces, hyphens (-), underscores (_), periods (.), parenthesis (), colons (:), and plus signs (+).
- Type: Select Object Storage.
- Role: Select the role of the storage pool (Data Pool,
Index Pool, and Compound Pool).Note:
- Data Pool: Stores data.
- Index Pool: Stores the index information of stored objects.
- Compound Pool: Supports multi-purpose resuse and can be selected as an Index Pool or a Data Extra Pool in Storage Policy.
- Data Security Policy:
- Type: Select data redundancy type
(Replicas/EC).
- If you select Replicas, set the following parameters:
- Replicas: Set the number of replicas for the storage pool in the 2-6 value range.
Note:
- Storage pools with Index Pool or Compound Pool role only support one redundancy policy, that is, Replicas.
- In production environments, we recommend setting at least 3 replicas to ensure data security.
- If you select EC, set the following parameters:
- EC Policy: Set the EC policy
for storage (Recommended/Custom).
- Recommended: Select from six recommended values: 2+1, 4+2, 8+3, 4+2:1, 8+2:1, 16+2:1.
- Custom: Customize the
EC policy. Enter the number of data and parity
blocks.Note: Positive integers only. Make sure
that the number of data blocks is greater than the
number of parity blocks, and parity blocks do not
exceed 4.
Note:
- An EC policy consists of data blocks and parity blocks. Data blocks indicate the number of data shards, while parity blocks indicate the number of parity shards generated through the algorithm. Taking the 4+2 EC policy on the server level as an example. This policy ensures data availability even when 2 servers fail.
- Disk Utilization is displayed in real time. The formula for calculating disk utilization: data blocks/(data blocks + parity blocks).
- EC Policy: Set the EC policy
for storage (Recommended/Custom).
- If you select Replicas, set the following parameters:
- Level: Select the level of the failure domain (Server/Rack/Room) according to your topology plan.
- Data Disk: Select data disks to add based on the
topology canvas.Note:
- Selected data disks must meet the failure domain requirements of the data security policy.
- Select data disks of similar sizes if possible.
- Type: Select data redundancy type
(Replicas/EC).