Security Group
What is Security Group?
A security group provides security control services for VM NICs. It filters the ingress or egress TCP, UDP, and ICMP packets of VM NICs based on the specified security rules.
Feature Framework
Security Group and Security Rule
A security group control and filter NIC ingress/egress flows through security rules.
A security group can have one or more security rules. The security rules can be
categorized into system rules and custom rules according to their creation
mechanism.
- System Rules: The rules added by the system automatically to allow mutual communications among NICs in the same security group. System rules have higher priorities than all custom rules and cannot be modified or deleted. If you need to deny communication among the NICs in the same security group, disable the corresponding system rules.
- Custom Rule: Rules added by users as needed.
A security rule has the following attributes: direction, object, protocol&port,
policy, and priority.
- Direction: Security rules filter flows based on the flow source or
flow destination. They can be categorized into the following two types based
on the direction of flows they control.
- Ingress Rule: Ingress rules take effect on flows accessing VM NICs. They are responsible for filtering ingress flow sources.
- Egress Rule: Egress rules take effect on flows out of VM NICs. They are responsible for filtering egress flow destinations.
- Object: The flow sources or destinations that controlled by the
security rules.
- Source: Corresponds to ingress rules. You can set the source as IP
addresses or security groups.
- IP address: Allow or reject the flows from this IP address to access VM NICs in the current security group.
- Security group: Allow or reject flows from NICs in another security group to access NICs in the current security group.
- Destination: Corresponds to egress rules. You can set the
destination as IP addresses or security groups.
- IP address: Allow or reject the VM NICs in the current security group to access the IP address.
- Security group: Allow or reject the VM NICs in the current security group to access NICs in another security group.
- Source: Corresponds to ingress rules. You can set the source as IP
addresses or security groups.
- Protocol&Port: The protocol and port that the security rule take
effect on.
- ALL: The security rule takes effect on all protocols. You cannot specify port in this case.
- TCP: The security rule takes effect on the flows using TCP protocols and the from the specified ports. Supported ports 1-65535.
- UDP: The security rule takes effect on the flows using UDP protocols and the from the specified ports. Supported ports 1-65535.
- ICMP: The security rule takes effect on the flows using all ICMP protocols. The start port and end port are both -1.
Sample:- An ingress rule, whose protocol is TCP, source is 192.168.12.0/24, port is 1000, and policy is Allow, means allows flows from 192.168.12.0/24 to use the TCP protocol to access the 1000 port of NICs in the group.
- An egress rule, whose protocol is UDP, destination is 192.168.12.0/24, port is 1000-1001, and policy is Allow, means allows NICs in the group to use the TCP protocols to access the 1000 and 1001 ports of 192.168.12.0/24.
- Policy: The action that the security rules make on the specified
flows.
- Allow: Permits the flows to or from the NICs.
- Reject: Prevents the flows to or from the NIC.
- Priority:
- You can set priorities for rules on the same direction. The highest rule take effect when a conflict occurs in such a scenario as you set more than one rule, especially an allow rule and a reject rule, on the same source or destination.
- Supported value: 1-100. A higher value indicates a lower priority.
Security Group and VM NIC
A security group provide security controls to VM NICs attached to it. A security
group can be attached to one or more VM NICs, and a VM NIC can be attached to one or
more security groups.
- Priority:
- If you attach more than one security groups to a VM NIC, you can set priorities for these groups. The NIC matches the rules of the group with the highest priority first, and then the group of lower priorities.
- By default, all admin security group have higher priority than user security groups.
- Policies for Other Flows:
- After an NIC is attached to security groups, you need to set a default flow policy to process the flows that are not stipulated by security group rules.
- By default, all ingress rules that are not stipulated are rejected and all egress rules that are not stipulated are allowed.
Security Group and Permission
Security groups are divided into admin security groups and tenant/sub-account
security groups. Generally, admin security groups are created and owned by
administrators (including admin and platform managers); tenant/sub-account security
groups are created and owned by tenants/sub-accounts.
- A tenant/sub-account can view and manage security groups owned by itself.
- The administrator can view and manage all security group. When attach security groups to NICs, note that an admin security group can be attached to any NIC, while a tenant/sub-account security group can be attached to only NICs owned by the same tenant/sub-account.
Security Group VS Firewall
A firewall manages the south-north traffic of VPC networks. A security group manages
the east-west traffic of VPC networks and is applied to VM NICs. The two services
complement with each other. The following table compares the two services from three
aspects.
| Item | Security Group | Firewall |
|---|---|---|
| Application scope | VM NIC | The entire VPC network |
| Deployment mode | Distributed | Centralized |
| Deployment location | VM instance | VPC vRouter |
| Configuration policy | Supports only Allow and Reject policies | Allows you to customize Accept, Drop, or Reject policies as needed |
| Priority | Allows you to customize priorities | Allows you to customize priorities |
| Match condition | Source IP/security group, destination IP/security group, source port, destination port, and protocol | Source IP address, source port, destination IP address, destination port, protocol, and packet status |
Considerations
- If you use a security group along with other network services, such as load balancing and route table, make sure that the security group rules required by these network services are added to the security group.
- Public networks, flat networks, and VPC networks support the security group service. It is provided by the security group network service module, which uses iptables to implement security control.
- A security group is a distributed firewall. Each security rule change, NIC association or disassociation will cause the security group rule to be updated on all associated VM instances.
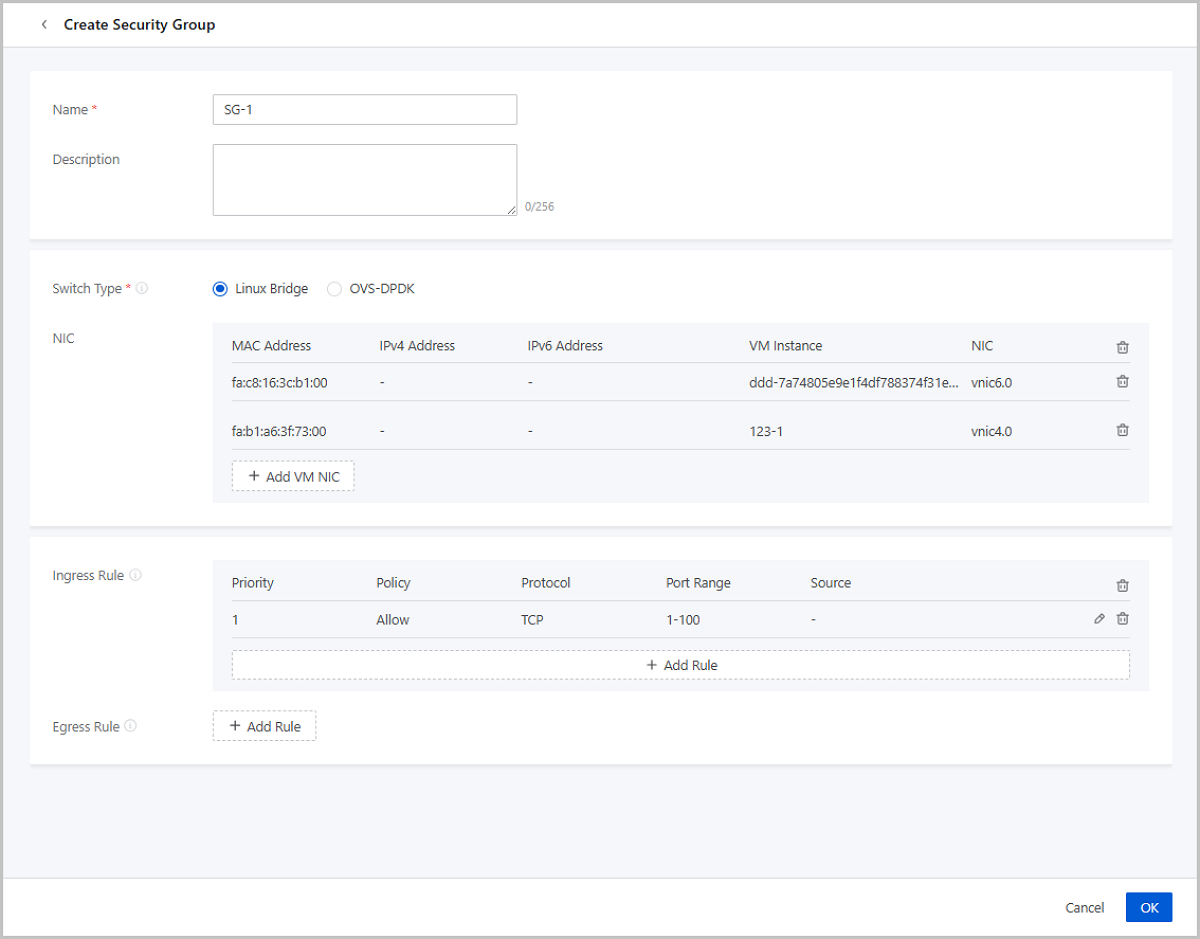
Create a Security Group
On the main menu of ZStack Cube Ultimate, choose . On the Security Group page, click Create Security Group. Then, the Create Security Group page is displayed.
On the displayed page, set the following parameters:
- Name: Enter a name for the security group.
- Description: Optional. Enter a description for the security group.
- Switch Type: Select a switch type to filter NICs across different networks.
- NIC: Optional. Add a NIC to the security group. You can add NICs either here or after the security group is created.
- Ingress Rule: Optional. Add rules to filter flows accessing the security group. You can add ingress rules either here or after the security group is created.
- Egress Rule: Optional. Add rules to filter flows out of the security group. You can add egress rules either here or after the security group is created.
To add an ingress/egress rule, set the following parameters:
- Type: Set the direction of flows that the rule controls.
- Priority: Optional. Set a priority to the rule. Valid
values: integers from 1 to 100. A smaller number indicates a higher priority.
 Note:
Note:
- If you do not set a priority manually, the rule is endowed with a priority lower than that of all current rules by default.
- If the priority you set has been occupied, the rule originally occupying it will be pushed back by one automatically. For example, if you set the priority as 2 for the current rule, the rule with the priority 2 originally will be pushed to 3, the original rule 3 will be pushed to 4, and so on.
- IP Type: Choose IPv4 or IPv6.
- Protocol: Choose a communication protocol that the rule takes effect on. Supported protocols: ALL, TCP, UDP, and ICMP.
- Port: Set a port that the rule takes effect on if you
choose the protocol as TCP or UDP.Note:
- You can enter a port range in this format:
${Start_Port}-${End_Port}. - You can enter more than one (up to 10) port (port range) , with each port (range) separated by a comma (,).
- You can enter a port range in this format:
- Source: You need to set this parameter for an ingress
rule to allow/reject the flows from the specified source. The source can be an
IP address/CIDR or another security group.Note:
- You can enter an IP range as the source in this format:
Start IP-End IP. - If you enter both CIDRs and IP addresses in other formats, make sure that CIDRs use 24-bit netmasks. If you enter CIDRs only, the netmasks are not limited. Do not use 0.0.0.0/0 or ::/0.
- You can enter more than one (up to 10) IP address (range) /CIDR, with each IP address (range) /CIDR separated by a comma (,).
- You can enter an IP range as the source in this format:
- Destination: You need to set this parameter for an egress
rule to allow/reject VM NICs to access the specified destination. The
destination can be an IP address/CIDR or another security group.Note:
- You can enter an IP range as the source in this format:
Start IP-End IP. - If you enter both CIDRs and IP addresses in other formats, make sure that CIDRs use 24-bit netmasks. If you enter CIDRs only, the netmasks are not limited. Do not use 0.0.0.0/0 or ::/0.
- You can enter more than one (up to 10) IP address (range) /CIDR, with each IP address (range) /CIDR separated by a comma (,).
- You can enter an IP range as the source in this format:
- Enable: Choose whether to make the rule take effect after the creation. Default: true. If set to false, this rule does not take effect after the creation until you enable it manually.
Manage a Security Group
On the main menu of ZStack Cube Ultimate, choose . Then, the Security Group page appears.
The following table lists the actions that you can perform on a security group.
| Action | Description |
|---|---|
| Create Security Group | Create a security group. |
| Edit Security Group | Edit the name and description of a security group. |
| Enable Security Group | Enable a disabled security group. |
| Disable Security Group | Disable an enabled security group. After a security group is disabled, the security group rules and relevant services are no longer in effect. |
| Delete Security Group | Deleting a security group also deletes the security group rules and relevant services. |
You can click the name of a security group and enter its details page to perform more
actions on the security group rules.
| Action | Description |
|---|---|
| Add Rule | Add an ingress or egress rule to the security group. |
| Modify Rule | Modify a rule.Note: You cannot modify the default
rules used for the mutual communications within the security
group. |
| Enable Rule | Enable a rule to make it take effect. |
| Disable Rule | Disable a rule to make it invalid. |
| Import Rule | Import rules to the security group in
batch.Note: The imported rules are lower than all existing rules
on the priority and disabled by default. You can manually enable
than and modify their priorities after the
import. |
| Export Rule | Export rules of the security group. |
| Delete Rule | Delete a rule.Note: You cannot delete the default
rules used for the mutual communications within the security
group. |
You can click the name of a security group to enter its details page. Then click the
NIC tab. You can perform more actions on the NICs in the
security group on this tab.
| Action | Description |
|---|---|
| Associate NIC | Add a NIC to the security group.Note:
|
| Disassociate NIC | Remove a NIC from the security group. |