Load Balancing
What is Load Balancer?
A load balancer distributes traffic flows of a virtual IP address to backend servers. It automatically inspects the availability of backend servers and isolates unavailable servers during traffic distribution. This way, the load balancer improves the availability and service capability of your business. ZStack Cube Ultimate supports multiple NIC teaming for NIC redundancy and load-balancing capabilities.
- Shared-performance load balancing: uses a VPC vRouter to provide load balancing services. Traffic is distributed to backend servers by the VPC vRouter. If the VPC vRouter is providing multiple services, the load balancing service shares the performance of the VPC vRouter with other services.
- Dedicated-performance load balancing: uses a load balancer instance to provide load balancing services. Traffic is distributed to backend servers by the load balancer instance. A load balancer instance is a custom VM instance dedicated to providing load balancing services.
Concepts
- Frontend network: A frontend network is a type of network that is associated
with a load balancer. Requests from the network are distributed by the load balancer
to backend servers based on a specified policy.
- Shared-performance load balancer: You can specify a public network or VPC network as a frontend network.
- Dedicated-performance load balancer: You can specify a public network, flat network, or VPC network as a frontend network.
- Backend network:A backend network is a type of network that is associated
with a load balancer. Requests from frontend networks are distributed by the load
balancer to servers in the backend network.
- Shared-Performance Load Balancer:
- If you specify a public network as the frontend network, you can specify any one of the VPC networks of the VPC vRouter to which the public network is attached as the backend network.
- If you specify a VPC network as the frontend network, you can specify any one of the VPC networks of the VPC vRouter to which the VPC network is attached as the backend network.
- Dedicated-Performance Load Balancer:
- If you specify a public network as the frontend network, you can specify a flat network or any one of the VPC networks of the VPC vRouter to which the public network is attached as the backend network.
- If you specify a flat network as the frontend network, you must specify the same network as the backend network.
- If you specify a VPC network of a VPC vRouter as the frontend network, you must specify the same network as the backend network. If you need to associate the load balancer with more backend networks, you can attach more NICs to the load balancer instance. Note that the backend networks that you associate are among the other VPC networks of the VPC vRouter.
- Shared-Performance Load Balancer:
- Load balancer instance: A load balancer instance is a custom VM instance used to
provide load balancing services.
- The network where the default NIC of a load balancer instance resides is the frontend network of the load balancer instance. The default NIC cannot be detached from a load balancer instance.
- The networks of the NICs of a load balancer instance, except the default NIC, are the backend networks of the load balancer.
- The management NIC (if any) cannot be detached.
- LB image: A dedicated-performance load balancer (LB) image
encapsulates dedicated-performance load-balancing services and can be used to create
load balancer instances. However, a dedicated-performance load balancer image cannot
be used to create VM instances.
 Note: ZStack Cube Ultimate provides two
versions of LB image: VyOS 1.1.7 and openEuler 22.03. The following lists
the differences on the features supported by the two version.
Note: ZStack Cube Ultimate provides two
versions of LB image: VyOS 1.1.7 and openEuler 22.03. The following lists
the differences on the features supported by the two version.Feature VyOS 1.1.7 openEuler 22.03 ACL Support Support Attching VF NIC to LB instance (SR-IOV) Not Support Support - Load balancer instance: A load balancer (LB) instance offering defines the CPU, memory, image, and management network configuration settings used to create LB instances. LB instances provide load balancing services for the public network, flat network, and VPC network.
- Listener: A listener monitors the frontend requests of a load
balancer and distributes the requests to a backend server based on the specified
policy. In addition, the listener performs health checks on backend
servers.
- Listeners support the TCP, HTTP, HTTPS, and UDP protocols.
- A load balancer can be associated with multiple listeners while a listener can be associated with only one load balancer.
- If the listener uses the weighted round-robin load-balancing algorithm, you can set the weight value for each individual backend server on the backend server group details page.
- Forwarding rule: A forwarding rule forwards the requests from different
domain names or URLs to different backend server groups.
- A forwarding rule is composed of a domain name and URL.
- A listener can have up to 40 forwarding rules.
- You can configure a domain-based or URL-based forwarding rule for a load balancer. You can add multiple forwarding rules to a listener and associate these rules with different backend server groups.
- A forwarding rule is matched by using the exact match and fuzzy match mechanisms. If multiple forwarding rules are matched, the forwarding rule matched through the exact match mechanism is used.
- Certificate: If you select HTTPS for a listener, associate it with a certificate to make the listener take effect. You can upload either a certificate or certificate chain.
- Backend server group: A backend server group is a group of backend servers that
handles requests distributed by load balancers. It is the basic unit for traffic
distribution by load balancer instances.
- A load balancer can be associated with multiple backend server groups, while a backend server group can be associated with only one load balancer.
- A backend server group can be associated with multiple listeners in the same load balancer.
- Creating a load balancer will automatically create an empty backend server group.
- Backend server: A backend server handles requests distributed by a load balancer. You can add a VM instance on the Cloud or a server on a third-party cloud as a backend server.
How Load Balancing Works
Obtain Actual Client IP Address
Background
When receiving incoming client requests, a load balancer selects a backend server and establishes a new TCP connection to the selected backend server. Then, the load balancer forwards the requests to the backend server. When receiving responses from the backend server, the load balancer forwards the responses to the client. Therefore, the backend server can only obtain the forwarded IP address instead of the actual client IP address from a TCP session.
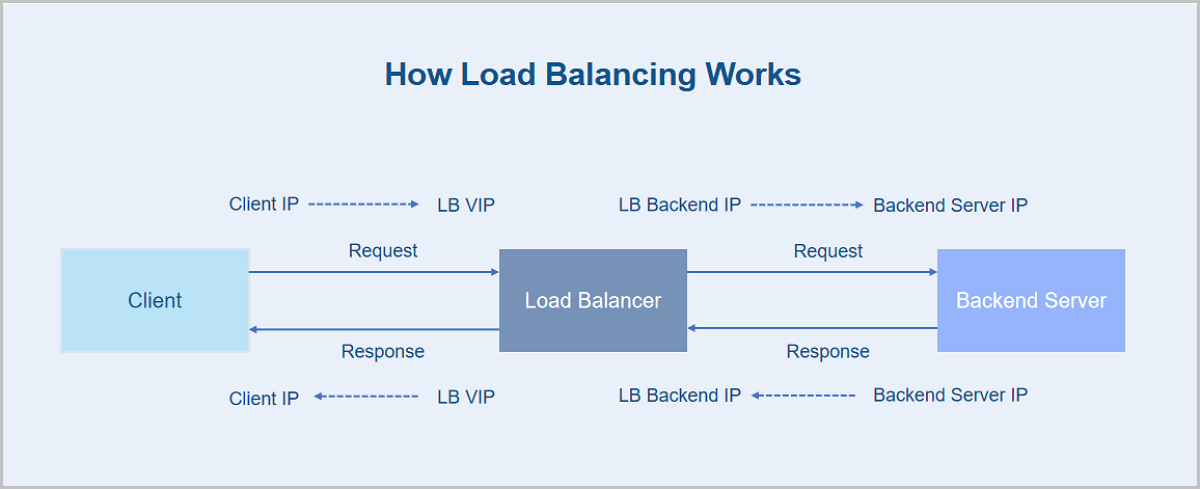
When Layer 7 listeners (HTTP/HTTPS protocols) are used, you can use the X-Forwarded-For header to obtain the actual client IP address. The X-Forwarded-For header is an HTTP request header used to record the actual client IP address. You can add the X-Forwarded-For header only when connecting clients through an HTTP proxy server or a load balancer. Common proxy servers (such as IIS 6, IIS 7, Apache, Tomcat, and Nginx) can use the X-Forwarded-For header to obtain the actual client IP address.
Note: You can achieve the same feature by using the Proxy protocol, which only requires
a header to be added to the TCP session to forward requests from clients. However,
you need to make sure that the corresponding backend servers support the Proxy
protocol. Currently, considering the potential impact on performance, the Cloud does
not support transparent Proxy for the time being.The following sections describe how to configure the X-Forwarded-For header on Apache and Nginx servers in a CentOS 7 system.
Configure Apache Servers
- Install the
Apache.
# Run the following installation command in a CentOS 7 system [root@localhost ~]# yum -y install httpd # Enable the HTTP service and set the HTTP service to start on boot [root@localhost ~]# systemctl start httpd [root@localhost ~]# systemctl enable httpd # Disable the VM firewall [root@localhost ~]# iptables -F - Modify configurations.
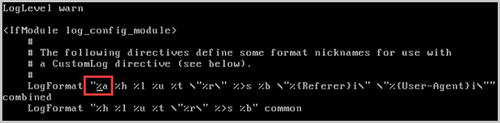
# Modify the httpd.conf configuration file
[root@localhost ~]# vi /etc/httpd/conf/httpd.conf

# Add the following fields
 LoadModule remoteip_module modules/mod_remoteip.so  //Load the mod_remoteip.so module
 RemoteIPHeader X-Forwarded-For  //Set the RemoteIPHeader header
 RemoteIPInternalProxy <ip_range1> <ip_range2> ... <ip_rangeX>  //<ip_range1> <ip_range2> ... <ip_rangeX> are the back-to-origin CIDR blocks of backend servers. Seperate multiple CIDR blocks with spaces

# Change the log format
 LogFormat "%a %l %u %t \"%r\" %>s %b \"%{Referer}i\" \"%{User-Agent}i\"" combined

# Restart Apache for the configurations to take effect
[root@localhost ~]# systemctl restart httpd
Figure 2. Modify Configurations 
- View the results.
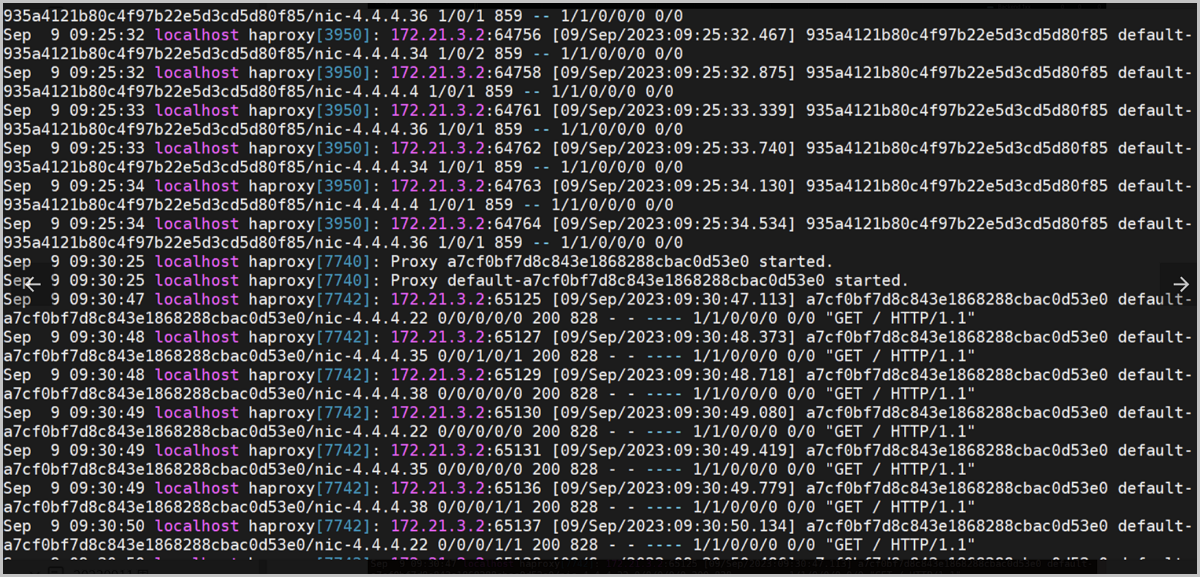
# View the access_log file to obtain the source client IP address
[root@localhost ~]# tail -f /var/log/httpd/access_log
Figure 3. View the Result 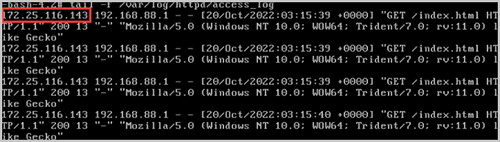
Configure Nginx Servers
- Install the
Nginx.
# Download the installation package and unzip the package [root@localhost ~]# wget http://nginx.org/download/nginx-1.0.12.tar.gz [root@localhost ~]# tar zxvf nginx-1.0.12.tar.gz [root@localhost ~]# cd nginx-1.0.12 # Install dependencies [root@localhost ~]# yum -y install pcre pcre-devel [root@localhost ~]# yum -y install zlib zlib-devel [root@localhost ~]# yum -y install openssl openssl-devel # Install and start # Use http_realip_module module to read X-Forwarded-For records [root@localhost ~]# ./configure --prefix=/usr/local/nginx --with-http_stub_status_module --without-http-cache --with-http_ssl_module --with-http_realip_module [root@localhost ~]# make [root@localhost ~]# make install # Check the service status [root@localhost ~]# ps -ef | grep nginx # Test whether the service is successfully enabled [root@localhost ~]# curl http://IP address:80 # Disable the VM firewall [root@localhost ~]# iptables -F - Modify configurations.
# Modify the nginx.conf configuration file
[root@localhost ~]# vi /usr.local/nginx/conf/nginx.conf

# Add the following fields
 set_real_ip_from <ip_range1>;
 set_real_ip_from <ip_range2>;
 ...
 set_real_ip_from <ip_rangex>;  //<ip_range1>, <ip_range2>, and <ip_rangeX> are the back-to-origin CIDR blocks of backend servers. Seperate multiple IP ranges with spaces
 real_ip_header X-Forwarded-For;

# Restart the Nginx service for the configurations to take effect
[root@localhost ~]# ps -ef|grep nginx
[root@localhost ~]# kill -9 nginx.pid
[root@localhost ~]# cd /root/nginx/sbin
[root@localhost ~]# ./nginx -c /usr/local/nginx/conf/nginx.conf
Figure 4. Modify Configurations 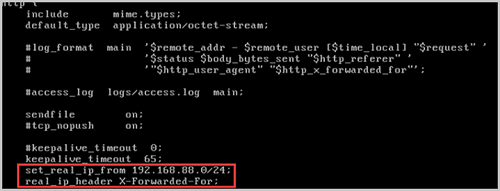
- View the results.
# View the access_log file to obtain the source client IP address
[root@localhost ~]# tail -f /usr/local/nginx/logs/access.log
Figure 5. View the Result 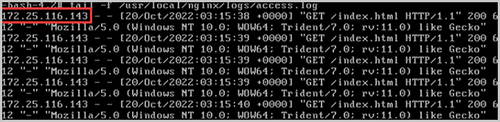
Load Balancer
Create a Load Balancer
On the main menu of ZStack Cube Ultimate, choose . On the Load Balancer page, click Create Load Balancer. The Create Load Balancer page appears.
- Create a shared-performance LB
- Create a dedicated-performance LB
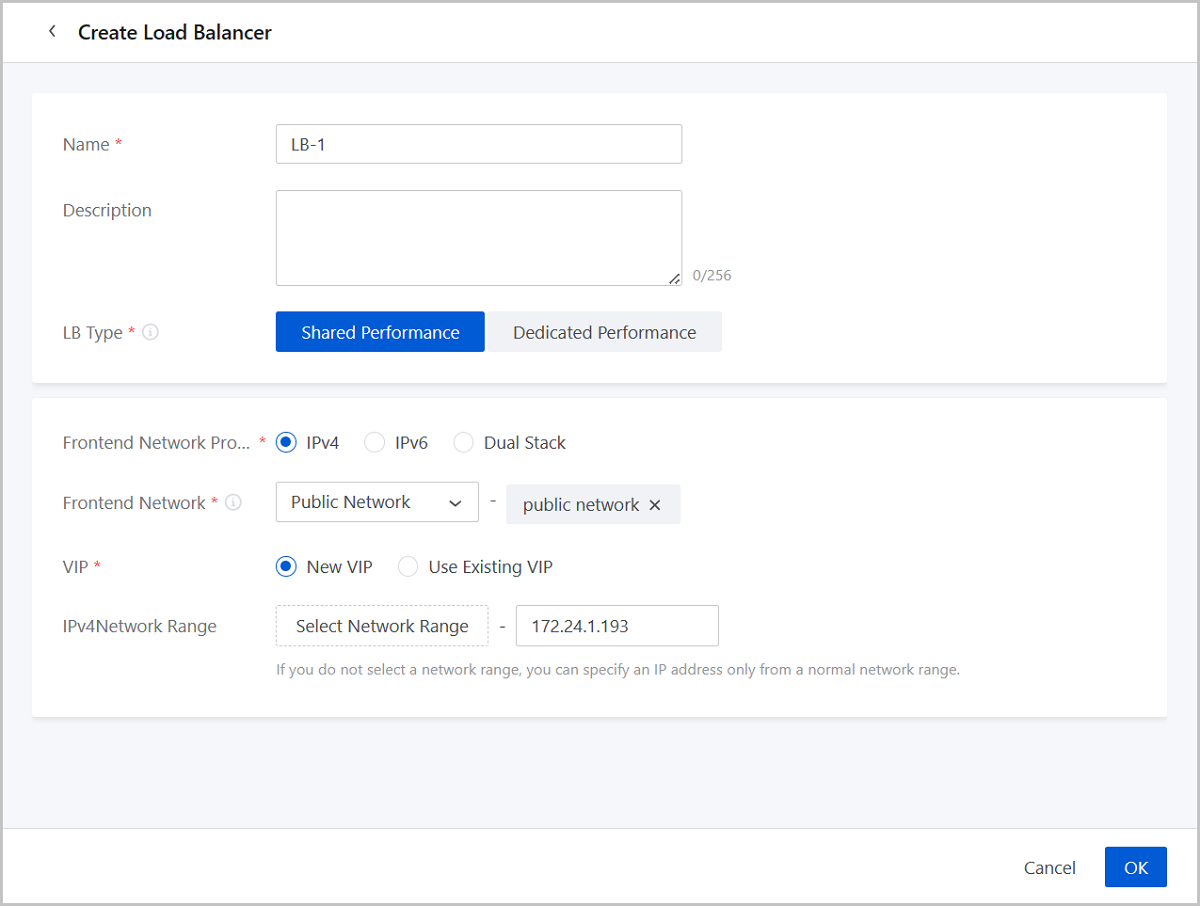
Create a Shared-Performance LB
- Name: Enter a name for the LB.
- Description: Optional. Enter a description for the LB.
- LB Type: Select Shared Performance.
- A shared-performance LB distributes traffics to backend servers by using a VPC vRouter.
- If the VPC vRouter are providing multiple services, the load balancing service needs to share the performance of the VPC vRouter with other services.
- Frontend Network Protocol: Select the network protocol for the frontend network. You can select IPv4, IPv6, or Dual Stack
- Frontend Network: Select a
network as the frontend network of the LB. You can select a public network
or VPC network.
Requests from the frontend network are distributed by the load balancer to backend servers based on a specified policy.
- VIP: You can create a virtual IP address (VIP) or use
an existing VIP to provide load balancing services.
- New VIP: If you create a
VIP, you can set the following parameters:
- Network Range: Optional. Select an IP range.
- Assign IP: Optional. You can assign a
virtual IP address.Note:
- If left blank, the system automatically assigns a VIP.
- If you do not select a network range, you can specify an IP address only from a normal network range.
- Use Existing VIP: If you use an existing VIP,
you can set the following parameters:
- VIP: Select an existing VIP. You can
select a custom VIP or a system VIP:
- Custom: Select a VIP that you created. You can select a VIP in a public network, VPC network, or flat network.
- System: Select a system VIP. After a VPC vRouter is created, the system creates a VIP in the L3 network that is associated with the VPC vRouter. The automatically created VIP can be a public network VIP or a flat network VIP.
- VIP: Select an existing VIP. You can
select a custom VIP or a system VIP:
- New VIP: If you create a
VIP, you can set the following parameters:
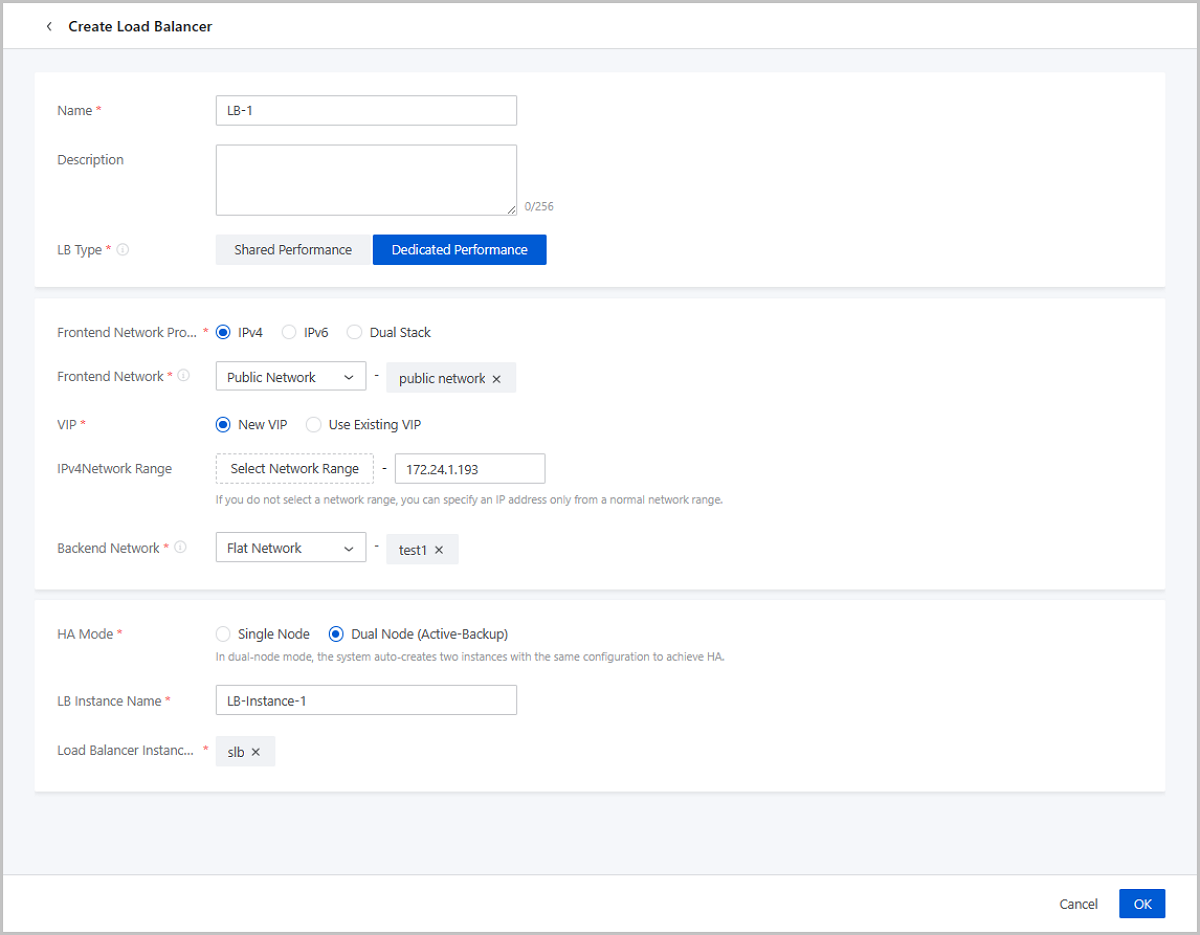
Create a Dedicated-Performance LB
- Name: Enter a name for the LB.
- Description: Optional. Enter a description for the LB.
- LB Type: Select Dedicated Performance.
- A dedicated-performance LB distributes traffics to backend servers by using LB instances.
- A load balancer instance is a custom VM instance dedicated to providing load balancing services.
- Frontend Network Protocol: Select the network protocol for the frontend network. You can select IPv4, IPv6, or Dual Stack
- Frontend Network: Select a network as the frontend
network of the LB. You can select a public network, flat network, or VPC
network.Note: Currently, you cannot select a flat network disabled with
IP address management to create a load balancer.
Requests from the frontend network are distributed by the load balancer to backend servers based on a specified policy.
- Enable SR-IOV: Optional. Choose whether to
use SR-IOV to pass through a VF NIC to the LB instance as a frontend
network NIC.Note:
- By default, the SR-IOV is disabled and a vNIC is attached to the LB instance.
- If the hardware requirements are satisfied, you can enable SR-IOV to attach a VF NIC to the LB instance.
- To enable SR-IOV, ensure the following points:
- The L2 network of the frontend network uses the SR-IOV network acceleration mode.
- There are available VF NICs based on the physical NICs corresponding to the frontend network.
- If enabled, choose an offering that uses an openEuler image to create the LB instance.
- Enable SR-IOV: Optional. Choose whether to
use SR-IOV to pass through a VF NIC to the LB instance as a frontend
network NIC.
- VIP: You can create a VIP or use an existing VIP to
provide load balancing services.
- New VIP: If you create a VIP, you can set the
following parameters:
- Network Range: Optional. Select an IP range.
- Assign IP: Optional. Specify a VIP.
This parameter is available only after you select an IP range.Note:
- If left blank, the system automatically assigns a VIP.
- If you do not select a network range, you can specify an IP address only from a normal network range.
- Use Existing VIP: If you use an existing VIP,
you can set the following parameters:
- VIP: Select an existing VIP. You can
select a custom VIP or a system VIP:
- Custom: Select a VIP that you created. You can select a VIP in a public network, VPC network, or flat network.
- System: Select a system VIP. After a VPC vRouter is created, the system creates a VIP in the L3 network that is associated with the VPC vRouter. The automatically created VIP can be a public network VIP or a flat network VIP.
- VIP: Select an existing VIP. You can
select a custom VIP or a system VIP:
- New VIP: If you create a VIP, you can set the
following parameters:
- Backend Network: Select a network as the backend network.Note:
- If you specify a public network as the frontend network, you can specify a flat network or any one of the VPC networks of the VPC vRouter to which the public network is attached as the backend network.
- If you specify a flat network as the frontend network, you must specify the same network as the backend network.
- If you specify a VPC network of a VPC vRouter as the frontend network, you must specify the same network as the backend network.
- Enable SR-IOV: Optional. Choose whether to
use SR-IOV to pass through a NF NIC to the LB instance.
- By default, the SR-IOV is disabled and a vNIC is attached to the LB instance.
- If the hardware requirements are satisfied, you can enable SR-IOV to attach a VF NIC to the LB instance.
- To enable SR-IOV, ensure the following points:
- The L2 network of the frontend network uses the SR-IOV network acceleration mode.
- There are available VF NICs based on the physical NICs corresponding to the frontend network.
- If enabled, choose an offering that uses an openEuler image to create the LB instance.
- HA Mode: Specify the HA mode of the LB. You can select
Single Node or Dual Node (Active-Backup).
In dual-node mode, the system auto-creates two instances with the same configuration to achieve HA.
- LB Instance Name: Enter a name for the LB instance.
- Load Balancer Instance Offering: Select an LB
instance offering.Note: If you enable SR-IOV for the frontend or backend
network, select an offering that uses an openEuler image.
After you create a LB, you can add a listener and associate VM NICs with the listener to make the LB take effect.
Manage a Load Balancer
On the main menu of ZStack Cube Ultimate, choose . Then, the Load Balancer page appears.
| Action | Description |
|---|---|
| Create Load Balancer | Create a load balancer. |
| Edit Name and Description | Edit the name and description of the load balancer. |
| Delete Load Balancer |
|
Load Balancer Monitoring
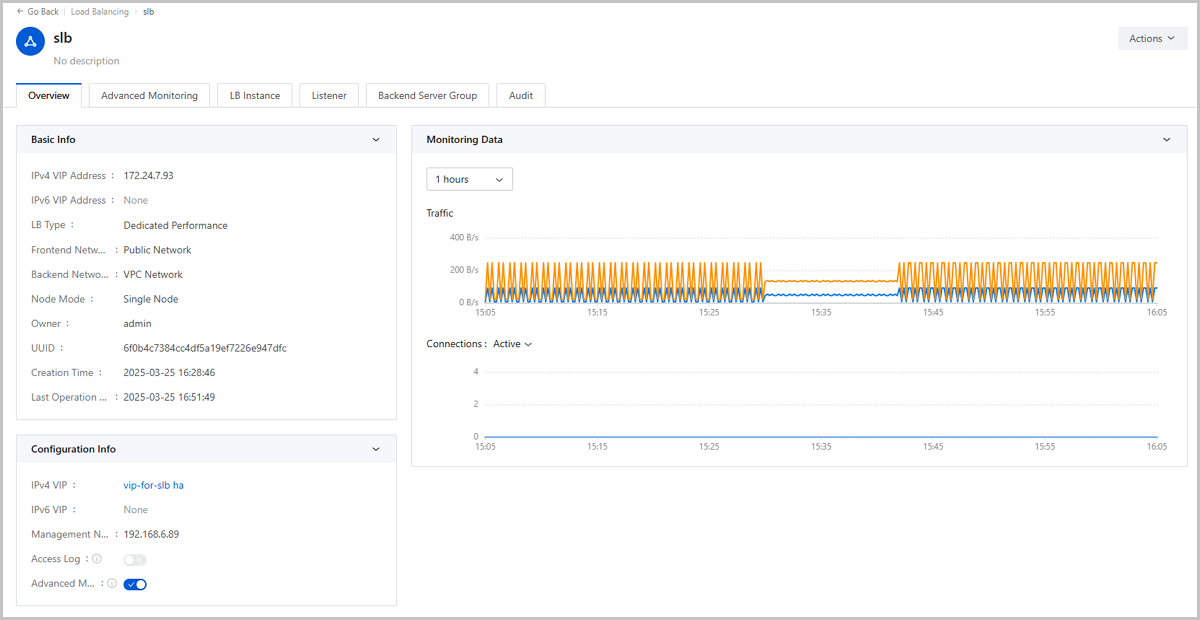
The monitoring of the load balancer helps you gain real-time insights into its workload, performance, and connections. ZStack Cube Ultimate provides multiple monitoring modes to satisfy the precision requirements for information at different levels.
Basic Monitoring
- Time span: You can modify the time span to view the monitoring data generated over the specified period. Available time span options include 15 minutes, 1 hour, 6 hours, 1 day, 1 week, 1 month, 1 year, and custom.
- Monitoring metrics:
- Traffic (Inbound/Outbound): Displays the volume of traffic accessing/sent from the load balancer in real time.
- Connections (Active/Concurrent/New)
- Active: Displays the count of active connections processed by the load balancer in real time.
- Concurrent: Displays the count of all connections processed by the load balancer in real time.
- New: Displays the count of connections newly created on the load balancer in real time.
Access Log
Records the access information of the load balancer in the log file, including the client IP, backend server, access time, request method, and request path. The access log helps you with issue identification and troubleshooting.
- On the load balancer's details page, click Overview. On the Overview page, turn on the Access Log switch (Optional).
- Log in to the load balancer instance and view /var/log/haproxy.log.Note:
- Turning on the Access Log switch enables more information to be recorded in /var/log/haproxy.log. These information occupies system storage space on the load balancer instance.
- After turning on the Access Log switch, you need reconnect the load balancer instance to make the modification take effect.
- For a shared-performance load balancer, a VPC vRouter acts as its load balancer instance. After you turning on its Access Log switch, reconnect the VPC vRouter to make the modification take effect and log in to the VPC vRouter to view /var/log/haproxy.log.
- The Access Log and Advanced Monitoring switches are mutually exclusive. If you have enabled Advanced Monitoring for the load balancer, you cannot turn on the Access Log switch.
Advanced Monitoring
The advanced monitoring mode displays the load balancer's monitoring data in a detailed and visualized way. Compared with the basic monitoring and access log, the advanced monitoring provides more comprehensive metrics and enables a more intuitive and flexible presentation.
- Prepare an advanced monitoring server. For more information, see Create an Advanced Monitoring Server
- On the load balancer's details page, click Overview. On the Overview page, turn on the Advanced Monitoring switch.
- On the load balancer's details page, click Advanced
Monitoring. Then, you can view the advanced monitoring of
the load balancer.Note: Before you can enable Advanced
Monitoring, make sure the following points:
- You have an available advanced monitoring server.
- The advanced monitoring server is running.
- The load balancer's owner has the permission to use the advanced monitoring server.
- The load balancer's frontend network is a public network, which is also the public network of the advanced monitoring server.
- For shared-performance load balancers based on the same
VPC vRouter, they must use the same advanced monitoring
server.The following actions on the load balancer may cause changes of VPC vRouter that the load balancer is based on. Before these actions, we recommend that you disable the advanced monitoring of the load balancer to prevent negative influence on the advanced monitoring of other load balancers:
- Changing the backend servers of the load balancer and the new backend servers use VPC networks associated with another VPC vRouter.
- Changing the VPC network of the backend servers of the load balancer and the new VPC network is associated with another VPC vRouter.
- For a shared-performance load balancer, it must have at least one listener and the listener must have at least one backend server associated.
- The load balancer instance (or the corresponding VPC vRouter) uses the openEuler operating system.
- The Advanced Monitoring and Access Log switch are mutually exclusive. If you have enabled Access Log for the load balancer, you cannot turn on the Advanced Monitoring switch.
- You have an available advanced monitoring server.
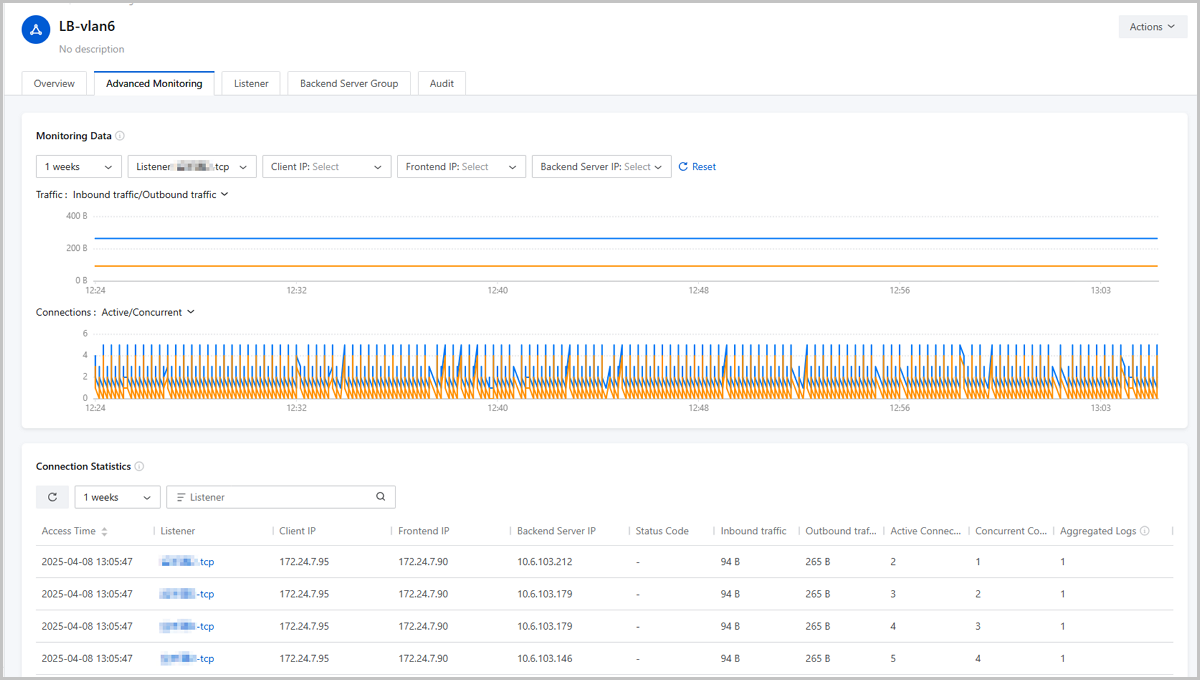
The Advanced Monitoring page is divided into two parts: Monitoring Data and Connection Statistics.
- Monitoring object: Respectively monitors each listener in the load balancer.Note:
- Currently, the advanced monitoring mode applies to HTTP and TCP listeners.
- Before you can view the monitoring data of an HTTP/TCP listener, make sure the listener has at least one backend server associated.
- The UI displays a maximum of 1000 monitoring data at once. You can adjust the time span or the filter criteria (client IP, frontend IP, and backend server IP) to view the data you need.
- Monitoring filter: Filters monitoring data by the client IP, frontend IP, and backend server IP and displays only the data meeting the specified conditions.
- Monitoring metric:
- Traffic (Inbound/Outbound): Displays the volume of traffic accessing/sent from the listener in real time.
- Connections (Active/Concurrent)
- Active: Displays the count of active connections processed by the listener in real time.
- Concurrent: Displays the count of all connections processed by the listener in real time.
Note:
- Currently, the advanced monitoring mode applies to HTTP and TCP listeners.
- Before you can view the connection statistics of an HTTP/TCP listener, make sure the listener has at least one backend server associated.
- Access Data generated within the same second and with identical listener, client IP, frontend IP, backend server IP, status code, inbound/outbound traffic, and active/concurrent connections are aggregated as one entry for display.
- The UI displays a maximum of 1000 connection records at once. You can adjust the time span or the filter criteria (listener, client IP, frontend IP, and backend server IP) to view the records you need.
Listener
Create a Listener
On the main menu of ZStack Cube Ultimate, choose . On the load balancer management page, click the target load balancer. On the details page of the load balancer, click the Listener tab. On the tab, click Create Listener. The Create Listener page is displayed.
- Name: Enter a name for the listener.
- Description: Optional. Enter a description for the listener.
- Protocol: Select a listening protocol.
Valid values: TCP, HTTP, HTTPS, and UDP.
- If you select TCP, HTTP, or UDP, you can select a port that ranges from 1 to 65535.
- If you select HTTPS:
- You can select a port that ranges from 1 to 65535.
- You need to associate the listener with a certificate. You can upload a certificate or certificate chain. For more information, see Create a Certificate.
- Certificate: Associate a certificate with the listener.
- Load Balancer Port: Specify a port for load balancing. Valid values: 1 to 65535.
- Backend Server Port: Specify a backend
server port. Valid values: 1 to 65535.
For example, if you specify port 80 as the load balancing port and port 5000 as the backend server port, requests sent to port 80 of the load balancer (LB) virtual IP address are distributed to the port 8000 of backend servers.
- Load Balancer Algorithm: Set a routing rule for data packets.
Default: Round Robin.The following lists the supported load balancing algorithms:
- Round Robin:
When the load balancer receives requests, it forwards equal shares of traffic to backend servers in turn. It is the simplest load balancing algorithm, which does not consider the established connections or system loads of the servers and is mostly used when the performance of each backend server varies little.
- Least Connections:
When the load balancer receives requests, it forwards new connection requests to backend servers that record least connections. This algorithm is applicable to scenarios when the time that backend servers used to handle different requests varies much. It is often used for long-term connection services.
- Source IP Hash:
When the load balancer receives requests, it generates a hash based on the source and destination IP addresses and then forwards traffic to specific backend servers. This algorithm is applicable to scenarios when the requests of different clients vary much.
- Weighted Round Robin:
When the load balancer receives requests, it forwards the traffic to backend servers based on the static weight configured in most cases according to hardware configurations of the servers. Requests are more likely to be distributed to backend servers with a higher weight. Weighted round robin is a variant of the round robin algorithm and is mostly used when the performance of each backend server varies much.
- Round Robin:
- Session Persistence: An innate mechanism of the load balancing
service. It identifies the association of the interactions between a client and backend
servers based on which a load balancer can direct the client's requests to a specific
backend server and achieve business continuity.The Cloud provides two session persistence mechanisms: TCP/UDP-based 4th-layer session persistence and HTTP/HTTPS-based 7th-layer session persistence:
- 4th-layer session persistence: A load balancer directs requests from clients of the same source IP address to a backend server.
- 7th-layer session persistence: The mechanisms under different load balancing
algorithms differ from each other.
- Round Robin and Weighted Round Robin apply cookie-based session persistence. A load balancer uses a cookie to direct the requests to the backend server previously responded.
- Source IP Hash uses the Hash function to calculate the source IP addresses of clients and directs requests from clients of the same source IP address to a backend server.
Note:
- When you choose 4th-layer session persistence: If you select Source IP Hash for Load Balancer Algorithm, session persistence is enabled and cannot be disabled. If you select an algorithm other than Source IP Hash, session persistence is disabled and cannot be enabled.
- When you choose HTTP/HTTPS-based 7th-layer session persistence: If you select Source IP Hash for Load Balancer Algorithm, session persistence is enabled and cannot be disabled. If you select Least Connections, session persistence is disabled and cannot be enabled.
- When you choose HTTP-based 7th-layer session persistence: If you select Round Robin or Weighted Round Robin for Load Balancer Algorithm and choose Rewrite Cookie, the http-tunnel mode is not supported.
- Cookie Handling Method: If you enable HTTP/HTTPS-based 7th-layer
session persistence and choose Round Robin or Weighted Round Robin algorithm, you need to
set the cookie handling method. The following two cookie handling methods are
supported:
- Insert Cookie: A load balancer inserts cookies into the
messages of a backend server responded to a client, so next time when the client sends
requests along with the cookies, the load balancer can direct the requests to the
backend server previously responded.
- Session Persistence Timeout Period: The timeout period of the session persistence between a client and backend server. Default value: 60 seconds. Valid values: 30 to 3600 seconds.
- Rewrite Cookie: You need to customize a cookie in the
response text returned by the backend server. After the customization, a load balancer
rewrites the cookie. So next time when the client sends requests along with the
cookie, the load balancer can direct the requests to the backend server previously
responded.
- Cookie Name: Set a cookie name. The name must be 1 to 20 characters in length. It can contain English letters, digits, underscores (_) and hyphens (-).
- Insert Cookie: A load balancer inserts cookies into the
messages of a backend server responded to a client, so next time when the client sends
requests along with the cookies, the load balancer can direct the requests to the
backend server previously responded.
- Backend Server Group: Optional. Select a
backend server group.Note:
- A backend server group is a group of backend servers that share the same configurations. You can associate one or more listeners with a backend server group. The listeners distribute traffic based on the weight that you assign to each backend server.
- You can associate a listener with one or more backend server groups that are attached to the same LB.
- If a backend server is added to multiple backend server groups, you cannot associate the same listener with these backend server groups.
- After you associate a listener with a backend server group, you can view the health status of the backend server group on the details page of the listener. A backend server group may be in Healthy or Unhealthy status.
- Advanced: Configure
advanced settings for the listener.
- HTTP Redirect: You can enable HTTP Redirect for a listener
whose protocol is HTTP to forward all flows accessing this listener to a listener
using HTTPS protocol.Note:
- Disable Session Persistence before you can enable HTTP Redirect.
- Before you enable HTTP Redirect, make sure that at least an HTTPS listener is available in the load balancer.
- After you enable HTTP Redirect, all other configurations such as health checking parameters and forward rules go invalid for all flows will be processed by the destination HTTPS listener. You can sync these configurations to the HTTPS listener manually as needed.
- Destination Listener Port: Select an HTTPS listener port to process the redirected flows.
- Redirect Status Code: Select a redirect status code. Default:
302. Following are definition of different status codes:
- 301: Moved Permanently. Informs the client that the requested resource has been moved to a new address permanently. The client can cache and access the new address on the next request.
- 302: Founds. Informs the client that the requested resource has been moved to a new address temporarily. The client does not cache this new address and still access the original address first on the next request.
- 303: See Other. This code is similar to code 302, but the client must obtain the new address through a GET request. This code mainly applies to scenarios where you want to skip to a GET request after a POST request.
- 307: Temporary Redirect. This code is similar to code 302, but the client's request method for accessing the new address must be the same as the request method for accessing the original address.
- 308: Permanent Redirect. This code is similar to code 301, but the client's request method for accessing the new address must be the same as the request method for access the original address.
- Health Check Protocol: Set the health check protocol. Valid
values: TCP, HTTP, and UDP. You can select a protocol different from the listening
protocol.
- If you select TCP, HTTP, or HTTPS as the listening protocol, you can select TCP or HTTP as the health check protocol.
- If you select UDP as the listening protocol, you can select UDP as the health check protocol.
- If you select HTTP as health check protocol, you can configure normal status
code, health check URI, and HTTP health check method:
- Normal Status Code: The HTTP status code returned when the health check passes. You can select one or more status codes. Valid values: http_2xx, http_3xx, http_4xx, and http_5xx.
- Health Check URI: The URI of the page on which health
checks are performed, for example, /healthcheck.html.
A health check on static pages is recommended. When you set a health check URI, make sure that:
- The URI must be 2 to 80 characters in length.
- The URI can contain letters, digits, hyphens (-), forward slashes (/), periods (.), percentage signs (%), question marks (?), number signs (#), ampersands (&), or a combination of these characters.
- The URI must start with a forward slash (/) but it cannot contain only forward slashes.
- HTTP Health Check Method: The method used to perform HTTP health checks on server applications. Valid values: HEAD and GET. Default: HEAD. The health check requests simulate the access requests of a browser.
- Idle Connection Timeout: The amount of time that the load balancer terminates the connection between the server and the client when no data is transmitted. Default value: 60 seconds.
- Healthy Threshold: The maximum number of consecutive successful health checks required for a unhealthy backend server to be considered healthy. Default value: 2.
- Health Check Port: The health check port. Default: default. This value indicates that the health check port is the same as the specified backend server port. You can also specify another port.
- Unhealthy Threshold: The maximum number of consecutive failed health checks required for a healthy backend server to be considered unhealthy. Default value: 2.
- Health Check Interval: The time interval between each health checks of an individual backend server. Default value: 5 seconds.
- Maximum Concurrent Requests: The maximum number of concurrent connection requests of the listener. Valid values: 1 to 2000000. Default: 2000000.
- Processes: The number of HAProxy processes. Default:
1.
Using multiple processes can improve the listener performance and increase listening concurrency. However, multiple processes might occupy more memory and affect the listening accuracy.
- Protocol Version: You can choose HTTP1.1 or HTTP2.0. Default value: HTTP1.1.
- IP Passthrough: Default: Disabled. When enabled, the listener
uses the Proxy protocol to pass client IP addresses to the backend servers.Note: The
proxy protocol needs to be enabled on backend servers, otherwise the communication
negotiation with the instance will fail.
- IP Passthrough Protocol: Default: v1. You can select v1 or v2 for the IP passthrough protocol.
- HTTP Mode: The HTTP connection mode of the load balancer.
This option is available only when the listening protocol is HTTP.
- http-server-close: The server-facing connection is closed after the end of the response is received, and the client-facing connection remains open.
- http-keep-alive: All requests and responses are processed, and connections remain open but idle between responses and new requests.
- http-tunnel: Only the first request and response are processed and a tunnel is
established between the client and the server, so that they can talk without
further analysis of HTTP protocol. This mode is not recommended.Note: This mode
does not support the HTTP session persistence mechanism that applies the Round
Robin/Weighted Round Robin algorithm and Rewrite Cookie handling
method.
- httpclose: The same as tunnel mode, but with a
Connection:
                    close
header field appended in both the client and server directions. This mode is not recommended. - forceclose: Both the client and the server connections are actively closed by the load balancer after the end of a response.
- Data Compression: Default: disabled. When enabled, the system
will compress files of specific types. Data compression reduces the size of
transferred files, improves file transfer efficiency, and reduces bandwidth
consumption.
Supported file types: text/xml, text/plain, text/css, application/javascript, application/x-javascript, application/rss+xml, application/atom+xml, and application/xml.
- Data Compression Algorithm: Default value: gzip. You can
select gzip, defalte, and raw-deflate for the data compression algorithm.
- gzip: One of the most widely used HTTP content encoding method and is based on DEFLATE algorithm for compression.
- deflate: A specific compression algorithm actually applied to gzip and other compression formats and is a combination of the LZ77 (Lempel-Ziv) algorithm and Huffman coding.
- raw-delate: Compresses the data using only the DEFLATE algorithm without any additional header or footer information.
Note: When choosing deflate or raw-deflate, make sure that both the client
and the backend server are able to handle these compression formats correctly,
otherwise it may result in data not being decompressed or displaying
abnormally.
- Data Compression Algorithm: Default value: gzip. You can
select gzip, defalte, and raw-deflate for the data compression algorithm.
Figure 1. Create a Listener 
- HTTP Redirect: You can enable HTTP Redirect for a listener
whose protocol is HTTP to forward all flows accessing this listener to a listener
using HTTPS protocol.
Manage a Listener
On the main menu of ZStack Cube Ultimate, choose . On the Load Balancer page, click a load balancer to enter its details page. Click Listener. Then, the Listener tab page is displayed.
| Action | Description |
|---|---|
| Create Listener | Create a new listener. |
| Edit Listener | Edit the name and description of the listener. |
| Bind Certificate | If the protocol of your listener is HTTPS, bind a certificate or a certificate link to your listener. Note that this action is not supported if the protocol of the listener is TCP, HTTP, or UDP. |
| Disassociate Certificate | If the protocol of your listener is HTTPS, you can disassociate a certificate from the listener. Note that this action is not supported if the protocol of the listener is TCP, HTTP, or UDP. |
| Modify Basic Settings | Modify the load balancing algorithm and session persistence mechanism of a listener. |
| Modify Advanced Settings | Modify the advanced settings of a listener, for
example, Health Check parameters and HTTP Redirect parameters.Note:
|
| Attach Backend Server Group | Attach a backend server group to the selected listener. |
| Disassociate Backend Server Group | Disassociate a backend server group from a listener. |
| Configure Forwarding rule | Configure the forwarding rule of the selected
listener on the Forwarding Rule page.Note: Only HTTP and HTTPS
protocols support forwarding rule configuration. |
| Delete Listener | Deleting a load balancer listener also deletes the corresponding load balancing service. |
Create a Forwarding Rule
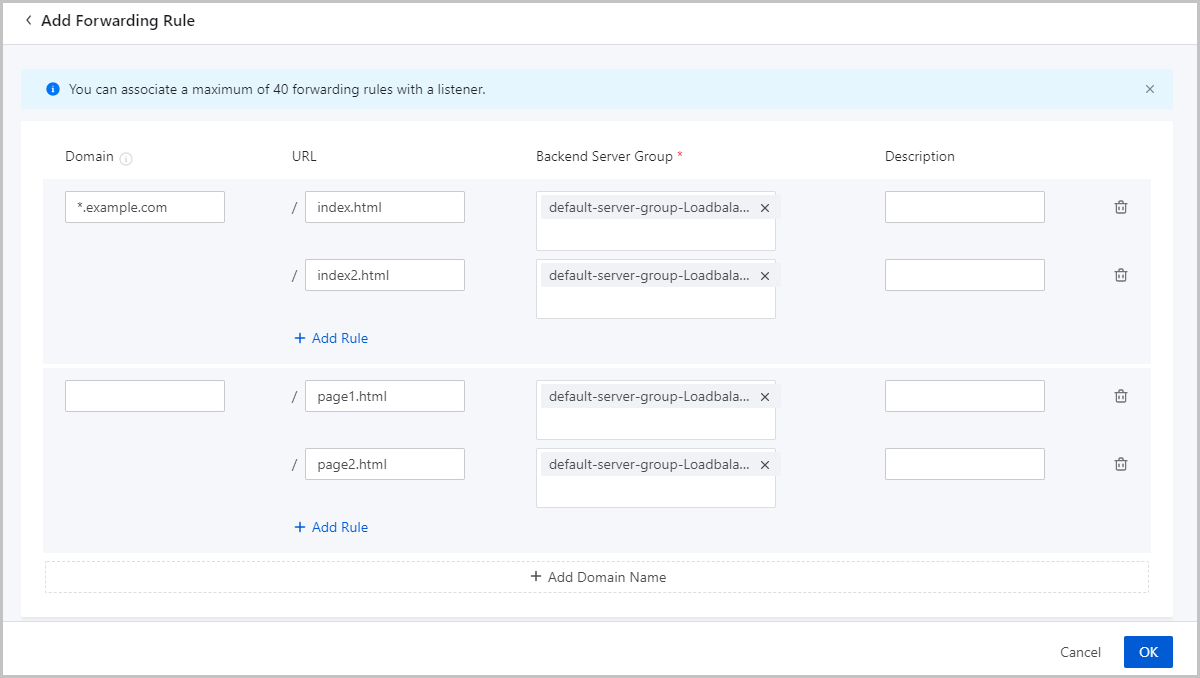
On the main menu of ZStack Cube Ultimate, choose . On the load balancer page, click the target load balancer. On the details page of the load balancer, click the Listener tab. On the tab, click the target listener to go to the details page. On the page, click the Forwarding Rule tab. On the tab, click Add Forwarding Rule. Then, the Add Forwarding Rule page appears.
- Domain Name: Optional. Enter the domain name that you
need to forward. The domain name must be 0-125 characters in length and can
contain letters, digits, hyphens (-), periods (.), and asterisks
(*).Note: Consider the following when you use an asterisk (*) in a generic
domain name:
- Put the asterisk (*) in the first place of the domain name.
- Do not fill in only asterisks (*) for the domain name.
- Supported formats: *.example.com and *example.com.
- URL: Optional. Enter a request URL. The URL must be 0-80 characters in length and can contain letters, digits, hyphens (-), forward slashes (/), periods (.), percent signs (%), question marks (?) number signs (#), and ampersands (&).
- Backend Server Group: Select a backend server group that you want to associate the rule with.
- Description: Optional. Enter a description for the forwarding rule.
Note:
- You must enter a domain name, URL, or both.
- You can add a forwarding rule by clicking Add Rule or Add Domain Name. A listener can be associated a maximum of 40 forwarding rules.
Forwarding Rule Matching Algorithm
-
- If the domain name is specified, the system attempts to match
URLs:
- If a URL is matched, the request is forwarded to the associated backend server group. If multiple URLs are matched based on the exact match mechanism, the request is forwarded to the backend server group associated with the URL that is matched most accurately.
- If the specified URLs of the domain name are not matched, the request is forwarded to the backend server group associated with the root URL.
- If the root URL is not configured, errors are returned.
- If the domain name is not specified in the frontend request or no
domain name is matched, the system attempts to match forwarding
rules that have their domain names unspecified:
- If a forwarding rule is matched, the request is forwarded to the associated backend server group.
- If no forwarding rule is matched, the request is forwarded to the backend server group that is not associated with any rule.
- If all backend server groups associated with the listener have associated forwarding rules, errors are returned.
- If the domain name is specified, the system attempts to match
URLs:
Note: If you have enabled HTTP Redirect for a listener, note that all
forwarding rules you configure for it are invalid because all flows accessing it
are forwarded to and processed by the destination HTTPS listener in fact. If you
need, configure forwarding rules for the destination HTTPS listener instead of
the original HTTP listener.Backend Server Group
Create a Backend Server Group
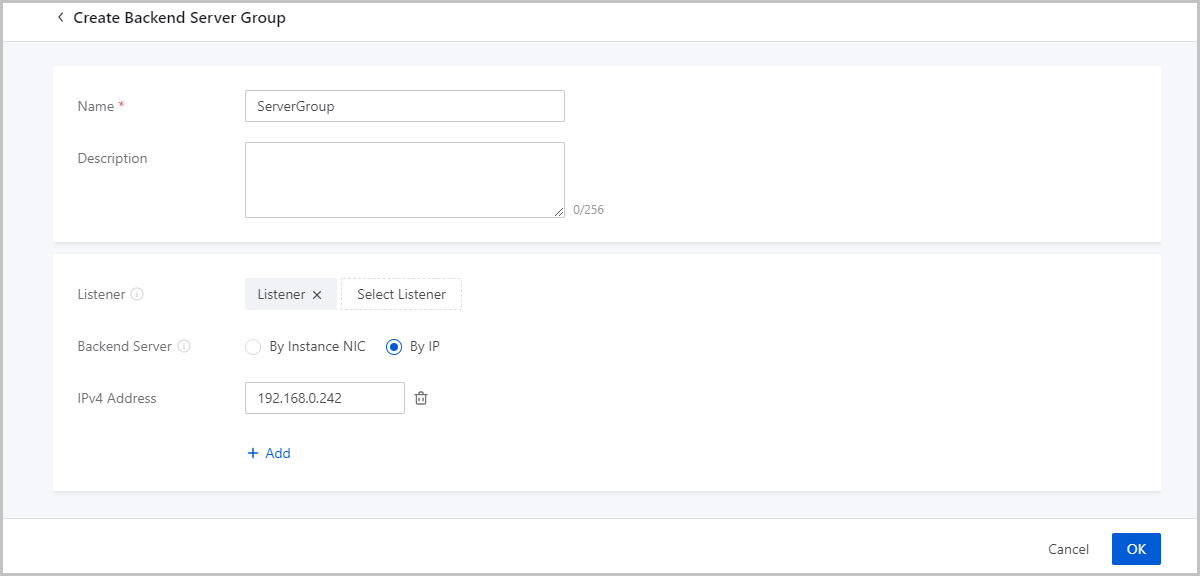
On the main menu of ZStack Cube Ultimate, choose . On the Load Balancer page, click the target load balancer. On the details page of the load balancer, click the Backend Server Group tab. On the tab, click Create Backend Server Group. The Create Backend Server Group page appears.
- Create a backend server group by instance NIC
- Create a backend server group by IP address
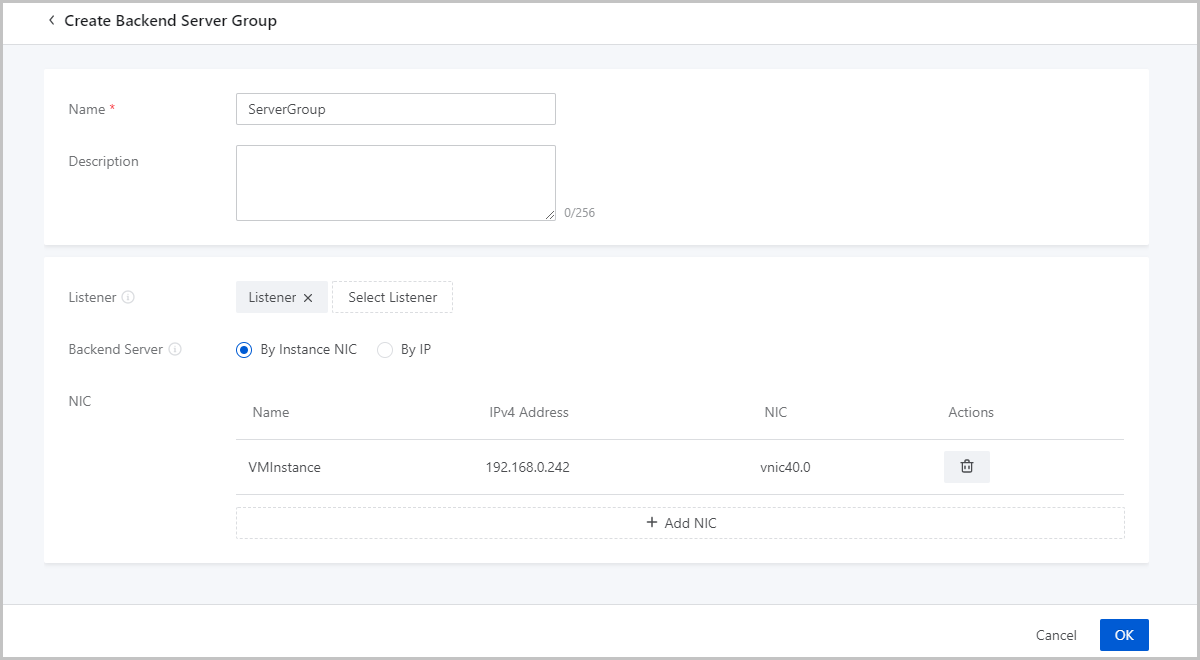
Create Backend Server Group by Instance NIC
- Name: Enter a name for the backend server group.
- Description: Optional. Enter a description for the backend server group.
- Listener: Select an existing listener.Note:
- A listener monitors the frontend requests of a load balancer and distributes the requests to a backend server based on the specified policy. In addition, the listener performs health checks on backend servers.
- A backend server group can be associated with multiple listeners in the same load balancer.
- If the listener uses the weighted round-robin load-balancing algorithm, you can set the weight value for each individual backend server on the backend server group details page.
- Backend Server: Select By Instance
NIC.Note: You can filter instance NICs by the backend network of the
load balancer and add instances as backend servers to the backend server
group.
- NIC: Add instance NICs to the backend server group.
Create Backend Server Group by IP Address
- Name: Enter a name for the backend server group.
- Description: Optional. Enter a description for the backend server group.
- Listener: Select an existing listener.Note:
- A listener monitors the frontend requests of a load balancer and distributes the requests to a backend server based on the specified policy. In addition, the listener performs health checks on backend servers.
- A backend server group can be associated with multiple listeners in the same load balancer.
- If the listener uses the weighted round-robin load-balancing algorithm, you can set the weight value for each individual backend server on the backend server group details page.
- Backend Server: Select By IP.Note:
- You can add servers on third-party platforms to the Cloud as backend servers. The IP addresses of the servers that you add to the Cloud must be connected to the virtual IP address of the load balancer.
- This method applies to only dedicated-performance load balancers.
- IPv4 Address: Enter the IP address of the server that you want to add to the backend server group.
- Add: You can add one or more servers as backend servers.
Considerations
- A backend server group is a group of backend servers that share the same configurations. You can associate one or more listeners with a backend server group. The listeners distribute traffic based on the weight that you assign to each backend server.
- A load balancer can be associated with multiple backend server groups, while a backend server group can be associated with only one load balancer.
- An empty backend server group is automatically created when you create a load balancer.
Manage a Backend Server Group
On the main menu of ZStack Cube Ultimate, choose . On the Load Balancer page, locate a load balancer and enter its details page. Click Backend Server Group, and the Backend Server Group tab appears.
| Action | Description |
|---|---|
| Create Backend Server Group | Create a backend server group. |
| Delete Backend Server Group | Deleting a backend server group also deletes the backend servers in the group and disassociates the group from the listener. |
Certificate
Create a Certificate
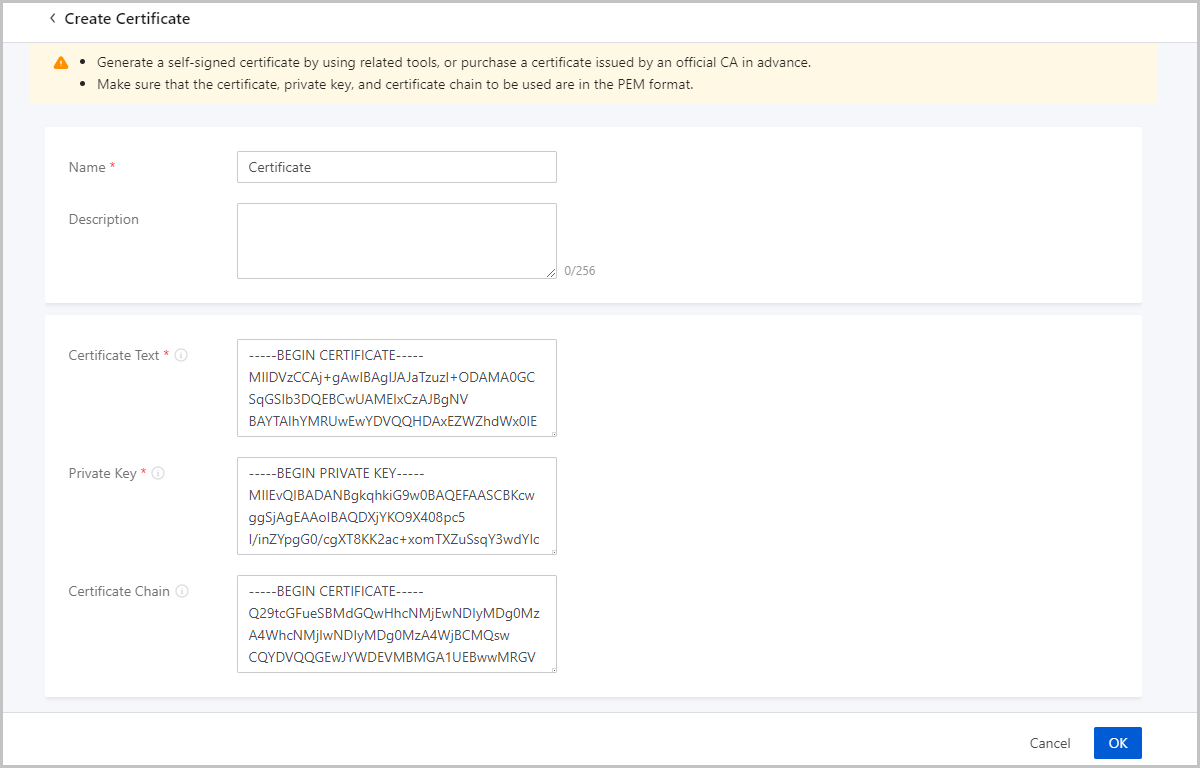
On the main menu of ZStack Cube Ultimate, choose . On the Certificate tab, click Create Certificate. The Create Certificate page appears.
- Name: Enter a name for the certificate.
- Description: Optional. Enter a description for the certificate.
- Certificate Text: Enter the certificate
content.Sample:
-----BEGIN CERTIFICATE-----
#end-usercertiicate#
-----END CERTIFICATE-----
Note:
- The certificate content starts with
-----BEGIN
                                    CERTIFICATE-----
and ends with-----END CERTIFICATE-----. - The certificate content cannot contain spaces.
- The certificate content starts with
- Private Key: Enter the private
key.Sample:
-----BEGIN PRIVATE KEY-----
#privatekey#
-----END PRIVATE KEY-----
Note:
- The private key starts with
-----BEGIN PRIVATE
                                    KEY-----
and ends with-----END PRIVATE KEY-----. - The private key cannot contain spaces.
- The private key starts with
- Certificate Chain: Optional. If you need to upload
multiple certificates, you need to combine the root and intermediates
certificates and then upload the
certificates.Sample:
-----BEGIN CERTIFICATE-----
#rootcertificate#
-----END CERTIFICATE-----
-----BEGIN CERTIFICATE-----
#intermediatescertiicate#
-----END CERTIFICATE-----
-----BEGIN CERTIFICATE-----
#intermediatescertificate#
-----END CERTIFICATE-----
Note:
- Put the root certificate in the first place and arrange the intermediate certificates in order from the second place. Do not leave blank lines between the certificates.
- The certificate content cannot contain spaces.
Considerations
If an LB listener uses the HTTPS protocol, you must associate certificates with the listener. You can upload individual certificates or a certificate chain.
Manage a Certificate
On the main menu of ZStack Cube Ultimate, choose . Then, the Certificate tab is displayed.
| Action | Description |
|---|---|
| Create Certificate | Create a certificate.Note:
|
| Edit Certificate | Edit the name of description of the certificate. |
| Delete Certificate | Delete an added certificate.Note: If the
certificate is associated with one or more listeners, the
association between the certificate and the listeners will be
deleted as well. |
Load Balancer Image
Add a Load Balancer Image
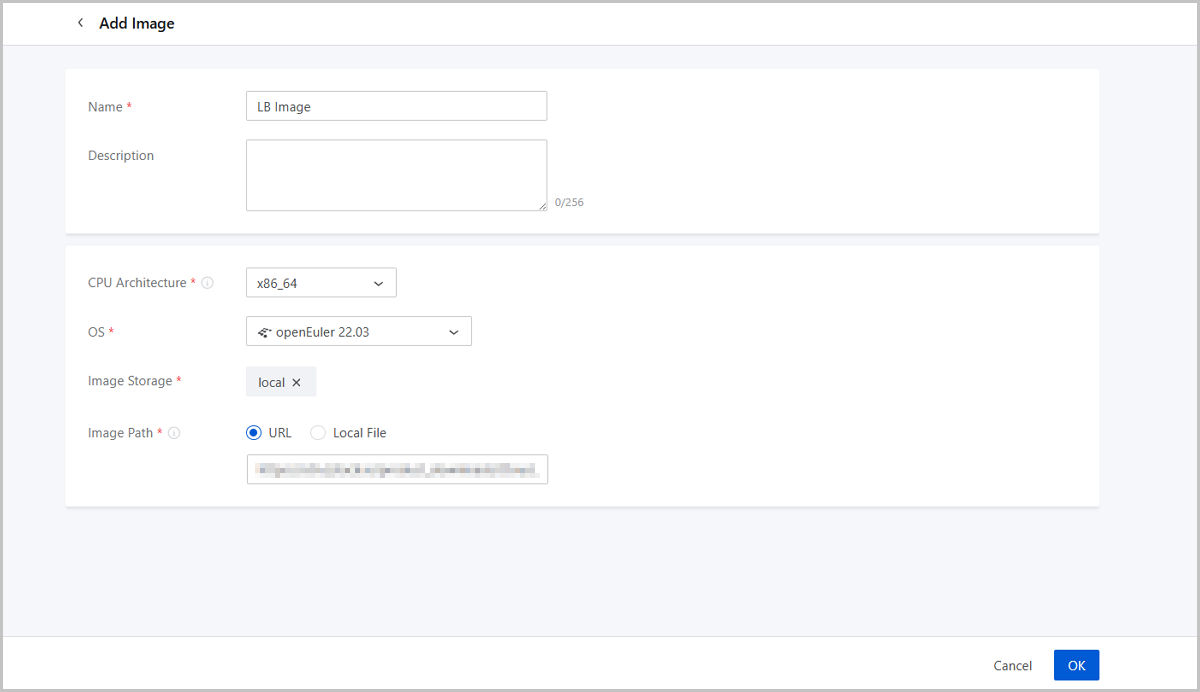
On the main menu of ZStack Cube Ultimate, choose . On the Image tab, click Add Image. The Add Image page appears.
- Name: Enter a name for the LB image.
- Description: Optional. Enter a description for the LB image.
- CPU Architecture: Select a CPU architecture for the LB image. LB instances created from the image inherit this CPU architecture.
- OS: Select an OS for the LB image. Supported OS types differ depending on the CPU architecture.
- Image Storage: Select an image storage to store the LB image.
- Image Path: Enter a URL or upload a local file.
- URL: Enter the download URL of the LB
image.ZStack Cube Ultimate provides you with dedicated-performance LB images (KVM). You can download the latest images from the official website.
- Software: ZStack-SLB-2.5.4.2.qcow2
- Download address: Click here
Note:
- ImageStore image storage support breakpoint resume. If the connection is interrupted due to network fluctuations and other reasons, the upload task will be automatically suspended.
- You can cancel, suspend, or continue the task by going to .
- Local File: Upload an LB image file that can
directly be accessed by the current browser.Note:
- You can upload the LB image to an ImageStore or Ceph image storage.
- ImageStore image storage support breakpoint resume. If you refresh the browser, close the browser, or stop the management node service, the task will be automatically suspended. Otherwise, the upload task will fail.
- You can cancel, suspend, or continue the task by going to .
- URL: Enter the download URL of the LB
image.
Manage a Load Balancer Image
On the main menu of ZStack Cube Ultimate, choose . Then, the Image tab appears.
| Action | Description |
|---|---|
| Edit LB Image | Edit the name and description of an LB image. |
| Add LB Image | Add an LB image. |
| Enable LB Image | If enabled, the LB image is available as a candidate when you create an LB instance offering. |
| Disable LB Image | If disabled, the LB image is no longer available as a candidate when you create an LB instance offering. |
| Export LB Image | Export an LB image. ImageStore and Ceph image
storage support image export. Exported images are displayed on the
Exported tab.Note:
|
| Delete LB Image | Delete an LB image.Note: Deleting a LB image may
cause LB instance creation failures. Proceed with
caution. |
| Recover LB Image | Recover a deleted LB image. If you recover a deleted LB image, the LB image is displayed on the Available tab. |
| Expunge LB Image | Expunge a deleted LB image. You can only expunge an LB image that is in the recycle bin. |
| Download Exported LB Image | Download an exported LB image. ImageStore and
Ceph image storage support image export. If you download an exported
LB image, the download is implemented by the
browser.Note: ImageStore image storage allows you to view the
MD5 value of the downloaded image to check whether the
downloaded image is the same as the exported
image. |
| Delete Exported LB Image | Delete an exported LB image.Note:
|
Load Balancing Instance Offering
Create a Load Balancer Instance Offering
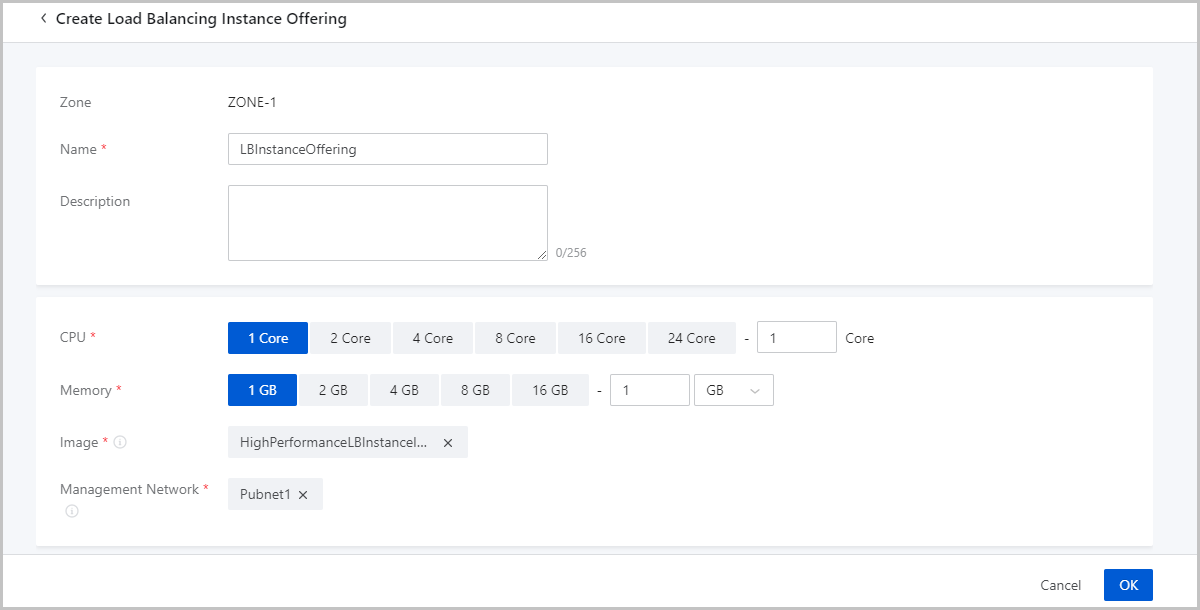
On the main menu of ZStack Cube Ultimate, choose . On the Offering tab, click Create Load Balancer Instance Offering. The Create Load Balancer Instance Offering page is displayed.
- Zone: By default, the current zone is displayed.
- Name: Enter a name for the load balancer (LB) instance offering.
- Description: Optional. Enter a description for the LB instance offering.
- CPU: Specify the number of CPU cores for the LB instance
offering.Note: Enter an integer that ranges from 1 to 1,024.
- Memory: Specify the memory size for the LB instance
offering.Note: Enter an integer. Unit: MB, GB, and TB. Valid values: 16MB to
100TB.
- Image: Select a dedicated-performance LB image that you added.Note:
- This image encapsulates dedicated-performance LB services and can only be used to create LB instances. You cannot use this image to create VM instances directly.
- This image is an official customized image, which can be obtained from the official website.
- Management Network: Select a management network that you created.Note:
- A management network is the network that a management node uses to deploy and configure resources such as hosts, VPC vRouters, and LB instances.
- If you use a public network to manage physical resources, the public network shall be selected as the management network.
Manage a Load Balancer Instance Offering
On the main menu of ZStack Cube Ultimate, choose . Then, the Offering page appears.
| Action | Description |
|---|---|
| Create Load Balancer Instance Offering | Create a load balancer instance offering. |
| Edit Load Balancer Instance Offering | Edit the name and description of a load balancer instance offering. |
| Set Sharing Mode |
Set the sharing mode of a resource. The
platform provides the following sharing modes:
Note:
|
| Delete Load Balancer Instance Offering | Delete a load balancer instance offering. |