Elastic Baremetal Management
What is Elastic Baremetal Management?
- The Elastic Baremetal Management feature is provided in a separate module. Before you can use this feature, you need to purchase the Plus License of Elastic Baremetal Management, in addition to the Base License.
- A tenant can use an elastic baremetal offering shared by the admin to create an elastic baremetal instance.
Concepts
- Provision network: A provision network is a dedicated network for PXE boot
and image downloads while creating elastic baremetal instances.
- Before you can use Elastic Baremetal Management, you need to deploy an IPv4 provision network.
- Provision networks require high network performance. We recommend that you use at least 10 Gigabit NICs for your provision network.
- You can configure a gateway for your provision network. This way, the provision network can be connected to other networks. If you do not need to connect your provision network to other networks, you do not need to configure a gateway for your provision network.
- Elastic baremetal cluster: An elastic baremetal cluster consists of elastic baremetal
instances. You can manage elastic baremetal instances by managing an elastic
baremetal cluster where the instances reside.
- You must attach a provision network to an elastic baremetal cluster to provide PXE services for baremetal nodes in the cluster.
- You can attach only one provision network to an elastic baremetal cluster. However, you can attach a provision network to multiple elastic baremetal clusters.
- You can attach an L2 network to an elastic baremetal cluster to provide an extended L2 business network for elastic baremetal instances in the cluster. Elastic baremetal instances and VM instances that share the same L2 network can access each other without using the gateway. The L2 network that you can attach to an elastic baremetal cluster can be of the VLAN or NoVLAN type.
- Gateway node: A gateway node is a node where the ingress and egress
traffic of the Cloud and elastic baremetal instances is forwarded.
- You can attach multiple gateway nodes to an elastic baremetal cluster. However, you can attach only one gateway node to an elastic baremetal cluster.
- A gateway node is used to take over primary storages and assign storage space for elastic baremetal instances.
- A gateway node provides iPXE, DHCP, and other services. It is used to deliver configuration settings to elastic baremetal instances.
- Baremetal node: A baremetal node is used to create a baremetal instance
and is identified based on the BMC interface and IPMI configuration
setting.
- You can set the startup methods for the baremetal nodes. The
following two startup methods are supported:
- Startup from a volume: Uses a volume as the system volume of the baremetal node to install and deploy the operating system.
- Startup form a local disk: Uses a local disk as the system volume of the baremetal node to install and deploy the operating system.
- If you select to startup the baremetal node from a local
disk, you can choose whether to take over the original
operating system.
- If you choose not to take over the original operating system, the Local Disk (Non Take-Over) is used. When you use the baremetal node to create an elastic baremetal instance, this method helps download an operating system from the Cloud and install it on the instance. Meanwhile, the local system volume is formatted.
- If you choose to take over the original operating system, the Local Disk (Take-Over) method is used. The elastic baremetal instance created from the baremetal node used the original system operating system stored on the local disk directly.
- The management node must be connected to the IPMI network to remotely manage baremetal nodes.
- Baremetal nodes must be configured with the BMC interfaces, IPMI addresses, ports, usernames, and passwords, and be connected to the IPMI network.
- A baremetal node can be distributed to only one elastic baremetal instance and an elastic baremetal instance can only be assigned one baremetal node.
- You can provide compute resources for elastic baremetal instances by using a baremetal node or elastic baremetal offering.
- You can set the startup methods for the baremetal nodes. The
following two startup methods are supported:
- Elastic baremetal instance offering: An elastic baremetal offering defines the number of vCPU
cores, memory size, CPU architecture, CPU model, and other configuration settings of
elastic baremetal instances.
- You can get elastic baremetal offerings of baremetal nodes by obtaining their hardware information. Baremetal nodes with the same offering can be managed in a unified way.
- The baremetal offerings obtained from the node hardware information can be classified into 3 types according to their startup methods: startup from a volume, startup from a local disk (take-over), and startup from a local disk (non take-over).
- You can use an elastic baremetal offering to create an elastic baremetal instance. You can also release the advanced settings of baremetal nodes to avoid resource idling.
- You can create a pricing list for elastic baremetal instances based on elastic baremetal offerings. Then bills are generated for the elastic baremetal instances based on their usage.
- Elastic baremetal instance: An elastic baremetal instance has the same performance as
physical servers and allows elastic scaling. You can apply for and scale resources
based on your needs.
- The following two startup methods are supported for elastic
baremetal instances:
- Volume: Uses a volume as the system volume of the elastic baremetal instance to install and deploy the operating system.
- Local Disk: Uses a local disk as the system disk of the elastic baremetal instance to install and deploy the operating system.
- The Local Disk (Non Take-Over) and Local Disk (Take-Over)
methods are supported:
- Local Disk (Non Take-Over): When you use a baremetal node to create the elastic baremetal instance, the operating system is downloaded from the Cloud and installed on the elastic baremetal instance. This method will format the local system disk.
- Local Disk (Take-Over): When you use a baremetal node to create the elastic baremetal instance, the original operating system on the local system disk is used as the operating system of the elastic baremetal instance.
- The following describes the resources supplied to elastic baremetal
instances of different startup methods:
- To elastic baremetal instances of both the volume startup method and local disk startup method, the compute resources are provided by corresponding baremetal nodes, and L3 networks on the Cloud are used as their business networks.
- To elastic baremetal instances of the volume startup method, the storage resources are provided by SharedBlock or Ceph primary storage on the Cloud, and the PXE boots are supported by the provision network.
- To elastic baremetal instances of local disk startup method, the storage resources are provides by their local disks. If you attach data volumes or block storage volumes to the instances, they can use the storage resources provided by SharedBlock, Ceph, or Vhost (ZHPS) primary storage on the Cloud.
- We recommend that you create an elastic baremetal instance by using an image that has installed the agent. Otherwise, you cannot perform the following actions on the instance: open the instance console, modify the instance password, attach a volume to or detach a volume from the instance, and attach a network to or detach a network from the instance.
- By default, you can you an image whose BIOS mode is UEFI to create an elastic baremetal instance. If you need to use an image with a Legacy BIOS mode, contact the official technical support.
- You can configure business networks for elastic baremetal instances. If you attach an L2 network to the cluster where your baremetal nodes reside, elastic baremetal instances and VM instances that share the same L2 network can access each other without using the gateway.
- You can enable the elastic baremetal instances of the volume startup method to automatically release the associated baremetal node when it is powered-off. The baremetal node released can be used by other elastic baremetal instances, thus avoiding the resource idling.
- The following two startup methods are supported for elastic
baremetal instances:
Scenarios
- Scenarios that require high security and strict monitoring:
The financial and insurance industries have high requirements over business deployment compliance and data security. In these scenarios, you can use Baremetal Management to secure dedicated resources, data isolation, easy management, and operation-tracking. This way, you can ensure the reliability and security compliance of your key business system and data.
- High-performance computing scenarios:
Supercomputing, genome sequencing, and other high-performance computing scenarios have high requirements over the computing performance, stability, and timeliness. However, the virtualization may cause performance losses and hyperthreading may negatively influence the business. Deploying a reasonable number of baremetal clusters can solve these problems, meeting the high-performance computing requirements.
- Key database scenarios:
To meet business requirements, you may not want to deploy some key databases on VM instances while want to deploy the databases on physical servers that feature dedicated resources, network isolation, and guaranteed performance. In these scenarios, you can use Baremetal Management to provide dedicated high-performance physical servers for your applications.
Advantages
- Integration of high performance and scalability:
Elastic Baremetal Management provides dedicated physical servers for your applications to ensure high performance and stability. In addition, this feature allows elastic scaling. You can apply for and scale resources based on your needs.
- Strong scalability:
A single management node allows you to manage 10,000 baremetal nodes and scale-out according to your needs.
- Strong compatibility:
An elastic baremetal instance no longer depends on IPMI/BMC network (optional), and the NIC can be used as a baremetal node as long as it supports PXE boot. The realization of the elastic baremetal instance does not associate any CPU or virtualization technology. As long as there is a system image that can be started, and no matter if it is an ISO, qcow2, or raw image, it can be used as a virtual hard disk by an elastic baremetal instance. That is, the elastic baremetal can be directly used on domestic servers.
In addition, the elastic baremetal management feature can be achieved by software only, without purchasing any proprietary hardware. It is compatible with all x86 and most of domestic ARM CPU architectures and supports mainstream x86 operating systems and some ARM operating systems.
- Advanced technology:
In addition to turn on/off baremetal servers and deploy system, elastic baremetal management also supports the use of virtual resources on the Cloud, including VPC/flat/public networks, volumes, primary storage and other resources, which seamlessly connects physical resources and cloud resources, and greatly improves the availability of cloud resources.
- Consistency in operation experience:
All features of a VM instance can be directly operated on an elastic baremetal instance. And an elastic baremetal instance can use any advanced network services without purchasing additional network hardware.
- Flexible deployment:
An elastic baremetal instance supports both volume deployment method and local disk deployment method, respectively using the primary storage resource and the local disk on the Cloud, which combines the scalability of resources on the Cloud with the stable I/O and high throughput of local disks.
The primary storage resources used by an elastic baremetal instance can be shared by the KVM clusters of the Cloud, which relieves you from deploying additional storage resources. In addition, local disk deployment method supports take over the original system, which effectively ensures the business continuity.
Quick Start
About this task
On the main menu of ZStack Cube Ultimate, choose . Then, you are redirected to the Quick Start Wizard page.
You can follow the following steps to quick start Elastic Baremetal Management.
Procedure
-
Preparation
Elastic Baremetal Management provides dedicated physical servers for your applications to ensure high performance and stability. In addition, this feature allows elastic scaling. You can apply for and scale resources based on your needs.
Before you can use Elastic Baremetal Management, you need to complete the following preparations:- Understand Basics
You can refer to the working principal diagram in Introduction and understand what resources are needed and what is the relationship between these resources.
- Deploy Physical Network
Make sure that you have deployed IPv4 physical networks, including management networks, storage networks, provision networks, business networks, IPMI networks. We recommend that you use at least 10 Gigabit NICs for your provision network.
- Prepare Basic Resource:
Make sure that you have deployed the basic resources required by Elastic Baremetal Management, such as Ceph or Shared Block primary storage and business networks.
- Create Image:
Prepare elastic baremetal images with the agent installed, and add these images to the Cloud. Otherwise, you cannot open the console, change the password of the elastic baremetal instance, attach/detach volumes or networks, or view monitoring data.
图 1. Preparation 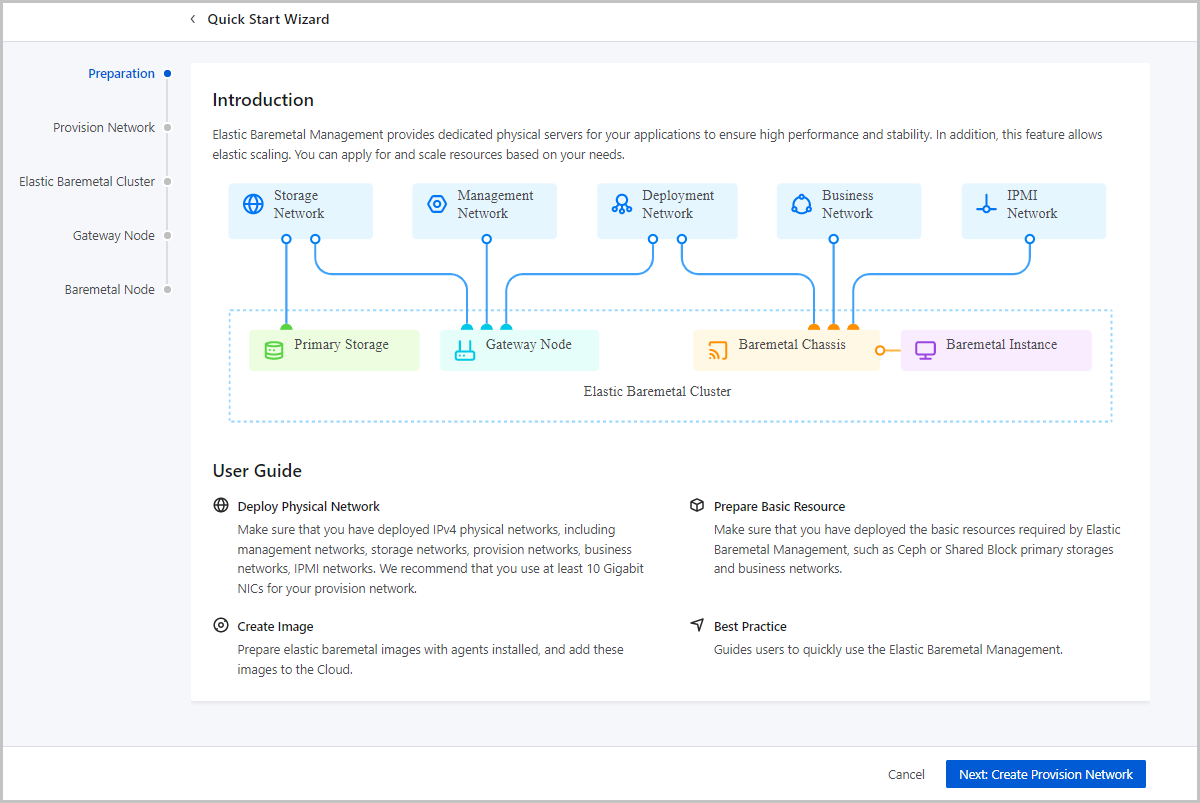
- Understand Basics
-
Provision Network
Provision Network:A provision network is a dedicated network for PXE boot and image downloads while creating elastic baremetal instances.
- Before you can use Elastic Baremetal Management, you need to deploy an IPv4 provision network.
- Provision networks require high network performance. We recommend that you use at least 10 Gigabit NICs for your provision network.
- You can configure a gateway for your provision network. This way, the provision network can be connected to other networks. If you do not need to connect your provision network to other networks, you do not need to configure a gateway for your provision network.
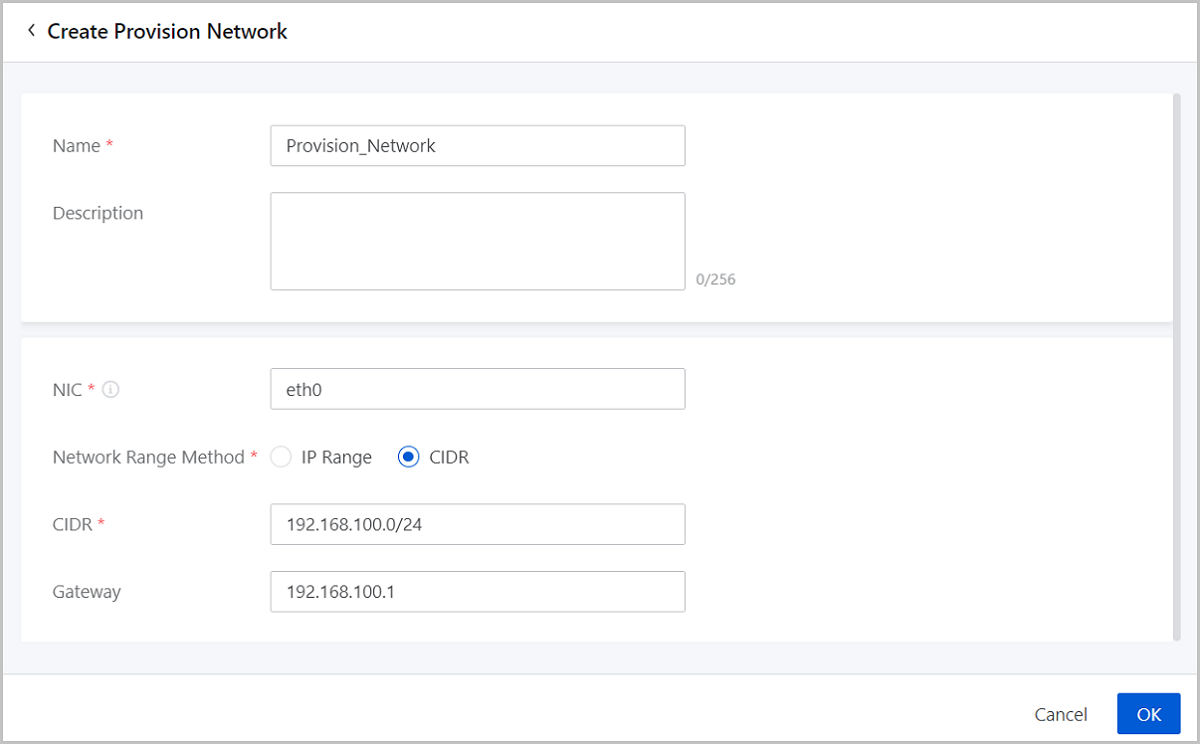
On the displayed page, set the following parameters:- Name: Set a name for the provision network.
The name must be 1 to 128 characters in length and can contain Chinese characters, letters, digits, spaces, hyphens (-), underscores (_), periods (.), parenthesis (), colons (:), and plus signs (+) and cannot begin or end with spaces.
- Description: Optional. Enter a description for the provision network.
- NIC: Enter the name of the NIC on the provision network.
The NIC name must be consistent with the NIC name in the actual deployment environment.
 Note:
Note:
- The server that you use as a baremetal node must have at least one PXE boot NIC used for network management. We recommend that you use the first NIC of the server as the provision NIC to improve the deployment efficiency.
- Make sure that no other DHCP service is deployed in the provision network. This avoids DHCP conflicts.
- Network Range Method: Select a method to add a network
range for the provision network. You can select IP Range or CIDR.If you select IP Range, you need to set the following parameters:
- Start IP: Set a start IP address for the network range, for example, 192.168.0.2.
- End IP: Set an end IP address for the network range, for example, 192.168.0.254.
- Netmask: Set a netmask for the network range, for example, 255.255.0.0.
- Gateway: Set a gateway for the provision
network, for example, 192.168.0.1.Note: If you do not need
to connect to other networks, you do not need to configure a
gateway.
If you select CIDR, you need to set the following parameters:- CIDR: Set a CIDR block for the provision network, for example, 192.168.0.0/24.
- Gateway; Optional. Set a gateway for the
provision network, for example, 192.168.108.1.Note: If you do
not need to connect to other networks, you do not need to
configure a gateway.
图 2. Create Provision Network 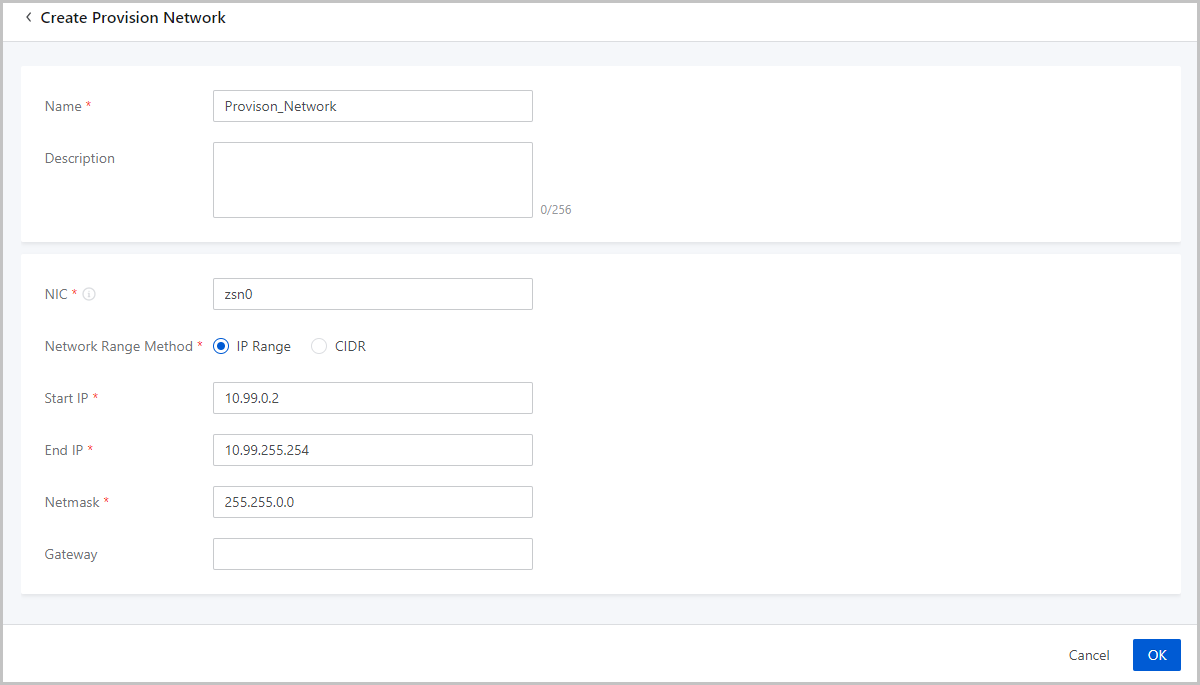
-
Elastic Baremetal Cluster
Elastic Baremetal Cluster: An elastic baremetal cluster consists of elastic baremetal instances. You can manage elastic baremetal instances by managing an elastic baremetal cluster where the instances reside.
- You must attach a provision network to an elastic baremetal cluster to provide PXE services for baremetal nodes in the cluster.
- You can attach only one provision network to an elastic baremetal cluster. However, you can attach a provision network to multiple elastic baremetal clusters.
- You can attach an L2 network to an elastic baremetal cluster to provide an extended L2 business network for elastic baremetal instances in the cluster. Elastic baremetal instances and VM instances that share the same L2 network can access each other without using the gateway. The L2 network that you can attach to an elastic baremetal cluster can be of the VLAN or NoVLAN type.
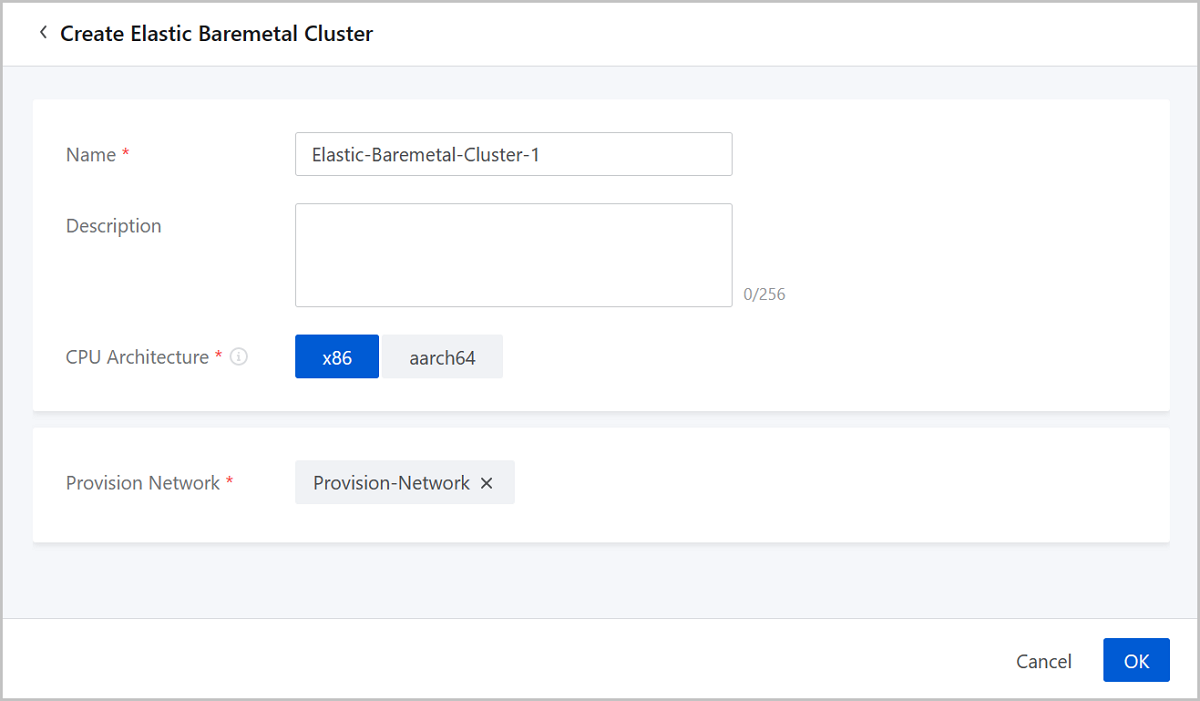
On the displayed page, set the following parameters:- Name: Set a name for the elastic baremetal
cluster.
The name must be 1 to 128 characters in length and can contain Chinese characters, letters, digits, spaces, hyphens (-), underscores (_), periods (.), parenthesis (), colons (:), and plus signs (+) and cannot begin or end with spaces.
- Description: Optional. Enter a description for the elastic baremetal cluster.
- CPU Architecture: The CPU architecture of the
elastic baremetal cluster. The available architectures include
x86_64 and aarch64.
- If you need to add only baremetal nodes with the x86_64 architecture to the elastic baremetal cluster, select x86_64.
- If you need to add only baremetal nodes with the aarch64 architecture to the elastic baremetal cluster, select aarch64.
Note: Make sure that the CPU architecture of the elastic
baremetal cluster is consistent with that of baremetal nodes and
gateway node. - Provision Network: Select a provision network that you need to attach to the cluster.
- Primary Storage: Select a primary storage that you need to attach to the cluster. You can select a primary storage of the SharedBlock or Ceph type.
- iSCSI Storage: If you select a primary storage of the SharedBlock type, you need to attach the iSCSI storage to the cluster.
- L2 Network: Select an L2 network that you need to attach to the cluster.
图 3. Create Elastic Baremetal Cluster 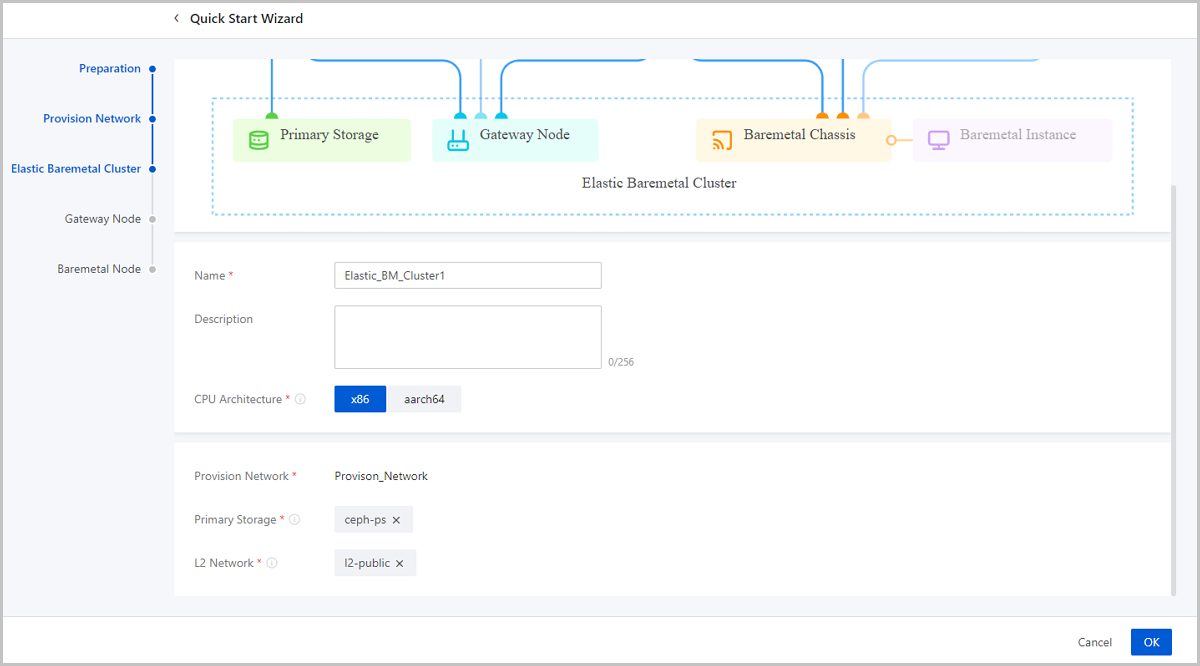
-
Gateway Node
Gateway Node: A gateway node is a node where the ingress and egress traffic of the Cloud and elastic baremetal instances is forwarded.
- You can attach multiple gateway nodes to an elastic baremetal cluster. However, you can attach only one gateway node to an elastic baremetal cluster.
- A gateway node is used to take over primary storages and assign storage space for elastic baremetal instances.
- A gateway node provides iPXE, DHCP, and other services. It is used to deliver configuration settings to elastic baremetal instances.
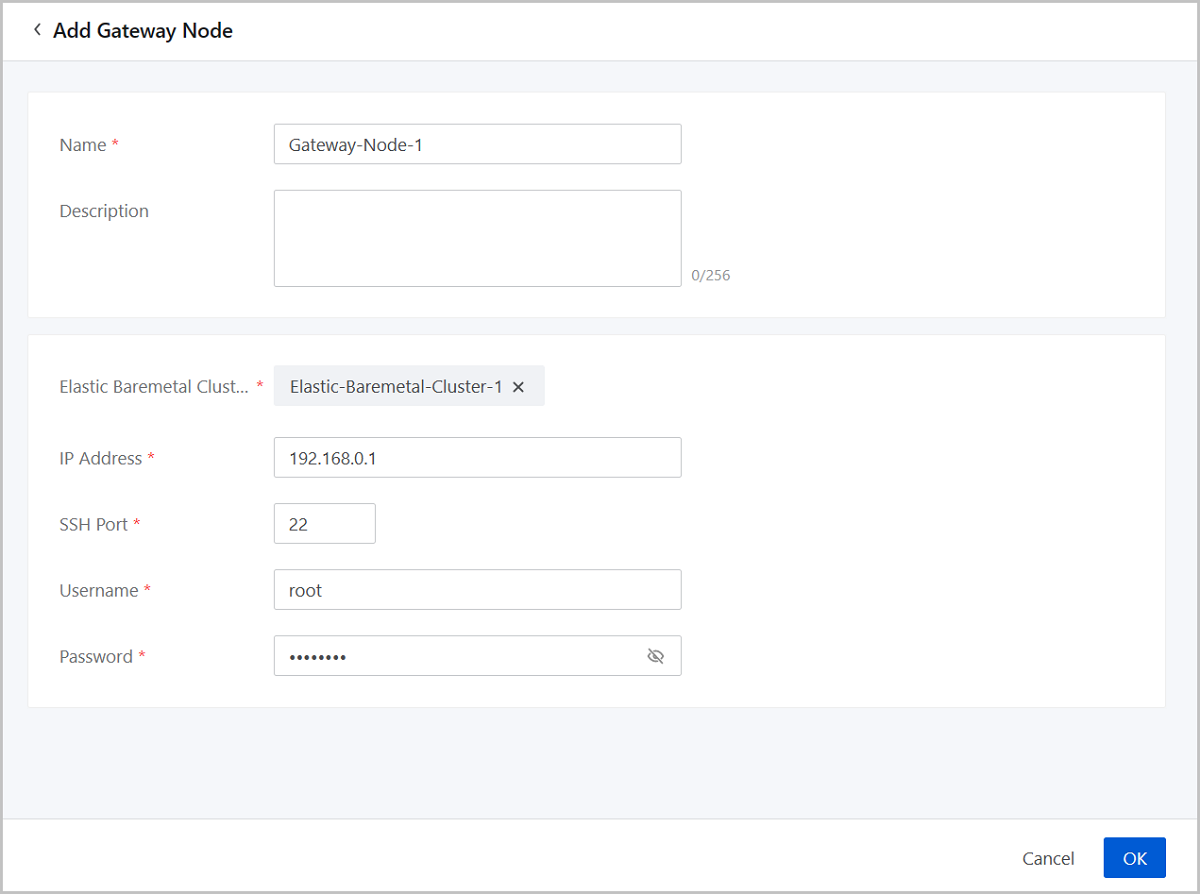
On the displayed page, set the following parameters:- Name: Set a name for the gateway node. A name can contain Chinese characters, letters, digits, hyphens (-), underscores (_), periods (.), parenthesis (), colons (:), and plus signs (+).
- Description: Optional. Enter a description for the gateway node.
- Elastic Baremetal Cluster: Select an elastic baremetal cluster to which you need to attach the gateway node.
- IP Address: Enter an IP address for the gateway node based on your actual scenario.
- SSH Port: Enter an SSH port for the gateway node based on your actual scenario. Default: 22
- Username: Enter the username of the gateway node.
- Password: Enter the password of the username.
图 4. Add Gateway Node 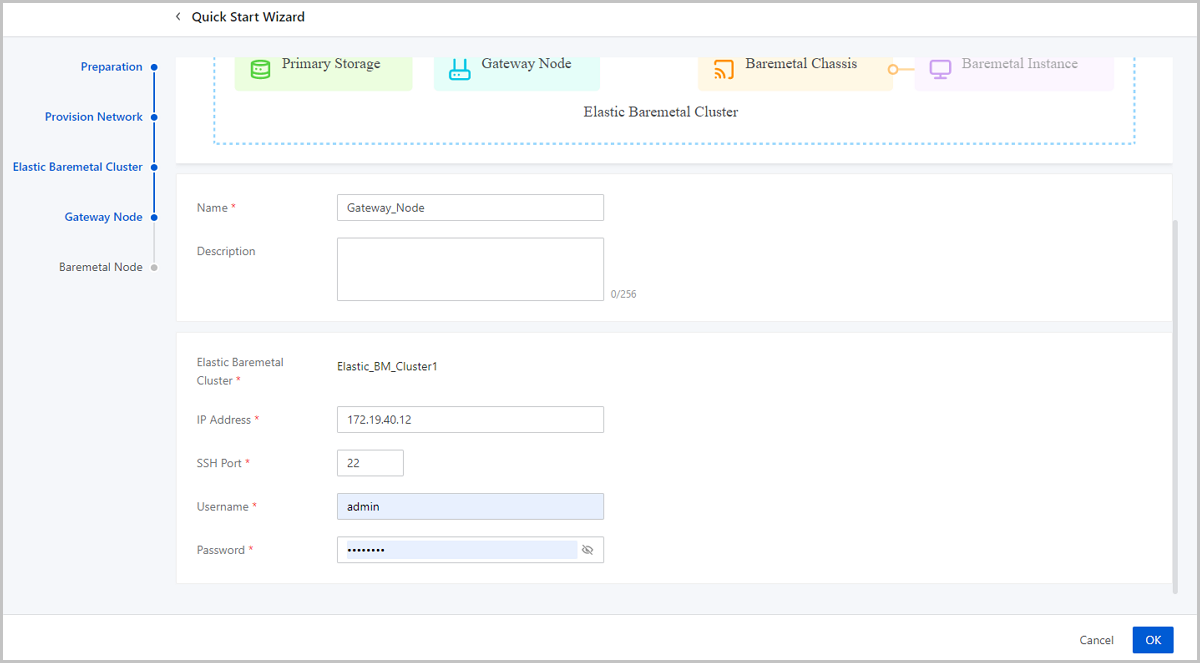
-
Baremetal Node
Baremetal Node: A baremetal node is used to create a baremetal instance and is identified based on the BMC interface and IPMI configuration setting.
- You can set the startup methods for the baremetal nodes. The
following two startup methods are supported:
- Startup from a volume: Uses a volume as the system volume of the baremetal node to install and deploy the operating system.
- Startup form a local disk: Uses a local disk as the system volume of the baremetal node to install and deploy the operating system.
- If you select to startup the baremetal node from a local
disk, you can choose whether to take over the original
operating system.
- If you choose not to take over the original operating system, the Local Disk (Non Take-Over) is used. When you use the baremetal node to create an elastic baremetal instance, this method helps download an operating system from the Cloud and install it on the instance. Meanwhile, the local system volume is formatted.
- If you choose to take over the original operating system, the Local Disk (Take-Over) method is used. The elastic baremetal instance created from the baremetal node used the original system operating system stored on the local disk directly.
- The management node must be connected to the IPMI network to remotely manage baremetal nodes.
- Baremetal nodes must be configured with the BMC interfaces, IPMI addresses, ports, usernames, and passwords, and be connected to the IPMI network.
- A baremetal node can be distributed to only one elastic baremetal instance and an elastic baremetal instance can only be assigned one baremetal node.
- You can provide compute resources for elastic baremetal instances by using a baremetal node or elastic baremetal offering.
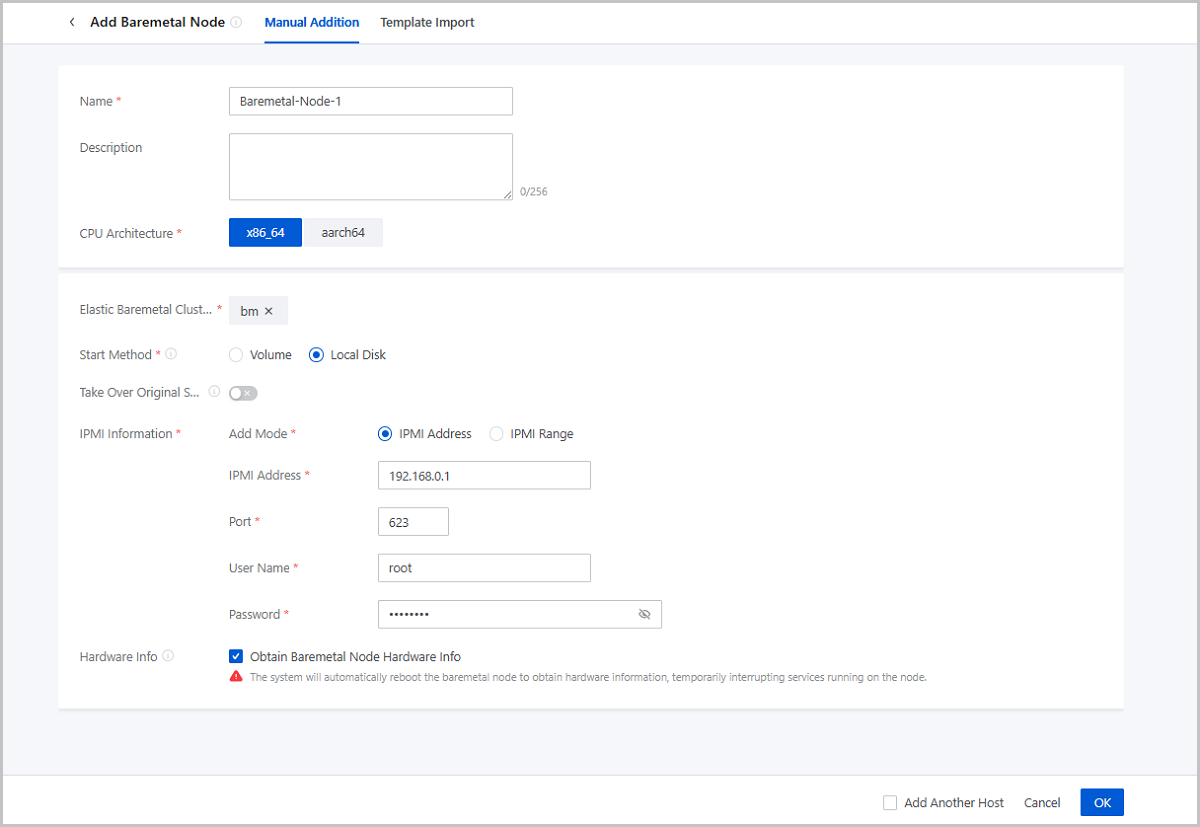
On the displayed page, set the following parameters:- Name: Set a name for the baremetal node.
The name must be 1 to 128 characters in length and can contain Chinese characters, letters, digits, spaces, hyphens (-), underscores (_), periods (.), parenthesis (), colons (:), and plus signs (+) and cannot begin or end with spaces.
- Description: Optional. Enter a description for the baremetal node.
- CPU Architecture: The CPU architecture of the elastic
baremetal cluster. The available architectures include x86_64 and
aarch64.Note: Make sure that the CPU architecture of the elastic
baremetal cluster is consistent with that of baremetal nodes and gateway
node.
- Elastic Baremetal Cluster: Select an elastic baremetal cluster where the baremetal node resides.
- Start Method: The startup method of the elastic
baremetal instance. The following two startup methods are supported:
- Volume: Uses a volume as the system volume of the elastic baremetal instance to install and deploy the operating system.
- Local Disk: Uses a local disk as the system
disk of the elastic baremetal instance to install and deploy the
operating system.
- Non Take-Over : When you create an elastic baremetal instance, the operating system is downloaded from the Cloud and installed on the elastic baremetal instance. This method will format the local system disk.
- Take-Over: When you create an elastic
baremetal instance, the original operating system on the
local system disk is used as the operating system of the
elastic baremetal instance.If you take over the original system, note that:
- We recommend that you take over a system that has installed the agent. If the taken-over system does not have the agent installed, install the agent after the elastic baremetal instance is created. Otherwise, you cannot open the console of the elastic baremetal instance, modify the password of the instance, attach a volume to or detach a volume from the instance, or attach a network to or detach a network from the instance.
- By default, the supported BIOS mode of the image used to create an elastic baremetal instance is UEFI. To use an image whose BIOS mode is Legacy, contact the official technical support.
- Make sure that the operating system you take over is officially supported by Elastic Baremetal Management. Otherwise, you can perform very limited operations on the elastic baremetal instance created from the baremetal node. For more information, see Operating Systems.
- You need to set the following parameters:
- Platform: Select the platform type based on the operating system that you take over. Supported types of platform: Linux and Windows.
- Elastic Baremetal
Instance: Select whether to make the
system automatically create an elastic baremetal
instance based on this node as soon as it is added.Note:
- You can select this checkbox only when the Start Method is Local Disk (Take-Over) and the Platform is Linux.
- If you select the checkbox, the system will automatically obtain the node hardware information and create a baremetal instance. This process does not reboot the baremetal node, ensuring business continuity.
- If you select this checkbox, make sure that the baremetal node is running and has the apring tool and the agent of the latest version installed.
- Provision IP: If you select Auto Create Elastic Baremetal Instance, configure a provision network for the node in advance and enter the provision network IP here.
- IPMI Information: Enter the IPMI information by using
the IPMI address method or IPMI range method.If you use the IPMI address method, set the following parameters:
- IPMI Address: Enter an IPMI address.
- Port: Enter an IPMI port.
- User Name: Enter an IPMI username.
- Password: Enter the password of the IPMI username.
If you use the IPMI range method, set the following parameters:- IPMI Range: Enter an IPMI range.
- Port: Enter an IPMI port. Make sure that the ports of the IPMI range are consistent with each other.
- User Name: Enter an IPMI username. Make sure that the usernames of the IPMI range are the same.
- Password: Enter the password of the IPMI username. Make sure that the passwords of the IPMI range are the same.
- Obtain Hardware Information: Reboot the baremetal
node and obtain hardware information. By default, the switch is turned on.Note:
- If you have selected Auto Create Elastic Baremetal Instance, you do not need to set this parameter because the system can automatically obtain the node hardware information without rebooting the node.
- If you do not select Auto Create Elastic Baremetal Instance, you can turn on this switch to make the system reboot the baremetal node to obtain its hardware information, thus ensuring that the node runs properly and can be used to create an elastic baremetal instance.
- Rebooting the baremetal node temporarily interrupts the services running on it. To reduce the business impact, you can select business off-peak hours to obtain hardware information after you add the node to the Cloud.
图 5. Add Baremetal Node 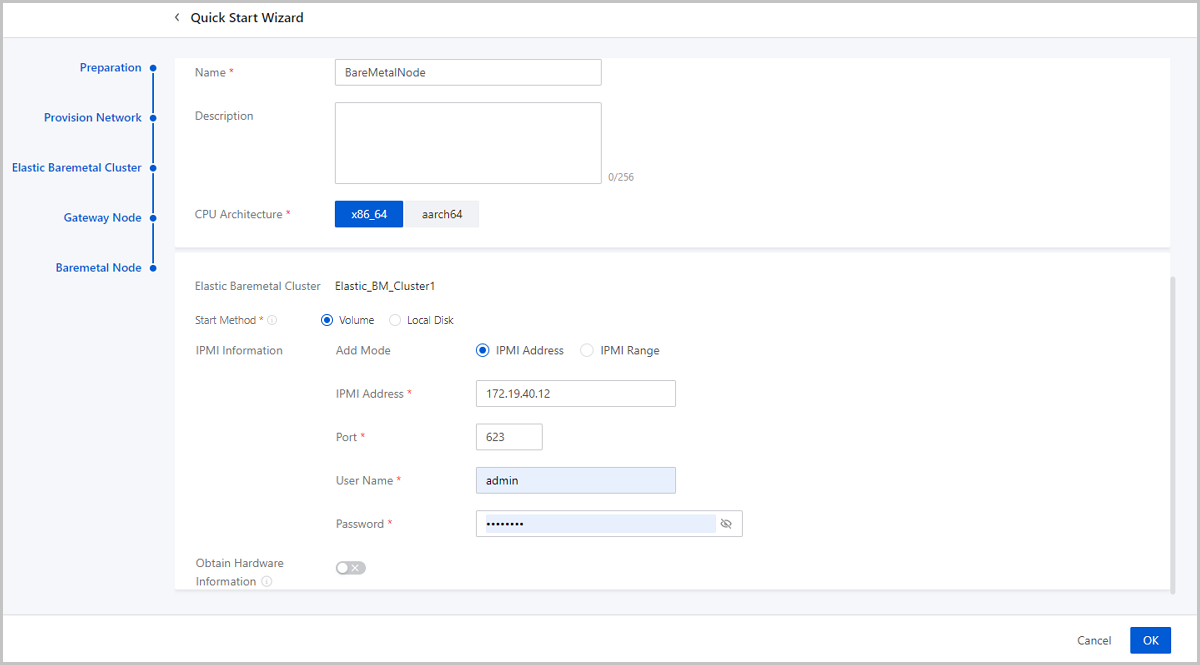
- You can set the startup methods for the baremetal nodes. The
following two startup methods are supported:
-
Check Configurations
After you complete the Quick Start Wizard, you can create an elastic baremetal instance. However, you need to check the following configurations due to deployment concerns before you create an instance:
- If you use ZStack Ceph Enterprise storage and do not
add an access token for the ZStack Ceph Enterprise
storage, you need to login to the management node of the ZStack Ceph Enterprise to add the gateway node as the
gateway server. Follow these steps and make sure your configurations
are correct:
- Login to the management node of ZStack Ceph Enterprise and add the gateway node as the gateway server.
- Make sure that the gateway node is connected on ZStack Cube Ultimate. Then, enter the gateway node
system and run the following script to start the target core
module:
After running the script successfully, reboot the gateway node.[root@172-25-13-12 ~ ]# if [ -f /etc/xdc/xdc.conf ]; then sed -i '/^xdc_proxy_feature/d' /etc/xdc/xdc.conf; echo xdc_proxy_feature = true >>/etc/xdc/xdc.conf; echo -e "iscsi_target_mod\ntarget_core_user\ntarget_core_iblock" > /etc/modules-load.d/target.conf; systemctl enable target; systemctl enable xdc; fiNote: If you do not run the script manually, your
first attempt to create an elastic baremetal instance
with this storage will fail. You just need to manually
reboot the gateway node and then the creation will be
successful.
- If you use ZStack Ceph Enterprise storage and want to
add an access token for the ZStack Ceph Enterprise
storage, you need to login to the management node of ZStack Ceph Enterprise as the admin in advance, choose , and obtain an access token of the admin permission.
Then you need to enter the acess token when you add Ceph primary
storage on the Cloud.Note: Make sure that the license of the
ZStack Ceph Enterprise storage is
valid.
图 6. Obtain Access Token 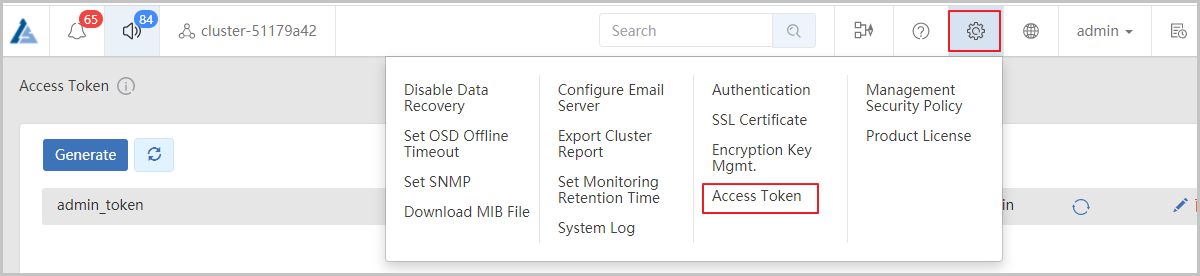
图 7. Add ZStack Ceph Enterprise Primary Storage 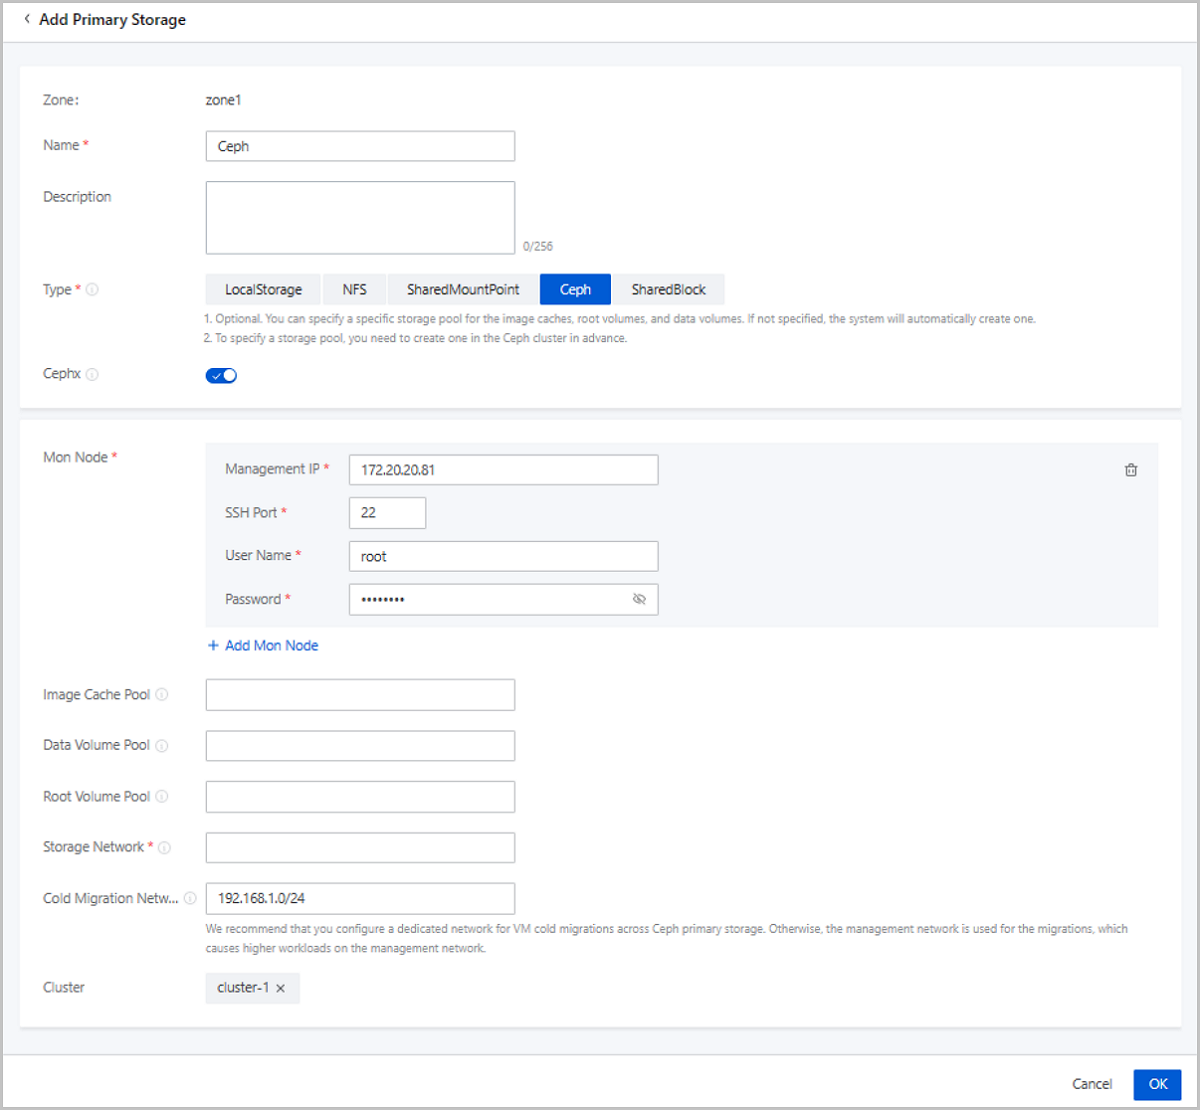
- If you use ZStack Ceph Enterprise storage and do not
add an access token for the ZStack Ceph Enterprise
storage, you need to login to the management node of the ZStack Ceph Enterprise to add the gateway node as the
gateway server. Follow these steps and make sure your configurations
are correct:
-
Elastic Baremetal Instance
Elastic Baremetal Instance: An elastic baremetal instance has the same performance as physical servers and allows elastic scaling. You can apply for and scale resources based on your needs.
- The following two startup methods are supported for elastic
baremetal instances:
- Volume: Uses a volume as the system volume of the elastic baremetal instance to install and deploy the operating system.
- Local Disk: Uses a local disk as the system disk of the elastic baremetal instance to install and deploy the operating system.
- The Local Disk (Non Take-Over) and Local Disk (Take-Over)
methods are supported:
- Local Disk (Non Take-Over): When you use a baremetal node to create the elastic baremetal instance, the operating system is downloaded from the Cloud and installed on the elastic baremetal instance. This method will format the local system disk.
- Local Disk (Take-Over): When you use a baremetal node to create the elastic baremetal instance, the original operating system on the local system disk is used as the operating system of the elastic baremetal instance.
- The following describes the resources supplied to elastic baremetal
instances of different startup methods:
- To elastic baremetal instances of both the volume startup method and local disk startup method, the compute resources are provided by corresponding baremetal nodes, and L3 networks on the Cloud are used as their business networks.
- To elastic baremetal instances of the volume startup method, the storage resources are provided by SharedBlock or Ceph primary storage on the Cloud, and the PXE boots are supported by the provision network.
- To elastic baremetal instances of local disk startup method, the storage resources are provides by their local disks. If you attach data volumes or block storage volumes to the instances, they can use the storage resources provided by SharedBlock, Ceph, or Vhost (ZHPS) primary storage on the Cloud.
- We recommend that you create an elastic baremetal instance by using an image that has installed the agent. Otherwise, you cannot perform the following actions on the instance: open the instance console, modify the instance password, attach a volume to or detach a volume from the instance, and attach a network to or detach a network from the instance.
- By default, you can you an image whose BIOS mode is UEFI to create an elastic baremetal instance. If you need to use an image with a Legacy BIOS mode, contact the official technical support.
- You can configure business networks for elastic baremetal instances. If you attach an L2 network to the cluster where your baremetal nodes reside, elastic baremetal instances and VM instances that share the same L2 network can access each other without using the gateway.
- You can enable the elastic baremetal instances of the volume startup method to automatically release the associated baremetal node when it is powered-off. The baremetal node released can be used by other elastic baremetal instances, thus avoiding the resource idling.
On the displayed page, set the following parameters:- Name: Set a name for the elastic baremetal
instance.
The name must be 1 to 128 characters in length and can contain Chinese characters, letters, digits, spaces, hyphens (-), underscores (_), periods (.), parenthesis (), colons (:), and plus signs (+) and cannot begin or end with spaces.
- Description: Optional. Enter a description for the elastic baremetal instance.
- Tag: Optional. Attach a tag to the elastic baremetal instance.
- Elastic Baremetal Cluster: Optional. Select an elastic
baremetal cluster to filter baremetal nodes in the cluster.Note: If you do not
select an cluster, the cluster where the selected baremtal node resides on
is used.
- Creation Mode: Select a creation mode. You can select Add
By Baremetal Node or Add By Baremetal Offering.If you select Add By Baremetal Node, set the following parameters:
- Baremetal Node: Select a baremetal node based
on the startup method. Three startup methods are supported: Volume,
Local Disk (Non Take-Over), and Local Disk (Take-Over).
-
If you select the Volume startup method, note the following points:
- An elastic baremetal instance of volume startup method cannot use Vhost (ZHPS) primary storage. And a Vhost (ZHPS) primary storage cannot co-exist with primary storage of other types in the same elastic baremetal cluster. Therefore, we recommend that you do not choose a baremetal node of volume startup method if you have attached a Vhost (ZHPS) primary storage to the cluster. Otherwise, the elastic baremetal instance fails to be created because the system is unable to allocate storage resources to it.
- If you select the Volume startup method,
configure the following parameters:
- Power Off To Release Baremetal
Node: When an elastic baremetal
instance is powered off, the associated baremetal
node is automatically released and can be used by
another elastic baremetal instance. This mechanism
avoids resource idling. By default, this feature
is disabled.Note: If you choose to release a
baremetal instance upon power-off, note that:
- This feature may change the associated baremetal node. The operating system will clean up business NIC configurations of the elastic baremetal instance. If your resources are sufficient, we recommend that you do not use this feature.
- If you select Add By Baremetal Node and enable this feature, you need to manually select a baremetal node and configure the business NIC when you restart the elastic baremetal instance.
- If you select Add By Baremetal Offering and enable this feature, you do not need to manually select a baremetal node but need to configure the business NIC when you restart the elastic baremetal instance.
- Image: Select an image
to create the elastic baremetal instance. The
mainstream x86_64 operating systems and some ARM
operating systems are supported. The following
table lists the supported OSs.
CPU Infrastructure Type Operating System x86 Windows - Windows 2012
- Windows 2016
- Windows 2019
- Windows 10
Linux - CentOS 7
- CentOS 8
- Ubuntu 18LTS
- Ubuntu 20LTS
ARM Linux - CentOS 7
- KylinV10
Note: When you select an image, note
that:- We recommend that you use images with the agent installed. Otherwise, you cannot launch the consoles, modify the password, attach or detach volumes, attach or detach networks, or view monitoring data of an elastic baremetal instance that uses the image.
- By default, the BIOS of the image that you can use to create an elastic baremetal instance is in UEFI mode. If you need to use an image whose BIOS is in Legacy mode, contact the official technical support.
- If you use a Windows image, we recommend that you choose the network safe mode when you start the elastic baremetal instance for the first time. In this mode, the drives can be automatically loaded, and you can avoid the instance start failure.
- Advanced: Configure
advanced settings for the elastic baremetal instance.
- Data Disk Offering: Optional. Select a disk offering for the elastic baremetal instance. If you select a disk offering, a data volume is created and attached to the instance. By default, no disk offering is selected.
- Storage Allocation
Policy: Optional. Select a primary
storage where the root volume and data volume of
elastic baremetal instance reside. Default:
Random. You can also configure the primary storage
manually and share the primary storage resources
with KVM clusters on the Cloud.Note:
- Custom: Vhost (ZHPS) primary storage does not support elastic baremetal instances of volume startup method. You cannot choose a Vhost primary storage for instances of volume startup method.
- System Allocation: Currently, a Vhost (ZHPS) primary storage cannot co-exist with primary storage of other types in the same cluster. If you attach a Vhost (ZHPS) primary storage to the cluster, an instance of volume startup methods will fail to be created because the system is unable to allocate storage resources to it.
- Gateway Node Allocation Policy: Optional. The policy that is used to allocate a gateway node when you create an elastic baremetal instance. Default: LeastBmPreferredGatewayAllocatorStrategy. Valid values: LeastBmPreferredGatewayAllocatorStrategy, LastGatewayPreferredAllocatorStrategy, and DefaultGatewayAllocatorStrategy.
- First Assigned Gateway
Node: Optional. Select a gateway node
for the first startup of the elastic baremetal
instance. If you do not specify a gateway node,
the gateway node selected based on the gateway
node allocation policy is used.Note: This option
takes effect only on the first start-up of the
elastic baremetal instance. Afterwards, gateway
nodes are assigned based on the gateway node
allocation policy.
- Power Off To Release Baremetal
Node: When an elastic baremetal
instance is powered off, the associated baremetal
node is automatically released and can be used by
another elastic baremetal instance. This mechanism
avoids resource idling. By default, this feature
is disabled.
-
If you select the Local Disk (Non Take-Over) startup method, configure the following parameters:
- System Disk: Select a
local disk as the system disk of the elastic
baremetal instance.Note: Make sure that the local
disk selected as the system volume of the elastic
baremetal instance is set as the first boot device
in the BIOS.
- Image: Select an image to
create the elastic baremetal instance. The
mainstream x86_64 operating systems and some ARM
operating systems are supported. The following
table lists the supported OSs.
CPU Infrastructure Type Operating System x86 Windows - Windows 2012
- Windows 2016
- Windows 2019
- Windows 10
Linux - CentOS 7
- CentOS 8
- Ubuntu 18LTS
- Ubuntu 20LTS
ARM Linux - CentOS 7
- Kylin V10
Note: When you select an image, note
that:- We recommend that you use images with the agent installed. Otherwise, you cannot launch the consoles, modify the password, attach or detach volumes, attach or detach networks, or view monitoring data of an elastic baremetal instance that uses the image.
- By default, the BIOS of the image that you can use to create an elastic baremetal instance is in UEFI mode. If you need to use an image whose BIOS is in Legacy mode, contact the official technical support.
- If you use a Windows image, we recommend that you choose the network safe mode when you start the elastic baremetal instance for the first time. In this mode, the drives can be automatically loaded, and you can avoid the instance start failure.
- Advanced: Configure
advanced settings for the elastic baremetal instance.
- Data Disk Offering: Optional. Select of disk offering for the data volume attached to the elastic baremetal instance. By default, no data volume is attached.
- Storage Allocation Policy: Optional. Select a primary storage for the instance root volume and data volumes. By default, the primary storage is selected by the system automatically. You can also specify a primary storage manually.
- Gateway Node Allocation Policy: Optional. The policy that is used to allocate a gateway node when you create an elastic baremetal instance. Default: LeastBmPreferredGatewayAllocatorStrategy. Valid values: LeastBmPreferredGatewayAllocatorStrategy, LastGatewayPreferredAllocatorStrategy, and DefaultGatewayAllocatorStrategy.
- First Assigned Gateway
Node: Optional. Select a gateway node
for the first startup of the elastic baremetal
instance. If you do not specify a gateway node,
the gateway node selected based on the gateway
node allocation policy is used.Note: This option
takes effect only on the first start-up of the
elastic baremetal instance. Afterwards, gateway
nodes are assigned based on the gateway node
allocation policy.
- System Disk: Select a
local disk as the system disk of the elastic
baremetal instance.
-
If you select the Local Disk (Take-Over) startup method, configure the following parameters:
- Advanced: Configure
advanced settings for the elastic baremetal instance.
- Data Disk Offering: Optional. Select of disk offering for the data volume attached to the elastic baremetal instance. By default, no data volume is attached.
- Storage Allocation Policy: Optional. Select a primary storage for the instance root volume and data volumes. By default, the primary storage is selected by the system automatically. You can also specify a primary storage manually.
- Gateway Node Allocation Policy: Optional. The policy that is used to allocate a gateway node when you create an elastic baremetal instance. Default: LeastBmPreferredGatewayAllocatorStrategy. Valid values: LeastBmPreferredGatewayAllocatorStrategy, LastGatewayPreferredAllocatorStrategy, and DefaultGatewayAllocatorStrategy.
- First Assigned Gateway
Node: Optional. Select a gateway node
for the first startup of the elastic baremetal
instance. If you do not specify a gateway node,
the gateway node selected based on the gateway
node allocation policy is used.Note: This option
takes effect only on the first start-up of the
elastic baremetal instance. Afterwards, gateway
nodes are assigned based on the gateway node
allocation policy.
- Advanced: Configure
advanced settings for the elastic baremetal instance.
-
If you select Add By Baremetal Offering, set the following parameters:- Baremetal Offering: Select a baremetal
offering based on the startup method. Three startup methods are
supported: Volume, Local Disk (Non Take-Over), and Local Disk
(Take-Over).
-
If you select the Volume startup method, note the following points:
- An elastic baremetal instance of volume startup method cannot use Vhost (ZHPS) primary storage. And a Vhost (ZHPS) primary storage cannot co-exist with primary storage of other types in the same elastic baremetal cluster. Therefore, we recommend that you do not choose a baremetal offering of volume startup method if you have attached a Vhost (ZHPS) primary storage to the cluster. Otherwise, the elastic baremetal instance fails to be created because the system is unable to allocate storage resources to it.
- If you select the Volume startup method,
configure the following parameters:
- Quantity: Enter the number of baremetal instances you need to create.
- Power Off To Release Baremetal
Node: When an elastic baremetal
instance is powered off, the associated baremetal
node is automatically released and can be used by
another elastic baremetal instance. This mechanism
avoids resource idling. By default, this feature
is disabled.Note: If you choose to release a
baremetal instance upon power-off, note that:
- This feature may change the associated baremetal node. The operating system will clean up business NIC configurations of the elastic baremetal instance. If your resources are sufficient, we recommend that you do not use this feature.
- If you select Add By Baremetal Node and enable this feature, you need to manually select a baremetal node and configure the business NIC when you restart the elastic baremetal instance.
- If you select Add By Baremetal Offering and enable this feature, you do not need to manually select a baremetal node but need to configure the business NIC when you restart the elastic baremetal instance.
- Image: Select an image
to create the elastic baremetal instance. The
mainstream x86_64 operating systems and some ARM
operating systems are supported. The following
table lists the supported OSs.
CPU Infrastructure Type Operating System x86 Windows - Windows 2012
- Windows 2016
- Windows 2019
- Windows 10
Linux - CentOS 7
- CentOS 8
- Ubuntu 18LTS
- Ubuntu 20LTS
ARM Linux - CentOS 7
- Kylin V10
Note: When you select an image, note
that:- We recommend that you use images with the agent installed. Otherwise, you cannot launch the consoles, modify the password, attach or detach volumes, attach or detach networks, or view monitoring data of an elastic baremetal instance that uses the image.
- By default, the BIOS of the image that you can use to create an elastic baremetal instance is in UEFI mode. If you need to use an image whose BIOS is in Legacy mode, contact the official technical support.
- If you use a Windows image, we recommend that you choose the network safe mode when you start the elastic baremetal instance for the first time. In this mode, the drives can be automatically loaded, and you can avoid the instance start failure.
- Advanced: Configure
advanced settings for the elastic baremetal instance.
- Data Disk Offering: Optional. Select of disk offering for the data volume attached to the elastic baremetal instance. By default, no data volume is attached.
- Storage Allocation
Policy: Optional. Select a primary
storage for the instance root volume and data
volumes. By default, the primary storage is
selected by the system automatically. You can also
specify a primary storage manually.Note:
- Custom: Vhost (ZHPS) primary storage does not support elastic baremetal instances of volume startup method. You cannot choose a Vhost (ZHPS) primary storage for instances of volume startup method.
- System Allocation: Currently, a Vhost (ZHPS) primary storage cannot co-exist with primary storage of other types in the same cluster. If you attach a Vhost (ZHPS) primary storage to the cluster, an instance of volume startup methods will fail to be created because the system is unable to allocate storage resources to it.
- Gateway Node Allocation Policy: Optional. The policy that is used to allocate a gateway node when you create an elastic baremetal instance. Default: LeastBmPreferredGatewayAllocatorStrategy. Valid values: LeastBmPreferredGatewayAllocatorStrategy, LastGatewayPreferredAllocatorStrategy, and DefaultGatewayAllocatorStrategy.
- First Assigned Gateway
Node: Optional. Select a gateway node
for the first startup of the elastic baremetal
instance. If you do not specify a gateway node,
the gateway node selected based on the gateway
node allocation policy is used.Note: This option
takes effect only on the first start-up of the
elastic baremetal instance. Afterwards, gateway
nodes are assigned based on the gateway node
allocation policy.
-
If you select the Local Disk (Non Take-Over) startup method, configure the following parameters:
- Quantity: Enter the number of baremetal instances you need to create.
- Image: Select an image to
create the elastic baremetal instance. The
mainstream x86_64 operating systems and some ARM
operating systems are supported. The following
table lists the supported OSs.
CPU Infrastructure Type Operating System x86 Windows - Windows 2012
- Windows 2016
- Windows 2019
- Windows 10
Linux - CentOS 7
- CentOS 8
- Ubuntu 18LTS
- Ubuntu 20LTS
ARM Linux - CentOS 7
- Kylin V10
Note: When you select an image, note
that:- We recommend that you use images with the agent installed. Otherwise, you cannot launch the consoles, modify the password, attach or detach volumes, attach or detach networks, or view monitoring data of an elastic baremetal instance that uses the image.
- By default, the BIOS of the image that you can use to create an elastic baremetal instance is in UEFI mode. If you need to use an image whose BIOS is in Legacy mode, contact the official technical support.
- If you use a Windows image, we recommend that you choose the network safe mode when you start the elastic baremetal instance for the first time. In this mode, the drives can be automatically loaded, and you can avoid the instance start failure.
- Advanced: Configure
advanced settings for the elastic baremetal instance.
- Data Disk Offering: Optional. Select of disk offering for the data volume attached to the elastic baremetal instance. By default, no data volume is attached.
- Storage Allocation Policy: Optional. Select a primary storage for the instance root volume and data volumes. By default, the primary storage is selected by the system automatically. You can also specify a primary storage manually.
- Gateway Node Allocation Policy: Optional. The policy that is used to allocate a gateway node when you create an elastic baremetal instance. Default: LeastBmPreferredGatewayAllocatorStrategy. Valid values: LeastBmPreferredGatewayAllocatorStrategy, LastGatewayPreferredAllocatorStrategy, and DefaultGatewayAllocatorStrategy.
- First Assigned Gateway
Node: Optional. Select a gateway node
for the first startup of the elastic baremetal
instance. If you do not specify a gateway node,
the gateway node selected based on the gateway
node allocation policy is used.Note: This option
takes effect only on the first start-up of the
elastic baremetal instance. Afterwards, gateway
nodes are assigned based on the gateway node
allocation policy.
-
If you select the Local Disk (Take-Over) startup method, configure the following parameters:
- Quantity: Enter the number of baremetal instances you need to create.
- Advanced: Configure
advanced settings for the elastic baremetal instance.
- Data Disk Offering: Optional. Select of disk offering for the data volume attached to the elastic baremetal instance. By default, no data volume is attached.
- Storage Allocation Policy: Optional. Select a primary storage for the instance root volume and data volumes. By default, the primary storage is selected by the system automatically. You can also specify a primary storage manually.
- Gateway Node Allocation Policy: Optional. The policy that is used to allocate a gateway node when you create an elastic baremetal instance. Default: LeastBmPreferredGatewayAllocatorStrategy. Valid values: LeastBmPreferredGatewayAllocatorStrategy, LastGatewayPreferredAllocatorStrategy, and DefaultGatewayAllocatorStrategy.
- First Assigned Gateway
Node: Optional. Select a gateway node
for the first startup of the elastic baremetal
instance. If you do not specify a gateway node,
the gateway node selected based on the gateway
node allocation policy is used.Note: This option
takes effect only on the first start-up of the
elastic baremetal instance. Afterwards, gateway
nodes are assigned based on the gateway node
allocation policy.
-
- Baremetal Node: Select a baremetal node based
on the startup method. Three startup methods are supported: Volume,
Local Disk (Non Take-Over), and Local Disk (Take-Over).
图 8. Create Elastic Baremetal Instance 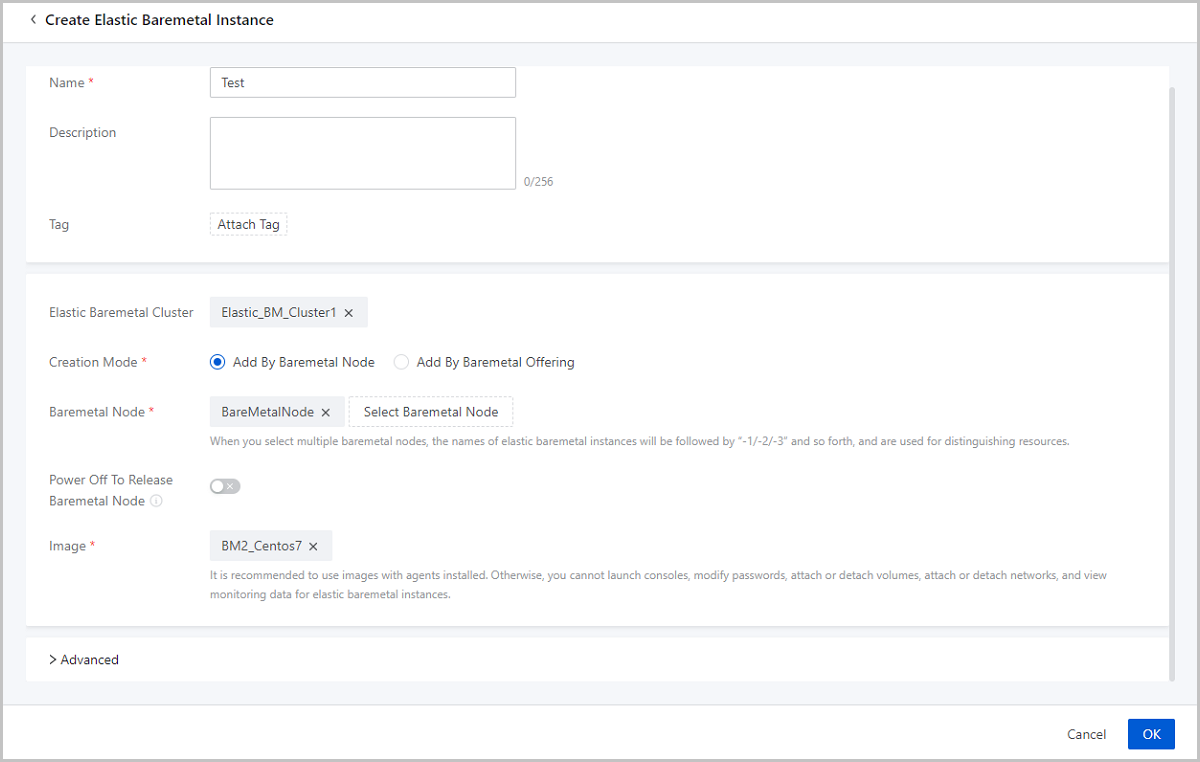
- The following two startup methods are supported for elastic
baremetal instances:
Provision Network
Create a Provision Network
On the main menu of ZStack Cube Ultimate, choose . On the Provision Network page. Click Create Provision Network. Then, the Create Provision Network page is displayed.
- Name: Set a name for the provision network.
The name must be 1 to 128 characters in length and can contain Chinese characters, letters, digits, spaces, hyphens (-), underscores (_), periods (.), parenthesis (), colons (:), and plus signs (+) and cannot begin or end with spaces.
- Description: Optional. Enter a description for the provision network.
- NIC: Enter the name of the NIC on the provision network.
The NIC name must be consistent with the NIC name in the actual deployment environment.Note:
- The server that you use as a baremetal node must have at least one PXE boot NIC used for network management. We recommend that you use the first NIC of the server as the provision NIC to improve the deployment efficiency.
- Make sure that no other DHCP service is deployed in the provision network. This avoids DHCP conflicts.
- Network Range Method: Select a method to add a network
range for the provision network. You can select IP Range or CIDR.If you select IP Range, you need to set the following parameters:
- Start IP: Set a start IP address for the network range, for example, 192.168.0.2.
- End IP: Set an end IP address for the network range, for example, 192.168.0.254.
- Netmask: Set a netmask for the network range, for example, 255.255.0.0.
- Gateway: Set a gateway for the provision
network, for example, 192.168.0.1.Note: If you do not need
to connect to other networks, you do not need to configure a
gateway.
If you select CIDR, you need to set the following parameters:- CIDR: Set a CIDR block for the provision network, for example, 192.168.0.0/24.
- Gateway; Optional. Set a gateway for the
provision network, for example, 192.168.108.1.Note: If you do
not need to connect to other networks, you do not need to
configure a gateway.
Manage a Provision Network
On the main menu of ZStack Cube Ultimate, choose . Then, the Provision Network page is displayed.
| Action | Description |
|---|---|
| Create Provision Network | Create a provision network. |
| Edit Provision Network | Edit the name and description of a provision network. |
| Delete Provision Network | Delete a provision network that does not have any
elastic baremetal clusters attached.Note: If a provision network is
attached to an elastic baremetal cluster, you cannot delete the
provision network. To perform this operation, you need to change
the provision network for the associated elastic baremetal
clusters. |
Elastic Baremetal Cluster
Create an Elastic Baremetal Cluster
On the main menu of ZStack Cube Ultimate, choose . On the Elastic baremetal Cluster page, click Create Elastic baremetal Cluster. Then, the Create Elastic baremetal Cluster page is displayed.
- Name: Set a name for the elastic baremetal cluster.
The name must be 1 to 128 characters in length and can contain Chinese characters, letters, digits, spaces, hyphens (-), underscores (_), periods (.), parenthesis (), colons (:), and plus signs (+) and cannot begin or end with spaces.
- Description: Optional. Enter a description for elastic baremetal cluster.
- CPU Architecture: The CPU architecture of the elastic
baremetal cluster. The available architectures include x86_64 and aarch64.
- If you need to add only baremetal nodes with the x86_64 architecture to the elastic baremetal cluster, select x86_64.
- If you need to add only baremetal nodes with the aarch64 architecture to the elastic baremetal cluster, select aarch64.
Note: Make sure that the CPU architecture of the elastic baremetal cluster
is consistent with that of baremetal nodes and gateway node. - Provision Network: Select a provision network that you need to attach to the cluster.
Manage an Elastic Baremetal Cluster
On the main menu of ZStack Cube Ultimate, choose . Then, the Elastic Baremetal Cluster page is displayed.
| Action | Description |
|---|---|
| Create Elastic baremetal Cluster | Create a elastic baremetal cluster. |
| Edit Elastic baremetal Cluster | Edit the name and description of an elastic baremetal cluster. |
| Enable Elastic baremetal Cluster | Enable a disabled elastic baremetal cluster. After being enabled, the elastic baremetal cluster can be used as a candidate resource. |
| Disable Elastic baremetal Cluster | Disable an enabled elastic baremetal cluster.
After being disabled, the elastic baremetal cluster cannot be used
as a candidate resource.Note: Resources that already use the elastic
baremetal cluster are not affected. |
| Attach L2 Network | Attach an L2 network to an elastic baremetal cluster to provide business network for elastic baremetal instances in the cluster. |
| Detach L2 Network | Detach an L2 network from an elastic baremetal
cluster.Note: Detaching an L2 network also detaches the NICs of
associated elastic baremetal instances. Proceed with
caution. |
| Change Provision Network | Change a provision network for an elastic
baremetal cluster.Note: To change a provision network, note that:
|
| Attach Primary Storage | Attach a primary storage to an elastic baremetal
cluster to provide storage resources to elastic baremetal instances
in the cluster.Note:
|
| Detach Primary Storage | Detach a primary storage from an elastic baremetal cluster. |
| Delete Elastic baremetal Cluster | Delete an elastic baremetal
cluster.Note: Deleting an elastic baremetal cluster also deletes
the baremetal nodes in the cluster and gateway nodes that are
associated with the cluster. It also affects elastic baremetal
instances in the cluster:
|
Gateway Node
Add a Gateway Node
On the main menu of ZStack Cube Ultimate, choose . On the Gateway Node page. Click Add Gateway Node. Then, the Add Gateway Node page is displayed.
- Name: Set a name for the gateway node. A name can contain Chinese characters, letters, digits, hyphens (-), underscores (_), periods (.), parenthesis (), colons (:), and plus signs (+).
- Description: Optional. Enter a description for the gateway node.
- Elastic Baremetal Cluster: Select an elastic baremetal cluster to which you need to attach the gateway node.
- IP Address: Enter an IP address for the gateway node based on your actual scenario.
- SSH Port: Enter an SSH port for the gateway node based on your actual scenario. Default: 22
- Username: Enter the username of the gateway node.
- Password: Enter the password of the username.
Manage a Gateway Node
On the main menu of ZStack Cube Ultimate, choose . Then, the Gateway Node page is displayed.
| Action | Description |
|---|---|
| Add Gateway Node | Add a gateway node. |
| Edit Gateway Node | Edit the name and description of a gateway node. |
| Enable Gateway Node | Enable a disabled gateway node. After being enabled, the gateway node can be used as a candidate resource. |
| Disable Gateway Node | Disable an enabled gateway node. After being
disabled, the gateway node cannot be used as a candidate
resource.Note: Resources that already use the gateway node are
not affected. |
| Reconnect Gateway Node | Reconnect a gateway node. This operation updates the latest configuration of the gateway node and does not affect your business continuity. |
| Change Password | Change the password of a gateway node. If the password of the gateway node server is changed, you need to perform this operation to update the password, otherwise the gateway node may be disconnected. |
| Change Elastic Baremetal Cluster | Change the elastic baremetal cluster for a
gateway node.Note: This operation will also stop the elastic
baremetal instances associated with the selected baremetal nodes
and may affect your business continuity. Proceed with
caution. |
| Delete Gateway Node | Delete a gateway node.Note: This operation will
stop all elastic baremetal instances associated with the
selected baremetal nodes. Proceed with caution. |
Baremetal Node
Add a Baremetal Node
On the main menu of ZStack Cube Ultimate, choose . On the Baremetal Node page, click Add Baremetal Node. Then, the Add Baremetal Node page is displayed.
- Manual Addition
- Template Import
Manual Addition
- Name: Set a name for the baremetal node.
The name must be 1 to 128 characters in length and can contain Chinese characters, letters, digits, spaces, hyphens (-), underscores (_), periods (.), parenthesis (), colons (:), and plus signs (+) and cannot begin or end with spaces.
- Description: Optional. Enter a description for the baremetal node.
- CPU Architecture: The CPU architecture of the elastic
baremetal cluster. The available architectures include x86_64 and
aarch64.Note: Make sure that the CPU architecture of the elastic
baremetal cluster is consistent with that of baremetal nodes and gateway
node.
- Elastic Baremetal Cluster: Select an elastic baremetal cluster where the baremetal node resides.
- Start Method: The startup method of the elastic
baremetal instance. The following two startup methods are supported:
- Volume: Uses a volume as the system volume of the elastic baremetal instance to install and deploy the operating system.
- Local Disk: Uses a local disk as the system
disk of the elastic baremetal instance to install and deploy the
operating system.
- Non Take-Over : When you create an elastic baremetal instance, the operating system is downloaded from the Cloud and installed on the elastic baremetal instance. This method will format the local system disk.
- Take-Over: When you create an elastic
baremetal instance, the original operating system on the
local system disk is used as the operating system of the
elastic baremetal instance.If you take over the original system, note that:
- We recommend that you take over a system that has installed the agent. If the taken-over system does not have the agent installed, install the agent after the elastic baremetal instance is created. Otherwise, you cannot open the console of the elastic baremetal instance, modify the password of the instance, attach a volume to or detach a volume from the instance, or attach a network to or detach a network from the instance.
- By default, the supported BIOS mode of the image used to create an elastic baremetal instance is UEFI. To use an image whose BIOS mode is Legacy, contact the official technical support.
- Make sure that the operating system you take over is officially supported by Elastic Baremetal Management. Otherwise, you can perform very limited operations on the elastic baremetal instance created from the baremetal node. For more information, see Operating Systems.
- You need to set the following parameters:
- Platform: Select the platform type based on the operating system that you take over. Supported types of platform: Linux and Windows.
- Elastic Baremetal
Instance: Select whether to make the
system automatically create an elastic baremetal
instance based on this node as soon as it is added.Note:
- You can select this checkbox only when the Start Method is Local Disk (Take-Over) and the Platform is Linux.
- If you select the checkbox, the system will automatically obtain the node hardware information and create a baremetal instance. This process does not reboot the baremetal node, ensuring business continuity.
- If you select this checkbox, make sure that the baremetal node is running and has the apring tool and the agent of the latest version installed.
- Provision IP: If you select Auto Create Elastic Baremetal Instance, configure a provision network for the node in advance and enter the provision network IP here.
- IPMI Information: Enter the IPMI information by using
the IPMI address method or IPMI range method.If you use the IPMI address method, set the following parameters:
- IPMI Address: Enter an IPMI address.
- Port: Enter an IPMI port.
- User Name: Enter an IPMI username.
- Password: Enter the password of the IPMI username.
If you use the IPMI range method, set the following parameters:- IPMI Range: Enter an IPMI range.
- Port: Enter an IPMI port. Make sure that the ports of the IPMI range are consistent with each other.
- User Name: Enter an IPMI username. Make sure that the usernames of the IPMI range are the same.
- Password: Enter the password of the IPMI username. Make sure that the passwords of the IPMI range are the same.
- Obtain Hardware Information: Reboot the baremetal
node and obtain hardware information. By default, the switch is turned on.Note:
- If you have selected Auto Create Elastic Baremetal Instance, you do not need to set this parameter because the system can automatically obtain the node hardware information without rebooting the node.
- If you do not select Auto Create Elastic Baremetal Instance, you can turn on this switch to make the system reboot the baremetal node to obtain its hardware information, thus ensuring that the node runs properly and can be used to create an elastic baremetal instance.
- Rebooting the baremetal node temporarily interrupts the services running on it. To reduce the business impact, you can select business off-peak hours to obtain hardware information after you add the node to the Cloud.
Template Import
- Download the template.
Click Download Template to download the CSV-formatted template file.
图 2. Template File Configuration 
- Fill in the configuration information according to the specified
format.
The configuration template contains a header and a row of sample. You can delete or overwrite the sample as needed.
Set the following parameters in the template:- Name: Enter a name for the baremetal
node.
The name must be 1 to 128 characters in length and can contain Chinese characters, letters, digits, spaces, hyphens (-), underscores (_), periods (.), parenthesis (), colons (:), and plus signs (+) and cannot begin or end with spaces.
- Description: Optional. Enter a description for the baremetal node.
- Elastic Baremetal Cluster: Enter the UUID of the elastic baremetal cluster.
- Start Method: Enter the startup method of
the baremetal node. You can enter Remote (volume), Local (local
disk non take-over), and Direct (local disk take-over):
- Remote: Use a volume as the system volume of the baremetal node to install and deploy the operating system
- Local: Use a local disk as the system volume of the baremetal node. When you use the baremetal node to create an elastic baremetal instance, the operating system is downloaded from the Cloud and installed on the elastic baremetal instance.
- Direct:Use a local disk as the system volume of the baremetal node. When you use the baremetal node to create an elastic baremetal instance, the operating system is downloaded from the Cloud and installed on the elastic baremetal instance.
- Platform Type: Set this parameter only when you select Local as the start method. Enter the platform type based on the operating system that you take over. Supported types of platform: Linux and Windows. If left blank, the Linux is selected by default.
- Provision IP: If you want to make the
system obtain the baremetal node hardware information and
automatically create an elastic baremetal instance without
rebooting the baremetal node, enter the node provision IP here.Note:
- You can enter this parameter to make the system obtain the node hardware information without rebooting the node only when Start Method is Direct and Platform is Linux.
- To obtain the hardware information, make sure that the baremetal node is running and has the arping tool and the agent of the latest version installed.
- If you enter this parameter, make sure that the value of Reboot to Obtain Hardware Information is No.
- Add IPMI Address: Enter the IPMI address.
- IPMI Port: Enter the IPMI port.
- IPMI Username: Enter the IMPI user name.
- IPMI Password: Enter the password of the IMPI user name.
- Reboot to Obtain Hardware Information:
Reboot the baremetal node and obtain hardware information. Enter
Yes to enable this feature or No to disable this feature.Note:
- If you add a new baremetal node, you need to obtain its hardware information to make sure that the node runs properly and can be used to create an elastic baremetal instance. However, rebooting the baremetal node temporarily interrupts the services running on it. To reduce the business impact, you can select business off-peak hours to obtain hardware information after you add the node to the Cloud.
- If the node satisfies the requirements of obtaining hardware information without rebooting and you have enter Provision IP, set Reboot to Obtain Hardware Information as No.
- Name: Enter a name for the baremetal
node.
- Upload the configuration file.
After you fill in the configuration information, verify that the syntax is correct, and then upload the file to the Cloud.
图 3. Template Import 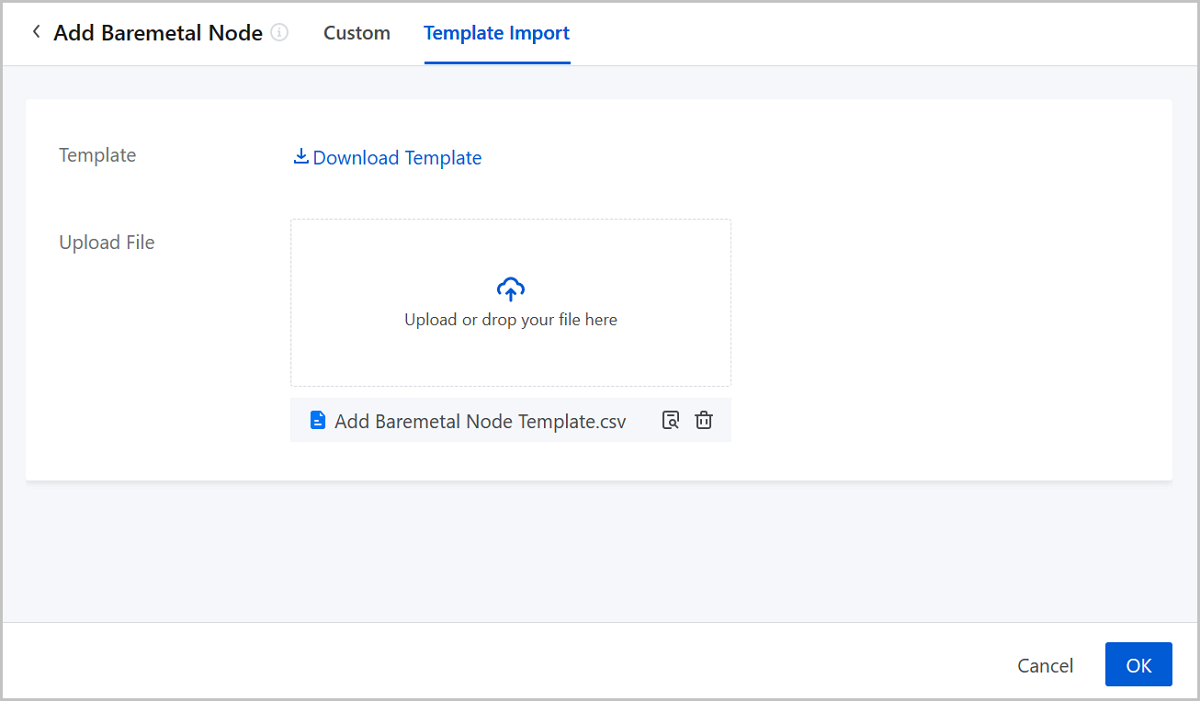
- Add baremetal nodes by using the template.
Click OK. Then, the Cloud add baremetal nodes according to the configuration file.
Considerations
- Unknown hardware information: Cannot obtain hardware information. Hence, baremetal nodes are not assignable. Perform the Obtain Hardware Information operation.
- PXE boot failed: Cannot obtain hardware information due to PXE boot failure. Hence, baremetal nodes are not assignable. Perform the Obtain Hardware Information operation.
- Wrong BIOS mode: BIOS modes are incorrect so that baremetal nodes are not assignable. After you modify these BIOS modes, perform the Obtain Hardware Information operation.
- Mismatch architecture: CPU architectures between baremetal nodes and the elastic baremetal clusters where baremetal nodes reside do not match. Hence, baremetal nodes are not assignable. Delete the baremetal nodes first, and then add them again.
Manage a Baremetal Node
On the main menu of ZStack Cube Ultimate, choose . Then, the Baremetal Node page is displayed.
| Action | Description |
|---|---|
| Add Baremetal Node | Add a baremetal node. |
| Edit Baremetal Node | Edit the name and description of a baremetal node. |
| Enable Baremetal Node | Enable a disabled baremetal node. After being enabled, the baremetal node can be used as a candidate resource. |
| Disable Baremetal Node | Disable an enabled baremetal node. After being
disabled, the baremetal node cannot be used as a candidate
resource.Note: Resources that already use the baremetal node are
not affected. |
| Power On Baremetal Node | Power on a powered-off baremetal node. |
| Power Off Baremetal Node | Power off a powered-on baremetal
node.Note: Powering off a baremetal node will stop the
associated elastic baremetal instances and may affect your
business continuity. Proceed with caution. |
| Reboot Baremetal Node | Reboot a powered-on baremetal node.Note: This
operation will reboot baremetal nodes and stop the associated
elastic baremetal instances, which may affect your business
continuity. Proceed with caution. |
| Obtain Hardware Information | To ensure the baremetal node runs properly and
can be used to create an elastic baremetal instance, you need to
obtain its hardware information.Note:
|
| Launch Console | Launch the baremetal node console. |
| Modify IPMI Info | Modify the IPMI username and password of a
baremetal node.Note: This operation supports only baremetal nodes
that are in Unknown state. |
| Delete Baremetal Node | Delete a baremetal node.Note: This operation will
stop all elastic baremetal instances associated with the
selected baremetal node and will affect your businesses. Proceed
with caution. |
Elastic Baremetal Offering
Manage an Elastic Baremetal Offering
On the main menu of ZStack Cube Ultimate, choose . Then, the Elastic Baremetal Offering page is displayed.
The following table lists the actions that you can perform on an elastic baremetal offering.
| Action | Description |
|---|---|
| Enable Elastic Baremetal Offering | Enable a disabled elastic baremetal offering. |
| Disable Elastic Baremetal Offering | Disable an enabled elastic baremetal offering.Note:
|
| Set Sharing Mode |
Set the sharing mode of a resource. The
platform provides the following sharing modes:
Note:
|
Elastic Baremetal Instance
Create an Elastic Baremetal Instance
On the main menu of ZStack Cube Ultimate, choose . On the Elastice Baremetal Instance page. Click Create Elastic Baremetal Instance. Then, the Create Elastic Baremetal Instance page is displayed.
- Name: Set a name for the elastic baremetal
instance.
The name must be 1 to 128 characters in length and can contain Chinese characters, letters, digits, spaces, hyphens (-), underscores (_), periods (.), parenthesis (), colons (:), and plus signs (+) and cannot begin or end with spaces.
- Description: Optional. Enter a description for the elastic baremetal instance.
- Tag: Optional. Attach a tag to the elastic baremetal instance.
- Elastic Baremetal Cluster: Optional. Select an elastic
baremetal cluster to filter baremetal nodes in the cluster.Note: If you do not
select an cluster, the cluster where the selected baremtal node resides on
is used.
- Creation Mode: Select a creation mode. You can select Add
By Baremetal Node or Add By Baremetal Offering.If you select Add By Baremetal Node, set the following parameters:
- Baremetal Node: Select a baremetal node based
on the startup method. Three startup methods are supported: Volume,
Local Disk (Non Take-Over), and Local Disk (Take-Over).
-
If you select the Volume startup method, note the following points:
- An elastic baremetal instance of volume startup method cannot use Vhost (ZHPS) primary storage. And a Vhost (ZHPS) primary storage cannot co-exist with primary storage of other types in the same elastic baremetal cluster. Therefore, we recommend that you do not choose a baremetal node of volume startup method if you have attached a Vhost (ZHPS) primary storage to the cluster. Otherwise, the elastic baremetal instance fails to be created because the system is unable to allocate storage resources to it.
- If you select the Volume startup method,
configure the following parameters:
- Power Off To Release Baremetal
Node: When an elastic baremetal
instance is powered off, the associated baremetal
node is automatically released and can be used by
another elastic baremetal instance. This mechanism
avoids resource idling. By default, this feature
is disabled.Note: If you choose to release a
baremetal instance upon power-off, note that:
- This feature may change the associated baremetal node. The operating system will clean up business NIC configurations of the elastic baremetal instance. If your resources are sufficient, we recommend that you do not use this feature.
- If you select Add By Baremetal Node and enable this feature, you need to manually select a baremetal node and configure the business NIC when you restart the elastic baremetal instance.
- If you select Add By Baremetal Offering and enable this feature, you do not need to manually select a baremetal node but need to configure the business NIC when you restart the elastic baremetal instance.
- Image: Select an image
to create the elastic baremetal instance. The
mainstream x86_64 operating systems and some ARM
operating systems are supported. The following
table lists the supported OSs.
CPU Infrastructure Type Operating System x86 Windows - Windows 2012
- Windows 2016
- Windows 2019
- Windows 10
Linux - CentOS 7
- CentOS 8
- Ubuntu 18LTS
- Ubuntu 20LTS
ARM Linux - CentOS 7
- KylinV10
Note: When you select an image, note
that:- We recommend that you use images with the agent installed. Otherwise, you cannot launch the consoles, modify the password, attach or detach volumes, attach or detach networks, or view monitoring data of an elastic baremetal instance that uses the image.
- By default, the BIOS of the image that you can use to create an elastic baremetal instance is in UEFI mode. If you need to use an image whose BIOS is in Legacy mode, contact the official technical support.
- If you use a Windows image, we recommend that you choose the network safe mode when you start the elastic baremetal instance for the first time. In this mode, the drives can be automatically loaded, and you can avoid the instance start failure.
- Advanced: Configure
advanced settings for the elastic baremetal instance.
- Data Disk Offering: Optional. Select a disk offering for the elastic baremetal instance. If you select a disk offering, a data volume is created and attached to the instance. By default, no disk offering is selected.
- Storage Allocation
Policy: Optional. Select a primary
storage where the root volume and data volume of
elastic baremetal instance reside. Default:
Random. You can also configure the primary storage
manually and share the primary storage resources
with KVM clusters on the Cloud.Note:
- Custom: Vhost (ZHPS) primary storage does not support elastic baremetal instances of volume startup method. You cannot choose a Vhost primary storage for instances of volume startup method.
- System Allocation: Currently, a Vhost (ZHPS) primary storage cannot co-exist with primary storage of other types in the same cluster. If you attach a Vhost (ZHPS) primary storage to the cluster, an instance of volume startup methods will fail to be created because the system is unable to allocate storage resources to it.
- Gateway Node Allocation Policy: Optional. The policy that is used to allocate a gateway node when you create an elastic baremetal instance. Default: LeastBmPreferredGatewayAllocatorStrategy. Valid values: LeastBmPreferredGatewayAllocatorStrategy, LastGatewayPreferredAllocatorStrategy, and DefaultGatewayAllocatorStrategy.
- First Assigned Gateway
Node: Optional. Select a gateway node
for the first startup of the elastic baremetal
instance. If you do not specify a gateway node,
the gateway node selected based on the gateway
node allocation policy is used.Note: This option
takes effect only on the first start-up of the
elastic baremetal instance. Afterwards, gateway
nodes are assigned based on the gateway node
allocation policy.
- Power Off To Release Baremetal
Node: When an elastic baremetal
instance is powered off, the associated baremetal
node is automatically released and can be used by
another elastic baremetal instance. This mechanism
avoids resource idling. By default, this feature
is disabled.
-
If you select the Local Disk (Non Take-Over) startup method, configure the following parameters:
- System Disk: Select a
local disk as the system disk of the elastic
baremetal instance.Note: Make sure that the local
disk selected as the system volume of the elastic
baremetal instance is set as the first boot device
in the BIOS.
- Image: Select an image to
create the elastic baremetal instance. The
mainstream x86_64 operating systems and some ARM
operating systems are supported. The following
table lists the supported OSs.
CPU Infrastructure Type Operating System x86 Windows - Windows 2012
- Windows 2016
- Windows 2019
- Windows 10
Linux - CentOS 7
- CentOS 8
- Ubuntu 18LTS
- Ubuntu 20LTS
ARM Linux - CentOS 7
- Kylin V10
Note: When you select an image, note
that:- We recommend that you use images with the agent installed. Otherwise, you cannot launch the consoles, modify the password, attach or detach volumes, attach or detach networks, or view monitoring data of an elastic baremetal instance that uses the image.
- By default, the BIOS of the image that you can use to create an elastic baremetal instance is in UEFI mode. If you need to use an image whose BIOS is in Legacy mode, contact the official technical support.
- If you use a Windows image, we recommend that you choose the network safe mode when you start the elastic baremetal instance for the first time. In this mode, the drives can be automatically loaded, and you can avoid the instance start failure.
- Advanced: Configure
advanced settings for the elastic baremetal instance.
- Data Disk Offering: Optional. Select of disk offering for the data volume attached to the elastic baremetal instance. By default, no data volume is attached.
- Storage Allocation Policy: Optional. Select a primary storage for the instance root volume and data volumes. By default, the primary storage is selected by the system automatically. You can also specify a primary storage manually.
- Gateway Node Allocation Policy: Optional. The policy that is used to allocate a gateway node when you create an elastic baremetal instance. Default: LeastBmPreferredGatewayAllocatorStrategy. Valid values: LeastBmPreferredGatewayAllocatorStrategy, LastGatewayPreferredAllocatorStrategy, and DefaultGatewayAllocatorStrategy.
- First Assigned Gateway
Node: Optional. Select a gateway node
for the first startup of the elastic baremetal
instance. If you do not specify a gateway node,
the gateway node selected based on the gateway
node allocation policy is used.Note: This option
takes effect only on the first start-up of the
elastic baremetal instance. Afterwards, gateway
nodes are assigned based on the gateway node
allocation policy.
- System Disk: Select a
local disk as the system disk of the elastic
baremetal instance.
-
If you select the Local Disk (Take-Over) startup method, configure the following parameters:
- Advanced: Configure
advanced settings for the elastic baremetal instance.
- Data Disk Offering: Optional. Select of disk offering for the data volume attached to the elastic baremetal instance. By default, no data volume is attached.
- Storage Allocation Policy: Optional. Select a primary storage for the instance root volume and data volumes. By default, the primary storage is selected by the system automatically. You can also specify a primary storage manually.
- Gateway Node Allocation Policy: Optional. The policy that is used to allocate a gateway node when you create an elastic baremetal instance. Default: LeastBmPreferredGatewayAllocatorStrategy. Valid values: LeastBmPreferredGatewayAllocatorStrategy, LastGatewayPreferredAllocatorStrategy, and DefaultGatewayAllocatorStrategy.
- First Assigned Gateway
Node: Optional. Select a gateway node
for the first startup of the elastic baremetal
instance. If you do not specify a gateway node,
the gateway node selected based on the gateway
node allocation policy is used.Note: This option
takes effect only on the first start-up of the
elastic baremetal instance. Afterwards, gateway
nodes are assigned based on the gateway node
allocation policy.
- Advanced: Configure
advanced settings for the elastic baremetal instance.
-
If you select Add By Baremetal Offering, set the following parameters:- Baremetal Offering: Select a baremetal
offering based on the startup method. Three startup methods are
supported: Volume, Local Disk (Non Take-Over), and Local Disk
(Take-Over).
-
If you select the Volume startup method, note the following points:
- An elastic baremetal instance of volume startup method cannot use Vhost (ZHPS) primary storage. And a Vhost (ZHPS) primary storage cannot co-exist with primary storage of other types in the same elastic baremetal cluster. Therefore, we recommend that you do not choose a baremetal offering of volume startup method if you have attached a Vhost (ZHPS) primary storage to the cluster. Otherwise, the elastic baremetal instance fails to be created because the system is unable to allocate storage resources to it.
- If you select the Volume startup method,
configure the following parameters:
- Quantity: Enter the number of baremetal instances you need to create.
- Power Off To Release Baremetal
Node: When an elastic baremetal
instance is powered off, the associated baremetal
node is automatically released and can be used by
another elastic baremetal instance. This mechanism
avoids resource idling. By default, this feature
is disabled.Note: If you choose to release a
baremetal instance upon power-off, note that:
- This feature may change the associated baremetal node. The operating system will clean up business NIC configurations of the elastic baremetal instance. If your resources are sufficient, we recommend that you do not use this feature.
- If you select Add By Baremetal Node and enable this feature, you need to manually select a baremetal node and configure the business NIC when you restart the elastic baremetal instance.
- If you select Add By Baremetal Offering and enable this feature, you do not need to manually select a baremetal node but need to configure the business NIC when you restart the elastic baremetal instance.
- Image: Select an image
to create the elastic baremetal instance. The
mainstream x86_64 operating systems and some ARM
operating systems are supported. The following
table lists the supported OSs.
CPU Infrastructure Type Operating System x86 Windows - Windows 2012
- Windows 2016
- Windows 2019
- Windows 10
Linux - CentOS 7
- CentOS 8
- Ubuntu 18LTS
- Ubuntu 20LTS
ARM Linux - CentOS 7
- Kylin V10
Note: When you select an image, note
that:- We recommend that you use images with the agent installed. Otherwise, you cannot launch the consoles, modify the password, attach or detach volumes, attach or detach networks, or view monitoring data of an elastic baremetal instance that uses the image.
- By default, the BIOS of the image that you can use to create an elastic baremetal instance is in UEFI mode. If you need to use an image whose BIOS is in Legacy mode, contact the official technical support.
- If you use a Windows image, we recommend that you choose the network safe mode when you start the elastic baremetal instance for the first time. In this mode, the drives can be automatically loaded, and you can avoid the instance start failure.
- Advanced: Configure
advanced settings for the elastic baremetal instance.
- Data Disk Offering: Optional. Select of disk offering for the data volume attached to the elastic baremetal instance. By default, no data volume is attached.
- Storage Allocation
Policy: Optional. Select a primary
storage for the instance root volume and data
volumes. By default, the primary storage is
selected by the system automatically. You can also
specify a primary storage manually.Note:
- Custom: Vhost (ZHPS) primary storage does not support elastic baremetal instances of volume startup method. You cannot choose a Vhost (ZHPS) primary storage for instances of volume startup method.
- System Allocation: Currently, a Vhost (ZHPS) primary storage cannot co-exist with primary storage of other types in the same cluster. If you attach a Vhost (ZHPS) primary storage to the cluster, an instance of volume startup methods will fail to be created because the system is unable to allocate storage resources to it.
- Gateway Node Allocation Policy: Optional. The policy that is used to allocate a gateway node when you create an elastic baremetal instance. Default: LeastBmPreferredGatewayAllocatorStrategy. Valid values: LeastBmPreferredGatewayAllocatorStrategy, LastGatewayPreferredAllocatorStrategy, and DefaultGatewayAllocatorStrategy.
- First Assigned Gateway
Node: Optional. Select a gateway node
for the first startup of the elastic baremetal
instance. If you do not specify a gateway node,
the gateway node selected based on the gateway
node allocation policy is used.Note: This option
takes effect only on the first start-up of the
elastic baremetal instance. Afterwards, gateway
nodes are assigned based on the gateway node
allocation policy.
-
If you select the Local Disk (Non Take-Over) startup method, configure the following parameters:
- Quantity: Enter the number of baremetal instances you need to create.
- Image: Select an image to
create the elastic baremetal instance. The
mainstream x86_64 operating systems and some ARM
operating systems are supported. The following
table lists the supported OSs.
CPU Infrastructure Type Operating System x86 Windows - Windows 2012
- Windows 2016
- Windows 2019
- Windows 10
Linux - CentOS 7
- CentOS 8
- Ubuntu 18LTS
- Ubuntu 20LTS
ARM Linux - CentOS 7
- Kylin V10
Note: When you select an image, note
that:- We recommend that you use images with the agent installed. Otherwise, you cannot launch the consoles, modify the password, attach or detach volumes, attach or detach networks, or view monitoring data of an elastic baremetal instance that uses the image.
- By default, the BIOS of the image that you can use to create an elastic baremetal instance is in UEFI mode. If you need to use an image whose BIOS is in Legacy mode, contact the official technical support.
- If you use a Windows image, we recommend that you choose the network safe mode when you start the elastic baremetal instance for the first time. In this mode, the drives can be automatically loaded, and you can avoid the instance start failure.
- Advanced: Configure
advanced settings for the elastic baremetal instance.
- Data Disk Offering: Optional. Select of disk offering for the data volume attached to the elastic baremetal instance. By default, no data volume is attached.
- Storage Allocation Policy: Optional. Select a primary storage for the instance root volume and data volumes. By default, the primary storage is selected by the system automatically. You can also specify a primary storage manually.
- Gateway Node Allocation Policy: Optional. The policy that is used to allocate a gateway node when you create an elastic baremetal instance. Default: LeastBmPreferredGatewayAllocatorStrategy. Valid values: LeastBmPreferredGatewayAllocatorStrategy, LastGatewayPreferredAllocatorStrategy, and DefaultGatewayAllocatorStrategy.
- First Assigned Gateway
Node: Optional. Select a gateway node
for the first startup of the elastic baremetal
instance. If you do not specify a gateway node,
the gateway node selected based on the gateway
node allocation policy is used.Note: This option
takes effect only on the first start-up of the
elastic baremetal instance. Afterwards, gateway
nodes are assigned based on the gateway node
allocation policy.
-
If you select the Local Disk (Take-Over) startup method, configure the following parameters:
- Quantity: Enter the number of baremetal instances you need to create.
- Advanced: Configure
advanced settings for the elastic baremetal instance.
- Data Disk Offering: Optional. Select of disk offering for the data volume attached to the elastic baremetal instance. By default, no data volume is attached.
- Storage Allocation Policy: Optional. Select a primary storage for the instance root volume and data volumes. By default, the primary storage is selected by the system automatically. You can also specify a primary storage manually.
- Gateway Node Allocation Policy: Optional. The policy that is used to allocate a gateway node when you create an elastic baremetal instance. Default: LeastBmPreferredGatewayAllocatorStrategy. Valid values: LeastBmPreferredGatewayAllocatorStrategy, LastGatewayPreferredAllocatorStrategy, and DefaultGatewayAllocatorStrategy.
- First Assigned Gateway
Node: Optional. Select a gateway node
for the first startup of the elastic baremetal
instance. If you do not specify a gateway node,
the gateway node selected based on the gateway
node allocation policy is used.Note: This option
takes effect only on the first start-up of the
elastic baremetal instance. Afterwards, gateway
nodes are assigned based on the gateway node
allocation policy.
-
- Baremetal Node: Select a baremetal node based
on the startup method. Three startup methods are supported: Volume,
Local Disk (Non Take-Over), and Local Disk (Take-Over).
Manage an Elastic Baremetal Instance
On the main menu of ZStack Cube Ultimate, choose . Then, the Elastic Baremetal Instance page is displayed.
| Action | Description | Elastic Baremetal Instance State |
|---|---|---|
| Create Elastic Baremetal Instance | Create an elastic baremetal instance. | / |
| Edit Elastic Baremetal Instance | Edit the name and description of an elastic baremetal instance. | / |
| Start Elastic Baremetal Instance | Start a stopped elastic baremetal
instance.Note: You cannot start elastic baremetal instances in
bulk, if the baremetal instances are not associated with elastic
baremetal offerings or baremetal nodes. You can start the
elastic baremetal instance one by one and associate offering or
baremetal node with it. |
Stopped |
| Stop Elastic Baremetal Instance | Stop a running elastic baremetal instance. This
operation will also stop your business. Make sure that there is no
business running on the elastic baremetal instance before stopping
it.Note: You cannot stop an elastic baremetal instance, if the
associated gateway node is disconnected. |
Running |
| Reboot Elastic Baremetal Instance | Reboot a running elastic baremetal instance. This operation will also stop your business. Make sure that there is no business running on the elastic baremetal instance before rebooting it. | Running |
| Power Off Elastic Baremetal Instance | Forcibly power off a running elastic baremetal instance into the stopped state. | Running |
| Obtain Status | Manually obtain the status of an elastic
baremetal instance.Note:
|
/ |
| Launch Console | Launch the console of an elastic baremetal
instance.Note: You cannot perform this operation if the elastic
baremetal instance is not installed with an agent. To launch the
console of an elastic baremetal instance, use the image with an
agent installed to create an elastic baremetal
instance. |
Running |
| Attach Tag | Attach tags to one or more elastic baremetal
instances to quickly locate and filter these resources.Note: You can attach up to 50 tags to a single
resource. Conversely, There is no limit to the number of
resources to which you can attach a single tag. |
/ |
| Detach Tag | Detach tags from elastic baremetal instances. | / |
| Attach Volume | Attach a volume to an elastic baremetal instance.
Currently you can attach classic volume or shared volume of Shared
Block and Ceph primary storage.Note:
|
Running/Stopped |
| Detach Volume | Detach a volume from an elastic baremetal instance.Note:
|
Running/Stopped |
| Attach Block Storage Volume | Passthroughs Ceph or Vhost block primary storage
volumes to an elastic baremetal instance to provide high-performance
storage services.Note:
|
Running/Stopped |
| Detach Block Storage Volume | Detaches a block storage volume from an elastic
baremetal instance.Note: Detaching a block storage volume from a
running elastic baremetal instance affects the business
continuity. Please exercise caution. |
Running/Stopped |
| Change System | Change the system of a stopped elastic baremetal instance.Note:
|
Stopped |
| Modify Password | Modify the password for an elastic baremetal instance.Note: You
cannot modify the password, if the running elastic baremetal
instance is not installed with an agent. We recommend that you
use images with the agent installed to create elastic baremetal
instances. |
Running |
| Create Image | Create an image for the elastic baremetal instance. You can use this image to create new elastic baremetal instances. | Stopped |
| Create Snapshot | Before you perform a business-sensitive operation
on an elastic baremetal instance, you can schedule snapshot creation
at specified time points to record the state of the system volume or
data volume of the instance. This allows rollback in case of
breakdowns.Note: Currently you can create single snapshots for
elastic baremetal instances. |
Running/Stopped |
| Delete Elastic Baremetal Instance | Deleting an elastic baremetal instance releases
the associated baremetal node, gateway, and IP address. The deleted
elastic baremetal instance is displayed on the Recycle
Bin tab.Note:
|
/ |
| Expunge/Recover Elastic Baremetal Instance | Expunge or recover a deleted elastic baremetal instance.
Note: Expunging an elastic baremetal
instance will release its IP address. And, the Cloud will
re-assign an IP address to a recovered elastic baremetal
instance. |
Deleted |
Elastic Baremetal Instance Details
Elastic Baremetal Instance Configuration Info
On the main menu of ZStack Cube Ultimate, choose . On the Elastic Baremetal Instance page, click the name of an elastic baremetal instance and enter its details page. On the details page, click Configuration Info. Then, the Configuration Info tab is displayed.
The Configuration Info tab displays the configuration information about the elastic baremetal instance in the form of a list.
Volume
This section displays a list of root volumes and data volumes attached to the elastic baremetal instance. You can perform operations on these volumes as needed.
Block Storage Volume
| Action | Description | Instance Status |
|---|---|---|
| Create Block Storage Volume | Create a block storage volume based on a Ceph or Vhost primary storage. | Running/Stopped |
| Attach Block Storage Volume | Attach a Ceph or Vhost block storage volume
to the elastic baremetal instance.Note:
|
Running/Stopped |
| Detach Block Storage Volume | Detaches a block storage volume from an
elastic baremetal instance.Note: Detaching a block storage
volume from a running elastic baremetal instance affects the
business continuity. Please exercise caution. |
Running/Stopped |
| Create Block Storage Volume Snapshot | Create a snapshot for a block storage volume to record its status at a specified time point. | Running/Stopped |
| Set QoS | Set QoS for block storage volume.
Note:
|
Running/Stopped |
NIC
| Action | Description | Elastic Baremetal Instance State |
|---|---|---|
| Attach NIC | Attach a NIC to the elastic baremetal
instance.
Note:
|
Running/Stopped |
| Detach NIC | Detach a NIC from the elastic baremetal
instance.Note: Detaching NIC affects the network
connectivity of the elastic baremetal instance and
disassociates the relevant network services. Proceed with
caution. |
Running/Stopped |
| Set Default NIC | Set an attached NIC as the default NIC for the elastic baremetal instance. | Running/Stopped |
Physical GPU Device
| Action | Description | Elastic Baremetal Instance State |
|---|---|---|
| Edit Name | Modify the name of the pGPU. | Running/Stopped |
Local Disk
This section displays a list of local disks of the elastic baremetal instance, including the type and capacity of the local disk.
Elastic Baremetal Instance agent
The agent is installed on an elastic baremetal instance and regularly communicate with the management node. Make sure that an agent is installed on the elastic baremetal instance before you can obtain the hardware information, view internal monitoring, launch console, change password, and attach/detach volumes and networks.
Installation Package
| CPU Architecture | Operating System | Installation Package |
|---|---|---|
| x86_64 | Linux | zstack-bm-agent-x86_64-2.0.0.bin |
| x86_64 | Windows | ZStackBaremetalAgent-2.0.0.exe |
| ARM | Linux | zstack-bm-agent-aarch64-2.0.0.bin |
Installation Method
The installation method varies according to the CPU architecture and operating system of the elastic baremetal instance. The following takes the management node as an example to introduce how to install an agent on an elastic baremetal instance.
- x86_64 Linux elastic baremetal instance:
- Log in to the management node system and run the following command
to download the agent to the gateway node
system:
[root@node1 ~]# scp /opt/zstack-dvd/x86_64/h76c/bm2_agents/zstack-bm-agent-x86_64-2.0.0.bin $Gateway_Node_Management_IP:/root //$Gateway_Node_Management_IP is the IP address of the management network where the gateway node resides - Log in to the gateway node system and run the following command to
download the agent to the elastic baremetal instance
system:
[root@node2 ~]# scp /root/zstack-bm-agent-x86_64-2.0.0.bin $BM_Provision_IP:/root //$BM_Provision_IP is the IP address of the provision network where the elastic baremetal instance resides - SSH to the elastic baremetal instance system form the gateway node
system and run the following command to install the agent:
[root@172.32.1.249 ~]# bash zstack-bm-agent-x86_64-2.0.0.bin图 1. Install Agent 
- Log in to the management node system and run the following command
to download the agent to the gateway node
system:
- x86_64 Windows elastic baremetal instance:
- Log in to the management node system and run the following command
to download the agent to the gateway node
system:
[root@10-0-235-239 ~]# scp /opt/zstack-dvd/x86_64/h76c/bm2_agents/ZStackBaremetalAgent-2.0.0.exe $Gateway_Node_Management_IP:/root //$Gateway_Node_Management_IP is the IP address of the management network where the gateway node resides - Log in to the gateway node system and set up a HTTP server to provide the download link of the installation package for the elastic baremetal instance.
- Log in to the elastic baremetal instance system by IPMI and access the HTTP service of the gateway node to download and install the agent.
- Log in to the management node system and run the following command
to download the agent to the gateway node
system:
- ARM Linux 弹性裸金属实例:
- 进入管理节点系统,执行以下命令将agent安装包下载至网关节点系统:
[root@10-0-235-239 ~]# scp /opt/zstack-dvd/aarch64/ns10/bm2_agents/zstack-bm-agent-aarch64-2.0.0.bin $Gateway_Node_Management_IP:/root #$Gateway_Node_Management_IP 为网关节点所在管理网络IP地址 - 进入网关节点系统,执行以下命令将agent安装包下载至弹性裸金属实例系统:
[root@10-0-235-239 ~]# scp /root/zstack-bm-agent-aarch64-2.0.0.bin $BM_Provision_IP:/root #$BM_Provision_IP 为弹性裸金属实例所在部署网络IP地址 - 从网关节点系统远程登陆至弹性裸金属系统,执行以下命令安装agent:
[root@10-0-235-239 ~]# bash zstack-bm-agent-aarch64-2.0.0.bin如图 2所示:图 2. 安装agent 
- 进入管理节点系统,执行以下命令将agent安装包下载至网关节点系统:
Installation Requirements
| CPU Architecture | Supported Operating System |
|---|---|
| x86 |
|
| ARM |
|
| Entry | Requirements |
|---|---|
| Environmental Dependence |
|
| Ports |
Windows:
Linux:
|
Note:
- The agent must be installed by the root account of the elastic baremetal instance operating system.
- If the default port is occupied, the agent might fail to be started after installation. In this case, you can go the installation directory, find the conf.yaml file, and manually change the port.
Manage an Agent
- Stop the agent service:
service zwatch-vm-agent stop - Start the agent service:
service zwatch-vm-agent start - Restart the agent service:
service zwatch-vm-agent restart - Query the agent service:
service zwatch-vm-agent
                        status