Volume
What is Volume?
| Volume Type | Description | |
|---|---|---|
| Root Volume | A root volume provides support for the system operations of a VM instance. | |
| Data Volume | Classic Volume | A data volume provides extended storage space for a VM instance. Classic volumes are similar to hard disks in PCs. Classic volumes must be attached to VM instances for use and cannot be used alone. |
| Shared Volume | A data volume provides extended storage space for a VM instance. A shared volume is essentially the volume that can be attached to multiple VM instances for use, which is similar to a physical disk in that the disk can be attached to multiple physical servers, and each server can read data from and write data into the disk. | |
| Uninstantiated Volume | A new data volume will be displayed on the Uninstantiated tab if you do not specify a primary storage or VM instance for it. When you attach instance for the uninstantiated volume, it can be used by the VM instance as an available resource. | |
Considerations
- AVM instance can have a maximum of 24 data volumes attached.
- A root volume is an integral part of a VM instance. It cannot be detached from a VM instance.
- A data volume attached to a VM instance can be detached from the VM instance and then attached to another VM instance of the same hypervisor type. While a data volume attached to a VM instance cannot be attached to a VM instance of another hypervisor type. For example, a KVM VM volume cannot be attached to a VMware VM instance.
- A classic volume can be attached to only one VM instance. A shared volume can be created on a Ceph primary storage and SharedBlock primary storage and allows simultaneous access from multiple VM instances.
- If you simply attach a shared volume to multiple VM instances, files cannot be shared between VM instances. Build a shared file system if you need to share files between VM instances.
- The storage space that a volume takes up is calculated based on the virtual size of the volume. When a volume is created, the virtual size of the volume is deducted. The actual storage space that the volume takes up is small upon creation while increases along with growing data writes.
- When multiple primary storage are available, you can specify a primary
storage to create a volume. If you do not specify a primary storage when you
create a volume, note that:
- For LocalStorage primary storage, the volume is created on the primary storage with the largest available space by default.
- For NFS primary storage, the volume is created on a random primary storage by default.
- For the combination of LocalStorage and NFS primary storage or the combination of LocalStorage and SharedMountPoint (SMP) primary storage, by default, the volume is created on a primary storage that does not store the root volume of the VM instance.
- You can set the QoS for a data volume to limit its disk bandwidth. Note that an excessively low QoS may greatly lower I/O performance.
- To attach a VirtIO volume to a VM instance, make sure that a VirtIO driver is installed on the VM instance. Mainstream Linux distributions such as CentOS 6 and CentOS 7 are integrated with VirtIO drivers. Therefore, you do not need to install them again. For Windows-based VM instances, you need to install VirtIO drivers manually by installing GuestTools on the VM details page.
Application Scenarios
- Oracle RAC
Oracle Real Application Clusters (Oracle RAC) was originally designed to enhance database services. Over the years, it has evolved into a comprehensive high availability (HA) framework, serving as the foundation for cloud database systems and ensuring high availability, scalability, flexibility, and agility for all applications in a data center. Oracle RAC uses a shared disk architecture, requiring volume management and file systems for database storage to support cluster awareness. Oracle Automatic Storage Management (ASM) is the recommended volume manager for Oracle databases in a clustered environment.
ASM automatically manages shared disks, allowing users to use shared volume for RAC nodes. This enables data management by RAC without the need for an additional shared file system deployment.
Create a Data Volume
On the main menu of ZStack Cube Ultimate, choose . On the Data Volume tab, click Create Data Volume. The Create Data Volume page appears.
- Create a classic volume based on a disk offering.
- Create a classic volume based on a volume image.
- Create a shared volume based on a disk offering.
- Create a shared volume based on a volume image.
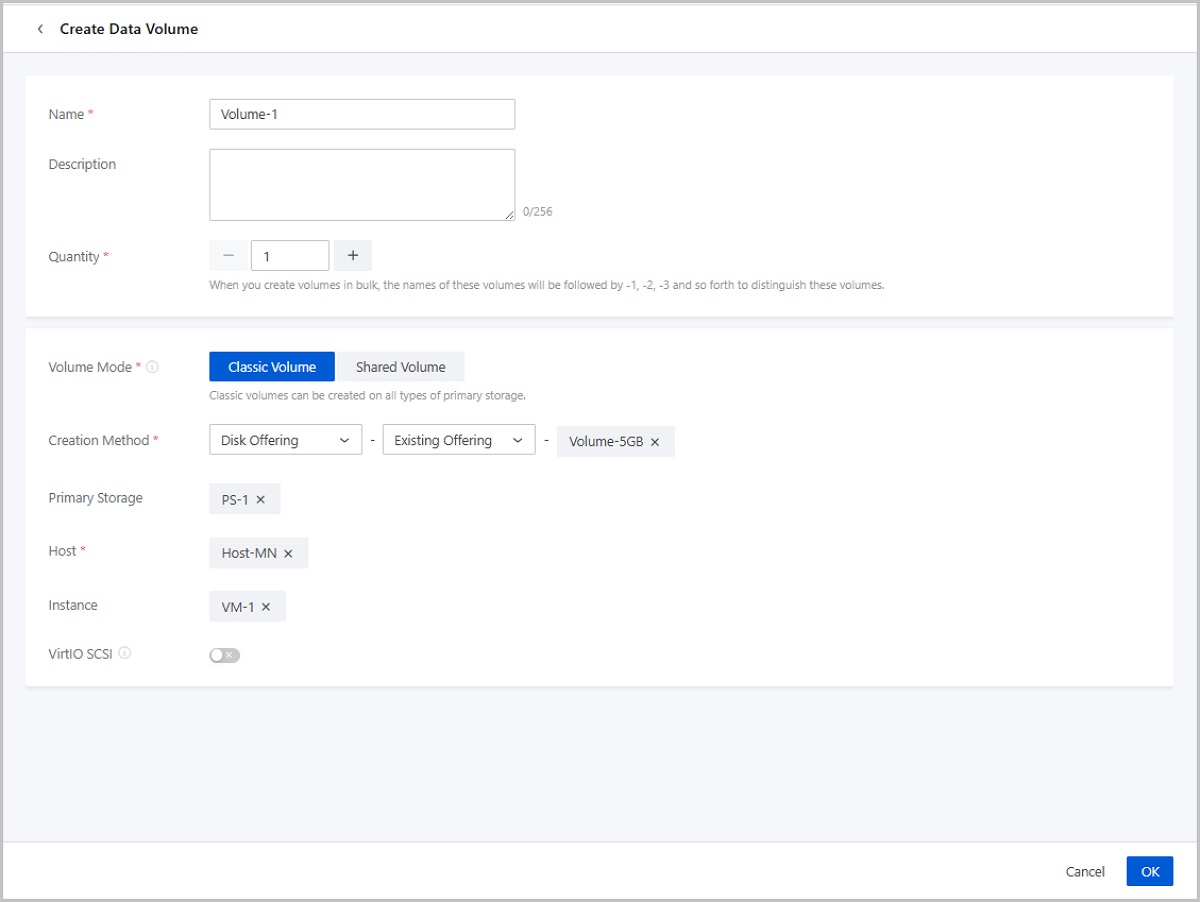
Create Classic Volume Based on a Disk Offering
- Name: Enter a name for the volume.
- Description: Optional. Enter a description for the volume.
- Quantity: Enter the number of volumes that you want
to create.
 Note: Enter an integer that ranges from 1 to 24.
 - Volume Mode: Select Classic Volume.
- Creation Method: Select an existing disk offering or customize a disk offering.
- Primary Storage: Optional. Select a primary storage.
- Instance: Optional. Select a VM instance or elastic baremetal instance to which the volume is attached.
- VirtioSCSI: Choose whether to use
the Virtio-SCSI bus to create an SCSI data volume.Note:
- Classic Volume: By default, VirtIO SCSI is disabled. If it is enabled, you can use it to create a VirtIO SCSI data volume.
- Shared Volume: By default, VirtIO SCSI is enabled and cannot be disabled.
- VirtIO SCSI data volumes allow multi-queue I/O operations and have worldwide names (WWNs) as their unique IDs.
- We recommend that you do not create VirtIO SCSI data volumes on LocalStorage primary storage.
- You cannot create VirtIO SCSI data volumes on Vhost primary storage.
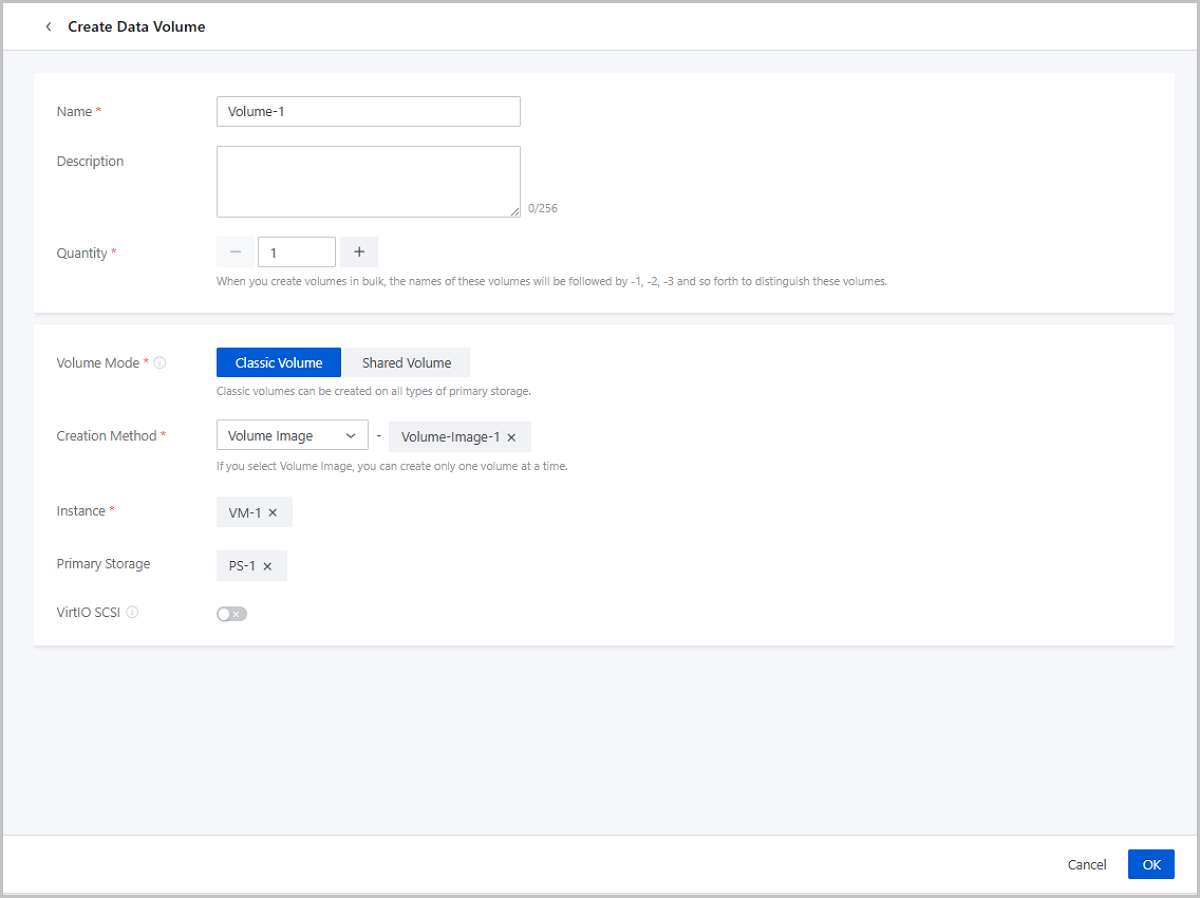
Create Classic Volume Based on a Volume Image
- Name: Enter a name for the volume.
- Description: Optional. Enter a description for the volume.
- Quantity: You can only create one volume a time by using a volume image.
- Volume Mode: Select Classic Volume.
- Creation Method: Select Volume Image.
- Instance: Optional. Select a VM instance or elastic baremetal instance to which the volume is attached.
- Primary Storage: Optional. Select
a primary storage on which the volume is created.Note: You can use a volume
image stored on an ImageStore image storage to create a volume on a Ceph
primary storage.
- VirtioSCSI: Choose whether to use
the Virtio-SCSI bus to create an SCSI data volume.Note:
- Classic Volume: By default, VirtIO SCSI is disabled. If it is enabled, you can use it to create a VirtIO SCSI data volume.
- Shared Volume: By default, VirtIO SCSI is enabled and cannot be disabled.
- VirtIO SCSI data volumes allow multi-queue I/O operations and have worldwide names (WWNs) as their unique IDs.
- We recommend that you do not create VirtIO SCSI data volumes on LocalStorage primary storage.
- You cannot create VirtIO SCSI data volumes on Vhost primary storage.
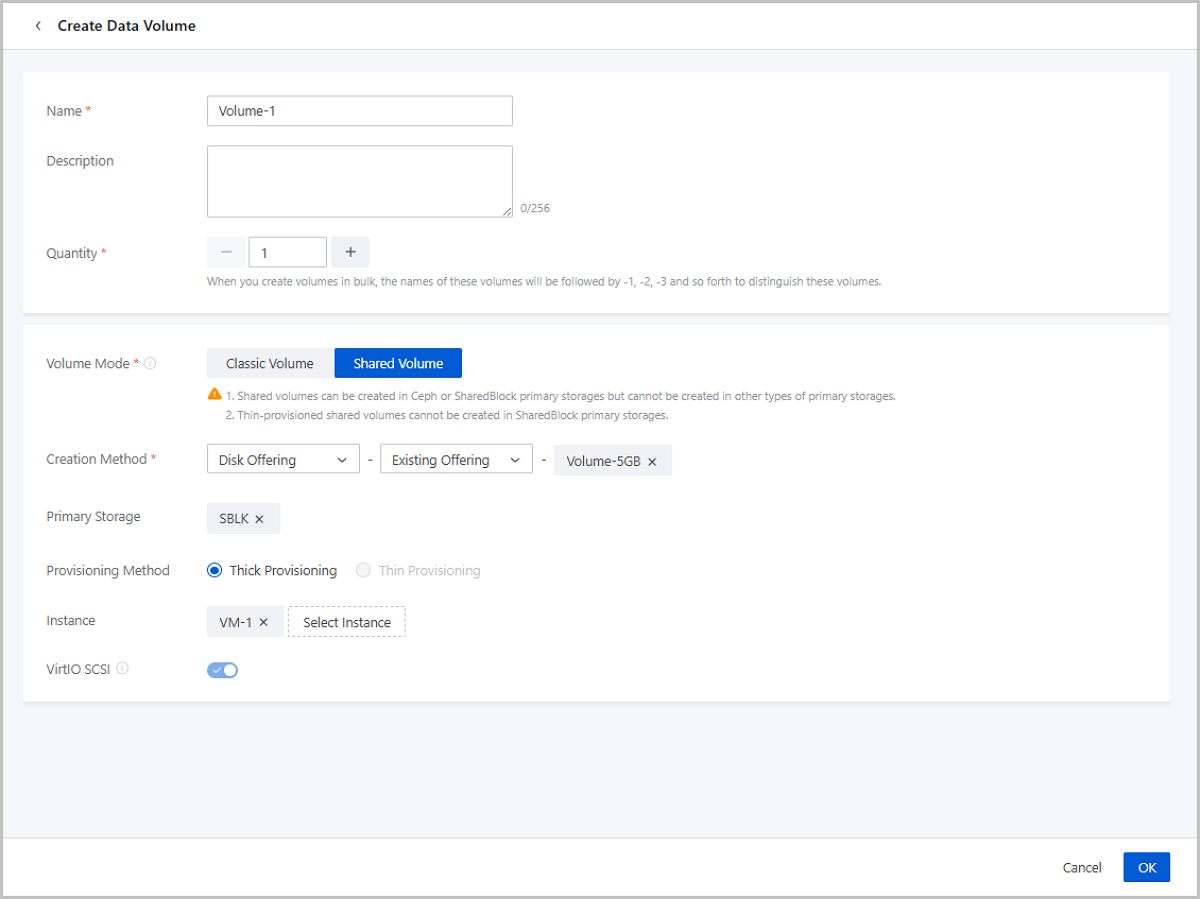
Create Shared Volume Based on Disk Offering
- Name: Enter a name for the volume.
- Description: Optional. Enter a description for the volume.
- Quantity: Enter the number of volumes that you want
to create.Note: Enter an integer that ranges from 1 to 24.
- Volume Mode: Select Shared Volume.Note:
- You can create a shared volume on a Ceph primary storage or a Shared Block primary storage. Other types of primary storage do not support this operation.
- You cannot create a thin-provisioned shared volume on a Shared Block primary storage.
- Creation Method: Select Disk Offering.
- Primary Storage: Optional. Select a primary storage.
- Instance: Optional. Select a VM instance or elastic baremetal instance to which the volume is attached.
- VirtioSCSI: Choose whether to use
the Virtio-SCSI bus to create an SCSI data volume.Note:
- Classic Volume: By default, VirtIO SCSI is disabled. If it is enabled, you can use it to create a VirtIO SCSI data volume.
- Shared Volume: By default, VirtIO SCSI is enabled and cannot be disabled.
- VirtIO SCSI data volumes allow multi-queue I/O operations and have worldwide names (WWNs) as their unique IDs.
- We recommend that you do not create VirtIO SCSI data volumes on LocalStorage primary storage.
- You cannot create VirtIO SCSI data volumes on Vhost primary storage.
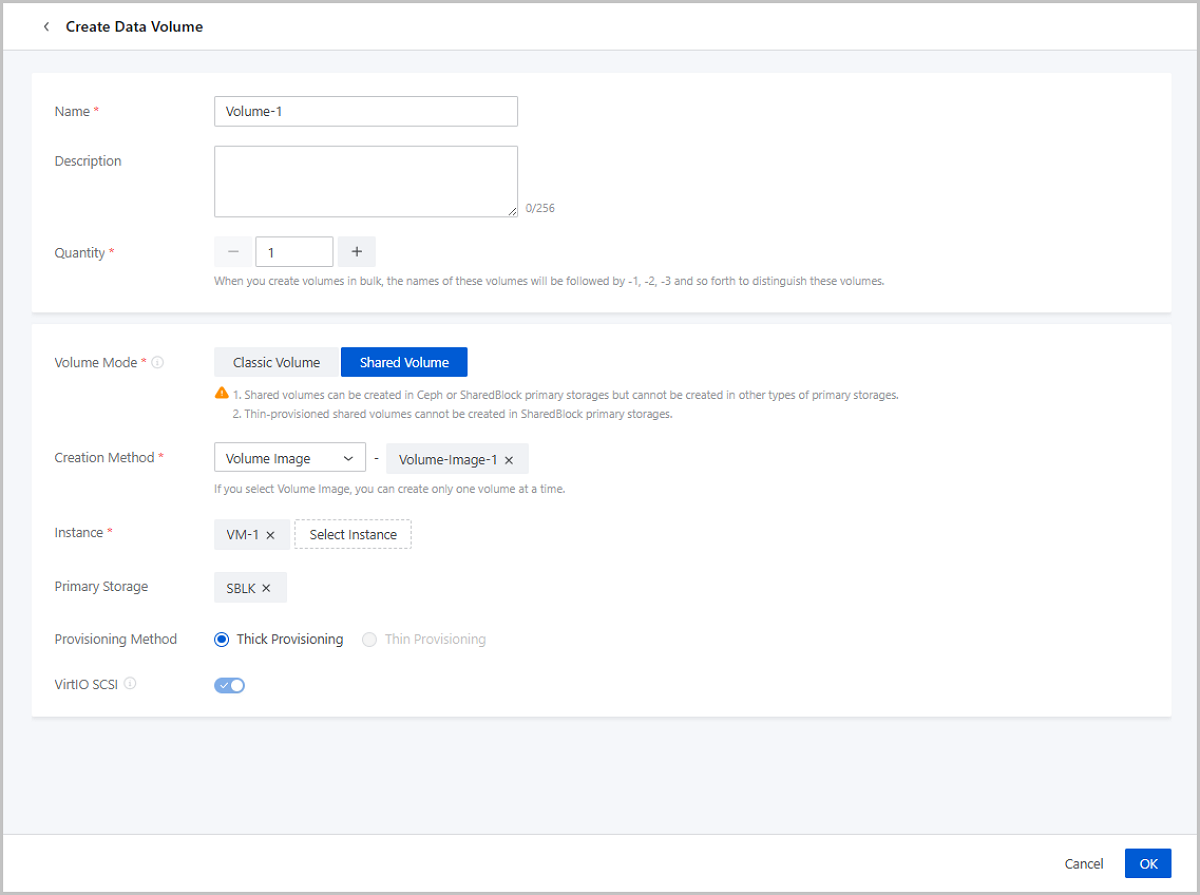
Create Shared Volume Based on Volume Image
- Name: Enter a name for the volume.
- Description: Optional. Enter a description for the volume.
- Quantity: You can only create one volume a time by using a volume image.
- Volume Mode: Select Shared Volume.Note:
- You can create a shared volume on a Ceph primary storage or a Shared Block primary storage. Other types of primary storage do not support this operation.
- You cannot create a thin-provisioned shared volume on a Shared Block primary storage.
- Creation Method: Select Volume Image.
- Instance: Optional. Select a VM instance or elastic baremetal instance to which the volume is attached.
- Primary Storage: Optional. Select a primary storage
on which the volume is created.Note: You can use a volume image stored on an
ImageStore image storage to create a volume on a Ceph primary
storage.
- VirtioSCSI: Choose whether to use
the Virtio-SCSI bus to create an SCSI data volume.Note:
- Classic Volume: By default, VirtIO SCSI is disabled. If it is enabled, you can use it to create a VirtIO SCSI data volume.
- Shared Volume: By default, VirtIO SCSI is enabled and cannot be disabled.
- VirtIO SCSI data volumes allow multi-queue I/O operations and have worldwide names (WWNs) as their unique IDs.
- We recommend that you do not create VirtIO SCSI data volumes on LocalStorage primary storage.
- You cannot create VirtIO SCSI data volumes on Vhost primary storage.
Notes
- You can batch create volumes only by using a disk offering.
- If you create a volume by using a disk offering, you can select a primary
storage and VM instance based on your business requirements:
- If you do not select a primary storage and VM instance, the created volume is in the uninstantiated state and is listed on the Uninstantiated tab.
- If you select a VM instance but do not select a primary storage:
- When only one primary storage is available, the volume is created on the primary storage.
- When multiple primary storage are
available:
-
- If all these primary storage are of the Local Storage type, the volume is created on the primary storage with the largest available space by default.
- If all these primary storage are of the NFS or Shared Block type, the volume is created on a random primary storage by default.
- If these primary storage are combinations of Local Storage and NFS primary storage, combinations of Local Storage and Shared Mount Point (SMP) primary storage, or combinations of Local Storage and Shared Block primary storage, by default, the volume is created on the primary storage that does not store the root volume of the VM instance the created volume you want to attach to.
- If these primary storage are a combinations of Ceph and Shared Block primary storage, the volume is created on the primary storage with the largest available space by default.
-
- If you only select a primary storage and do not select a VM
instance, the created volume is in the available state and takes up
the storage space of the primary storage.Note:
- If you select a Local Storage primary storage, you must select a host.
- If you select a Ceph primary storage, you can select a Ceph storage pool.
- If you select a Shared Block primary storage, you
must select a provisioning method, including thin
provisioning and thick provisioning.
- Thin provisioning: allocates storage space to a volume according to its data amount. This method improves usage efficiency of storage space.
- Thick provisioning: preallocates storage space that a volume needs. This method ensures sufficient storage space for a volume and thus ensures high storage performance.
- If you create a volume based on a volume image and do not select a primary
storage:
- If the volume image is stored on a Ceph image storage, the volume is created on a Ceph primary storage.
- If the volume image is not stored on a Ceph image storage:
- When multiple primary storage are
available:
-
- If all these primary storage are of the Local Storage type, the volume is created on the primary storage with the largest available space by default.
- If all these primary storage are of the NFS or Shared Block type, the volume is created on a random primary storage by default.
- If these primary storage are combinations of Local Storage and NFS primary storage, combinations of Local Storage and Shared Mount Point (SMP) primary storage, or combinations of Local Storage and Shared Block primary storage, by default, the volume is created on the primary storage that does not store the root volume of the VM instance the created volume you want to attach to.
- If these primary storage are a combinations of Ceph and Shared Block primary storage, the volume is created on the primary storage with the largest available space by default.
-
- When multiple primary storage are
available:
Manage a Data Volume
On the main menu of ZStack Cube Ultimate, choose . Then, the Data Volume tab is displayed.
The following table lists the actions that you can perform on a data volume.
| Action | Description |
|---|---|
| Create Data Volume | Create a new data volume based on a disk offering or
from a volume image.
|
| Edit Data Volume | Edit the name and description of a data volume. |
| Enable Data Volume | Enable a disabled data volume. |
| Disable Data Volume | Disable an enabled data volume. After disabled, some of the data volume actions will be restricted, for example, attach instance, volume migration, and so on. |
| Attach Instance | Attach a volume to an instance as its data volume.
|
| Detach Instance | Detach a data volume from the instance it attached
to.Note: This action interrupts the data reads/writes of the data
volume and may affect the business continuity. Please exercise
caution. |
| Change Host | Migrate a data volume to another compute note.
|
| Change Primary Storage | Allows you to migrate a data volume across primary
storage of same type, including Ceph↔Ceph, NFS↔NFS, and Shared
Block↔Shared Block. Changing primary storage only migrates valid data,
and the migrated volume follows the provisioning type of the target
primary storage.
Note:
|
| Change Owner | Change the owner of the data volume.
|
| Resize Volume | Allows you to resize a data volume when the VM
instance its attached to is running or stopped.
|
| Attach Tag | Attach tags to a volume.
|
| Detach Tag | Detach tags from a volume.Note:
|
| Create Backup | Create a backup for a data volume.
|
| Associate Backup Job | Associate a backup job with a data volume.
|
| Create Volume Image | Create an image based on a volume. The image can be
used to create new data volumes.
|
| Create Data Volume Snapshot | Create a data volume snapshot to record the volume
state at a specified time point before important actions. This allows a
quick rollback in case of breakdowns.
|
| Set Volume QoS | You can set a upper limit for a volume bandwidth by
either setting its total speed or read/write speed.
|
| Flatten Volume | Merges multiple snapshots of selected resources to
improve resource performance and data security. By flattening, you can
unlink the dependency between linked clone VM instances/volumes and
source VM instances/volumes to achieve data independence.Note:
|
| Export Volume | Exports a CSV file that contains volume
information.
|
| Delete Data Volume | A deleted volume is displayed on the
Recycle Bin tab page.Note:
|
| Expunge/Recover Data Volume | You can expunge or recover a deleted volume. A recovered volume is displayed on the Available tab page. |
Manage a Root Volume
On the main menu of ZStack Cube Ultimate, choose . Then, the Root Volume tab is displayed.
| Action | Description |
|---|---|
| Edit Name and Description | Edit the name and description of a root volume. |
| Resize Volume | Resize a root volume when the VM instance its attached to is
running or stopped.
|
| Attach Tag | Attach tags to a volume.
|
| Detach Tag | Detach tags from a volume.
|
| Backup Now | Create a backup for a root volume.
|
| Associate Backup Job | Associate a backup job with a root volume.
|
| Create Volume Image | Create an image based on a root volume. The image can be used to create new volumes. |
| Create Root Volume Snapshot | Create a root volume snapshot to record the volume state at a specified time point before important actions. This allows a quick rollback in case of breakdowns. |
| Set Volume QoS | Set the maximum bandwidth of the root volume by setting the total
speed or read/write speed.
|
| Flatten Volume | Merges multiple snapshots of selected resources to achieve data
independence and improve resource performance and data security.
|
| Export Volume List | Exports a CSV file that contains volume information.
|
Volume Details
Volume Snapshot
Snapshot: A snapshot is a point-in-time capture of data status in a volume. Create a snapshot to store the volume state before you perform important actions. The snapshot helps you recover the volume data when exceptions occur during the action. However, this is only a temporal solution. For a long-term backup, we recommend that you use Backup Management.
Volume Snapshot Type
- Manual snapshot: Data volume snapshots that you manually create at any time points.
- Automatic snapshot: Snapshots automatically created by scheduled jobs or by
the system in specific scenarios.
- To use a scheduled job to create snapshots, configure a scheduled snapshot policy in advance. The system automatically creates snapshots on corresponding resources at specified time points.
- The system automatically create volume snapshots
in the following scenarios:
- Resizing a data volume.
- Making a data rollback with a volume snapshot.Note:
- By default, the system does not create volume snapshots automatically when you make a data rollback with a snapshot.
- To make the system automatically create volume
snapshots whenever a snapshot rollback occurs,
follow this method:
On the main menu of ZStack Cube Ultimate, choose . Enable Volume Snapshot Auto Creation.
- Creating a data volume image on a Ceph primary storage.
Scenarios
- Quick recovery from breakdowns: You can use a snapshot to recover the volume to a normal state when exceptions occur in a production environment. This is a temporal solution. For a long-term and more completed data protection, we recommend that you use Backup Management.
- Data exploration: You can create snapshots based on production data, so as to provide a nearly real-time production data for exploration, report query, development, and testing.
- Fault tolerance improvement: We recommend that you create on or more snapshots before you perform important actions on resources, such as the system upgrading and data migration. You can quickly recover the data with the snapshots if exceptions occur during the upgrading or migration.
Create a Data Volume Snapshot
You can create a snapshot on the data volume details page. Follow these steps:
On the main menu of ZStack Cube Ultimate, choose . On the Data Volume page, click a data volume to enter its details page. On the details page, click . Then the Create Data Volume Snapshot page is displayed.
If the volume is attached to a VM instance. You can create a snapshot for it on the VM instance details page. On the VM details page, choose . Click a data volume to enter its details page. On the volume details page, click . Then, the Create Data Volume Snapshot page is displayed.
Create a Root Volume Snapshot
You can create a snapshot on the root volume details page. Follow these steps:
On the main menu of ZStack Cube Ultimate, choose . On the Root Volume page, click a root volume to enter its detail page. On the details page, click . Then, the Create Root Volume Snapshot page is displayed.
You can also create a snapshot for the root volume on the VM instance details page. On the VM instance details page, choose . Click a root volume to enter its details page. On the volume details page, click . Then, the Create Root Volume Snapshot page is displayed.
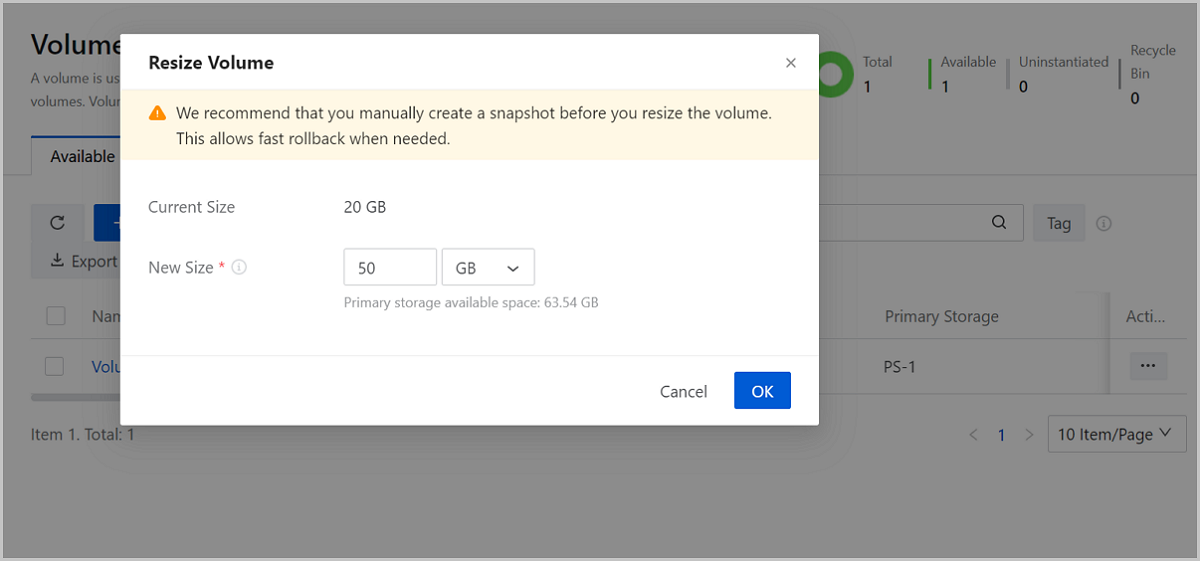
Resize a Volume
ZStack Cube Ultimate allows you to increasing the size of a volume. The resize procedure consists of resizing the volume on the Cloud and resizing the hard disk in the VM operating system.
Resize Volume on Cloud
Note:
- The new size must greater than the original size and the increment must no smaller than 4 MB.
- The new size must be a multiple of 4 MB. For example, if you enter a size of 37 MB, the actual volume size is 40 MB after the resize.
- We recommend that you manually create a snapshot before you resize the volume. This allows fast rollback when needed.
Resize Hard Disk in VM Operating System
Note:
- The risize operation has potential risks. For security reasons, we recommend that you plan a new partition for the new size.
- Only increasing the volume size is supported
- The increased size can be merged into the last partition for continuous use.
The following are three different resize scenarios:
- Use the resize2fs command to resize the ext4
partition.Note: Resize partition is a risky operation. Please exercise
caution. We recommend that you back up important data before the resize in
case of data loss.
Assume that the VM instance uses a CentOS7 operating system. The original size of the ext4 partition and the volume are both 60 GB. After the resize, the volume size is increased to 100 GB, and the new size is planned to be added to the ext4 partition.
Procedure:- Run lsblk to query the current partition. You can
see that the new size is not allocated to the disk
partition.
[root@10-0-18-185 ~]# lsblk NAME MAJ:MIN RM SIZE RO TYPE MOUNTPOINT vda 8:0 0 60G 0 disk └─vda1 8:1 0 60G 0 part / sr0 11:0 1 1024M 0 rom sda 253:0 0 100G 0 disk └─sda1 253:1 0 60G 0 part /data - Run fdisk /dev/sda to recreate the
partition.Note: The start sector of the new partition should be
consistent with that of the original disk. Otherwise, the data
may be
lost.
[root@10-0-18-185 ~]# fdisk /dev/sda Welcome to fdisk (util-linux 2.23.2). Changes will remain in memory only, until you decide to write them. Be careful before using the write command. Command (m for help): d # Delete the current partition Selected partition 1 Partition 1 is deleted Command (m for help): n # Create a new partition Partition type: # Set the partition type as primary p primary (0 primary, 0 extended, 4 free) e extended Select (default p): Using default response p Partition number (1-4, default 1): # Set the partition number as 1 First sector (2048-209715199, default 2048): # Set a start sector consistent with that of the original disk in case of data loss Using default value 2048 Last sector, +sectors or +size{K,M,G} (2048-209715199, default 209715199): # Set the end sector as the default value to allocate all disk space to the new partition Using default value 209715199 Partition 1 of type Linux and of size 100 GiB is set Command (m for help): w # Write these configurations into the disk The partition table has been altered! Calling ioctl() to re-read partition table. WARNING: Re-reading the partition table failed with error 16: Device or resource busy. The kernel still uses the old table. The new table will be used at the next reboot or after you run partprobe(8) or kpartx(8) Syncing disks. - Run partprobe to query the partition
list.
[root@10-0-18-185 ~]# partprobe - Run e2fsck -f /dev/sda1 to check whether the file
system partition works as
expected.
[root@10-0-18-185 ~]# e2fsck -f /dev/sda1 e2fsck 1.42.9 (28-Dec-2013) Pass 1: Checking inodes, blocks, and sizes Pass 2: Checking directory structure Pass 3: Checking directory connectivity Pass 4: Checking reference counts Pass 5: Checking group summary information /dev/sda1: 12/2621440 files (0.0% non-contiguous), 209591/10485504 blocks - Run resize2fs to make the new size recognized by
the xfs file
system.
[root@10-0-18-185 ~]# resize2fs /dev/sda1 resize2fs 1.42.9 (28-Dec-2013) Resizing the filesystem on /dev/sda1 to 26214144 (4k) blocks. The filesystem on /dev/sda1 is now 26214144 blocks long. - Run lsblk to query the current partition
size.
[root@10-0-18-185 ~]# lsblk
NAME   MAJ:MIN RM  SIZE RO TYPE MOUNTPOINT
sda      8:0    0  100G  0 disk
└─sda1   8:1    0  100G  0 part /data
sr0     11:0    1 1024M  0 rom
vda    253:0    0    60G  0 disk
└─vda1 253:1    0    60G  0 part /
- Run lsblk to query the current partition. You can
see that the new size is not allocated to the disk
partition.
- Use the xfs_growfs command to resize the xfs partition.Note:
- This solution applies to the dynamic xfs resize. You do not need to attach an ISO or use a LVM partition tool to manage the disk.
- The partition resize is a risky operation. We recommend that you back up important data before you exercise the resize.
Assume that the VM instance uses a CentOS 7 operating system. The original size of the xfs partition and the volume are both 60 GB. The xfs partition is mounted to /data. After the size, the volume size is increased to 100 GB, and the new size is planned to be added to the xfs partition.
Procedure:- Run lsblk to query the current partition. You can
see that the new size is not allocated to the disk
partition.
[root@10-0-44-210 ~]# lsblk NAME MAJ:MIN RM SIZE RO TYPE MOUNTPOINT vda 8:0 0 50G 0 disk └─vda1 8:1 0 50G 0 part / sr0 11:0 1 1024M 0 rom sdb 253:0 0 100G 0 disk └─sdb1 253:1 0 60G 0 part /data - Detach the mount point.The changed partition cannot be occupied before you running partprobe. Run umount /data to detach the mount point of /dev/sdb1.
[root@10-0-44-210 ~]# umount /data - Run fdisk /dev/sdb to recreate the
partition.Note: The start sector of the new partition should be
consistent with that of the original disk. Otherwise, the data
may be
lost.
[root@10-0-44-210 ~]# fdisk /dev/sdb Welcome to fdisk (util-linux 2.23.2). Changes will remain in memory only, until you decide to write them. Be careful before using the write command. Command (m for help): d # Delete the current partition Selected partition 1 Partition 1 is deleted Command (m for help): n # Create a new partition Partition type: # Set the partition type as primary p primary (0 primary, 0 extended, 4 free) e extended Select (default p): Using default response p Partition number (1-4, default 1): # Set the partition number as 1 First sector (2048-209715199, default 2048): # Set a start sector consistent with that of the original disk incase of data loss Using default value 2048 Last sector, +sectors or +size{K,M,G} (2048-209715199, default 209715199): # Set the end sector as the default value to allocate all disk space to the new partition Using default value 209715199 Partition 1 of type Linux and of size 100 GiB is set Command (m for help): w # Write these configurations into the disk The partition table has been altered! Calling ioctl() to re-read partition table. WARNING: Re-reading the partition table failed with error 16: Device or resource busy. The kernel still uses the old table. The new table will be used at the next reboot or after you run partprobe(8) or kpartx(8) Syncing disks. - Run partprobe to query the partition
list.
[root@10-0-44-210 ~]# partprobe - Run mount /dev/sdb1 /data to attach the new
partition to the mount point
/data.
[root@10-0-44-210 ~]# mount /dev/sdb1 /data - Run xfs_growfs /dev/sdb1 to make the new size
recognized by the xfs file
system.
[root@10-0-44-210 ~]# xfs_growfs /dev/sdb1 meta-data=/dev/sdb1 isize=512 agcount=7, agsize=3932096 blks = sectsz=512 attr=2, projid32bit=1 = crc=1 finobt=0 spinodes=0 data = bsize=4096 blocks=26214144, imaxpct=25 = sunit=0 swidth=0 blks naming =version 2 bsize=4096 ascii-ci=0 ftype=1 log =internal bsize=4096 blocks=7679, version=2 = sectsz=512 sunit=0 blks, lazy-count=1 realtime =none extsz=4096 blocks=0, rtextents=0 data blocks changed from 16214144 to 28835584 - Run lsblk to query the current partition
size.
[root@10-0-44-210 ~]# lsblk
NAME   MAJ:MIN RM  SIZE RO TYPE MOUNTPOINT
sdb      8:16   0  100G  0 disk
└─sdb1   8:17   0  100G  0 part /data
sr0     11:0    1 1024M  0 rom
vda    253:0    0    50G  0 disk
└─vda1 253:1    0    50G  0 part /
- Resize the Windows partition.You can directly resize the Windows partition on the Disk Management page.Note: Rescan the disk after
the resize.