Host
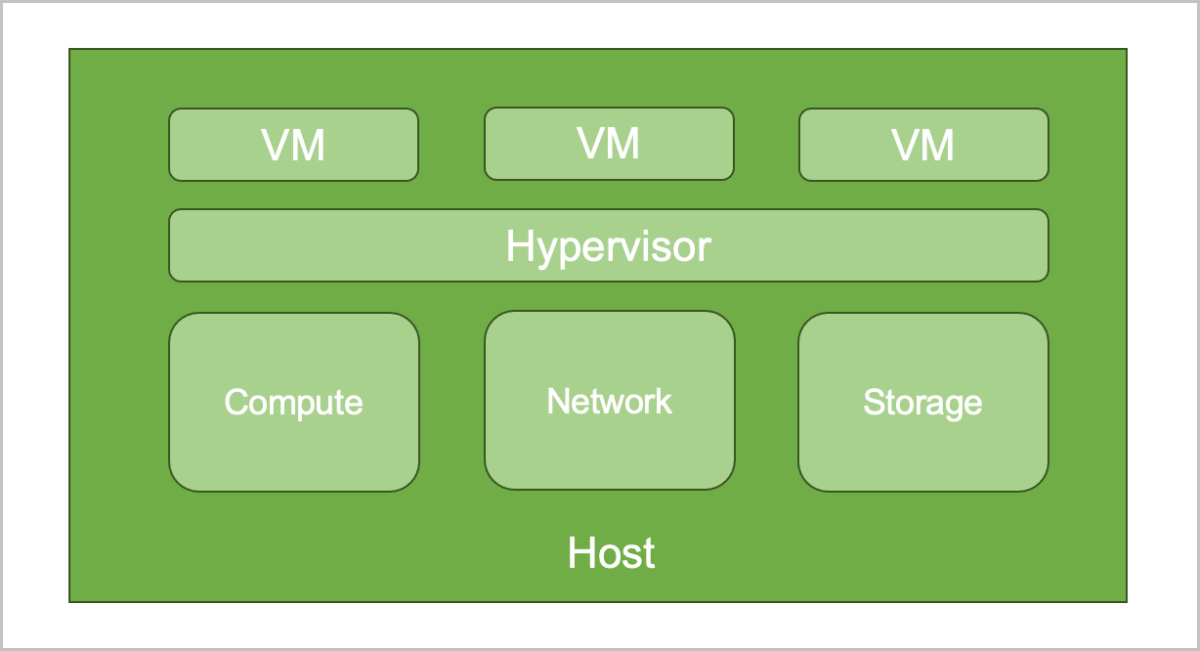
What is Host?
A host provides compute, network, and storage resources for VM instances. Hosts are core resources on the Cloud. VM instances are running on hosts.
Add a Host
On the main menu of ZStack Cube Ultimate, choose . On the Host page, click Add Host. Then, the Add Host page is displayed.
- Scan-based Addition
- Manual Addition
- Template Import
Scan-based Addition
- Detect Host
After you select Scan-ban-based Addition, the platform automatically detects hosts and displays their hardware information. You can select at least one detected host to add it to the platform. If no desired host is found, click Rescan in the upper-right corner to initiate another detection.
After all desired hosts are selected, click Next to proceed to the Configure host page.
- Configure HostOn the Configure Host page, set the following parameters:
- Name: Enter a name for the host.
The name must be 1 to 128 characters in length and can contain Chinese characters, letters, digits, spaces, hyphens (-), underscores (_), periods (.), parenthesis (), colons (:), and plus signs (+) and cannot begin or end with spaces.
- Root Password: Set a password for the root user of the host.
- SSH Port: Enter the SSH port of the host. Default: 22.
- Node Type: Select a node type for the
host. You can add the host as a hyper-converged node or a
compute node.
- If you select Hyper-converged
Node, the host functions as bot a
compute and storage node, providing computing and
storage services. The platform automatically formats all
disks, except the system disk, on the host. All existing
data on these disks are permanently erased and cannot be
recovered. Proceed with caution.
- Cluster: Select the
cluster where the host is located.
 Note:
Note:
- Hosts that apply the KVM virtualization technology can be added only to KVM-based clusters.
- Hosts of the X-Dragon architecture can be added only to X-Dragon-based clusters.
- Primary Storage: Displays primary storage deployed through Bootstrap. Primary storage deployed through other methods does not support expansion.
- Storage Pool: Select a
storage pool that the host belong to as a storage
node.
- You may fail to specify a storage pool if the
distribute storage version is too low. To ensure
the node can properly provide storage service, we
recommend that you
- Upgrade the distributed storage to the latest version.
- If a upgrade is not feasible due to business requirements, you can enter the distributed storage page to add the storage node.
- You may fail to specify a storage pool if the
distribute storage version is too low. To ensure
the node can properly provide storage service, we
recommend that you
- Cluster: Select the
cluster where the host is located.
- If you select Compute Node, the
host functions only as a compute node and provide
computing services.
- Cluster: Select the cluster where the host is located.
- If you select Hyper-converged
Node, the host functions as bot a
compute and storage node, providing computing and
storage services. The platform automatically formats all
disks, except the system disk, on the host. All existing
data on these disks are permanently erased and cannot be
recovered. Proceed with caution.
- Scan Host IOMMU Setting: Optional. Choose
whether to scan the IOMMU setting of the host. The IOMMU setting
is used in scenarios such as peripheral device passthrough and
virtualization. By default, the host IOMMU setting is not
scanned.Note: If you choose to scan the host IOMMU setting,
note the following:
- Scanning the host IOMMU setting will traverse available GPU devices on the host and physical NICs that can be virtualized. Before you scan the setting, make sure that Intel VT-d or AMD IOMMU is enabled in the host BIOS.
- Before you can use GPU passthrough, vGPU virtualization, and SR-IOV, scan the host IOMMU setting.
- If you are scanning the host IOMMU setting for the first time, restart the host to make the setting take effect.
- Intel EPT Hardware Assist: Optional.
Choose whether to enable Intel EPT hardware assist for Intel
CPUs to improve the CPU performance. By default, this feature is enabled.Note:
- If the CPU model of your Intel server is too old, you might fail to create VM instances or cannot open the console properly of the newly created VM instances. In this case, disable the Intel EPT hardware assist feature.
- Disabling Intel EPT Hardware Assist will lower the VM performance.
- Name: Enter a name for the host.
- Preview
Preview host configurations and click OK to confirm to add hosts.
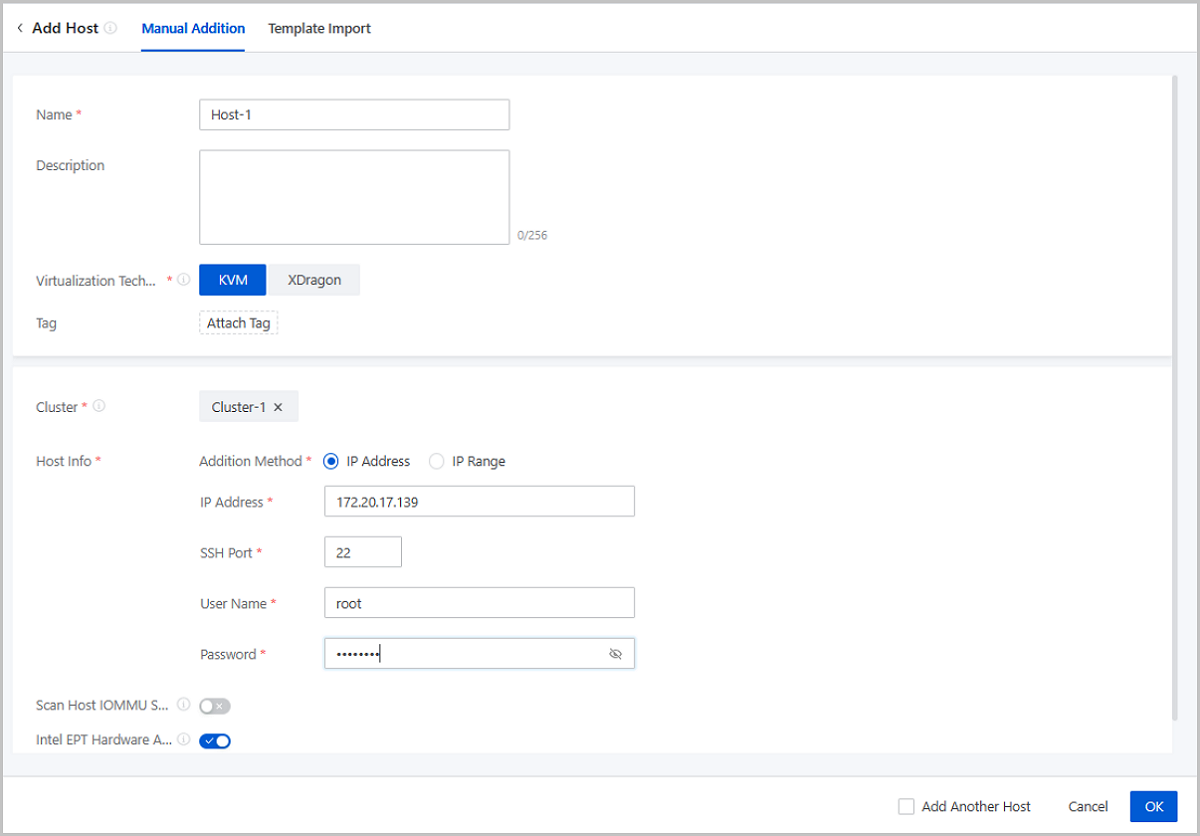
Manual Addition
- Name: Enter a name for the host.
The name must be 1 to 128 characters in length and can contain Chinese characters, letters, digits, spaces, hyphens (-), underscores (_), periods (.), parenthesis (), colons (:), and plus signs (+) and cannot begin or end with spaces.
- Description: Optional. Enter a description for the host.
- Virtualization Technology: Select the hypervisor type
of the server. You can select KVM or X-Dragon.
- If the server applies the KVM virtualization technology, select KVM.
- If the server applies the X-Dragon architecture, select X-Dragon.
- Tag: Optional. Attach one or more tags to the host.
- Cluster: Select the cluster where the host is located.Note:
- Hosts that apply the KVM virtualization technology can be added only to KVM-based clusters.
- Hosts of the X-Dragon architecture can be added only to X-Dragon-based clusters.
- Host Info: Configure the host information such as the
host IP and SSH port according to your actual needs. You can configure the
host information by entering an IP address or an IP range.
- If you select the IP Address method, set the
following parameters:
- IP Address: Enter the IP address of the host.
- SSH Port: Enter the SSH port of the host. Default: 22.
- SSH Username: Enter the SSH user name of the host. Default: root. You can enter a user name according to your actual needs.
- SSH Password: Enter an SSH password for the user name.
- If you select the IP Range method, set the
following parameters:
- IP Range: Enter the planed IP range for the host.
- SSH Port: Enter the SSH port for the
host. Default: 22.Note: Make sure that all hosts in the
specified IP range share the same SSH port.
- SSH Username: Enter the user name of
the host. Default: root. You can enter a user name according
to your actual needs.Note: Make sure that all hosts in the
specified IP range share the same user name.
- SSH Password: Enter a password for
the user name.Note: Make sure that all user name in the
specified IP range share the same password.
- If you select the IP Address method, set the
following parameters:
- Scan Host IOMMU Setting: Optional. Choose whether to
scan the IOMMU setting of the host. The IOMMU setting is used in scenarios
such as peripheral device passthrough and virtualization. By default, this
feature is disabled.Note: If you choose to scan the host IOMMU setting, note
the following:
- Scanning the host IOMMU setting will traverse available GPU devices on the host and physical NICs that can be virtualized. Before you scan the setting, make sure that Intel VT-d or AMD IOMMU is enabled in the host BIOS.
- Before you can use GPU passthrough, vGPU virtualization, and SR-IOV, scan the host IOMMU setting.
- If you are scanning the host IOMMU setting for the first time, restart the host to make the setting take effect.
- Intel EPT Hardware Assist: Optional. Choose whether
to enable Intel EPT hardware assist for Intel CPUs to improve the CPU
performance. By default, this feature is enabled.Note:
- If the CPU model of your Intel server is too old, you might fail to create VM instances or cannot open the console properly of the newly created VM instances. In this case, disable the Intel EPT hardware assist feature.
- Disabling Intel EPT Hardware Assist will lower the VM performance.
Import Template
- Download the configuration template.
Click Download Template to download the configuration template file in CSV format.
图 2. Configuration Template File 
- Fill in the host information according to the specified format.
The configuration template contains a header and a row of sample. You can delete or overwrite the sample as needed.
Set the following parameters in the template:- Name: Enter a name for the host. If null, the Cloud allocates a name (HOST-host IP address) to the host by default.
- Description: Optional. Enter a description for the host.
- Cluster: Enter the UUID of the cluster
where the host is located.Note: You can add only KVM-based
clusters in the template.
- Host IP: Enter an IP address or an IP
range for the host.
- IP Address: Enter the specified IP address of the host.
- IP Range: Enter the specified IP range to bulk add hosts.Note:
If you enter multiple IP ranges for the host, use commas (,) to separate the ranges. ^ means that the IP range is not included. For example,
192.168.0.1-192.168.0.100,^192.168.0.3-192.168.0.5
- Scan Host IOMMU Setting: Optional. Choose
whether to scan the IOMMU setting of the host. The IOMMU setting
is used in scenarios such as peripheral device passthrough and
virtualization. By default, this feature is disabled.Note: If
you choose to scan the host IOMMU setting, note the
following:
- Before you can use GPU passthrough, vGPU virtualization, and SR-IOV, scan the host IOMMU setting.
- Scanning the host IOMMU setting will traverse available GPU devices on the host and physical NICs that can be virtualized. Before you scan the setting, make sure that Intel VT-d or AMD IOMMU is enabled in the host BIOS.
- If you are scanning the host IOMMU setting for the first time, restart the host to make the setting take effect.
- Intel EPT Hardware Assist: Optional.
Specify whether to enable Intel EPT hardware assist for Intel
CPUs to improve the CPU performance. This feature is enabled by default.Note:
- If the CPU model of your Intel server is too old, you might fail to create VM instances or cannot open the console properly of the newly created VM instances. In this case, disable the Intel EPT hardware assist feature.
- Disabling Intel EPT Hardware Assist will lower the VM performance.
- SSH Port: Enter the SSH port for the host. If null, the Cloud will use port 22 by default.
- SSH User Name: Enter the SSH user name of the host.
- SSH Password: Enter an SSH password for the user name.
- Upload the configuration file.
After you fill in the host information, verify that the grammar is correct, and then upload the file to the Cloud.
图 3. Import Template 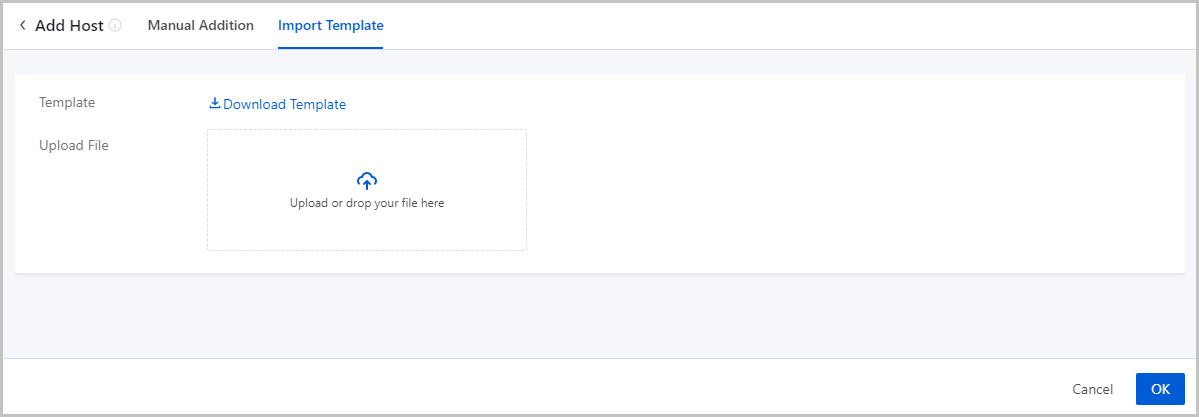
- Add hosts by using the template.
Click OK. Then, the Cloud add hosts according to the configuration file.
Manage a Host
On the main menu of ZStack Cube Ultimate, choose . Then, the Host page appears.
| Action | Description | Preconditioned Host Status |
|---|---|---|
| Add Host | Add one or more hosts. | / |
| Edit Host | Edit the name and description of a host. | / |
| Enable Host | Enable a host. | Disabled |
| Disable Host | Disable a host.Note: Disabling a host does not
affect the resources already running on the host. However, the
host is no longer available as a candidate when you apply for
new resources. |
Enabled |
| Reconnect Host | Reconnect a host.Note: In most cases, host
reconnection can be implemented when the host configurations are
updated. For example, if the memory or volume capacity of a hots
is updated, you can reconnect the host to update the
database. |
ALL |
| Enter Maintenance Mode | Enter the maintenance mode. If a host is in
maintenance mode, you can power off the host or troubleshoot
failures.
Note: If the primary storage is of a shared storage type, you can configure
the policy on failures of VM migration triggered when the host
enters maintenance mode.On the main menu of ZStack Cube Ultimate, choose , and configure the Policy for VM Migration
Failure in Entering Host Maintenance Mode
setting:
|
Connected |
| Add Bond | Aggregates the physical NIC ports on the host, so
as to realize a high availability or a load balance. Supports two
bond mode: active-backup and LACP.
Note: Make sure that the NIC ports added to a same bond have a
same speed rate. |
ALL |
| Power on | Power on a host. | Powered off |
| Power off | Power off a host.Note:
|
Powered on/Unknown |
| Restart | Restart a host.Note:
|
Powered on/Unknown |
| Enter Web Terminal | Enter a web terminal of a host to perform operations on the host. | Powered on/Unknown |
| Attach Tag | Attach a tag to one or more hosts.Note:
|
ALL |
| Detach Tag | Detach a tag from a host.Note:
|
ALL |
| Modify IPMI Info | Modify the IPMI username and password of the
host.Note: You can only modify the IPMI info of a host that is
in IPMI Unmanaged or Unknown power status. |
Unknown |
| Update SSH Password | Update the SSH password of a host. After the password is updated, the host is automatically reconnected. | / |
| Delete Host | Delete a host.Note: If you delete a host, note
that:
|
/ |
Host Details
pNUMA Topology
pNUMA Topology: A pNUMA topology (physical NUMA topology) is the topology of the host NUMA nodes predefined by the CPU vendor based on the host NUMA architecture.
Concepts
- NUMA: Non-uniform memory access (NUMA) is a computer memory design where the memory access time depends on the memory location relative to the CPU. Under NUMA, a processor can access its own local memory faster than non-local memory and thus improves VM performance.
- pNUMA node: A pNUMA node (physical NUMA node) is a host NUMA node predefined based on the host NUMA architecture. It is used to manage the CPUs and memory of the host. A pNUMA node mainly consists of pCPUs and local memory.
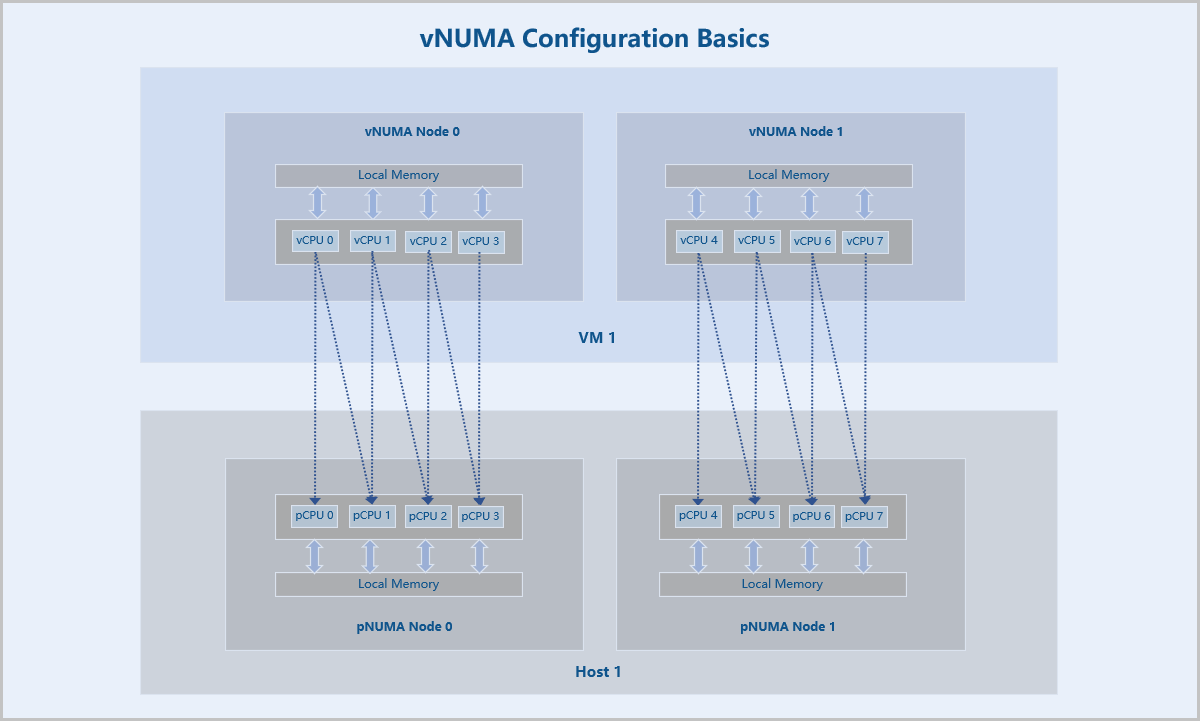
- vNUMA node: A vNUMA node (virtual NUMA node) is generated by passing-through associated pNUMA nodes via CPU pinning. It is used to manage the CPUs and memory of a VM instance. A vNUMA node mainly consists of vCPUs and local memory.
- vNUMA topology: A vNUMA topology (virtual NUMA topology) is the topology of VM NUMA nodes generated by passing-through associated pNUMA nodes via CPU pinning.
- Local memory: Local memory is the memory that a CPU (pCPU or vCPU) accesses through the Uncore iMC (Integrated Memory Controller) of the same NUMA (pNUMA or vNUMA) node. Compared with accessing non-local memory, accessing local memory has lower latencies.
Fundamentals
After you add a host on ZStack Cube Ultimate, you can view the pNUMA topology of the host. You can also configure vNUMA for VM instances running on the host according to the pNUMA topology.
vNUMA configurations are achieved through CPU pinning, which assigns the vCPUs of a VM instance to specific pCPUs of the host. In vNUMA configurations, all vCPUs of the VM instance are pinned to pCPUs of the host. In addition, the pCPUs pinned by a vCPU belong to the same pNUMA node.
After the vNUMA configurations are completed, a vNUMA topology with one or more vNUMA nodes is generated by passing-through the topology of associated host pNUMA nodes. Then the vCPUs of the VM instance primarily access the local memory of the vNUMA node where the vCPUs reside.
pNUMA Topology
- All pNUMA nodes of the host and the VM instances associated with each pNUMA node are displayed.
- Total Memory: The total amount of local memory that a pCPU can access from the pNUMA node where it resides.
- Free Memory: The amount of free local memory that a pCPU can access from the pNUMA node where it resides.
- Both the total memory and free memory are measured based on physical hardware resources.
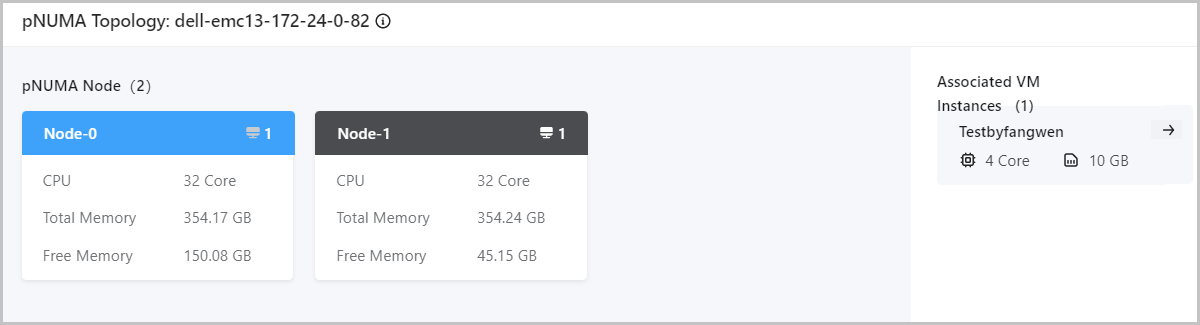
You can click the Redirect icon to view the vNUMA topologies of the associated VM instances. For more information about vNUMA topologies, see vNUMA Topology.
Host QEMU Version
Version Requirement
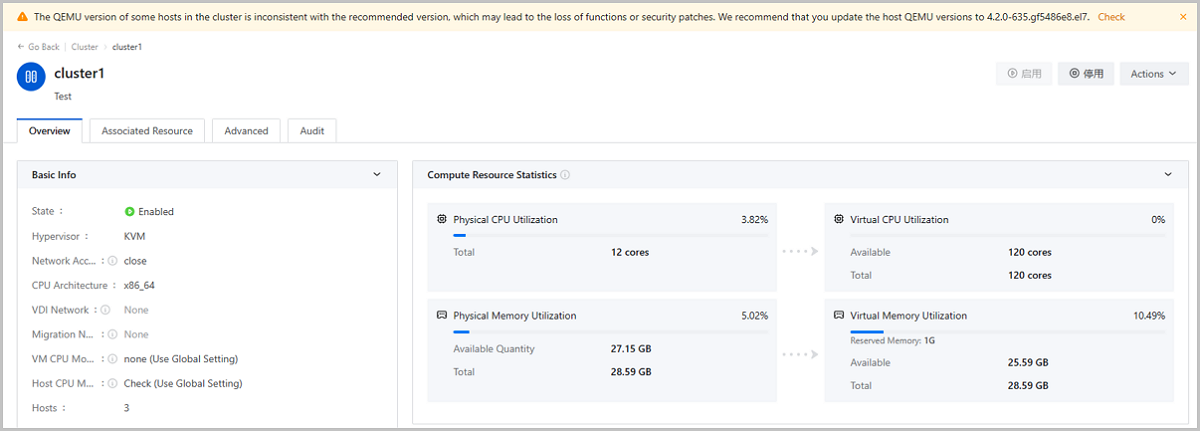
- All hosts in a same cluster should be installed with QEMU of the same version. If you need to add a host with a QEMU version different from those of other hosts in the cluster, update the QEMU of the hosts in this cluster to the Cloud recommended version or create a new cluster to add this new host.
- To avoid function or security patch losses, we recommend that all hosts use QEMU of the recommended version.
View Host QEMU Version
Update Host QEMU Version
ZStack Cube Ultimate allows you to update the QEMU version for all hosts in a cluster. Note that the QEMU update is a risky action. Before you execute the QEMU update, contact our technical support to evaluate the risk level.
- Check the connection of Cloud services and hardware.
- Set VM HA mode as None in Global Setting.
- Query the host QEMU version.
- Back up the database of the two management nodes.
- Upload the latest ISO image to the two management nodes and update the local repo source.
- Use CLI commands to updates QEMU version for hosts in the cluster.
- Use CLI commands to query the update process and confirm that the update is successful.
Note: For detailed update commands, contact our technical supports.Considerations
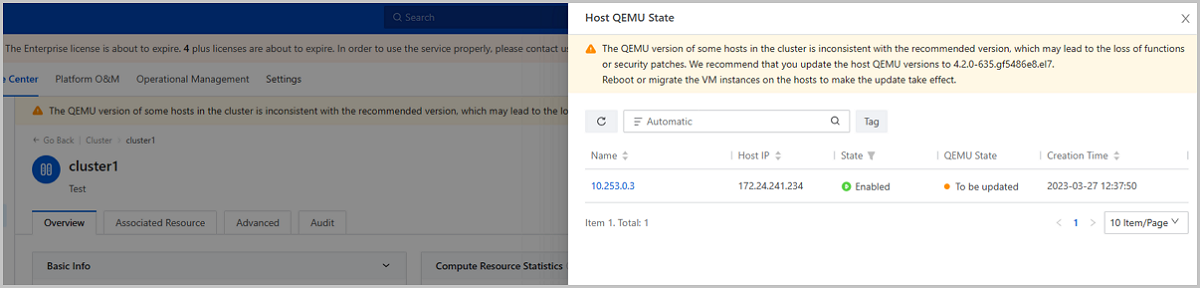
- After the update, restart or migrate the VM instances, VPC vRouters, and LB instances on the hosts to make the update take effect.
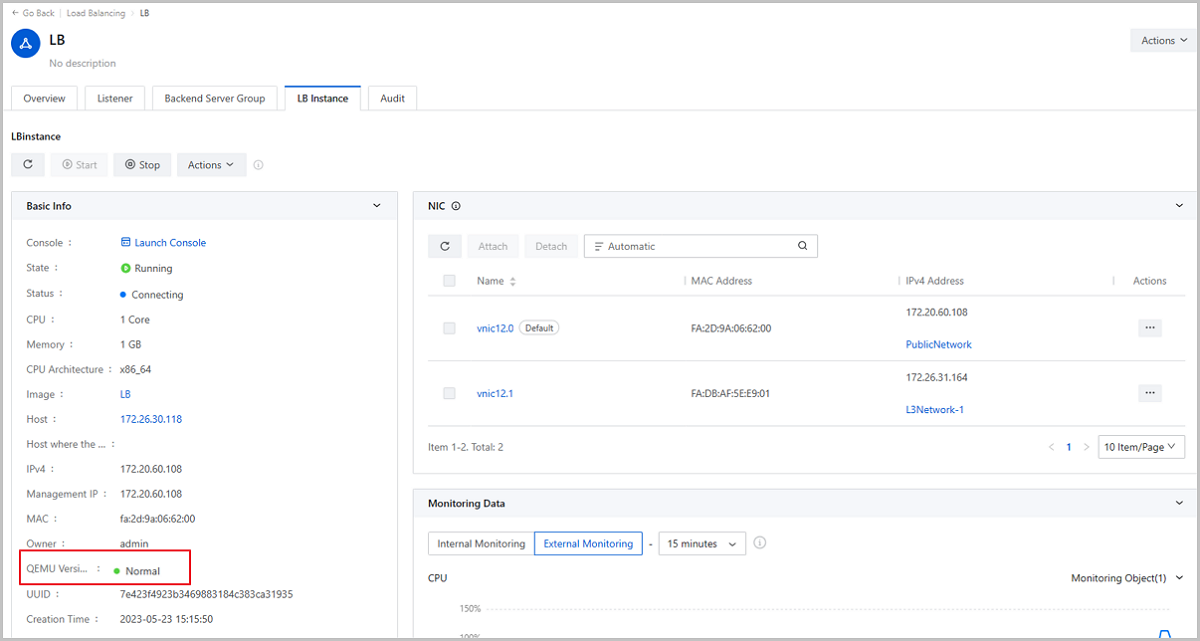
- When the QEMU version of a VM instance, VPC vRouter, or LB instance is not
consistent with that of the host it resides on, its QEMU state is displayed
as To be Updated. You can restart or migrate the VM/VPC vRouter/LB Instance
to update its QEMU version.
图 2. VM Instance QEMU State 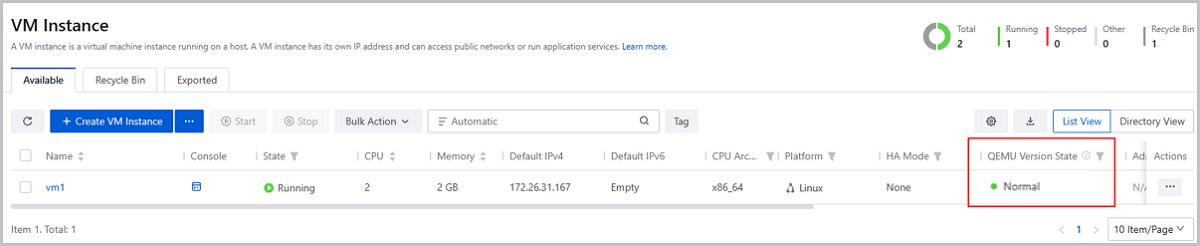
图 3. VPC vRouter QEMU State 
图 4. LB Instance QEMU State