Primary Storage
What is Primary Storage?
A primary storage is one or more servers that store volume files of VM instances. These files include root volume snapshots, data volume snapshots, image caches, root volumes, and data volumes.
- Local Storage: This type of primary storage uses the hard disks to store disk files.
- Network Shared Storage: This type of primary storage supports NFS, Shared
Mount Point (SMP), Ceph, SharedBlock, Vhost, CBD, AliyunNAS, and
AliyunEBS.
- NFS primary storage uses the Network File System (NFS) to store files.
- SMP primary storage supports network shared storage provided by commonly used distributed file systems, such as MooseFS, GlusterFS, OCFS2, and GFS2.
- Ceph primary storage uses distributed block storage to store files.
- SharedBlock primary storage uses shared block storage to store files.
- Vhost primary storage uses vhost-user mode to connect with high-performance SSD distributed storage.
- CBD connects high-performance distributed block storage through the CBD interface.
- AliyunNAS primary storage uses distributed files to store files.
- AliyunEBS primary storage uses distributed block storage to store files.
| Primary Storage | Cluster |
|---|---|
| LocalStorage | A cluster can have one or more LocalStorage primary storage attached. |
| NFS | A cluster can have one or more NFS primary storage attached. |
| SharedBlock | A cluster can have one or more SharedBlock primary storage attached. |
| SMP | A cluster can have one SMP primary storage attached. |
| Ceph | A cluster can have only one Ceph primary storage attached. |
| Vhost | A cluster can have only one Vhost primary storage attached. |
| CBD | A cluster can have only one CBD primary storage attached. |
| AliyunNAS | A cluster can have only one AliyunNAS primary storage attached. |
| AliyunEBS | A cluster can have only one AliyunEBS primary storage attached. |
| LocalStorage + NFS | A cluster can have one LocalStorage and one NFS primary storage attached. |
| LocalStorage + SMP | A cluster can have one LocalStorage and one SMP primary storage attached. |
| LocalStorage + SharedBlock | A cluster can have multiple LocalStorage and multiple SharedBlock primary storage attached. |
| Ceph + LocalStorage | A cluster can have both a Ceph and a maximum of three LocalStorage primary storage attached. |
| Ceph + SharedBlock |
|
| NFS + SharedBlock | A cluster can have both multiple NFS and multiple SharedBlock primary storage attached. |
Add a Primary Storage
On the main menu of ZStack Cube Ultimate, choose . On the Primary Storage page, click Add Primary Storage. Then, the Add Primary Storage page is displayed.
- Add a LocalStorage primary storage.
- Add an NFS primary storage.
- Add a SharedMountPoint (SMP) primary storage.
- Add a Ceph primary storage.
- Add a SharedBlock primary storage.
- Add a Vhost primary storage.
- Add a CBD primary storage.
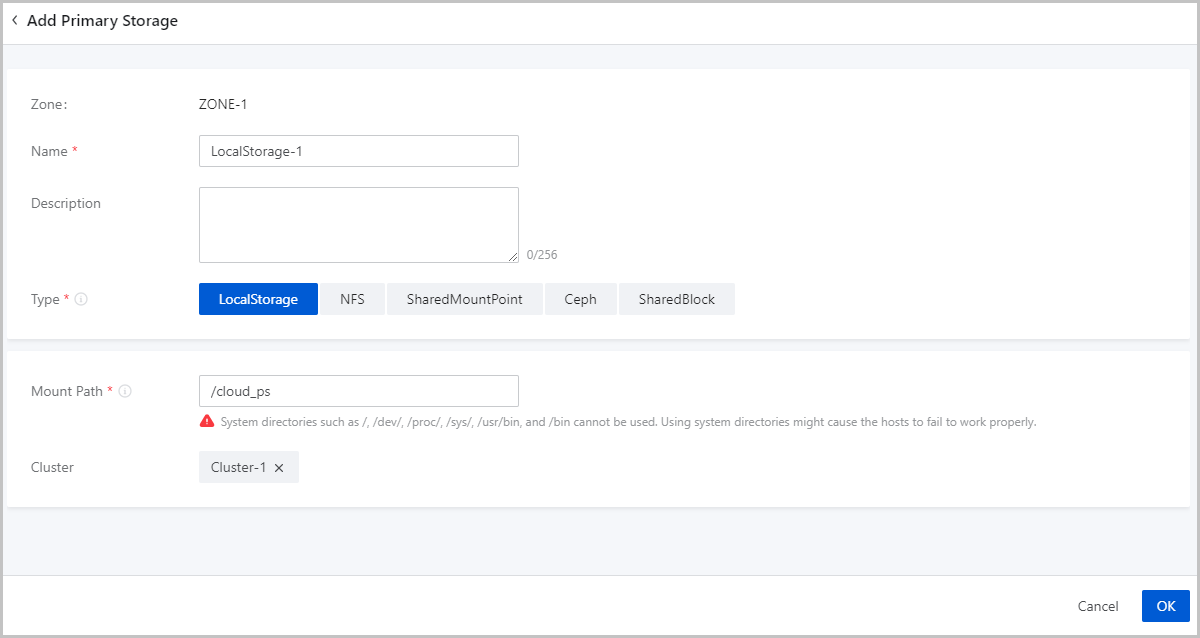
Add a LocalStorage Primary Storage
- Zone: By default, the current zone is displayed.
- Name: Enter a name for the primary storage.
The name must be 1 to 128 characters in length and can contain Chinese characters, letters, digits, spaces, hyphens (-), underscores (_), periods (.), parenthesis (), colons (:), and plus signs (+) and cannot begin or end with spaces.
- Description: Optional. Enter a description for the primary storage.
- Type: Select LocalStorage.
 Note:
Note:
- If you select LocalStorage, the Cloud uses the hard disks of each host as a primary storage. LocalStorage primary storage can work with ImageStore and SFTP image storage. The total capacity of a LocalStorage primary storage is the sum of each host directory capacity.
- If you attach multiple LocalStorage primary storage, make sure that each LocalStorage primary storage is deployed on an exclusive logical volume or physical disk.
- Mount Path: Enter the directory for mounting the
LocalStorage primary storage.Note:
- If the directory you entered does not exist, the Cloud automatically creates one.
- The following system directories cannot be used. Otherwise, the
hosts might fail to work properly.
- /
- /dev
- /proc
- /sys
- /usr/bin
- /bin
- Cluster: Select a cluster to which the LocalStorage primary storage is attached.
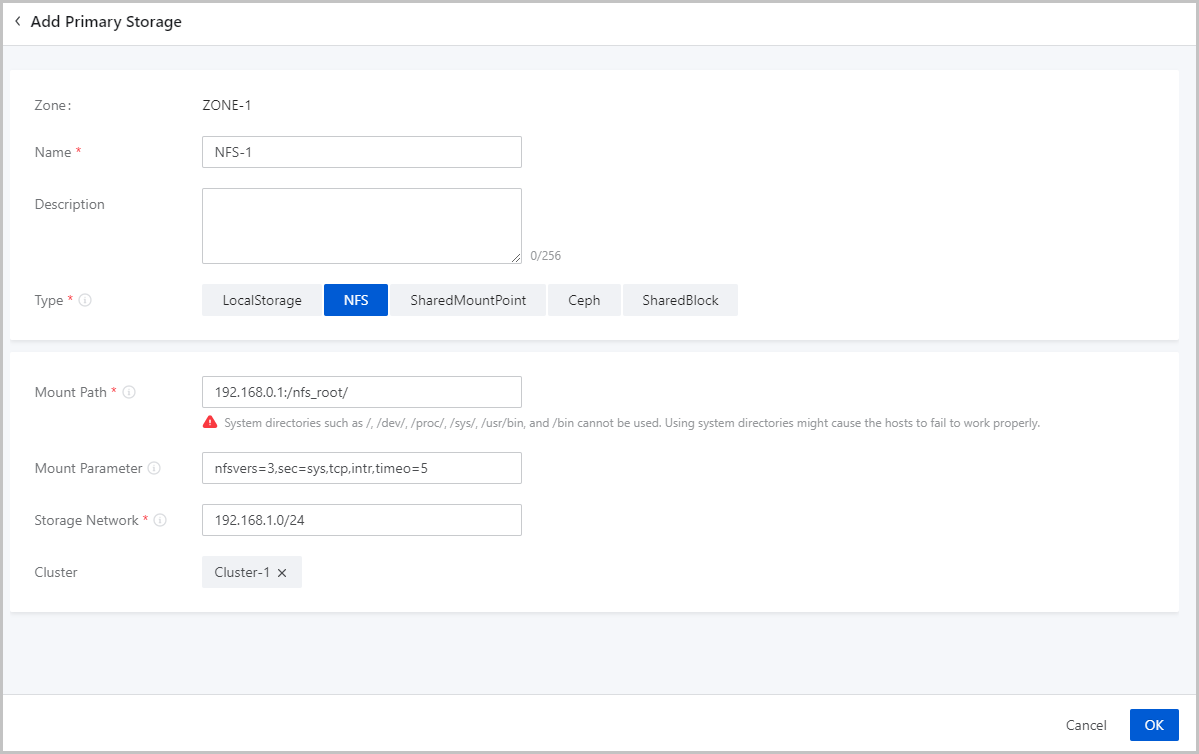
Add an NFS Primary Storage
- Zone: By default, the current zone is displayed.
- Name: Enter a name for the primary storage.
The name must be 1 to 128 characters in length and can contain Chinese characters, letters, digits, spaces, hyphens (-), underscores (_), periods (.), parenthesis (), colons (:), and plus signs (+) and cannot begin or end with spaces.
- Description: Optional. Enter a description for the primary storage.
- Type: Select NFS.Note: If you
select NFS, ZStack Cube Ultimate automatically mounts the
same NFS shared directory on all hosts as a primary storage. NFS primary
storage can work with ImageStore and SFTP
image storage, and can automatically mount the directory on all
hosts.
- Mount Path: Enter the shared directory of the NFS server.Note:
- Format: NFS_Server_IP:/NFS_Share_folder. For example, 192.168.0.1:/nfs_root.
- You need to set the access permissions of the corresponding directories on the NFS server in advance.
- To ensure security control on the NFS server, we recommend that you configure corresponding security rules for access control.
- You can check the shared directory of the NFS server by using
the
showmount -ecommand on NFS server in advance. - The following system directories cannot be used. Otherwise, the
hosts might fail to work properly.
- /
- /dev
- /proc
- /sys
- /usr/bin
- /bin
- Mount Option: Optional. To add mount options, make
sure that these options are supported by the NFS server.Note:
- The options are separated by commas (,). For example, nfsvers=3,sec=sys,tcp,intr,timeo=5. The preceding example means that the NFS server version is 3, the standard UNIX authentication mechanism is used, TCP is used as the transmission protocol, an NFS call can be interrupted in case of an exception, and the timeout is 0.5 seconds (5/10).
- To specify the mount options, you can refer to the content in the -o option of mount.
- You can set the options according to the mount command on commonly used clients. If the configured options conflict with the NFS server, the server shall prevail.
- Storage Network: Enter the storage network specified
for the shared storage. The storage network can be the management network of
the management node.Note:
- If you have a dedicated storage network, enter its CIDR.
- We recommend that you plan an independent storage network in advance to avoid potential risks. If you do not have an independent storage network, enter the network address according to your actual needs.
- The Cloud uses the storage network to check the health status of VM instances.
- Cluster: Select a cluster to which the NFS primary storage is attached.
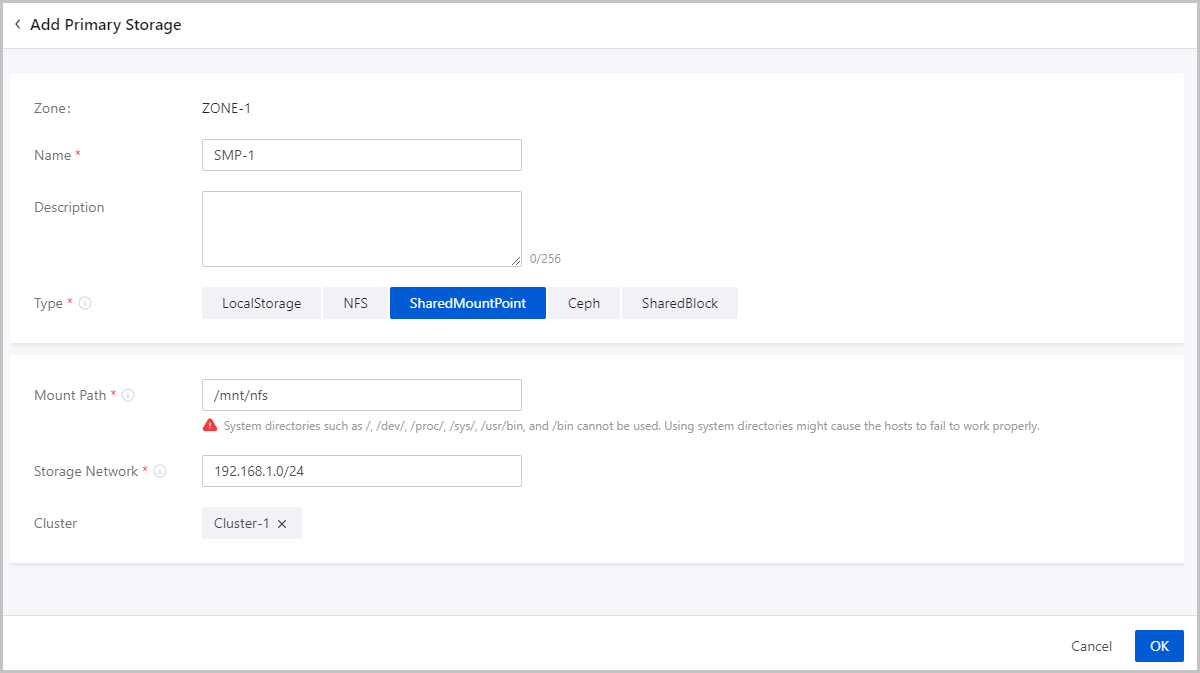
Add a SMP Primary Storage
Before you add a SMP primary storage, configure the corresponding distributed file system in advance, and mount the shared file system to the same file path on each host according to the client configuration of different storage systems.
- Download and install the client tool mfsmount of MooseFS, and create a directory as the mount node.
- Assuming that the IP address of the MooseFS Master Server is
172.20.12.19, create /mnt/mfs as the mount
point, and use the
mfsmountcommand to mount the MooseFS system. - You can also use the
mfssetgoalcommand to set the number of file copies to be saved as needed.
[root@localhost ~]#mkdir /mnt/mfs
[root@localhost ~]#mfsmount /mnt/mfs -H 172.20.12.19
[root@localhost ~]#mkdir /mnt/mfs/zstack
[root@localhost ~]#mfssetgoal -r 2 /mnt/mfs/zstack/
#The preceding commands mount the files in the /mnt/mfs/zstack/ directory to 172.20.12.19, and save two copies to the MooseFS storage server.- Zone: By default, the current zone is displayed.
- Name: Enter a name for the primary storage.
The name must be 1 to 128 characters in length and can contain Chinese characters, letters, digits, spaces, hyphens (-), underscores (_), periods (.), parenthesis (), colons (:), and plus signs (+) and cannot begin or end with spaces.
- Description: Optional. Enter a description for the primary storage.
- Type: Select SharedMountPoint.Note:
- For SMP primary storage, ZStack Cube Ultimate supports network shared storage provided by commonly used distributed file systems such as MooseFS, GlusterFS, OCFS2, and GFS2.
- SMP primary storage can work with ImageStore and SFTP image storage.
- Mount Path: Enter the directory of the shared storage
mounted by the host.Note:
- The following system directories cannot be used. Otherwise, the
hosts might fail to work properly.
- /
- /dev
- /proc
- /sys
- /usr/bin
- /bin
- The following system directories cannot be used. Otherwise, the
hosts might fail to work properly.
- Storage Network: Enter the storage network specified
for the shared storage. The storage network can be the management network of
the management node.Note:
- If you have a dedicated storage network, enter its CIDR.
- We recommend that you plan an independent storage network in advance to avoid potential risks. If you do not have an independent storage network, enter the network address according to your actual needs.
- The Cloud uses the storage network to check the health status of VM instances.
- Cluster: Select a cluster to which the SMP primary storage is attached.
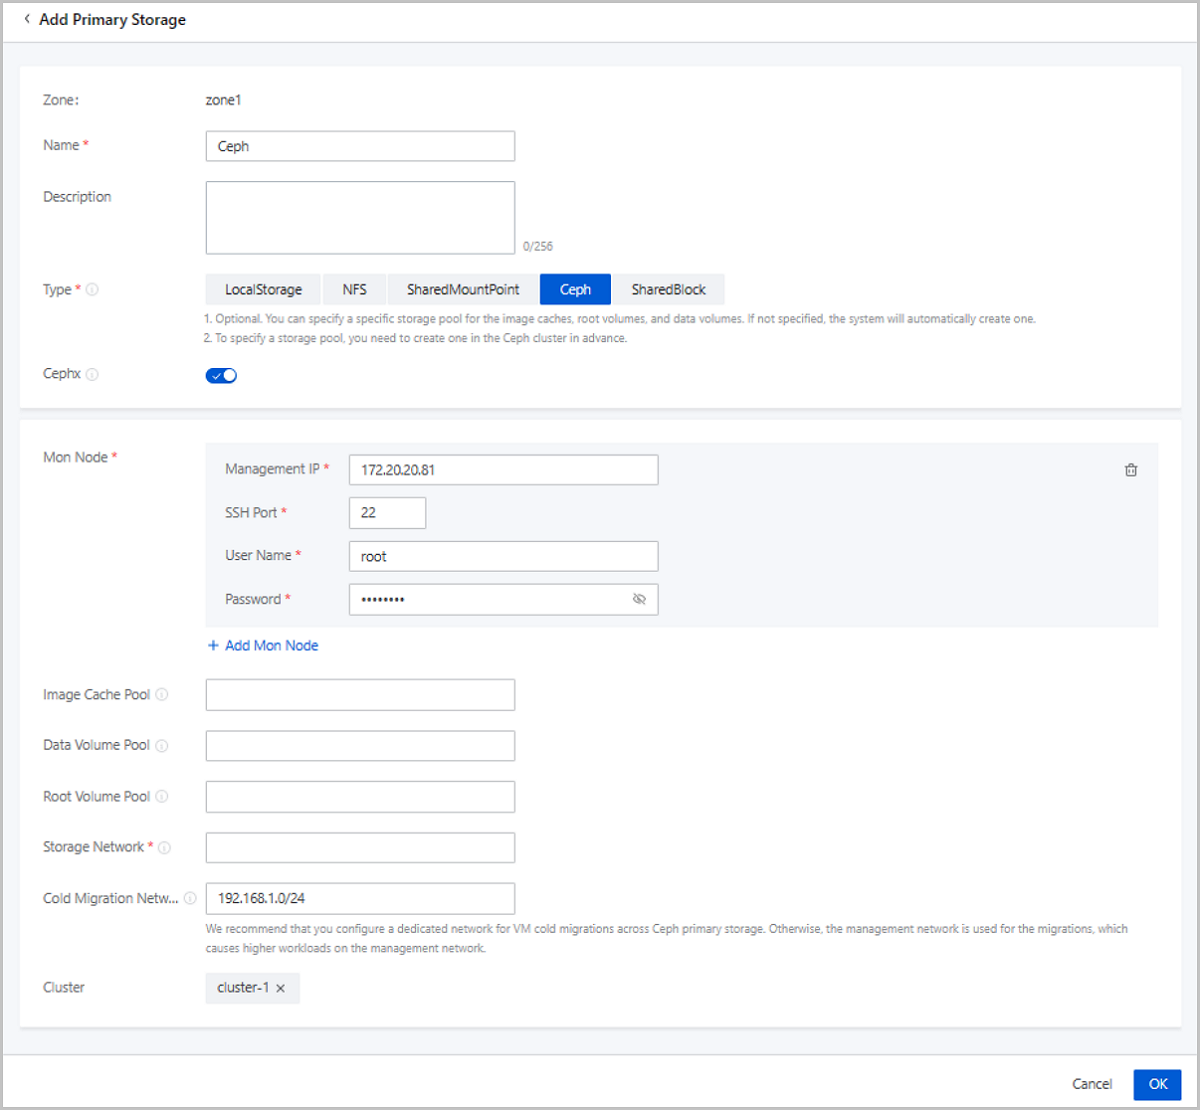
Add a Ceph Primary Storage
ZStack Cube Ultimate supports Ceph block storage. To add a Ceph primary storage, you need to add a Ceph or an ImageStore image storage, and configure the Ceph distributed storage in advance.
- Zone: By default, the current zone is displayed.
- Name: Enter a name for the primary storage.
The name must be 1 to 128 characters in length and can contain Chinese characters, letters, digits, spaces, hyphens (-), underscores (_), periods (.), parenthesis (), colons (:), and plus signs (+) and cannot begin or end with spaces.
- Description: Optional. Enter a description for the primary storage.
- Type: Select
Ceph.Note: ZStack Cube Ultimate primary storage can work with the following Ceph editions:
- Ceph open-source edition: Jewel series, Luminous series, and Nautilus series.
- ZStack Ceph Enterprise: All released ZStack Ceph Enterprise. If you are concerned more about data security and I/O performance, ZStack Ceph Enterprise is recommended. For more information, contact our official technical support.
- Cephx: Optional. Determine whether to enable Ceph authentication.Note:
- By default, Ceph authentication is enabled.
- If the network of the storage node and the compute node is relatively safe, you can disable Cephx to avoid Ceph authentication failure.
- Make sure that the key authentication of the Ceph storage is consistent with this option. If Cephx is not disabled for the Ceph storage, enabling Ceph authentication here may cause VM creation failure.
- Mon Node: Enter the IP address, SSH port, user name,
and password of the Ceph monitor.
- Management IP: Enter the IP address of the Ceph monitor.
- SSH Port: Enter the SSH port of the Ceph monitor. Default: 22.
- User Name: Enter the user name of the Ceph monitor.
- Password: Enter the password of the Ceph monitor.
You can click Add Mon Node to add more Ceph monitors.
- Image Cache Pool: Optional. Enter the name of an
image cache storage pool.Note:
- You can specify a storage pool for image caches. If you do not specify a storage pool, the Cloud creates one automatically.
- If you specify a storage pool, make sure that a storage pool is already available in the Ceph cluster. Then you can specify the UUID of a storage pool.
- Data Volume Pool: Optional. Enter the name of a data
volume storage pool. Note:
- You can specify a storage pool for data volumes. If you do not specify a storage pool, the Cloud creates one automatically.
- If you specify a storage pool, make sure that a storage pool is already available in the Ceph cluster. Then you can specify the UUID of a storage pool.
- Root Volume Pool: Optional. Enter the name of a root
volume storage pool.Note:
- You can specify a storage pool for root volumes. If you do not specify a storage pool, the Cloud creates one automatically.
- If you specify a storage pool, make sure that a storage pool is already available in the Ceph cluster. Then you can specify the UUID of a storage pool.
- Storage Network: Enter the storage network specified
for the shared storage. The storage network can be the management network of
the management node.Note:
- If you have a dedicated storage network, enter its CIDR.
- We recommend that you plan an independent storage network in advance to avoid potential risks. If you do not have an independent storage network, enter the network address according to your actual needs.
- The Cloud uses the storage network to check the health status of VM instances.
- Cold Migration Network: A network dedicated for VM
cold migrations across Ceph primary storage. If not set, the system uses the
management network for VM cold migrations across Ceph primary storage by
default.Note: To avoid high workloads on the management network, we
recommend that you set a Dedicated network for VM cold migrations and
ensures the cold migration network connectivity between Ceph primary
storage.
- Ceph Enterprise Access Token: Optional.
If you add the access token, the ZStack Ceph Enterprise
storage is managed by the token.Note: Make sure that your ZStack Ceph Enterprise license is valid.
- Cluster: Select a cluster to which the Ceph primary storage is attached.
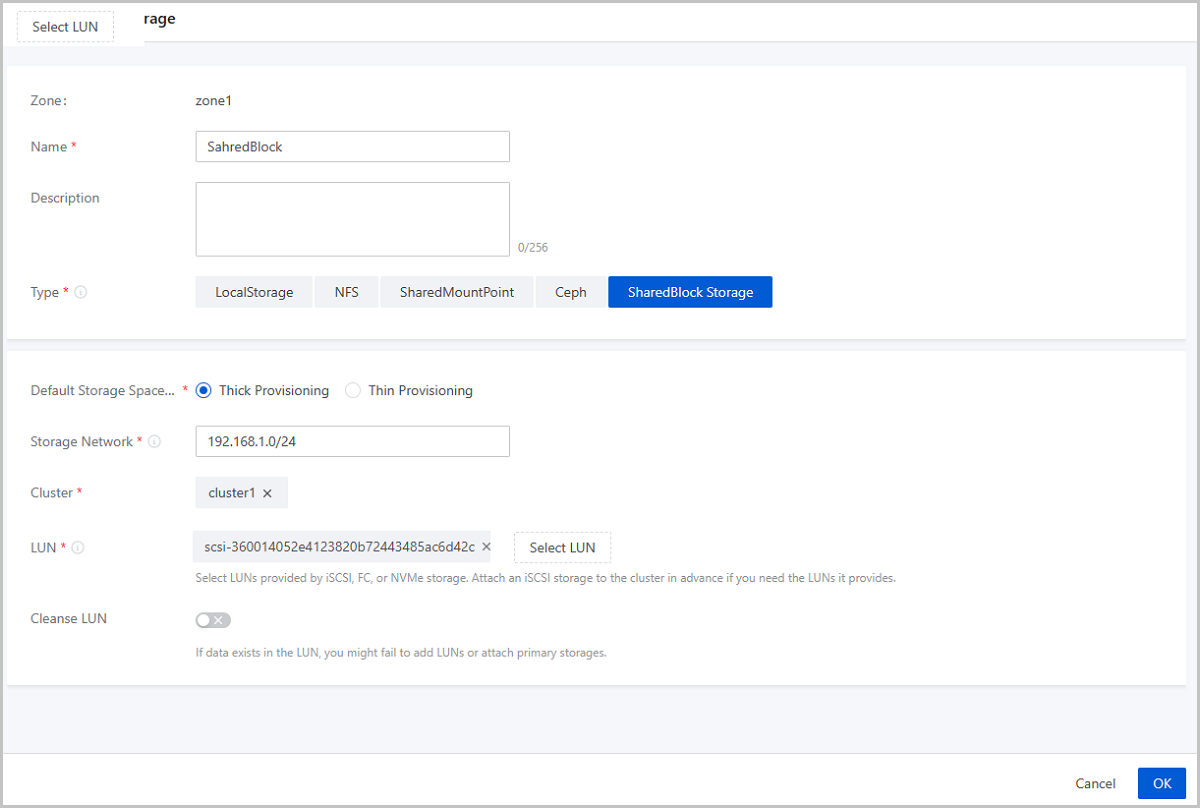
Add a SharedBlock Primary Storage
- Zone: By default, the current zone is displayed.
- Name: Enter a name for the primary storage.
The name must be 1 to 128 characters in length and can contain Chinese characters, letters, digits, spaces, hyphens (-), underscores (_), periods (.), parenthesis (), colons (:), and plus signs (+) and cannot begin or end with spaces.
- Description: Optional. Enter a description for the primary storage.
- Type: Select SharedBlock.Note:
- SharedBlock primary storage uses LUN devices for storage and can work with ImageStore image storage.
- You can add LUN devices online.
- Currently, SharedBlock primary storage supports two shared access protocols: iSCSI, FC, and NVMe-oF.
- Default Storage Space Allocation Strategy: Select a
storage space allocation strategy, including thick provisioning and thin
provisioning.
- Thick Provisioning: Allocates the required storage space in advance to provide sufficient storage capacities and to ensure storage performance.
- Thin Provisioning: Allocates storage spaces as needed to achieve a higher storage utilization.
- Storage Network: Enter the storage network specified
for the shared storage. The storage network can be the management network of
the management node. You need to specify a storage network if you choose
iSCSI or FC protocol.Note:
- If you have a dedicated storage network, enter its CIDR.
- We recommend that you plan an independent storage network in advance to avoid potential risks. If you do not have an independent storage network, enter the network address according to your actual needs.
- The Cloud uses the storage network to check the health status of VM instances.
- Cluster: Select a cluster to which the SharedBlock primary storage is attached.
- LUN: Select one or more LUN devices as needed. Here
you need to enter the disk unique identifier.Note:
- LUNs are provided by iSCSI, FC, or NVMe storage. Make sure that the compute node is connected with the iSCSI, FC, or NVMe storage properly, and is added to the Cloud.
- To use LUNs provided by an iSCSI storage, attach the iSCSI storage to the cluster you select for the primary storage in advance.
- Cleanse LUN: Optional. Determine whether to cleanse
LUN devices. By default, LUN devices are not cleansed.
- If you choose to cleanse LUN devices, the residual data, such as file systems, RAID, or signatures of partition tables in the LUN devices will be forced to clean up.
- If data exists in your LUN devices, and you do not cleanse the devices, you will fail to add LUN devices or attach primary storage.
- The LUN devices to be added cannot have partitions. Otherwise, you will fail to add the devices.
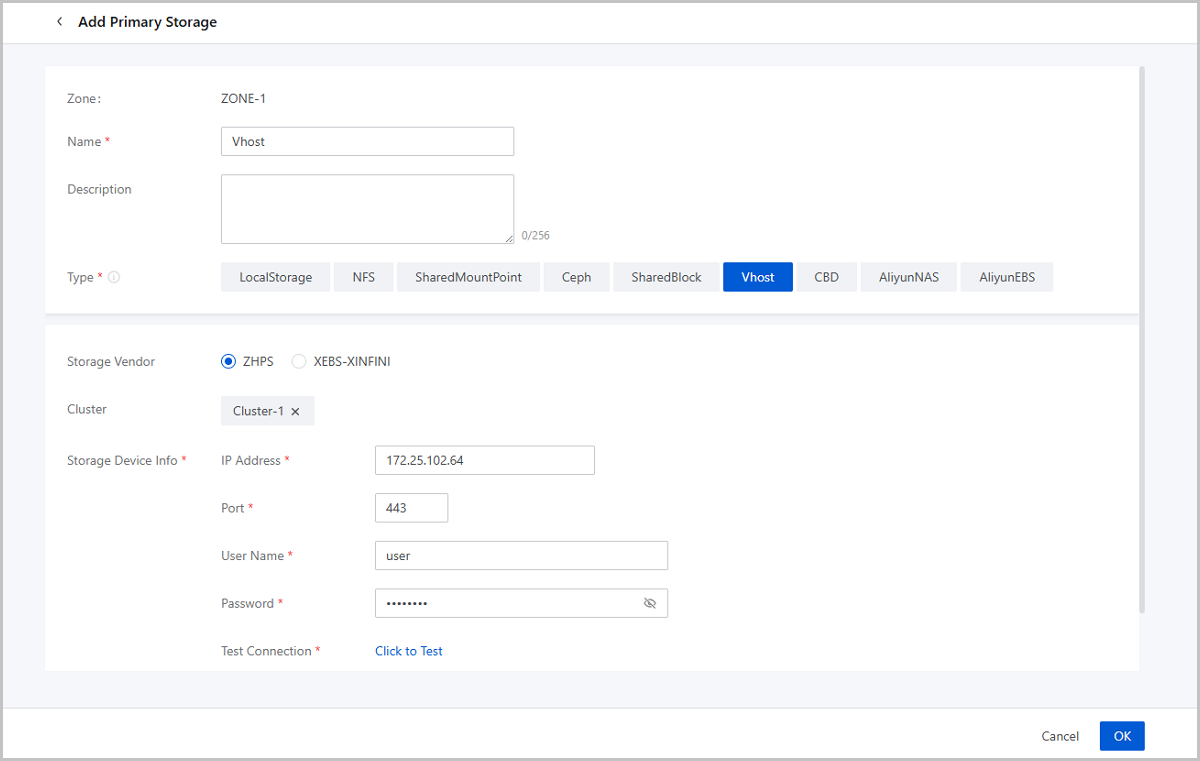
Add a Vhost Primary Storage
- Zone: By default, the current zone is displayed.
- Name: Enter a name for the primary storage.
The name must be 1 to 128 characters in length and can contain Chinese characters, letters, digits, spaces, hyphens (-), underscores (_), periods (.), parenthesis (), colons (:), and plus signs (+) and cannot begin or end with spaces.
- Description: Optional. Enter a description for the primary storage.
- Type: Select Vhost.Note: Vhost
primary storage uses vhost-user mode to connect with high-performance
SSD distributed storage, and can work with ImageStore image
storage.
- Vendor: Select the vendor of the Vhost storage. Currently, ZHPS and XEBS-XINFINI are supported
- Cluster: Optional. Select a cluster to which the Vhost primary storage is attached.
- Storage Device Info: Enter storage device
information. The parameters that you need to set depend on the storage
vendor.
- If the vendor is ZHPS, set the following parameters:
- IP Address: Enter the Vhost management IP address.
- Port: Enter the port of the Vhost management IP address.
- Username: Enter the username of the Vhost management IP address.
- Password: Enter the password corresponding to the username.
- Test Connection: Test the connectivity of the IP address and obtain the storage pool information.
- Storage Pool: Specify a storage pool. Make sure that a storage pool is already available in the storage cluster.
- If the vendor is XEBS-XINFINI, set the following
parameters:
- IP Address: Enter the Vhost management IP address and port. You can add multiple IP addresses. To ensure security, we recommend that you add 2 or more addresses.
- Token: Enter the Vhost token.
- Test Connection: Test the connectivity of the IP address and obtain the storage pool information.
- Storage Pool: Specify a storage pool. Make sure that a storage pool is already available in the storage cluster.
- If the vendor is ZHPS, set the following parameters:
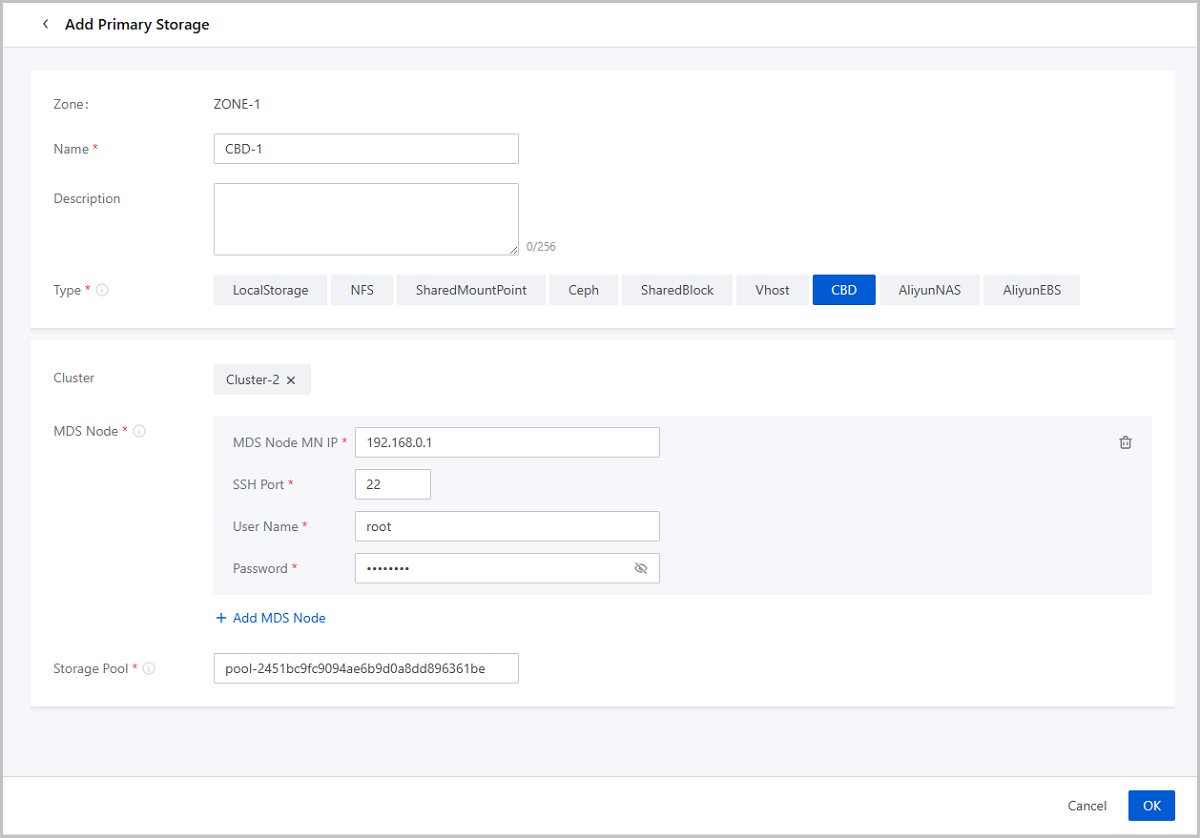
Add a CBD Primary Storage
- Zone: By default, the current zone is displayed.
- Name: Enter a name for the primary storage.
The name must be 1 to 128 characters in length and can contain Chinese characters, letters, digits, spaces, hyphens (-), underscores (_), periods (.), parenthesis (), colons (:), and plus signs (+) and cannot begin or end with spaces.
- Description: Optional. Enter a description for the primary storage.
- Type: Select CBD.
- Cluster: Select a cluster to which the primary storage is attached.
- MDS Node:
- MDS Node MN IP: Enter the management IP address of the MDS node.
- SSH Port: Enter the port of the MDS management IP address. Default: 22.
- Username: Enter the username.
- Password: Enter the password corresponding to the username.
- Storage Pool: Enter the pool name after creating the storage pool on the storage side in advance.
Manage a Primary Storage
On the main menu of ZStack Cube Ultimate, choose . Then, the Primary Storage page is displayed.
| Action | Description |
|---|---|
| Add Primary Storage | Add a primary storage to the Cloud. |
| Edit Primary Storage | Edit the name and description of the primary storage. |
| Enable Primary Storage | Enable the disabled primary storage. |
| Disable Primary Storage | Disable the primary storage. After the primary storage is disabled, you cannot use it to create VM instances, volumes, or snapshots. However, existing resources are not affected. |
| Reconnect Primary Storage | Reconnect the primary storage. This action will
update the storage information about the primary storage.Note: If
any host can connect properly to the primary storage, the status
of the primary storage will be Connected. |
| Enter Maintenance Mode | Place the primary storage in maintenance mode.Note:
|
| Set Ceph Enterprise Access Token | Add or modify an access token for the Ceph Enterprise storage. |
| Create Volume | Create a volume on the primary storage. Then,
this volume will be an instantiated volume. Note: Shared volumes now
support only Ceph and SharedBlock primary
storage. |
| Attach Cluster | Attach the primary storage to a cluster. Note
that one cluster can have multiple primary storage attached. The following are primary storage of
the same type that a cluster can have:
The following are
combinations of primary storages that a cluster can
have:
|
| Detach Cluster | Detach the primary storage from a cluster.Note:
If you detach a primary storage from a cluster, note the
following:
If you detach a primary storage from an elastic
baremetal cluster, note the following:
|
| Delete Primary Storage | Delete the primary storage. Note: When you delete
a primary storage, note the following:
|
| Clean up Data | Clean up original data reserved during the migrations across Ceph primary storage, the migrations across NFS primary storage, and the migrations across SharedBlock primary storage. To perform this action, go to the Data Cleanup tab of the primary storage details page, and click Cleanup. These data cannot be recovered after cleanup. Please exercise caution. |
| Clean Up Storage Trash | Clean up the trash data save in the recycle bin
of a Ceph primary storage.
|
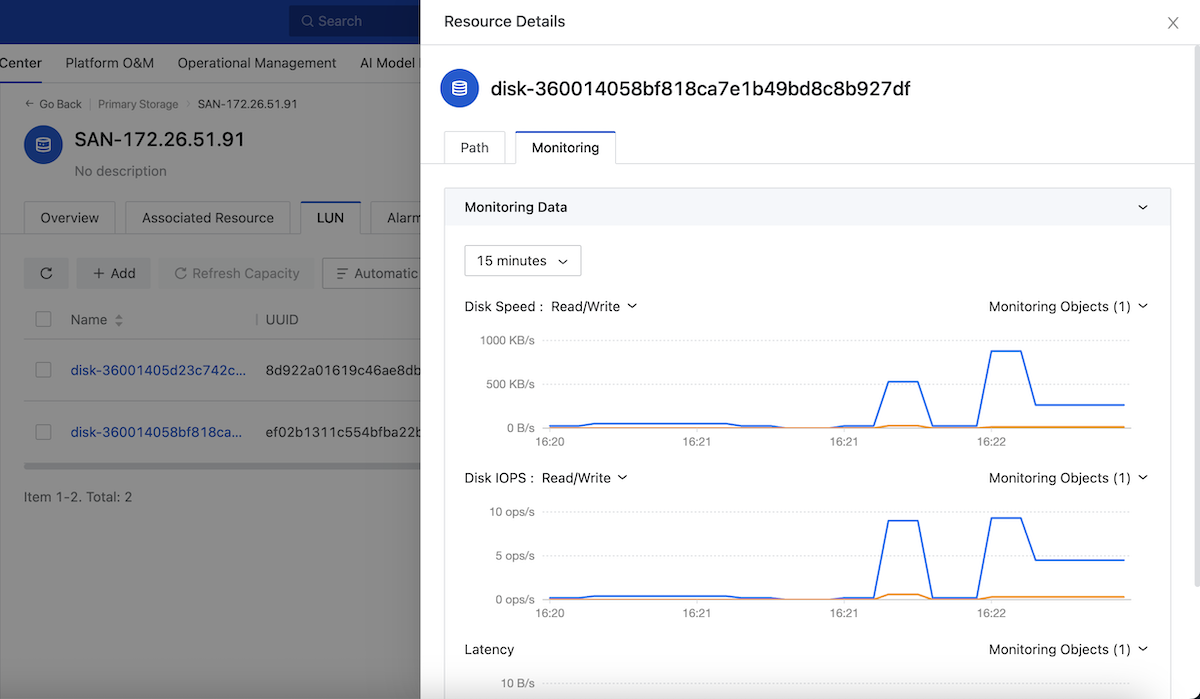
SharedBlock Details
SharedBlock LUN
On the main menu of ZStack Cube Ultimate, choose . On the Primary Storage page, click the name of a SharedBlock primary storage and enter its details page. Then, click LUN to enter the LUN tab.
View LUN Multipath
- You can specify a host to display the path information of the LUN on that host.
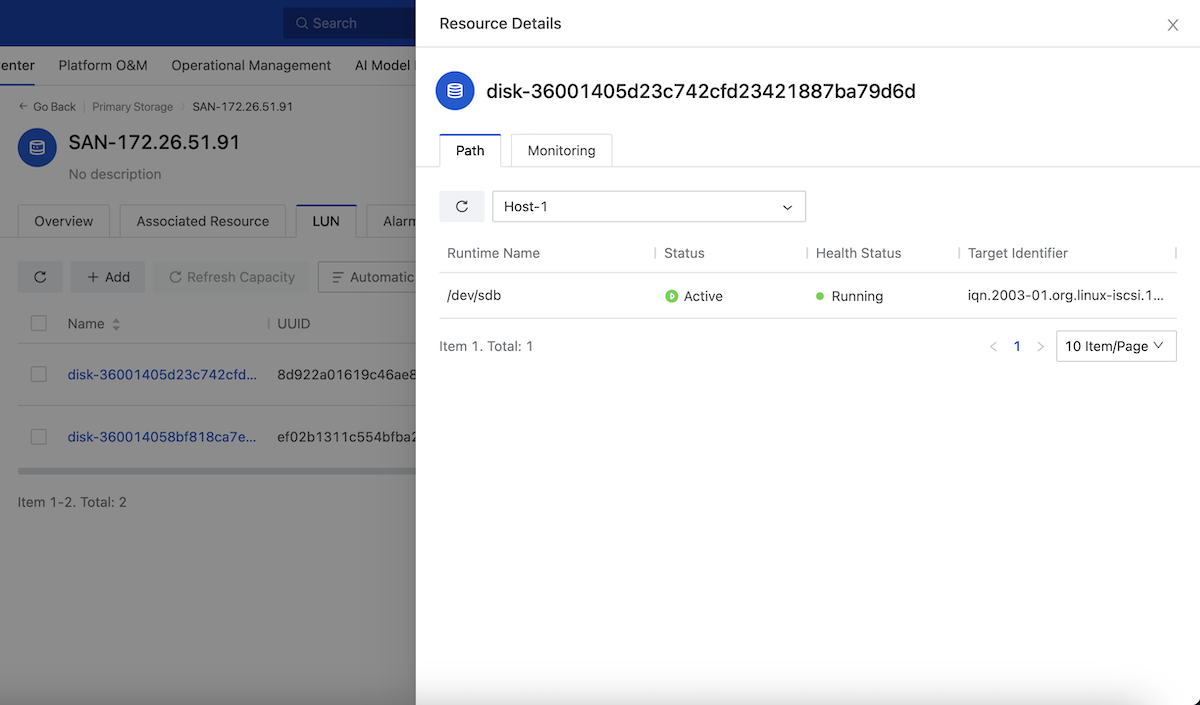
View LUN Monitoring Data
On the LUN tab, click the name of a LUN device. Then, the Resource Details page is displayed. On the Resource Details page, click Monitoring. You can view the monitoring data of the LUN on different hosts, including disk read/write, IOPS, and latency.