Auto-Scaling Group
What is Auto-Scaling Group?
An auto-scaling group is a group of VM instances that are used for the same scenarios. An auto-scaling group can automatically scale out or in based on application workloads or health status of VM instances in the group.
Characteristics
- Auto-Scaling
- Auto-Scaling consists of both scaling-out and scaling-in. When workloads increase, auto-scaling groups automatically scale-out by increasing VM instances in groups. When workloads decrease, auto-scaling groups automatically scale-in by reducing VM instances in groups.
- You can set an alarm notification for an auto-scaling group and specify an endpoint, such as system endpoint, Email, SMS, HTTP Application, DingTalk, and Microsoft Teams, to receive alarm messages.
图 1. Auto-Scaling 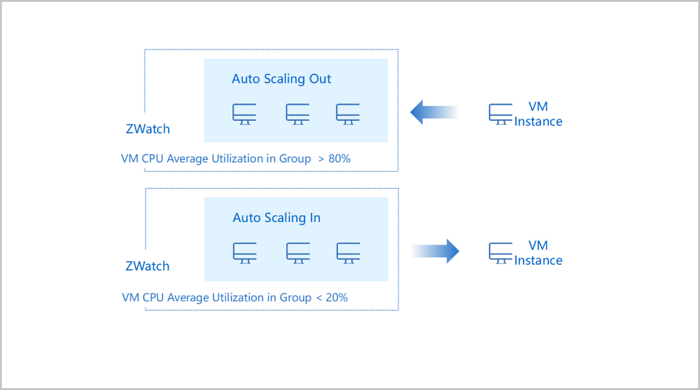
- Auto-Healing
- An auto-scaling group automatically removes unhealthy VM instances and creates new VM instances based on VM health checks. Therefore, the healthy VM in the auto-scaling group are always no less than the minimum VM number you set.
- ZStack Cube Ultimate supports two health check method: load balancer-based health check and VM health check. We recommend that you use the load balancer-based health check if you configure a load balancer for the auto-scaling group.
图 2. Auto-Healing 
Scenarios
- Auto-Scaling-Out:
During Double 11 festival, Spring festival, and other large holidays, some e-commerce companies launch activities to promote sales. This results in a workload surge. In this scenario, auto-scaling-out helps employ more VM instances to lower latency and avoid resource restraints.
- Auto-Scaling-In:
After the holidays, the business workloads of e-commerce companies decrease. In this scenario, auto-scaling-in helps reduce VM instances to avoid resource wastes.
- Auto-Healing:
To ensure a normal operation of companies' core business, the number of running VM instance cannot be less than a certain threshold. In this scenario, auto-healing helps maintain the healthy VM number.
Supplements
- An auto-scaling group automatically scales-out when the VM utilization in
the group exceeds the specified threshold.
- An auto-scaling group does not scale-out when it is cooling down.
- The VM instances in an auto-scaling group are always less than the maximum VM number you set.
- When the VM instances in an auto-scaling group achieve the maximum VM number, the auto-scaling group no longer scales out.
- An auto-scaling group automatically scales out when the VM instances in the
group are less than the minimum VM number.
- The VM instances in an auto-scaling group are always less than the maximum VM number you set.
- When the VM instances in an auto-scaling group achieve the maximum VM number, the auto-scaling group no longer scales out.
- An auto-scaling group automatically scales-in when the VM utilization in the
group is lower than the specified threshold.
- An auto-scaling group does not scale-in when it is cooling down.
- The VM instances in an auto-scaling group are always greater than the minimum VM number you set.
- When the VM instance number in an auto-scaling group is equal to the minimum VM number, the auto-scaling group no longer scales in.
- An auto-scaling group automatically scales-in when the VM instances in the
group exceed the maximum VM number.
- The VM instances in an auto-scaling group are always greater than the minimum VM number you set.
- When the VM instance number in an auto-scaling group is equal to the minimum VM number, the auto-scaling group no longer scales in.
Auto-healing Triggering Conditions
- The unhealthy VM instance is automatically deleted. If the VM instances in the group are less than the minimum VM number after the deletion, the auto-scaling group scales out by creating a new VM instance.
- For auto-scaling groups using load balancer-based health check, you can set
the health check interval.
Method: On the main menu of ZStack Cube Ultimate, choose . Then, you can set Load Balanced Auto-Scaling Group Health Check Interval. Default: 10. Unit: second. Valid values: 10 to 1000.
- For auto-scaling groups using load balancer-based health check, you can set
health check concurrency.
Method: On the main menu of ZStack Cube Ultimate, choose . Then, set Load Balanced Auto-Scaling Group Health Check Concurrency. Default: 10. Valid values: 10 to 1000.
- For auto-scaling groups using VM health check, you can set the interval to
delete unhealthy VM instances.
Method: On the main menu of ZStack Cube Ultimate, set . Then, set Unhealthy Instance Deletion Interval. Default: 30. Unit: Second. Valid values: 10 to 1000.
- For auto-scaling groups using VM health check, you can set the unhealthy
instance deletion concurrency.
Method: On the main menu of ZStack Cube Ultimate, choose . Then, set Unhealthy Instance Deletion Concurrency. Default: 10. Valid values: 10 to 1000.
- You can set the interval to check the instance number in auto-scaling
groups.
Method: On the main menu of ZStack Cube Ultimate, choose . Then, set Instance Number Check Interval. Default: 20. Unit: second. Valid values: 10 to 1000.
Considerations
- Following reasons may result in repeated auto-scaling actions, such as
keeping creating or deleting VM instances:
- New VM instances cannot achieve a healthy status within a certain time after they are created. Then, the auto-healing policy deletes these unhealthy VM instances and creates new VM instances again. This forms a creating-deleting circulation. We recommend that you check the VM health check policy or change a check mechanism in this scenario.
- You set an unreasonable scaling-in or out threshold. For example, you set an auto-scaling group to scale in when the VM CPU utilization average is lower than 40%, and to scale out when the VM CPU utilization average is higher than 45%. Assume that there is one VM instance in the group and its CPU utilization is 60%. This triggers an auto-scaling out. And after the auto-scaling, the group contains two VM instances whose CPU utilization average is 30%, which then triggers an auto-scaling-in. This forms a scaling-out-and-in circulation. We recommend that you reasonable threshold for the scale-out and scale-in policies.
- Following reasons may make an auto-scaling group keep triggering alarms but
do not exercise a scaling-out action:
- You set an unreasonable maximum VM number or scaling-out trigger metric for the auto-scaling group. In this scenario, the VM utilization average is still higher than the scaling-out threshold even the VM instances in the group have achieved the maximum VM number. We recommend reset a reasonable maximum VM number or a scaling-out trigger metric for the group.
- The business application running on the VM instances in an auto-scaling group must be stateless and scalable horizontally.
- We recommend thay you do not manually attach volumes, NICs, or security
groups to VM instances in an auto-scaling group for the group may
automatically release VM instances.
 Note: The VM state information saved (if
any) may loss.
Note: The VM state information saved (if
any) may loss. - Auto-scaling groups are not scalable vertically. This means that the instance offering, network bandwidths, and other configurations of the VM instance in the auto-scaling group are not automatically changed.
- If you want to replace the external monitoring with internal monitoring for the trigger metric, you need to delete the auto-scaling group and recreate one.
Create an Auto-Scaling Group
On the main menu of ZStack Cube Ultimate, choose . On the Auto-Scaling Group page, click Create Auto-Scaling Group. Then, the Create Auto-Scaling Group page is displayed.
- Complete the basic configuration.To complete this step, set the following parameters:
- Zone: By default, the current zone is displayed.
- Group Name: Enter a name for the auto-scaling
group.
The name must be 1 to 128 characters in length and can contain Chinese characters, letters, digits, spaces, hyphens (-), underscores (_), periods (.), parenthesis (), colons (:), and plus signs (+) and cannot begin or end with spaces.
- Description: Optional. Enter a description for the auto-scaling group.
- Initial VM Count: Enter the initial number of
VM instances in the group.
- If you create an auto-scaling group for the first time, the number of VM instances in the group is equal to the initial VM count you set.
- The initial VM count must be an integer ranging from 1 to 1000. Make sure that the initial VM count is greater than the minimum VM count and smaller than the maximum VM count. Make your configurations as needed.
- Minimum VM Count: Enter the minimum number of
VM instances in the auto-scaling group.
- When a scale-in policy is configured, the number of VM instances in the auto-scaling group must not be smaller than that of the specified minimum VM count.
- The minimum VM count must be an integer ranging from 1 to 1000. Make your configurations as needed.
- Maximum VM Count: Enter the maximum number of
VM instances in the auto-scaling group.
- When a scale-out policy is configured, the number of VM instances in the group must not be greater than that of the specified maximum VM count.
- The maximum VM count must be an integer ranging from 1 to 1000. Make your configurations as needed.
- If you choose to configure the load balancing service (recommended),
set the following parameters:
- Load Balancer: Select a load
balancer.
- Before you can select a load balancer, create it first and then associate one or more listeners with it.
- Listener: Select a listener that is
associated with the load balancer.
- The listener list displays all listeners associated with the load balancer.
- If you select multiple listeners, they listen on their respectively configured ports of VM instances in the auto-scaling group.
- Network: Select an L3 network used
for creating VM instances.
- If you do not use the load balancing service, you can select a VPC network or flat network. Specifically, the VPC network must be attached to a VPC vRouter.
- If you use the load balancing service, the network you select must be included in the backend network of the load balancer.
- Health Check Method: Select a health
check method. We recommend that you choose Load
Balancer.
- VM-based health check: This method checks the health status of VM instances in real time. If a VM instance is detected in stopped, unknown, or deleted state, it is considered to be unhealthy. Then, the VM instance is automatically removed from the auto-scaling group and a new one is created. This ensures the number of healthy VM instances in an auto-scaling group is no less than the specified minimum VM count.
- Load balancer-based health check: This method use the built-in mechanism of the load balancer.
- Health Check Grace Period: Set the
health check grace period after you select the load
balancer-based health check method.
- The health check grace period is a period of time after VM instances in the auto-scaling group are created and booted. During this period, application services related to these VM instances are probably still booting, and the auto-scaling group will not perform load balancer-based health checks. After this period, the health status of the VM instances are monitored based on the health check mechanism of the load balancer.
- The grace period must be longer than 10 seconds. Enter an integer. Unit: second, minute, and hour.
- Load Balancer: Select a load
balancer.
- If you do not configure the load balancing service, set the
following parameters:
- Load Balancer: Leave this field blank.
- Network: Select a private L3
network.Note: Currently, our auto-scaling service offers
auto-scaling capabilities that let you automatically add
or delete VM instances in the scenarios such as VPC
networks and flat networks.
- Health Check Method:
- VM-based health check: This method checks the health status of VM instances in real time. If a VM instance is detected in stopped, unknown, or deleted state,it is considered to be unhealthy. Then, the VM instance is automatically removed from the auto-scaling group and a new one is created. This ensures the number of healthy VM instances in an auto-scaling group is not less than the specified minimum VM count.
- Enable Immediately After Creation: Choose whether to enable the auto-scaling group immediately after creation. By default, the group is not enabled immediately.
图 1. Basic Configuration 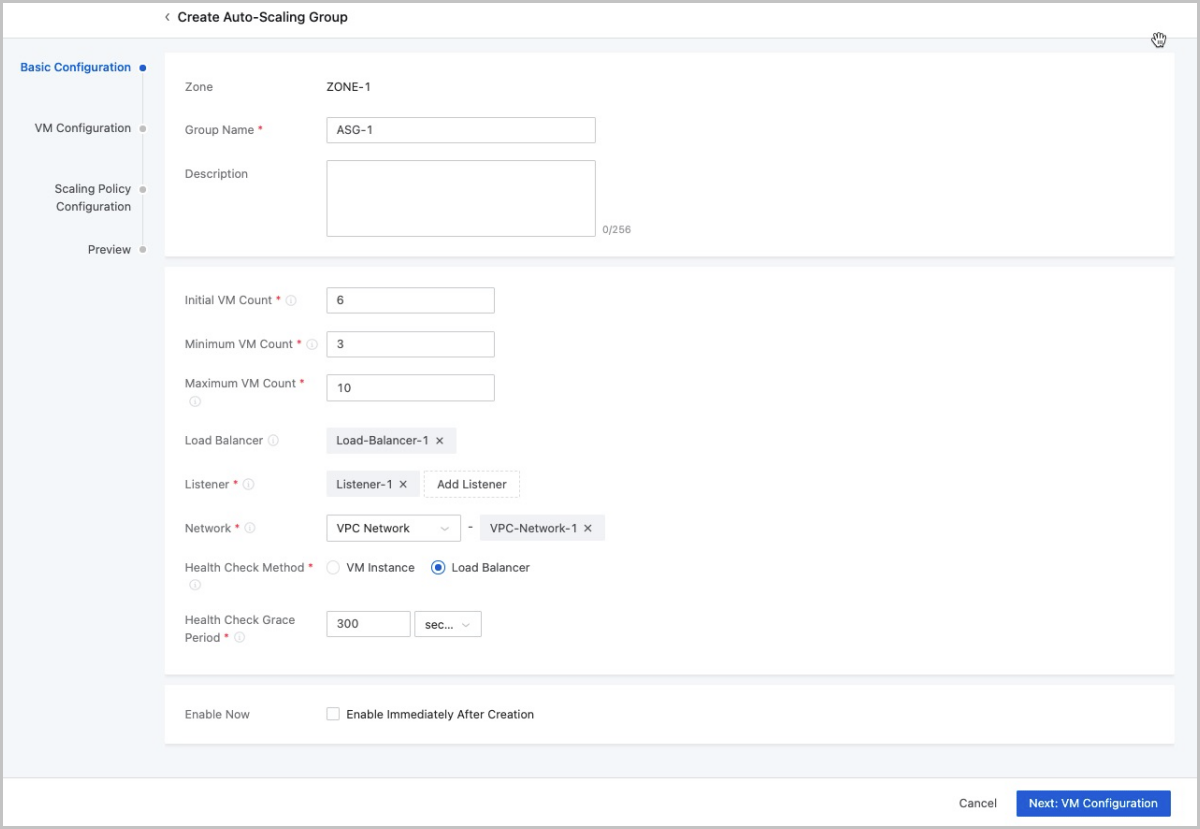
- Complete the VM configuration.To complete this step, set the following parameters:
- VM Name: Enter a name for the VM instance.
- VM instances in an auto-scaling group are named in the format of asg-Auto-Scaling Group Name-VM Name-First Five Digits of VM UUID. "asg" is an abbreviation of "autoscaling group".
- Description: Optional. Enter a description for the VM instance.
- Instance Offering : Select an instance offering for the VM instance.
- Image: Select an image for the VM instance.Note:
- The image of a VM instance in an auto-scaling group can be in qcow2 or raw format.
- If you want to use the internal monitoring metrics, select an image with the agent installed, or install the agent manually by using the User Data script.
- If you modify the image after you create a VM instance, the new image will only be effective for the subsequently created VM instances, and VM instances created before still remain the original image.
- Root Disk Offering: Optional. Select an
existing disk offering for the root volume of the VM instance. The
root disk offering defines the root volume information such as the
size and disk bandwidth.
- If you do not select a disk offering, the size of the root disk offering is consistent with the size of the selected image.
- L3 Network: The L3 network you selected in the previous step is displayed.
- Advanced:
- Data Disk Offering: Select a data disk offering. The data disk offering can be used to directly create data volumes and attach them to the VM instance.
- VM Scheduling Group: Optional. Add
the VM instance to a VM scheduling group.
- A VM instance can be added to only one VM scheduling group. After the addition, the VM instance will be scheduled based on the scheduling policy associated with group.
- The scheduling policies associated with a VM scheduling group can be classified into the following four types: VM Exclusive from Each Other, VM Affinitive to Each Other, VMs Affinitive to Hosts, and VMs Exclusive from Hosts.
- Security Group: Select a security group. VM instances in the group share the same security group rules.
- Console Password: Enter a password (VNC password) for the VM console. Password length: 6 to 18 characters.
- SSH Public Key: Inject an SSH public
key into the VM instance. By doing so, you can SSH in to the
VM instance without a password.
- Before you can inject an SSH public key into the VM instance, install cloud-init for the VM image first. Recommended cloud-init version: 0.7.9, 17.1, 19.4, 19.4, and later.
- User Data: Import User Data. You can
upload user-defined parameters or scripts to customize
configurations for VM instances or to accomplish specific
tasks.
- Before you can import User Data to Linux-based VM
instances, install cloud-init for the VM image
first.The following is a sample script of importing User Data to a Linux-based VM instance.
#cloud-config
users:
 - name: test
   shell: /bin/bash
   groups: users
   sudo: ['ALL=(ALL) NOPASSWD:ALL']
   ssh-authorized-keys:
       - ssh-rsa AAAAB3NzaC1LXCJfjroD1lT root@10-0-0-18
bootcmd:
 - mkdir /tmp/temp
write_files:
 - path: /tmp/ZStack_config
   content: |
       Hello,world!
   permissions: '0755'
fqdn: Perf-test
disable_root: false
ssh_pwauth: yes
chpasswd:
  list: |
      root:word
  expire: False
runcmd:
 - echo ls -l / >/root/list.sh
The sample script above implements the following functions:- Creates a user with the name test for the VM instance and inject it with an ssh-key.
- Writes the /etc/hosts file when the VM instance starts. Meanwhile, creates a /tmp/temp directory, and write in the file under the directory.
- Sets a hostname, enable the user root, allow the user to SSH to the VM instance, and change the root password.
- Runs the
echo ls -l /command.
- Before you can import User Data to Windows-based VM
instances, install Cloudbase-Init for the VM image
first. For detailed information about the
installation method, see Cloudbase-Init
Documentation.The following is a sample script of importing User Data to a Windows-based VM instance.
#cloud-config
write_files:
   -   encoding: b64
       content: NDI=
       path: C:\b64
       permissions: '0644'
   -   encoding: base64
       content: NDI=
       path: C:\b64_1
       permissions: '0644'
   -   encoding: gzip
       content: !!binary |
           H4sIAGUfoFQC/zMxAgCIsCQyAgAAAA==
       path: C:\gzip
       permissions: '0644'
The sample script above creates the b64, b64_1, and gzip files in the C drives when the VM instance starts.
Note: When you use user data, note the following: If an
L2 network has multiple L3 networks within the same
CIDR, only the user data of the first L3 network takes
effect. This will make the internal monitoring of the VM
instance fail to work properly. - Before you can import User Data to Linux-based VM
instances, install cloud-init for the VM image
first.
图 2. VM Configuration 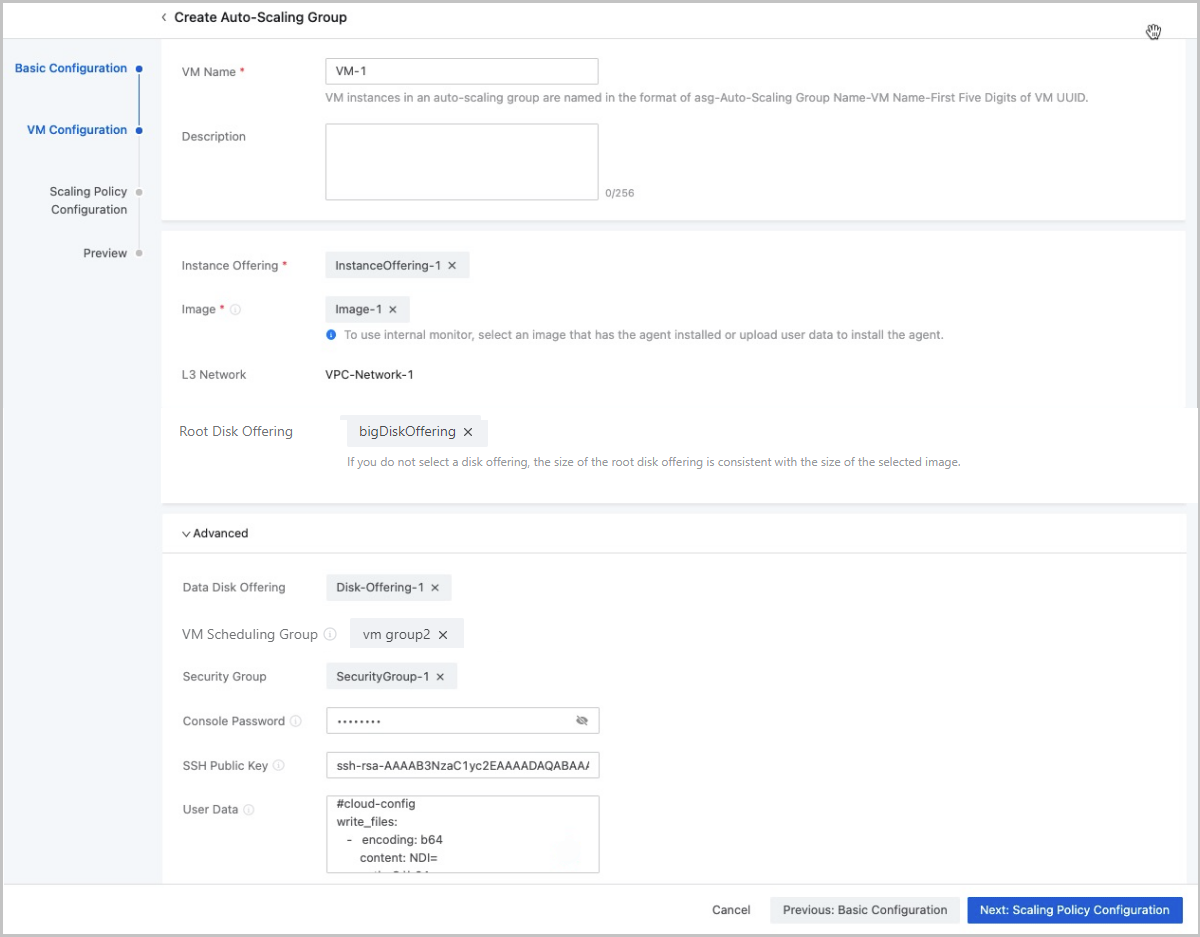
Note: Exercise caution. If you delete resources, such as the instance
offering, image, and network from the template configurations, you might
fail to create the auto-scaling group. - VM Name: Enter a name for the VM instance.
- Complete the scaling policy configuration.The Cloud provides two types of scaling policy: resource-based policy and periodic policy.
- Resource-based Policy: Configure the
scale-out and scale-in policies based on the resource utilization.
This policy type applies to the scenarios with unpredictable
business changes to increase or decrease VM instances
accordingly.
- Trigger Metric: Select a trigger
metric. Available trigger metrics are as follows:
- VM Memory Utilization Average: The sum of the memory utilization of a single VM instance in the auto-scaling group/The total number of VM instances in the auto-scaling group
- VM CPU Utilization Average: The sum of the CPU utilization of a single VM instance in the auto-scaling group/The total number of VM instances in the auto-scaling group
- VM Memory Utilization Average (Agent Required): The sum of the memory utilization of a single VM instance in the auto-scaling group/The total number of VM instances in the auto-scaling group
- VM CPU Utilization Average (Agent Required): The sum of the CPU utilization of a single VM instance in the auto scaling group/The total number of VM instances in the auto scaling group
Note:
- We recommend that you use an agent to monitor the average memory utilization of VM instances. The data monitored through this method is more accurate.
- If you select trigger metrics that require an agent, make sure that you select an image with an installed agent when you create VM instances.
- You can install agents by using the User Data script for Linux-based VM instances. For more information, see the User Data part in this topic.
- If you did not install an agent for internal monitoring but select trigger metrics that require an agent, the auto-scaling group would fail to take effect.
- Scale-out policy:
- Trigger Rule: Set a
trigger condition and the threshold duration.
- The utilization must be an integer ranging from 1 to 100. Unit: %.
- The threshold duration must be an integer that is greater than 0. Unit: second, minute, and hour.
- Addition Policy: Enter
the number of VM instances to be added each time
when a scale-out action is triggered.Note: A
minimum number of 1 VM instance can be added each
time during the scale-out activity. If the value
is too large, the scale-out activity might
fail.
- Cooldown Time: Set the
cooldown time.
- Cooldown time refers to a specified period after a successful scaling activity. During this period, the auto-scaling group is in the locked state and rejects to perform another scaling action.
- The cooldown time must be an integer that is greater than 0. Unit: second and minute.
- Trigger Rule: Set a
trigger condition and the threshold duration.
- Scale-in policy:
- When workloads decrease, auto-scaling groups automatically scale in to avoid resource waste.
- Auto-scaling groups scale in based on the alarm
rules that you set for the groups.
For example, if the average memory utilization of all VM instances in an auto-scaling group keeps lower than 20% for a period of time, a reasonable number of VM instances are removed. This way, the workloads are well balanced at a reasonable level among the VM instances.
To configure the scale-in policy, set the following parameters:- Trigger Rule: Set a
trigger condition and the threshold duration. You
can set to trigger the policy when the utilization
greater than, less than, or equal to a specified
value.
- The utilization must be an integer ranging from 1 to 100. Unit: %. Note that the trigger rule set for the scale-out policy cannot conflict with that for the scale-in policy.
- The threshold duration must be an integer that is greater than 0. Unit: second, minute, and hour.
- Removal Policy: Select a
removal policy and enter the number of VM
instances to be removed each time when a scale-in
action is triggered. Available removal policies
are as follows:
- Most Recent Created VM Instance (default): When the auto-scaling group starts scale-in activities, the latest created VM instances are removed successively at first.
- Earliest Created VM Instance: When the auto-scaling group starts scale-in activities, the earliest created VM instances are removed successively at first.
- VM with Minimum CPU Usage: When the auto-scaling group starts scale-in activities, VM instances with the minimum CPU usage are removed successively at first.
- VM with Minimum Memory Usage: When the auto-scaling group starts scale-in activities, VM instances with the minimum memory usage are removed successively at first.
Note: A minimum number of 1 VM instance can
be removed each time during the scale-in activity.
If the value is too large, the scale-in activity
might fail. - Cooldown Time: Set the
cooldown time.
- Cooldown time refers to a specified period after a successful scaling activity. During this period, the auto-scaling group is in the locked state and rejects to perform another scaling action.
- The cooldown time must be an integer that is greater than 0. Unit: second and minute.
- Alarm Notification: Choose whether to
enable alarm notification. You can configure a monitoring
and alarm mechanism to trigger auto-scaling. By default,
alarm notification is not enabled.
- If enabled, you must specify one or more
endpoints.Endpoint: Specify one or more endpoints.
- You can either select the system endpoint (default) or select a custom endpoint such as email, DingTalk, HTTP application, short message service, and Microsoft Teams.
- If enabled, you must specify one or more
endpoints.
- Trigger Metric: Select a trigger
metric. Available trigger metrics are as follows:
- Periodic Policy: Perform scale-out or
scale-in policies periodically. This policy type applies to the
scenarios with predictable business changes to increase or decrease
VM instances periodically.
- Scale-out policy:
- Scale-out Period: Select a scale-out period. Options: scale-out by month, scale-out by week, scale-out by day, scale-out by hour, and scale-out by minute.
- Execution Time: If you set the scale-out period as scale-out by month, scale-out by week, or scale-out by day, select an execution time for the scale-out activities.
- Addition Policy: Enter the
number of VM instances to be added each time when
the auto-scaling group performs a scale-out
activity.Note: A minimum number of 1 VM instance
can be added each time during the scale-out
activity. If the value is too large, the scale-out
activity might fail.
- Cooldown Time: Set the
cooldown time.
- Cooldown time refers to a specified period after a successful scaling activity. During this period, the auto-scaling group is in the locked state and rejects to perform another scaling action.
- The cooldown time must be an integer that is greater than 0. Unit: second and minute.
- Schedule Effective Time:
Specify the time when the scale-out activities
starts. The auto-scaling group executes scale-out
actions according to the scale-in period since this
time point.Note: You can set the effective time if
you choose to scale-out by month, scale-out by
week, or scale-out by day.
- Scale-in policy:
- Scale-in Period: Select a scale-in period. Options: scale-in by month, scale-in by week, scale-in by day, scale-in by hour, and scale-in by minute.
- Execution Time: If you set the scale-in period as scale-in by month, scale-in by week, or scale-in by day, select an execution time for the scale-in activities.
- Removal Policy: Select a
removal policy and enter the number of VM instances
to be removed each time when the auto-scaling group
performs a scale-in activity. Available removal
policies are as follows:
- Most Recent Created VM Instance (default): When the auto-scaling group starts performing scale-in activities, the latest created VM instances are removed successively at first.
- Earliest Created VM Instance: When the auto-scaling group starts performing scale-in activities, the earliest created VM instances are removed successively at first.
- VM with Minimum CPU Usage: When the auto-scaling group starts performing scale-in activities, VM instances with the minimum CPU usage are removed successively at first.
- VM with Minimum Memory Usage: When the auto-scaling group starts performing scale-in activities, VM instances with the minimum memory usage are removed successively at first.
Note: A minimum number of 1 VM instance can be
removed each time during the scale-in activity. If
the value is too large, the scale-in activity
might fail. - Cooldown Time: Set the
cooldown time.
- Cooldown time refers to a specified period after a successful scaling activity. During this period, the auto-scaling group is in the locked state and rejects to perform another scaling action.
- The cooldown time must be an integer that is greater than 0. Unit: second and minute.
- Schedule Effective Time:
Specify the time when the scale-in activities
starts. The auto-scaling group executes scale-in
actions according to the scale-in period since this
time point.Note: You can set the effective time when
you choose to scale-in by month, scale-in by week,
or scale-in by day.
- Scale-out policy:
图 3. Scaling Policy Configuration 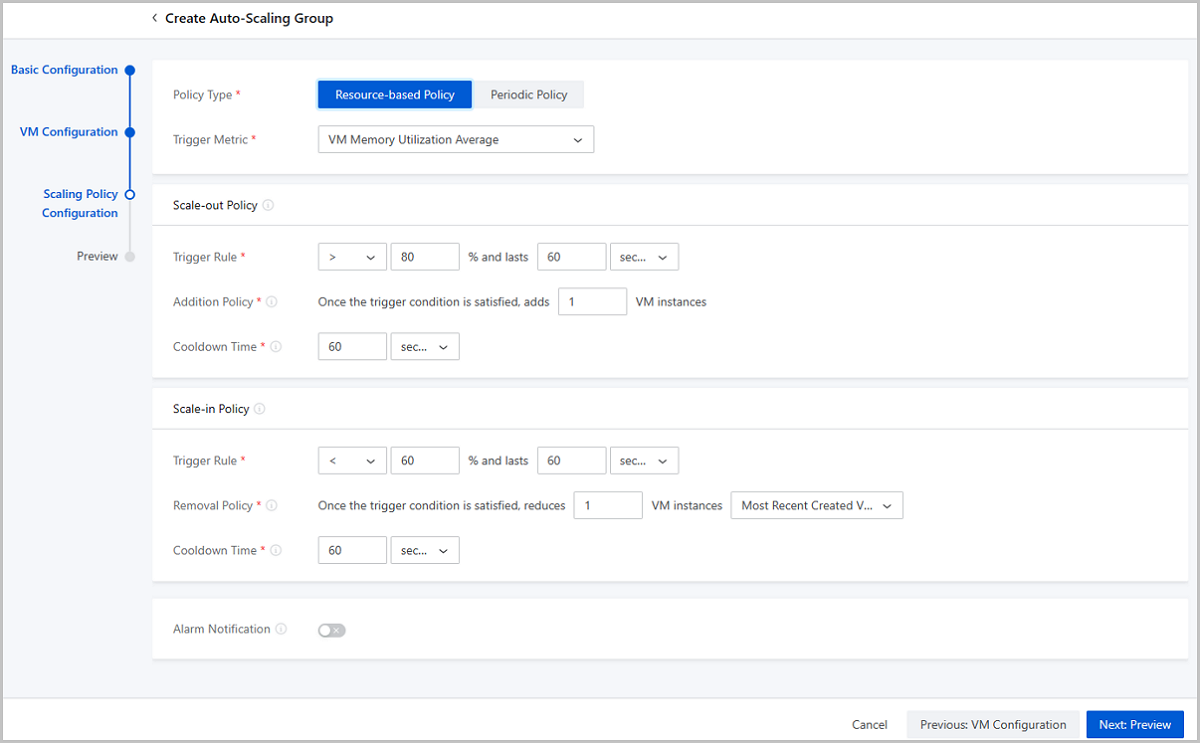
- Resource-based Policy: Configure the
scale-out and scale-in policies based on the resource utilization.
This policy type applies to the scenarios with unpredictable
business changes to increase or decrease VM instances
accordingly.
- Preview the configurations.
Preview the configuration information about the auto-scaling group. You can modify the configurations by clicking the "Edit" icon.
图 4. Preview Configurations 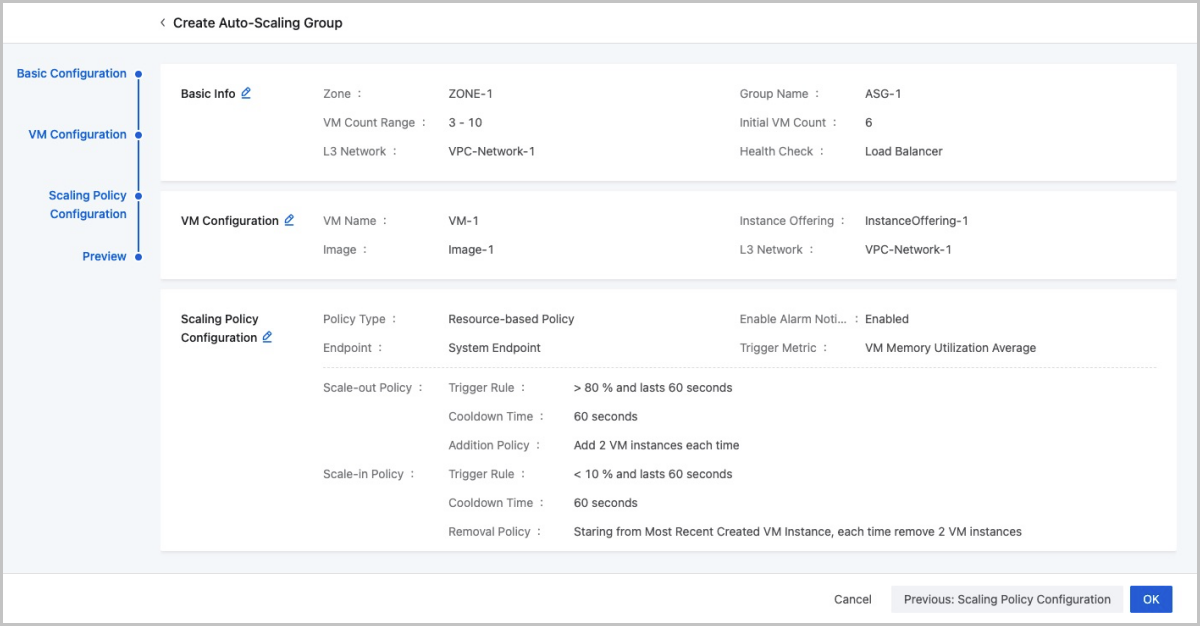
Manage an Auto-Scaling Group
On the main menu of ZStack Cube Ultimate, Choose . Then, the Auto-Scaling Group is displayed.
| Action | Description |
|---|---|
| Create Auto-Scaling Group | Create an auto-scaling group. |
| Edit | Edit the name and description of an auto-scaling group. |
| Enable Auto-Scaling Group | Enable a disabled auto-scaling group. |
| Disable Auto-Sacling Group | Disable an enabled auto-scaling group. |
| Add to VM Scheduling Group | Add all VM instances in the auto-scaling group to a VM scheduling group. After the addition, the scheduling policies associated with the group take effect on the VM instances immediately. |
| Remove from VM Scheduling Group | Remove all VM instances in the auto-scaling group from a VM scheduling group. After the removal, the VM instance will no longer be scheduled based on scheduling policies associated with the group. |
| Change Image | Change the image used to create the auto-scaling
group.Note: The new image is only used to create new VM
instances after the change and does not affect the existing VM
instances. |
| Delete Auto-Scaling Group | Delete an auto-scaling group. |