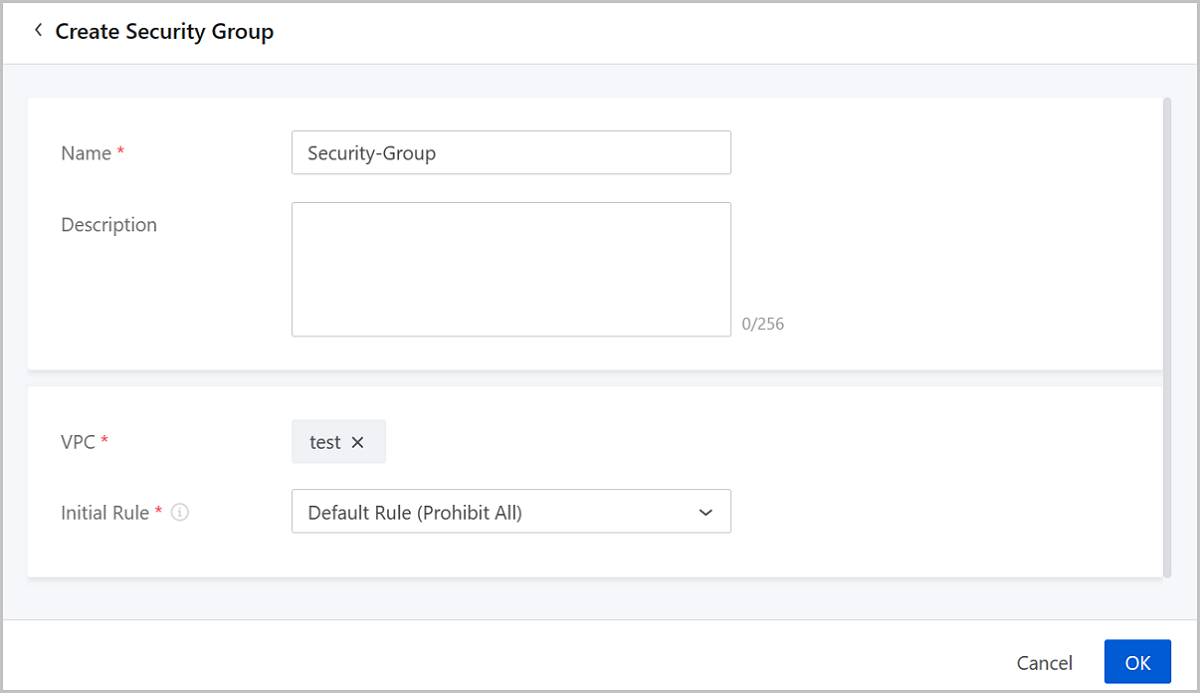
On the main menu of ZStack Cube Ultimate Hybrid Cloud
Management, choose Products > Security Group. On the Security Group page, click Create
Security Group. Then, the Create Security Group
page is displayed.
On the displayed page set the following parameter:
Name: Enter a name for the security group.
Description: Optional. Enter a description for the
security group.
VPC: Choose a VPC.
Initial Rule: Choose an initial rule for the security
group. Following four rules are supported:
Prohibit All: Prohibits ingress and egress flows from all
ports.
Allow All: Allows ingress and egress rules flows from all
ports.
Disable Some Vulnerable Ports: Prohibits only ingress flows from
vulnerable ports, such as 135,137, 139, 42, and 445 (Protocol: UDP or
TCP).
Allow Commonly Used Ports: Allows only ingress flows from
commonly used ports, such as 22, 23, 3389, 443, 80, 6379, 8080, 3306,
and 1433 (Protocol: UDP or TCP).
图 1. Create a Security Group
Manage a Security Group
On the main menu of ZStack Cube Ultimate Hybrid Cloud
Management, choose Products > Security Group. Then, the Security Group page is displayed.
The following lists the actions you can perform on a security group.
Action
Description
Edit Security Group
Edit the name and description of a security
group.
Create Security Group
Create a new security group.
Delete Security Group
Delete a security group.
Note: By default, the
local record of the security group and ECS instances associated
with the security group are deleted. If you want to delete the
security group on Alibaba Cloud, select the checkbox of
Delete Resources on Alibaba Cloud.
Security Group Details
Security Group Rule
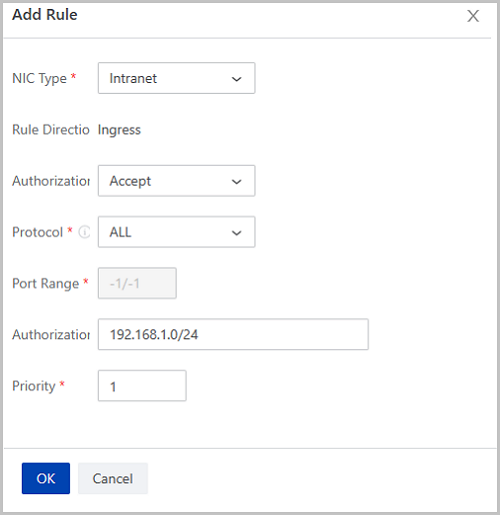
On the Security Group page, click the name of a security group.
Then, the security group details page is displayed. On the Rule tab
of the details page, click Add Rule. Then, the Add
Rule page is displayed.
On displayed page, set the following parameters:
NIC Type: Intranet (Default).
Rule Direction: Displays the direction you add the rule
to.
Authorization Policy: Select an authorization policy.
Valid values: Accept and Reject.
Protocol: Choose a protocol. Valid values: All,
TCP, UDP, ICMP, and GRE. You can choose ALL to
allow mutual communications among ECS instances in the group.
Port Range: Enter the port range the rule takes effect
on.
Note: The port range is affected by the protocol.
ALL: The port range is fixed as -1/-1. This value
means no limitation on ports.
TCP/UDP: The valid port range is 1~65535 by default. Format:
m/n (m must be smaller than n). For example, 1/200 means that the
port range is 1~200. If you enter 200/1, an error occurs.
ICMP: The port range is fixed as -1/-1. This value
means no limitation on ports.
GRE: The port range is fixed as -1/-1. This value
means no limitation on ports.
Authorization Objects: Enter an intranet CIDR the rule
takes effect on.
Note:
Enter a CIDR as needed.
If you enter 0.0.0.0/0, you allow or reject accesses from all IP
addresses. Exercise caution.
Priority: Set a priority for the rule. Valid values:
1-100. 1 represents the highest priority. Default: 1.
 Note: By default, the
local record of the security group and ECS instances associated
with the security group are deleted. If you want to delete the
security group on Alibaba Cloud, select the checkbox of
Delete Resources on Alibaba Cloud.
Note: By default, the
local record of the security group and ECS instances associated
with the security group are deleted. If you want to delete the
security group on Alibaba Cloud, select the checkbox of
Delete Resources on Alibaba Cloud.