Physical Network
What is Physical Network?
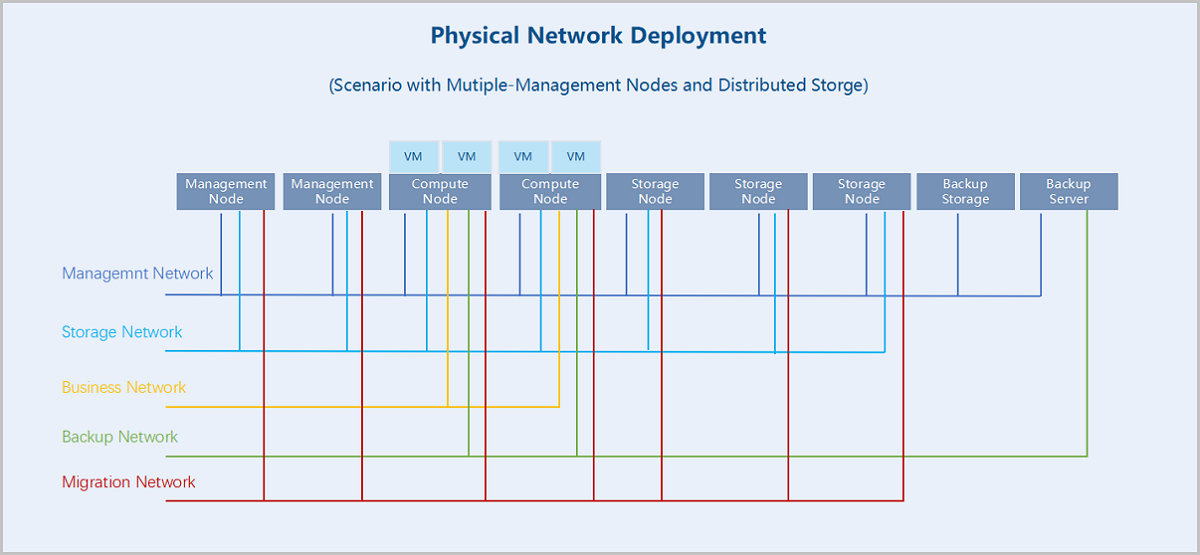
Physical Network: Real networks deployed in a physical environment, which can be divided into different categories based on their application scenarios, such as management networks, storage networks, business networks, backup networks, and migration networks. You can attach tags to a NIC port on ZStack Cube Ultimate to mark which type of network it belongs to according to your physical environment planning.
Physical Network Type
- Management Network: A network used to manage physical resources on
ZStack Cube Ultimate. The management nodes communicate
with the hosts, primary storage, image storage, VPC vRouters, and LB
instances (performance-dedicated) on the Cloud through the management
network. If you deploy a management network, it can be automatically
identified by ZStack Cube Ultimate.
- The management networks you add in comply with the management network definition here.
- The host IP addresses displayed on ZStack Cube Ultimate belong to the management network.
- The host callback IP addresses belong to the management network.
- Storage Network: A network specified for storage services. ZStack Cube Ultimate uses a storage network to get the health status of VM instances. We recommend that you deploy a dedicated storage network to avoid possible risks.
- Business Network: A network that can be added as an L2/L3 network on and attached to VM instances on ZStack Cube Ultimate. A VM instance uses a business network to provide services.
- Backup Network: A network used to back up or recover local business data in a local backup scenario. You need to deploy a backup network if you use Backup Service.
- Migration Network: A network used for VM migrations on ZStack Cube Ultimate.
Characteristics
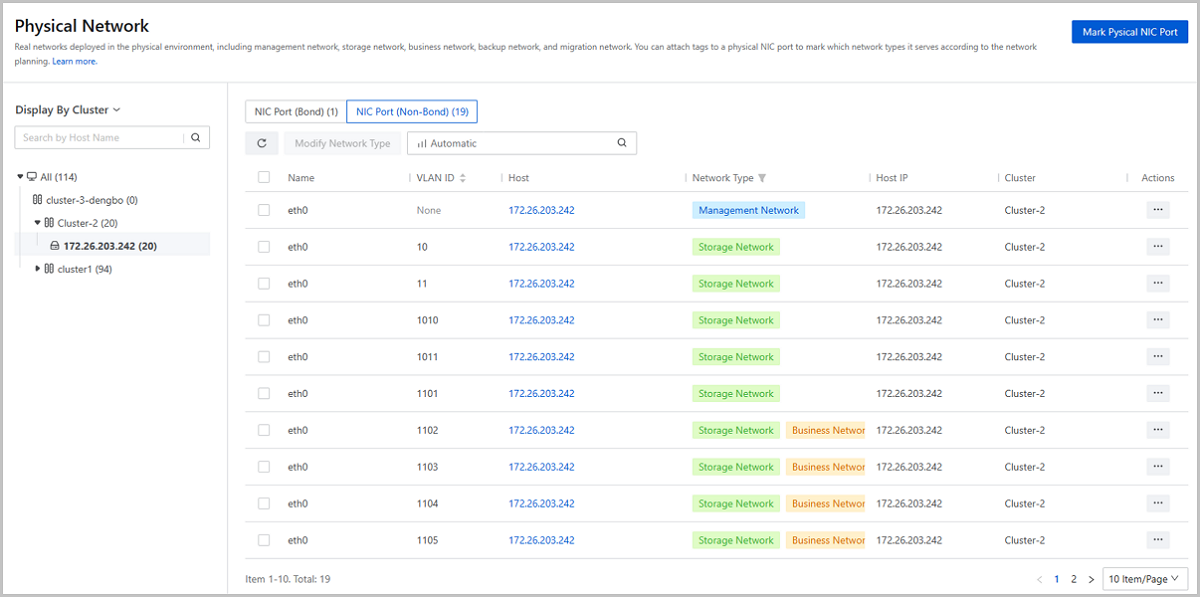
- The Physical Network page displays physical NIC ports (bonds and non-bonds) in fact. These NIC ports realize the network connections between hosts. You manage physical networks by managing these NIC ports.
- You can attach network-type tags to NIC ports according to your physical
environment planning. Management network tags are attached to corresponding
ports automatically by the system and other tags need to be attached by
yourself.
- If you add a management network in , the NIC port of the L2 network it belongs to is attached with a management network tag.
- The NIC port of the network to which a host IP address belongs is attached with a management network tag.
- The NIC port of the network to which a host callback IP address belongs is attached with a management network tag.
- You can add a custom network type to meet flexible needs.
- After you attach tags to corresponding NIC ports, you can view the flow monitoring of different network types, which help you master accurate network workloads more flexibly.
Manage Physical Network
On the main menu of ZStack Cube Ultimate, choose . Then, the Physical Network page is displayed.
You can make the following actions on the Physical Network page: Viewing physical NIC ports, marking NIC ports with network types, and modifying the network types of the NIC ports.
View Physical NIC Port
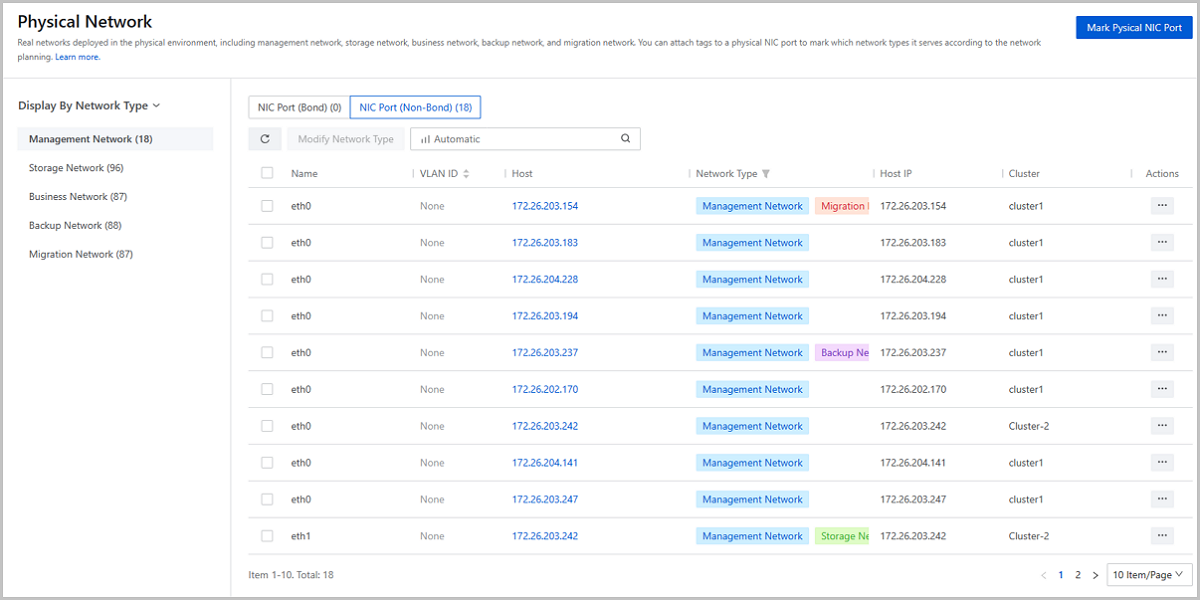
The Physical Network page displays all physical NIC ports (bonds and non-bonds) attached with network-type tags in the current zone. You can view such NIC port information as the NIC port name, VLAN ID, subordinated host, host IP, and network type.
Two display methods are supported: Display by Cluster and Display by Network Type.
- By Cluster: the page displays physical NIC ports in a directory tree according to the clusters and hosts they belong to. You can specify a cluster or host to screen out the physical NIC ports you need.
- By Network Type: the page displays physical NIC ports by network types they belong to. The NIC ports attached with network-type tags are displayed under corresponding categories, including management network, storage network, business network, backup network, and migration network.
 Note:
Note:
- A physical NIC port can be marked as one or more network types, which means a NIC port may appear under more than one category when you choose the display method as By Network Type.
- This page does not display physical NIC ports without any network-type tags. To attach network-type tags to NIC ports, see Mark NIC Port with Network Type.
Mark NIC Port with Network Type
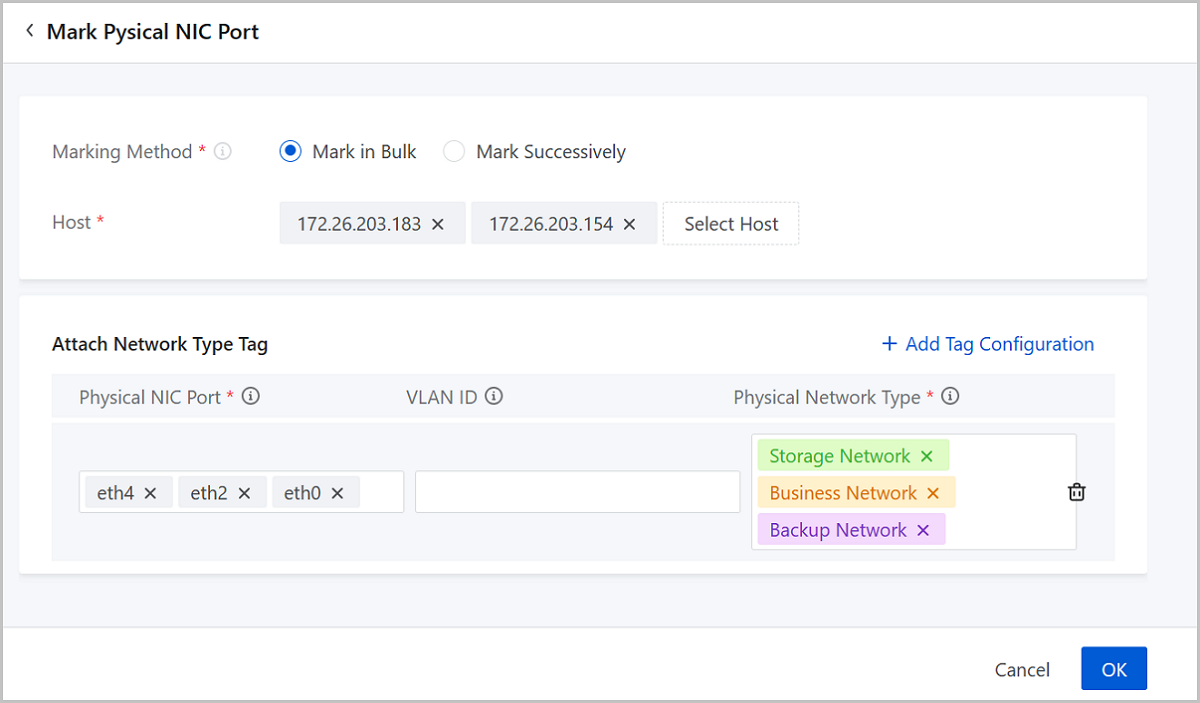
On the Physical Network page, choose Mark Physical NIC Port. Then, the Mark Physical NIC Port page is displayed. Set the following parameters:
- Marking Method: Select a marking method. Valid
values: Mark in Bulk and Mark Successively.If you choose Mark in Bulk, you can attach uniform network-type tags to multiple NIC ports from multiple hosts at one time. Set the following parameters:
- Host: Select hosts that the NIC ports to be marked belong to. You can select more than one hosts here. Then, click Add Tag Configuration.
- Physical NIC Port: Select the NIC ports
to be marked. You can select more than one port.Note:
- Select NIC ports that exist on each of the hosts you select. For example, to mark eth0, make sure that each of the hosts has a NIC port named eth0.
- NIC ports that have had a network-type tag attached are not available here. To add or delete tags to/from these NIC ports, go to their action lists and click Modify Network Type.
- VLAN ID: Optional. Select a VLAN subnet
port slaving to the physical NIC port. If you select a VLAN ID
here, the network-type tags are attached to the corresponding
subnet port.Note:
- You can select one or more VLAN ID at one time. If you select more than one physical NIC ports before, you can only select VLAN IDs that exist on each of the NIC ports. For example, to select VLAN ID 100, make sure that all physical NIC ports you select have this VLAN ID.
- VLAN subnet ports that have had a network-type tag attached are not available here. To add or delete tags to/from them, go to their action lists and click Modify Network Type.
- If you do not set this parameter, the network-type tags will be attached directly to the physical NIC ports you select before.
- Physical Network Type: Select
network-type tags. You can select more than one tags for a NIC
port.Note: The management network tags are automatically
attached to corresponding NIC ports by the system. You
cannot add/delete a management network tag to/from a NIC
port by yourself.
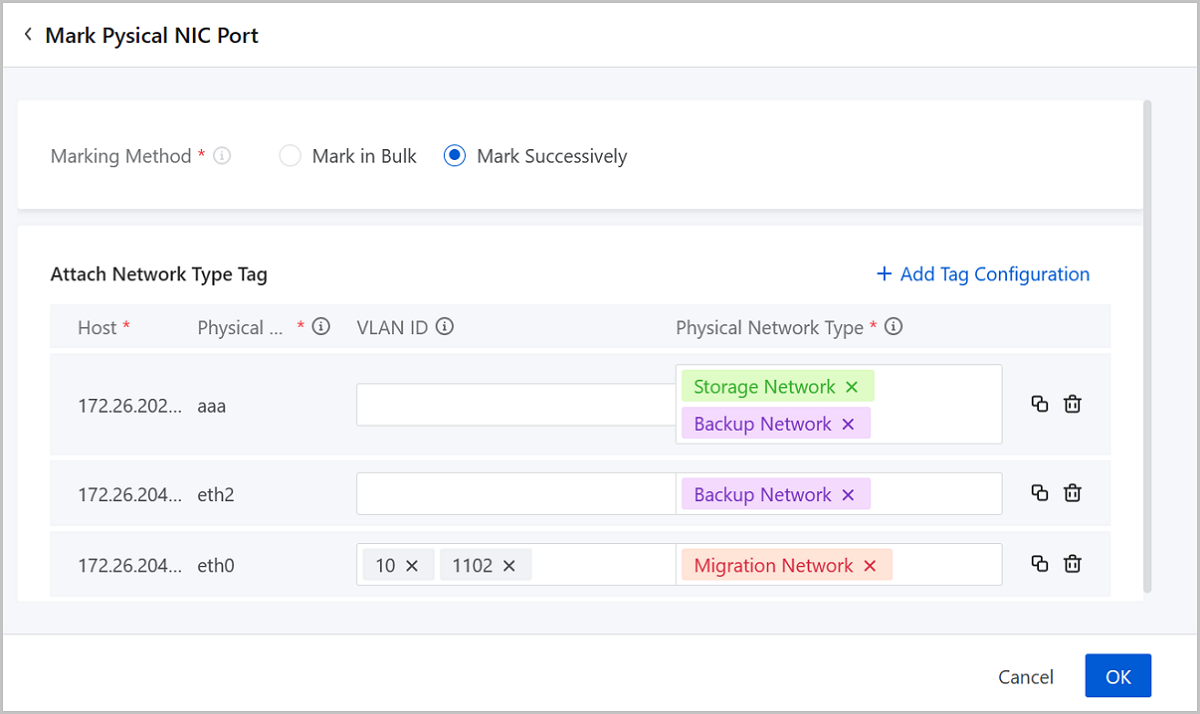
If you choose Mark Successively, you can mark NIC ports one by on and attach tags to only one NIC port from one host at one time. Click Add Tag Configuration and set the following parameters:- Host: Select the host that the NIC port to be marked belongs to. One tag configuration supports one host.
- Physical NIC Port: Select the NIC port to
be marked. One tag configuration supports one NIC port.Note: NIC
ports that have had a network-type tag attached are not
available here. To add/delete tags to/from these NIC ports,
go to their action lists and click Modify Network
Type.
- VLAN ID: Optional. Select a VLAN subnet
port slaving to the NIC port. The network-type tags are attached
to these subnet port only. You can select one or more VLAN ID at
one time.Note:
- VLAN subnet ports that have had a network-type tags attached are not available here. To add/delete tags to/from these ports, go to their action lists and click Modify Network Type.
- If you do not set these parameter, the network-type tags will be attached to the physical NIC port you select before by default.
- Physical Network Type: Select
network-type tags. You can select more than one tags for a NIC
port.Note: The management network tags are automatically
attached to corresponding NIC ports by the system. You
cannot add/delete a management network tag to/from a NIC
port by yourself.
After you finish a tag configuration, you can click Add Tag Configuration to mark next NIC port(s).
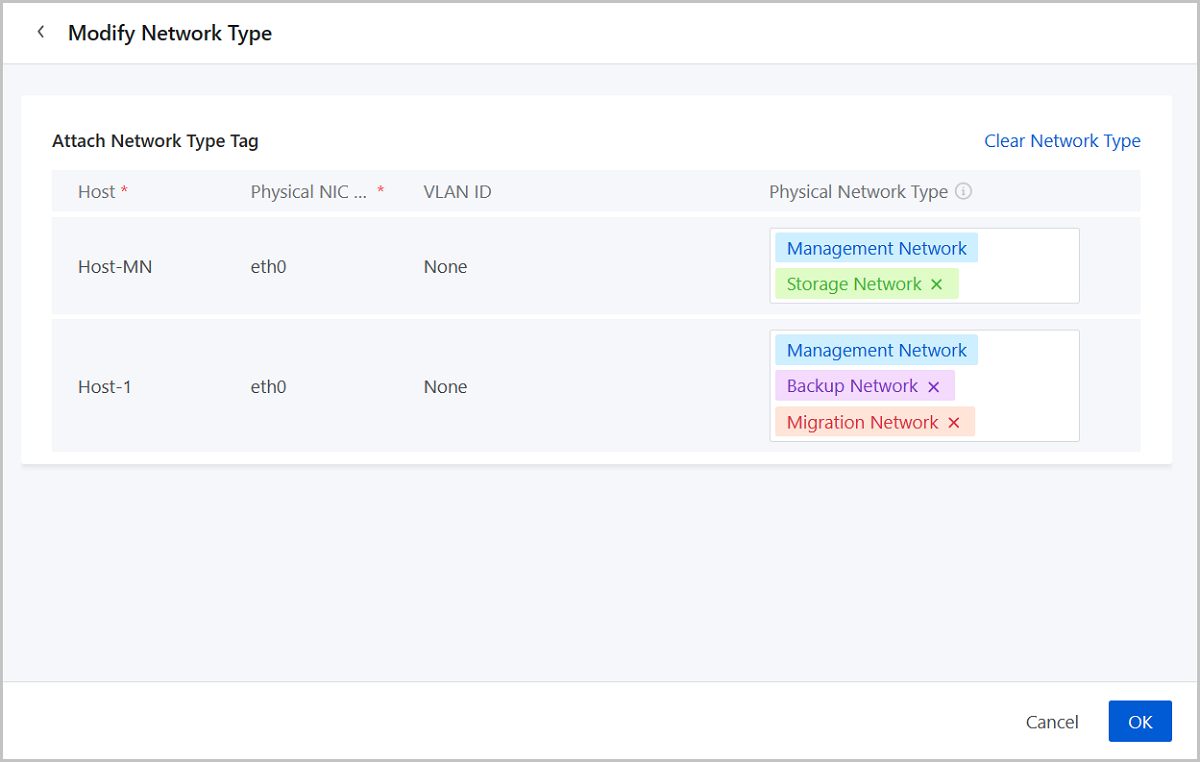
Modify Network Type of NIC Port
Note:
- The management network tags are automatically attached to corresponding NIC ports by the system. You cannot add/delete a management network tag to/from a NIC port by yourself.
- You can add other tags to a NIC port even though it has been marked as management network by the system.
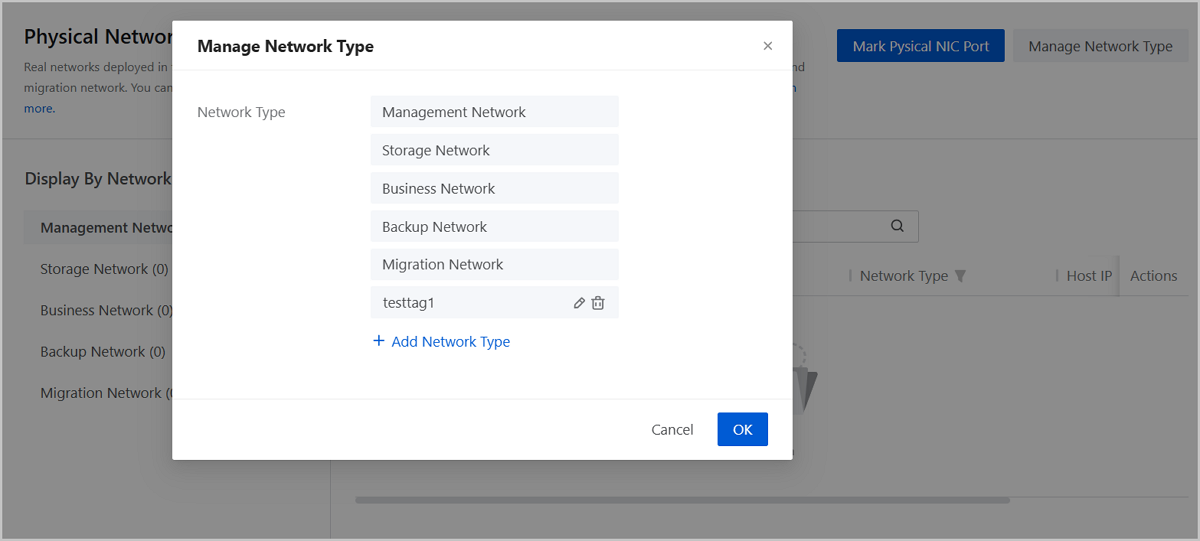
Manage Network Type
Note:
- Custom network type names must not duplicate existing network type names.
- Custom network type names can contain Chinese characters, letters, digits, and spaces and cannot begin or end with spaces.
Physical Network Monitoring
ZStack Cube Ultimate provides visual monitoring that display physical network flows in graphs. You can view the monitoring on the dashboard, the cluster details page, and the host details page.
Dashboard
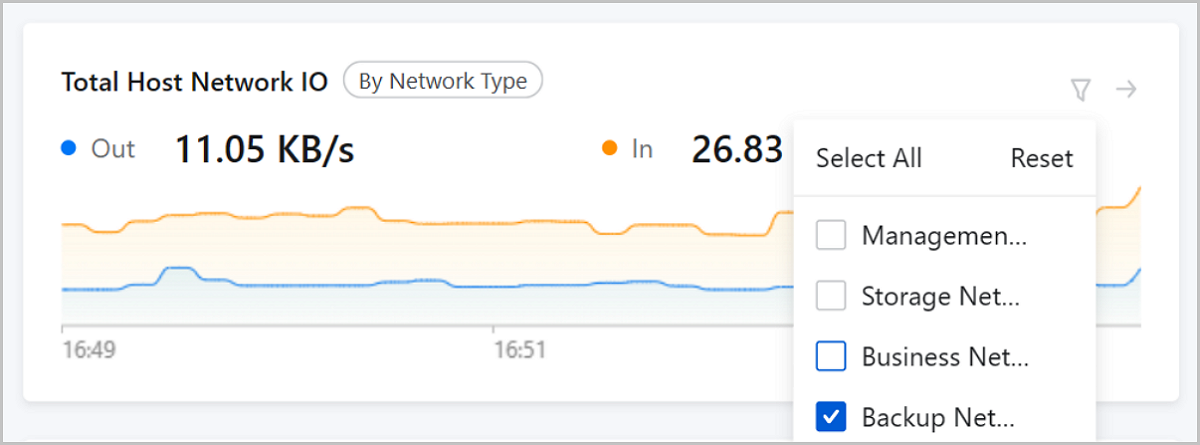
Log in to ZStack Cube Ultimate, the Dashboard page is displayed. If you have logged in, choose Dashboard on the main menu. On the Dashboard page, locate the monitoring chart Total Host Network IO.
- By default, this chart displays the out/in IO sum of all networks in the zone.
- You can specify one or more network types to make the chart display the IO data only of the networks of the specified type. To ensure the accuracy of the monitoring, we recommend that you attach network-type tags to corresponding NIC ports in advance.
Note: If you do not find the chart Total Host Network IO
on your dashboard, click Customize and add this chart
manually.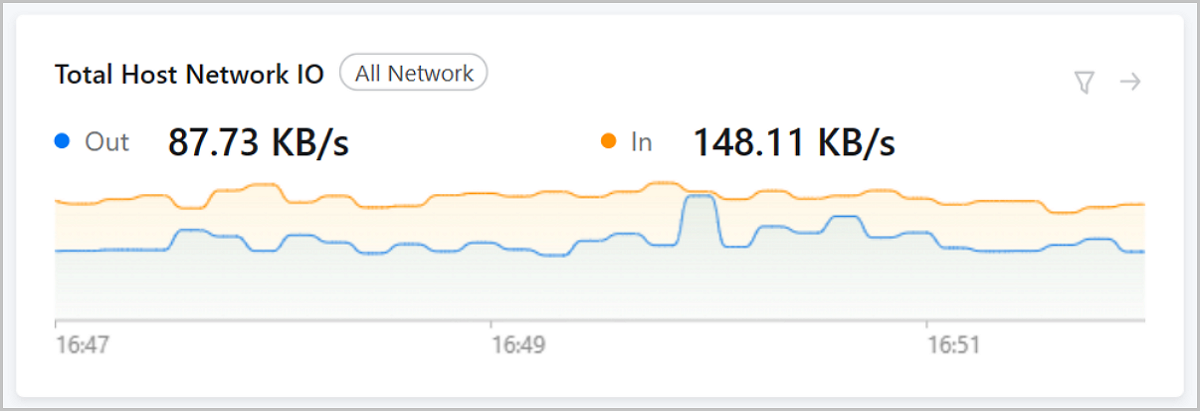
Cluster Details Page
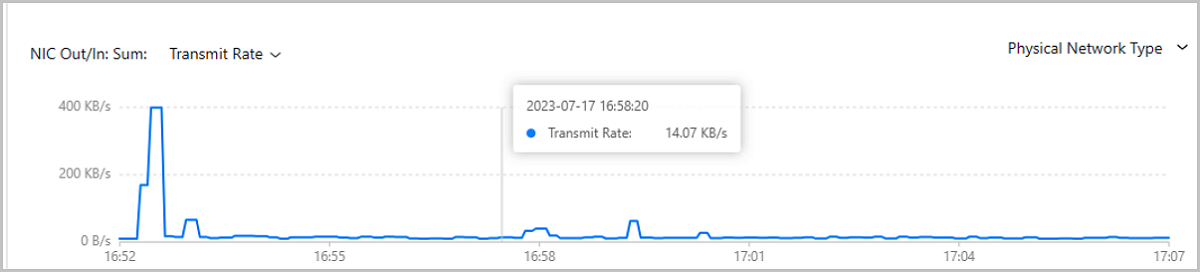
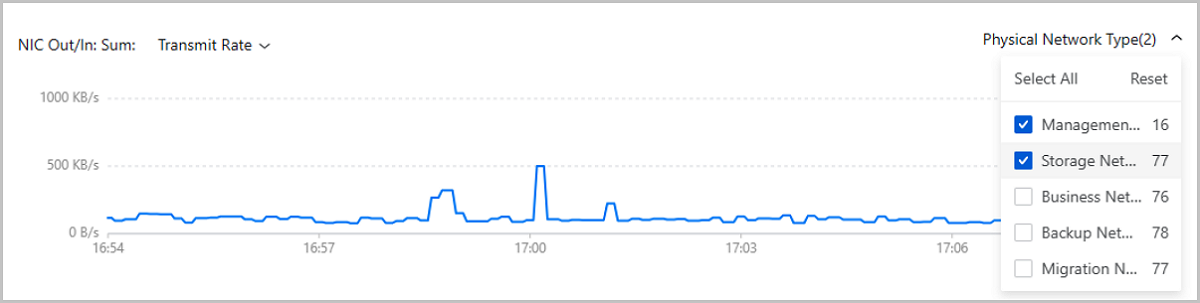
On the main menu of ZStack Cube Ultimate, choose . On the Cluster page, click a cluster name and enter its details page. On the cluster details page, locate the monitoring chart NIC Out/In Sum.
- By default, the chart displays the rate sum of all host NICs.
- You can specify one or more network types to make the chart displays the rate sum only of the NICs that belong to the networks of the specified types. To ensure the accuracy of the monitoring, we recommend that you attach network-type tags to corresponding NIC ports in advance.
Host Details Page
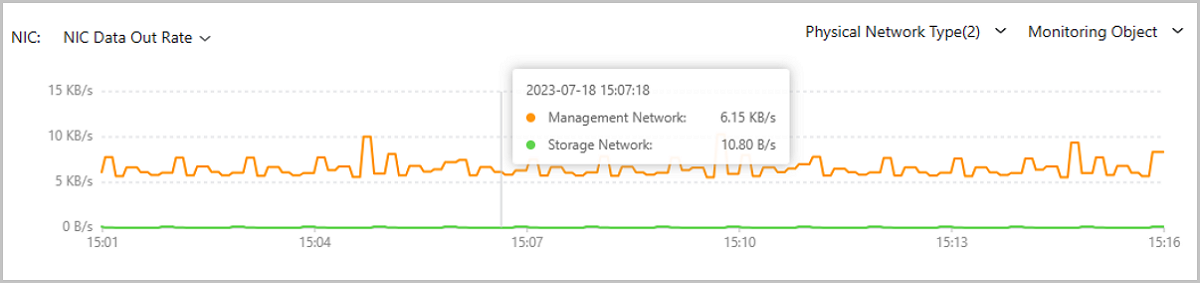
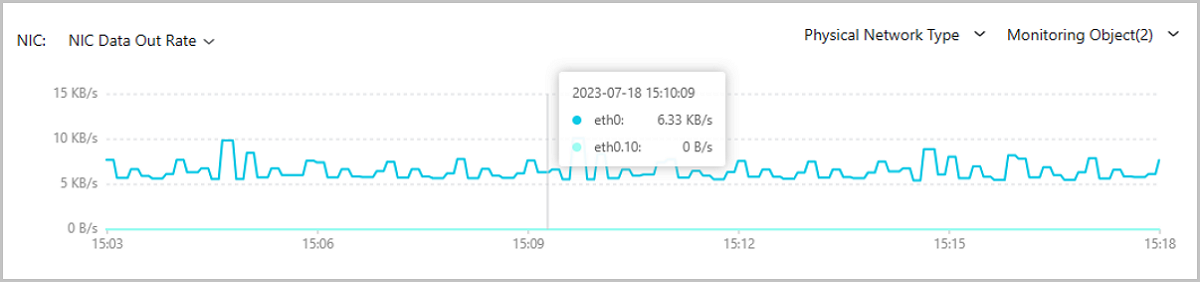
On the main menu of ZStack Cube Ultimate, choose . On the Host page, click a host name and enter its details page. On the host details page, locate the monitoring chart NIC.
- You can specify one or more network types to make the chart display the monitoring data only of the NIC ports that belong to the networks of the specified types. To ensure the accuracy of the monitoring, we recommend that you attach network-type tags to corresponding NIC ports in advance.
- You can specify one or more NICs to make the chart display the monitoring data only of the specified NICs.