Automated O&M
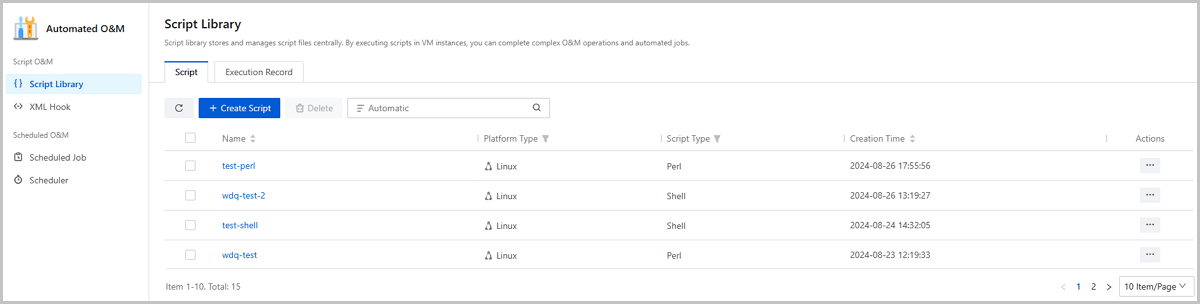
Script Library
What is Script Library
The script library stores and manages script files centrally. By executing scripts on VM instances, you can complete complex O&M operations and automated jobs.
Advantages
- Simple and User-Friendly
- Allows you to conveniently create a script in a visualized way and realize flexible script configurations by adding custom parameters.
- You can include complex commands in a script. By executing this script, VM instances can complete complex operations, thus reducing the difficulty of manual O&M.
- Convenient O&M
- Provides a dedicated page, Script Library, for the central management of multiple scripts. On the Script Library page, you can flexibly create scripts and delete or modify existing scripts.
- A script can be stored in the script library for long-term reuse. In addition, a script can be executed on multiple VM instances simultaneously without interference, thus effectively improving your O&M efficiency on large-scale scenarios.
- Provides detailed script execution records, recording the VM instances that executed this script, execution start time, execution completion time, and execution result, facilitating your operation tracking and troubleshooting.
- Diversity: Supports diversified command types, including Shell, Python, Perl, Bat, and Powershell. You can select a command type as you need.
Create a Script
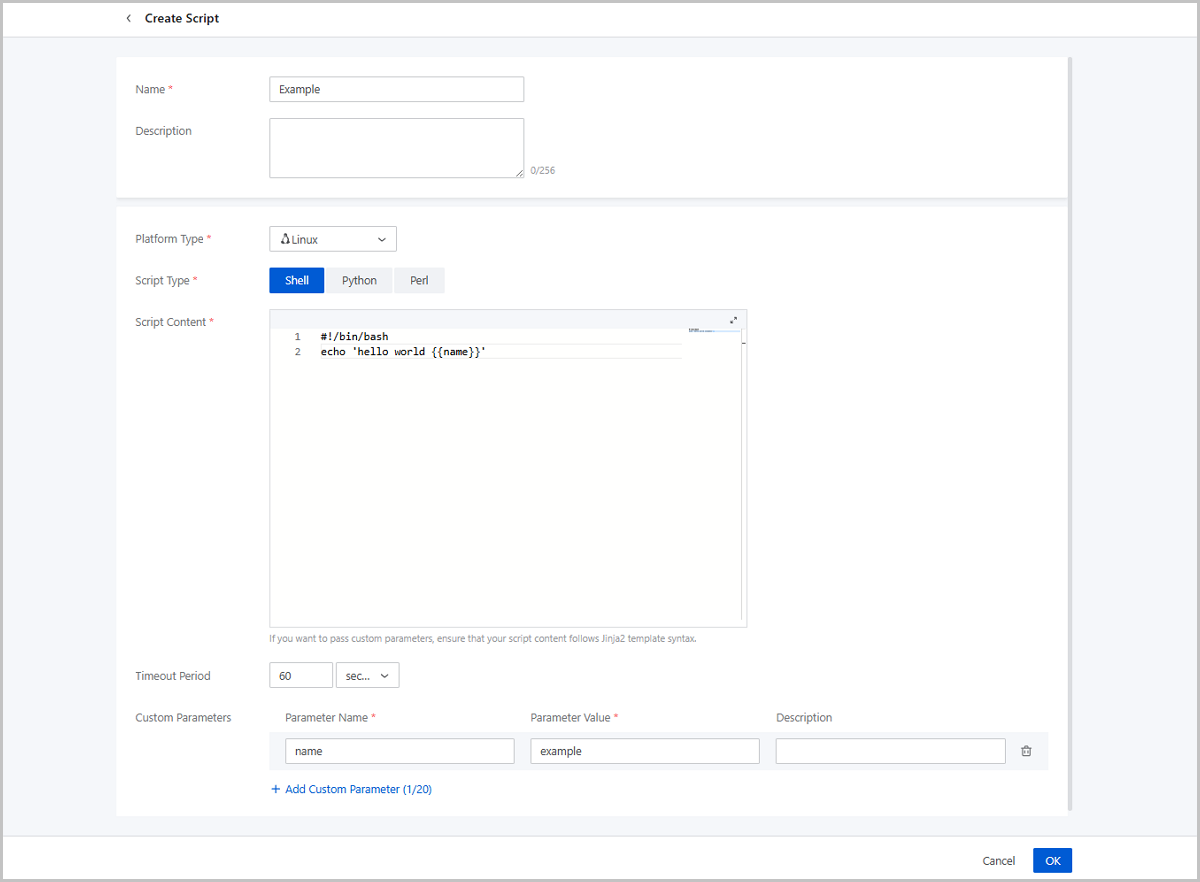
On the main menu of ZStack Cloud, choose . On the Script Library page, click Create Script. Then, the Create Script page is displayed.
- Name: Enter a name for the script. The name must be 1 to 128 characters in length and can contain Chinese characters, letters, digits, spaces, hyphens (-), underscores (_), periods (.), parenthesis (), colons (:), and plus signs (+) and cannot begin or end with spaces.
- Description: Optional. Enter a description for the script.
- Platform Type: Select a platform type. The script can be executed on the VM instances whose operating systems are consistent with this platform type. Currently, two platform types are supported: Linux and Windows.
- Script Type: Select a command type.
- If you set the script platform type as Linux, the following command types are supported: Shell, Python, and Perl.
- If you set the script platform as Windows, the following command types are supported: Bat and Powershell.
- Script Content: Enter the script content. If you want to
pass custom parameters, make sure that your script content follows the Jinja2
template syntax.
 Note: The script content is encoded in Base64 for storage and
transmission to ensure the data security.
Note: The script content is encoded in Base64 for storage and
transmission to ensure the data security. - Timeout Period: Set a timeout period for the script. When you execute this script, if the time consumption exceed this value without completing, this execution will be considered as failed due to timeout. Default value: 60 seconds. Unit: second, minute, and hour.
- Custom Parameter: Optional. If you want to pass custom
parameters to the script, click Add Custom Parameter and
set the following parameters:
- Parameter Name: Enter the parameter name. The name must be 1~64 characters in length.
- Parameter Value: Enter the parameter value. The value must be 1~64 characters in length.
- Description: Optional. Enter the description for the script.
You can add up to 20 custom parameters to a script.
Manage a Script
On the main menu of ZStack Cloud, choose . Then, the Script Library page is displayed.
| Action | Description |
|---|---|
| Create Script | Create a new script. |
| Edit Name and Description | Modify the name and description of the script. |
| Modify Script | Modify the content, timeout period, and custom parameters of the script. |
| Execute Script | Execute the script on specified VM instances.Note:
|
| Delete Script | Delete the script. |
Script Details
Script Execution Record
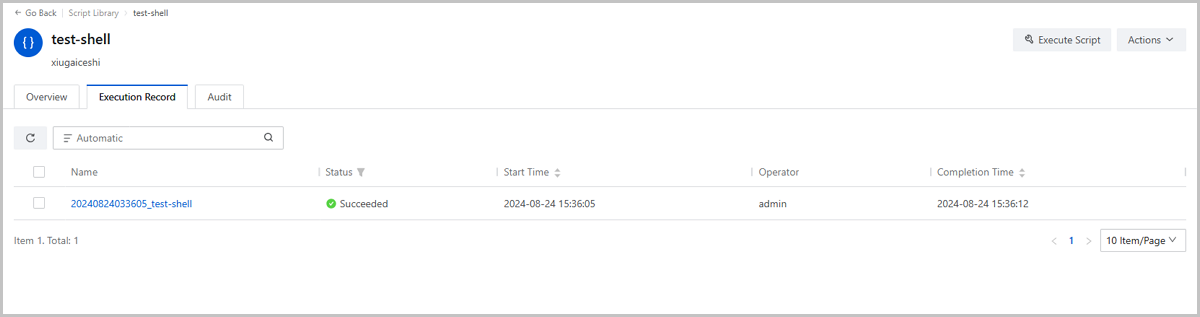
- View execution records of all scripts: On the main menu of ZStack Cloud, choose . On the Script Library page, click Execution Record. Then, you can see execution records of all scripts on this tab page.
- View execution records of a specified script: On the Script
Library page, locate a script and click the script name to enter
its details page. On the details page, click Execution
Record and you can see execution records of this
script.Note: Even if a script is deleted, you can still view its execution
records through the first method.
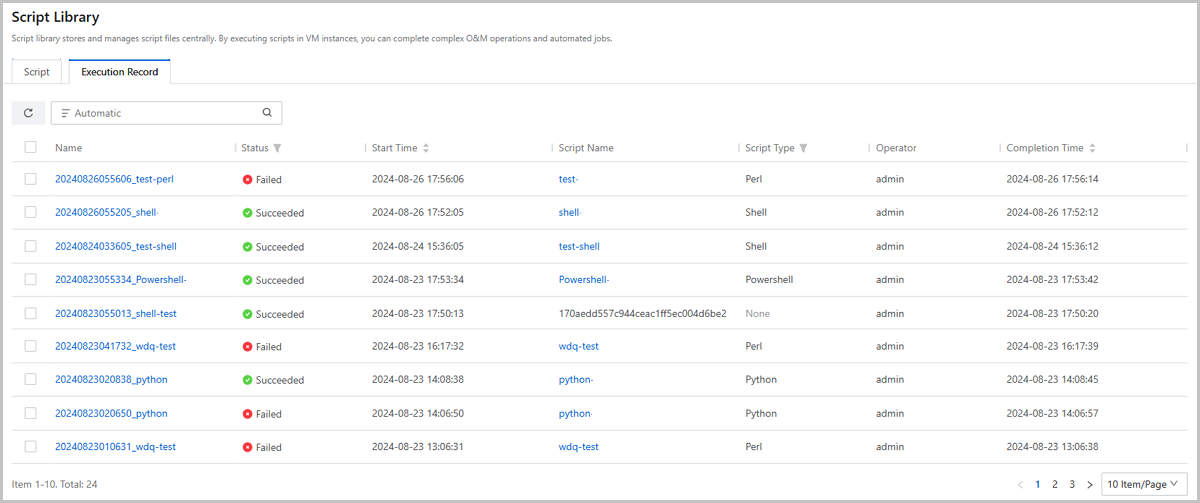
- The Overview page displays the basic information of the
execution record, including status, UUID, script name, operator, start time,
completion time, and execution details on each VM instance.
- If the script has been deleted when you view the execution records, the script name parameter is displayed as the script UUID.
- If execute a script on multiple VM instances in batch, the start time in Overview is the time point that the script is executed on the first VM instance and the completion time in Overview is the time point that the execution is finished on the last VM instance.
- The execution status can be Executing, Succeeded, Failed, or
Abnormal.
- Executing: All or a part of the selected VM instances are running the script.
- Succeeded: Each selected VM instance has run the script successfully .
- Failed: Each selected VM instance failed to run the script.
- Abnormal: A part of selected VM instances run the script successfully while the rest failed to run the script.
- In the Execution Details part, you can view the information of each VM instance that execute the script this time. You can click View Details to view the detailed information of the execution on each VM instance, including the status, start time, completion time of the execution on this VM instance and the response from the VM instance.
图 3. Execution Record - Overview 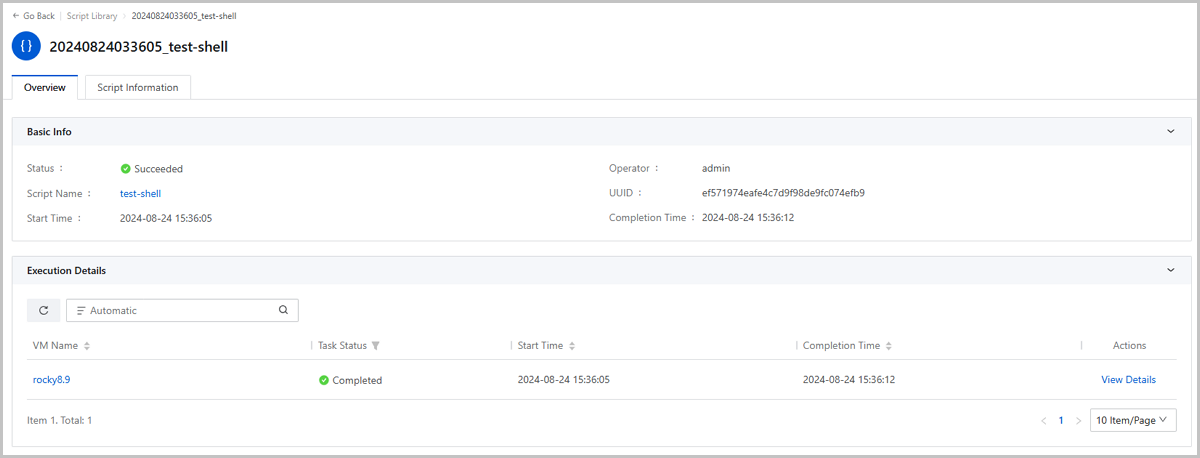
- The Script Information tab page displays the script
configurations at the time the execution record was generated, such as the
script content and custom parameters. You can use these information for
operation tracking and troubleshooting.Note: The configurations recorded on this
page may differ from the script's current configurations and this page can
be only used as a reference for operation tracking.
图 4. Execution Record - Script Information 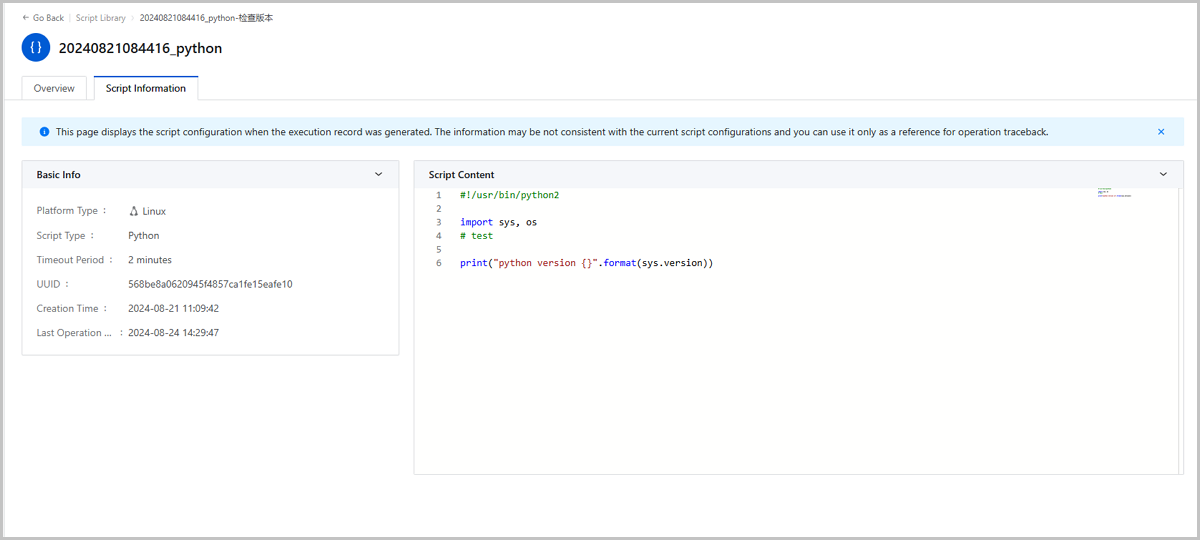
XML Hook
What is XML Hook?
An XML Hook is a script that can flexibly insert or modify parameters in XML files of VM instances. By attaching an XML Hook to a VM instance, you can customize VM configurations and enable specialized functionalities.

Advantages
- Flexibility
- ZStack Cloud manages XML Hooks as separate script files, helping separate temporary or customized configurations from the core logic code. By attaching/detaching XML Hooks to/from VM instances, you can dynamically adjust VM configurations without manually modifying core codes.
- On ZStack Cloud, XML Hooks can be stored long-term and reused. An XML Hook can be attached to multiple VM instances simultaneously, effectively improving O&M efficiency in large-scale scenarios.
- Scalability
By defining and using XML Hooks, you can flexibly modify VM XML files, thus achieving configurations that cannot be directly completed through UI operations. This effectively extends the capabilities of VM instances and helps meet customized requirements, such as modifying QEMU custom parameters and disabling TSO for vNICs.
Considerations
- To use XML Hooks, you must be familiar with VM instance configurations and XML Hook writing rules. If the XML Hook contains syntax errors or leads to configuration errors, the VM instances attached with this XML Hook fail to reboot or start.
- If you need to upgrade the QEMU/Libvirt or a VM instance which has an XML Hook attached, confirm in advance whether the expected QEMU/Libvirt version is compatible with the XML Hook to prevent the VM reboot/start failure because of XML Hook incompatibility after the upgrade.
Create an XML Hook
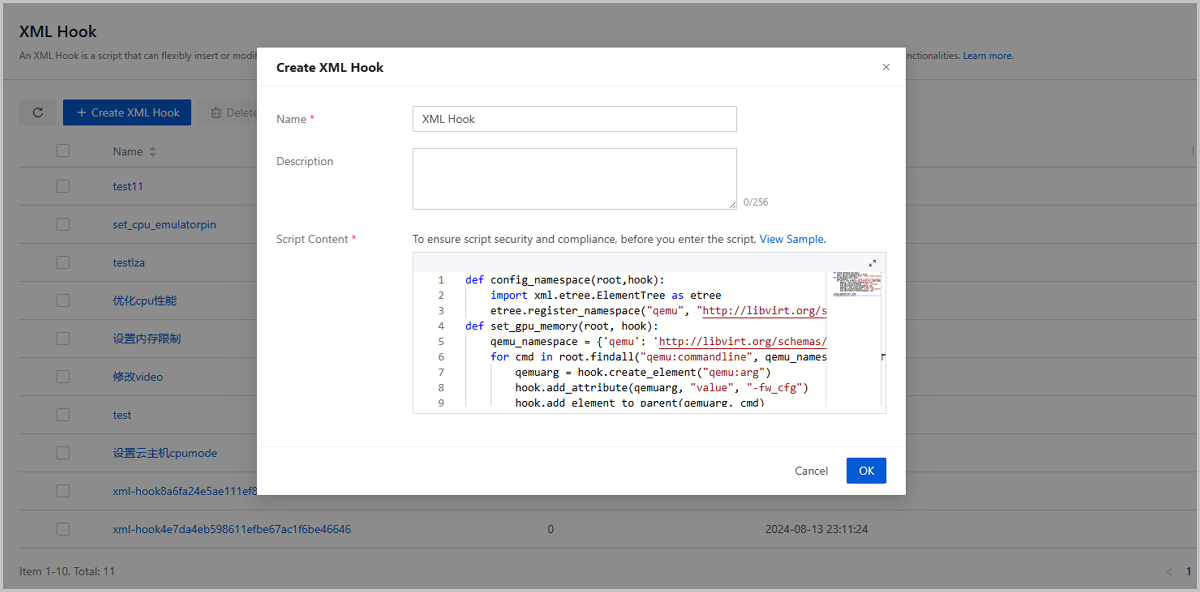
On the main menu of ZStack Cloud, choose . On the XML Hook page, click Create XML Hook. Then, the Create XML Hook page is displayed.
- Name: Enter a name for the XML Hook.
- Description: Optional. Enter a description for the XML Hook.
- Script Content: Enter the XML Hook content. To ensure the content safety and compliant, we recommend that you click View Sample before you enter the script. If you need more detailed instruction, see How to Write an XML Hook
Manage an XML Hook
On the main menu of ZStack Cloud, choose . Then, the XML Hook page is displayed.
You can perform the following actions on an XML Hook:
| Action | Description |
|---|---|
| Create XML Hook | Create a new XML Hook. |
| Edit Name and Description | Edit the name and description of the XML Hook. |
| Modify XML Hook | Modify the content of the XML Hook.Note:
|
| Attach VM Instance | Attach the XML Hook to a VM instance to insert or modify parameters in the VM XML file and achieve customized configurations.Note:
|
| Detach VM Instance | Detach the XML Hook from a VM instance.Note:
|
| Delete XML Hook | Delete the XML Hook.Note: You cannot delete an
XML Hook that is attached to VM instances. If you want to delete
this XML hook, detach its from all VM instances
first. |
How to Write an XML Hook
This topic introduces how to write the XML Hook content and provides sample XML Hooks.
Method Definitions of XmlHook Class
class XmlHook:

    def get_value_of_element(self, xmlbranch):
            """ Get the text content of an XML element. """

        # Params:
            xmlbranch: Element. The XML element object.

        # Return: String. The text content of the element.
        return

    def get_value_of_attribute(self, xmlbranch, attribute):
        """ Get the value of an attribute of an XML element. """

        # Params:
            xmlbranch: Element. The XML element object.
            attribute: String. The attribute name.

        # Return: String. The attribute value.
        return

    def get_value_of_attribute_from_parent(self, parent_xmlbranch, element, attribute):
        """  Get the value of an attribute of a child element from the parent element. """

        # Params:
            parent_xmlbranch: Element. The parent XML element object.
            element: String. The tag name of the child XML element object.
            attribute: String. The attribute name.

        # Return: String. The attribute value.
        return

    def found_attribute(self, xmlbranch, attribute):
        """ Check whether an XML element contain a specified attribute. """

        # Params:
            xmlbranch: Element. The XML element object.
            attribute: String. The attribute name.

        # Return: Boolean. Whether the element contains the attribute or not.
        return

    def modify_value_of_element(self, xmlbranch, value):
        """ Modify the text content of an XML element. """

        # Params:
            xmlbranch: Element. The XML element object.
            value: String. The new text content.

        # Return: None
        return

    def add_value_of_element(self, xmlbranch, value):
        """ Add or modify the text content of an XML element. """

        # Params:
            xmlbranch: Element. The XML element object.
            value: String. The new text content.

        # Return: None
        return

    def set_value_of_attribute(self, xmlbranch, attribute, attribute_value):
        """ Set the value of an attribute of an XML element (Crete the attribute if it does not exist). """

        # Params:
            xmlbranch: Element. The XML element object.
            attribute: String. The attribute name.
            attribute_value: String. The attribute value.

        # Return: None
        return

    def modify_value_of_attribute(self, xmlbranch, attribute, attribute_value):
        """ Modify the value of an attribute of an XML element (Do not modify if the attribute does not exist). """

        # Params:
            xmlbranch: Element. The XML element object.
            attribute: String. The attribute name.
            attribute_value: String. The attribute value.

        # Return: None

    def add_attribute(self, xmlbranch, attribute, attribute_value):
        """ Add an attribute to an XML element. """
        # Params:
            xmlbranch: Element. The XML element object.
            attribute: String. The attribute name.
            attribute_value: String. The attribute value.

        # Return: None
        return

    def delete_attribute(self, xmlbranch, attribute):
        """ Delete an attribute of an XML element. """

        # Params:
            xmlbranch: Element. The XML element object.
            attribute: String. The attribute name.

        # Return: None
        return

    def get_index_of_element(self, root, element_key):
        """ Get the index of an element in the parent element. """

        # Params:
            root: Element. The parent element object.
            element_key: String. The tag name of the element.

        # Return: Integer. The element index. If the index does not exist, the returned integer is -1.
        return

    def found_element(self, root, element_key):
        """ Check whether a parent element contains a child element with the specified tag name or not. """

        # Params:
            root: Element. The parent element object.
            element_key: String. The tag name of the element.

        # Return: Boolean. Whether the element exists or not.
        return

    def delete_element_from_parent(self, child_xmlbranch, parent_xmlbranch):
        """ Delete a child element from a parent element. """
        # Params:
            child_xmlbranch: Element. The child element object.
            parent_xmlbranch: Element. The parent element object.

        # Return: None
        return

    def add_element_to_parent(self, child_xmlbranch, parent_xmlbranch, index=-1):
        """ Add a child element to a parent element (You can set an index to specify the insertion position of the child element). """
        # Params:
            child_xmlbranch: Element. The child element object.
            parent_xmlbranch: Element. The parent element object.
            index: Integer. The child element index. Default: -1 (append to the end).

        # Return: Root element object.
        return

    def get_changed_xmlstr(self, root_xmlbranch):
        """ Get the modified XML string and format it for output. """

        # Params:
            root_xmlbranch: Element. The root element object.

        # Return: String. The formatted XML String.
        return

    def create_element(self, element_name):
        """ Create a XML element. """

        # Params:
            element_name: String. The tag name of the element.

        # Return: The new XML element object.
        return
XML Hook Sample
- root: Element. The root XML object, usually referring to the complete XML file of a VM instance.
- hook: Indicates the XmlHook class object.
In following samples, you can see the XML Hook examples as well as the VM XML content differences before and after you attach the XML Hooks.
- Original
XML
<domain> <devices> <hostdev mode='subsystem' type='pci' managed='no'> <source> <address domain='0x0000' bus='0x00' slot='0x0a' function='0x0'/> </source> </hostdev> </devices> </domain> - XML
Hook
def config_gpu_passthrough(root, hook, gpu_uuid): for devices in root.findall("devices"): for hostdev in devices.findall("hostdev"): hostdev_type = hook.get_value_of_attribute(hostdev, "type") if hostdev_type == "pci": hook.modify_value_of_attribute(hostdev, "type", "mdev") hook.add_attribute(hostdev, "model", "vfio-pci") hook.add_attribute(hostdev, "display", "on") for source in hostdev.findall("source"): for address in source.findall("address"): hook.delete_element_from_parent(address, source) source_address = hook.create_element("address") hook.add_attribute(source_address, "uuid", gpu_uuid) hook.add_element_to_parent(source_address, source) config_gpu_passthrough(root, hook, "4162a71b-f41e-4b06-b9ee-c503114dff29") - XML Modified by the XML
Hook
<domain>
    <devices>
        <hostdev display="on" managed="no" mode="subsystem" model="vfio-pci" type="mdev">
            <source>
                <address uuid="4162a71b-f41e-4b06-b9ee-c503114dff29"/>
            </source>
        </hostdev>
    </devices>
</domain>
- Original
XML
<domain> <cpu mode='custom' match='exact' check='full'> <topology sockets='1' cores='1' threads='1'/> <feature policy='require' name='hypervisor'/> </cpu> </domain> - XML
Hook
def config_cpu_mode(root, cpu_mode, hook): for cpu in root.findall("cpu"): hook.modify_value_of_attribute(cpu, "mode", cpu_mode) config_cpu_mode(root, "host-model", hook) - XML Modified by XML
Hook
<domain>
    <cpu mode='host-model' match='exact' check='full'>
        <topology sockets='1' cores='1' threads='1'/>
        <feature policy='require' name='hypervisor'/>
    </cpu>
</domain>
- Original
XML
<domain> <devices> <disk type="file" device="disk"> <driver name='qemu' type='qcow2'/> <target bus="virtio" dev="vda"/> </disk> <disk type="file" device="cdrom"> <target bus="ide" dev="hdc"/> <driver name='qemu' type='raw'/> </disk> <disk type="file" device="disk"> <driver name='qemu' type='qcow2'/> <target bus="ide" dev="vdb"/> </disk> <disk type="file" device="disk"> <driver name='qemu' type='qcow2'/> <target bus="virtio" dev="vdc"/> </disk> </devices> </domain> - XML
Hook
def config_virtio_disk_queue_number(root, queue_number, hook): def config_disk_queue_number(disk): for driver in disk.findall("driver"): hook.set_value_of_attribute(driver, "queues", str(queue_number)) # find virtio_disks from all_disks for devices in root.findall("devices"): for disks in devices.findall("disk"): for target in disks.findall("target"): bus = hook.get_value_of_attribute(target, "bus") if bus == "virtio": config_disk_queue_number(disks) config_virtio_disk_queue_number(root, 4, hook) - XML Modified by XML
Hook
<domain>
    <devices>
        <disk type="file" device="disk">
            <driver name='qemu' type='qcow2' queues="4"/>
            <target bus="virtio" dev="vda"/>
        </disk>
        <disk type="file" device="cdrom">
            <target bus="ide" dev="hdc"/>
            <driver name='qemu' type='raw'/>
        </disk>
        <disk type="file" device="disk">
            <driver name='qemu' type='qcow2'/>
            <target bus="ide" dev="vdb"/>
        </disk>
        <disk type="file" device="disk">
            <driver name='qemu' type='qcow2' queues="4"/>
            <target bus="virtio" dev="vdc"/>
        </disk>
    </devices>
</domain>
Sample 4: Configure MAC Address Based on MTU Value
- Original
XML
<domain> <devices> <interface type='default'> <mac address='fa:af:36:ba:c2:00'/> <mtu size='1500'/> </interface> <interface type='bridge'> <mac address='fa:88:98:8e:73:01'/> <mtu size='8888'/> </interface> </devices> </domain> - XML
Hook
def config_mac_address_by_mtu(root, hook, mac_address, expect_mtu_number): def config_mac_address(interface): for mac in interface.findall("mac"): hook.modify_value_of_attribute(mac, "address", mac_address) # find network (interface) card with specific mtu for devices in root.findall("devices"): for interface in devices.findall("interface"): for mtu in interface.findall("mtu"): mtu_number = hook.get_value_of_attribute(mtu, "size") if mtu_number == str(expect_mtu_number): config_mac_address(interface) config_mac_address_by_mtu(root, hook, "23:1a:d0:4e:3b:1e", 8888) - XML Modified by XML
Hook
<domain>
    <devices>
        <interface type='default'>
            <mac address='fa:af:36:ba:c2:00'/>
            <mtu size='1500'/>
        </interface>
        <interface type='bridge'>
            <mac address='23:1a:d0:4e:3b:1e'/>
            <mtu size='8888'/>
        </interface>
    </devices>
</domain>
Sample 5: Configure VM CPU Typology
- Original
XML
<domain> <cpu mode='custom' match='exact' check='full'> <topology sockets='32' dies='1' cores='4' threads='1'/> </cpu> </domain> - XML
Hook
def config_cpu_topology(root, sockets, dies, cores, threads, hook): for cpu in root.findall("cpu"): for topology in cpu.findall("topology"): hook.modify_value_of_attribute(topology, "sockets", str(sockets)) hook.modify_value_of_attribute(topology, "dies", str(dies)) hook.modify_value_of_attribute(topology, "cores", str(cores)) hook.modify_value_of_attribute(topology, "threads", str(threads)) config_cpu_topology(root, sockets=2, dies=1, cores=64, threads=1, hook=hook) - XML Modified by XML
Hook
<domain>
	<cpu mode='custom' match='exact' check='full'>
		<topology sockets='2' dies='1' cores='64' threads='1'/>
	</cpu>
</domain>
Sample 6: Modify VM CPU Feature
- Original
XML
<domain> <cpu mode='custom' match='exact' check='full'> <feature policy='require' name='x2apic'/> <feature policy='require' name='hypervisor'/> <feature policy='require' name='lahf_lm'/> </cpu> </domain> - XML
Hook
def config_cpu_feature(root, hook): for cpu in root.findall("cpu"): feature = hook.create_element("feature") hook.add_attribute(feature, "policy", "disable") hook.add_attribute(feature, "name", "svm") hook.add_element_to_parent(feature, cpu) config_cpu_feature(root, hook) - XML Modified by XML
Hook
<domain>
    <cpu mode='custom' match='exact' check='full'>
    <feature policy='require' name='x2apic'/>
    <feature policy='require' name='hypervisor'/>
    <feature policy='require' name='lahf_lm'/>
    <feature policy='disable' name='svm'/>
    </cpu>
</domain>
Sample 7: Modify VM QEMU Parameters
- Original
XML
<domain> <cpu mode='host-passthrough' check='none'> <topology sockets='2' cores='2' threads='1'/> </cpu> <qemu:commandline> <qemu:arg value='-qmp'/> <qemu:arg value='unix:/var/lib/libvirt/qemu/zstack/af45d04006114268a7ed0801fc46e961.sock,server,nowait'/> </qemu:commandline> </domain> - XML
Hook
def hide_cpu_emulator(root, hook): for cpu in root.findall("cpu"): for child in list(cpu): cpu.remove(child) cpu.set("mode", "host-passthrough") cpu.set("check", "none") feature = hook.create_element("feature") hook.add_attribute(feature, "policy", "disable") hook.add_attribute(feature, "name", "hypervisor") hook.add_element_to_parent(feature, cpu) def config_namespace(root, hook): import xml.etree.ElementTree as etree etree.register_namespace("zs", "http://zstack.org") etree.register_namespace("qemu", "http://libvirt.org/schemas/domain/qemu/1.0") def hide_hardware_vendor(root, hook): qemu_namespace = {'qemu': 'http://libvirt.org/schemas/domain/qemu/1.0'} for cmd in root.findall('qemu:commandline', qemu_namespace): # for CPU if not cmd.find("qemu:arg[@value='-cpu']", qemu_namespace): cpu_cfg = hook.create_element("qemu:arg") hook.add_attribute(cpu_cfg, "value", "-cpu") hook.add_element_to_parent(cpu_cfg, cmd) # for HOST KVM if not cmd.find("qemu:arg[@value='host,kvm=off']", qemu_namespace): host_kvm_cfg = hook.create_element("qemu:arg") hook.add_attribute(host_kvm_cfg, "value", "host,kvm=off") hook.add_element_to_parent(host_kvm_cfg, cmd) # for BIOS-VENDOR if not cmd.find("qemu:arg[@value='-smbios']", qemu_namespace): bios_cfg = hook.create_element("qemu:arg") hook.add_attribute(bios_cfg, "value", "-smbios") hook.add_element_to_parent(bios_cfg, cmd) # for VENDOR type0_value = "type=0,vendor=LENOVO,version=FBKTB4AUS,date=07/01/2015,release=1.180" xpath_type0 = "qemu:arg[@value='{}']".format(type0_value) if not cmd.find(xpath_type0, qemu_namespace): vendor_cfg = hook.create_element("qemu:arg") hook.add_attribute(vendor_cfg, "value", type0_value) hook.add_element_to_parent(vendor_cfg, cmd) # for BIOS-FACTORY smbios_args = cmd.findall("qemu:arg[@value='-smbios']", qemu_namespace) if len(smbios_args) < 2: bios_cfg_2 = hook.create_element("qemu:arg") hook.add_attribute(bios_cfg_2, "value", "-smbios") hook.add_element_to_parent(bios_cfg_2, cmd) # for FACTORY type1_value = "type=1,manufacturer=LENOVO,product=30AH001GPB,version=ThinkStation P300,serial=S4M88119,uuid=cecf333d-6603-e511-97d5-6c0b843f98ba,sku=LENOVO_MT_30AH,family=P3" xpath_type1 = "qemu:arg[@value='{}']".format(type1_value) if not cmd.find(xpath_type1, qemu_namespace): factory_cfg = hook.create_element("qemu:arg") hook.add_attribute(factory_cfg, "value", type1_value) hook.add_element_to_parent(factory_cfg, cmd) config_namespace(root, hook) hide_cpu_emulator(root, hook) hide_hardware_vendor(root, hook) - XML Modified by XML
Hook
<domain>
    <cpu mode='host-passthrough' check='none'>
        <topology sockets='2' cores='2' threads='1'/>
        <feature name="hypervisor" policy="disable"/>
    </cpu>
    <qemu:commandline>
        <qemu:arg value="-qmp"/>
        <qemu:arg value="unix:/var/lib/libvirt/qemu/zstack/af45d04006114268a7ed0801fc46e961.sock,server,nowait"/>
        <qemu:arg value="-cpu"/>
        <qemu:arg value="host,kvm=off"/>
        <qemu:arg value="-smbios"/>
        <qemu:arg value="type=0,vendor=LENOVO,version=FBKTB4AUS,date=07/01/2015,release=1.180"/>
        <qemu:arg value='-smbios'/>
        <qemu:arg value="type=1,manufacturer=LENOVO,product=30AH001GPB,version=ThinkStation P300,serial=S4M88119,uuid=cecf333d-6603-e511-97d5-6c0b843f98ba,sku=LENOVO_MT_30AH,family=P3"/>
    </qemu:commandline>
</domain>
Scheduled Job
What is Scheduled O&M?
ZStack Cloud provides two types of scheduled O&M resources: scheduled jobs and schedulers. These two types of resources are independent from each other. You can create schedulers and scheduled jobs based on different rules, and associate or disassociate scheduled jobs with or from schedulers.
Concepts
- A scheduled job defines that a specific action be
implemented at a specified time based on a scheduler.
- You can associate any available scheduled job with a scheduler.
- You can select Disable, Enable, Attach, and Detach actions for a scheduled job based on your actual production environments.
- If you delete a scheduler, the scheduled jobs associated with the scheduler will be disassociated. You can associate the scheduled jobs with other schedulers.
- Operations triggered by scheduled jobs are all recorded by the Audit feature.
- A scheduler is used to schedule jobs. It is suitable for
business scenarios that last for a long time.
- A scheduler defines the implementation rules for a scheduled job.
- A scheduler can be used for long-term operations, for example, creating snapshots at a specified interval for a VM instance.
- If you delete a scheduler, the scheduled jobs associated with the scheduler will be disassociated. You can associate the scheduled jobs with other schedulers.
- Operations triggered by schedulers are all recorded by the Audit feature.
Considerations
In the production environment, we recommend that you create a maximum of five snapshots for a volume and do not configure frequent scheduled snapshotting. Creating an excessive number of snapshots will lower I/O performance of VM instances or volumes, increase data security risks, and occupy the storage space of primary storage. To back up data for the long term, you can use Backup Service.
Create a Scheduled Job
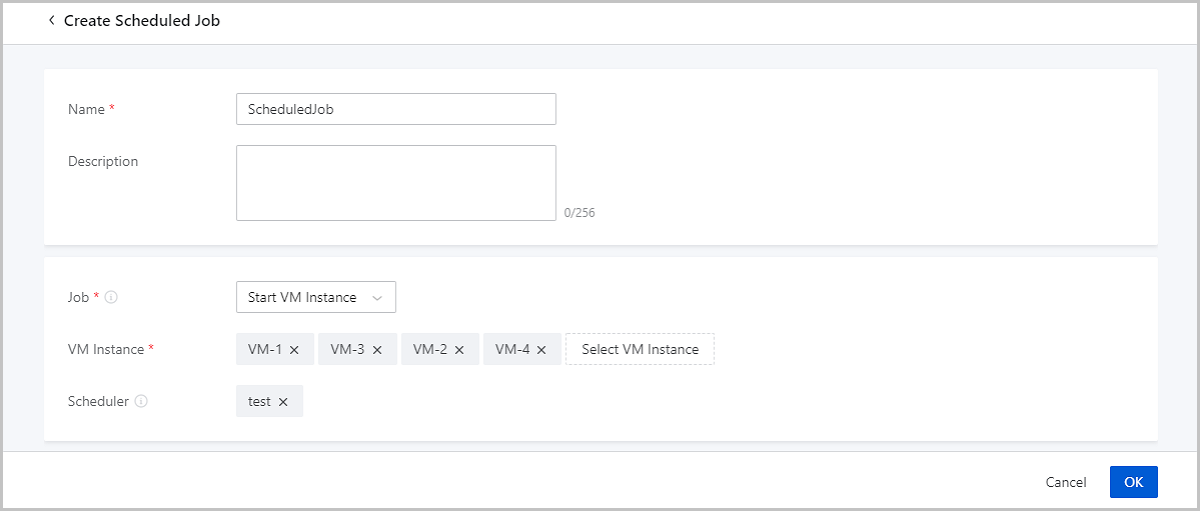
On the main menu of ZStack Cloud, choose . On the Scheduled Job page, click Create Scheduled Job. Then, the Create Scheduled Job page appears.
- Name: Enter a name for the job.
- Description: Optional. Enter a description for the job.
- Job: Select a job type. Valid values: Start VM Instance,
Stop VM Instance, Reboot VM Instance, Create VM Snapshot, and Create Volume
Snapshot.Note: If you choose Stop VM Instance, note that the VM
instances with HA enabled does not automatically reboot after they are
stopped through this scheduled job.
- Snapshot Type: When you set the job type as Create
Snapshot for VM instance, select a snapshot type for the job. You can create
single snapshots or snapshot groups. A single snapshot is the snapshot of the VM
root volume. A snapshot group consists snapshots of both the VM root volume and
data volumes attached to the VM instances.Note:
- A snapshot group created by a scheduled job does not contain a memory snapshot.
- To create snapshot groups, make sure that the VM root volume and data volumes are on Ceph primary storage. If you migrate VM/volumes to another-type storage or attach the VM instance with new data volumes that are not on Ceph primary storage after you create the scheduled job, it fails to create snapshot groups after the migrations or attachments.
- To create snapshot groups, make sure that the VM instance does not have a shared volume attached. If you attach a shared volume to a VM instance after you create the scheduled job, it fails to create snapshot groups after the attachment.
- VM Instance/Volume: Select one or more VM instances or
volumes for the scheduled job.Note: If you set the job type as Create VM
Snapshot or Create Volume Snapshot, note:
- You cannot select a VM/Volume with a CDP task attached.
- You cannot select a VM/Volume that has had a scheduled snapshot job attached.
- If you set Snapshot Type as Snapshot Group, you cannot select a VM instance whose data volume has had a scheduled snapshot job attached.
- Reserved Snapshots: Enter the maximum number of snapshots
that you want reserve.Note:
- This setting is available only when the root volume of the specified VM instance resides on a Ceph primary storage. The reserved snapshot number does not include manually created snapshots of the VM root volume.
- You can reserve 1-32 snapshots.
- Scheduler: Optional. Associate a scheduler to the scheduled job.