Backup Service
What is Backup Service?
Backup management integrates multiple disaster recovery technologies such as incremental backup and full backup that are suitable for multiple business scenarios. You can implement local backup and remote backup based on your business needs.
Backup Service is a separate feature module. To use this service, purchase both the Base License and the Plus License of Backup Service. The Plus License cannot be used independently.
Typical Backup Scenarios
 Note: If
you have the Tenant Management Plus license at the same time, the project
members (project managers, project admins, and general project members) can
perform local backup for VM instances, elastic baremetal instances, and data
volumes in the project.
Note: If
you have the Tenant Management Plus license at the same time, the project
members (project managers, project admins, and general project members) can
perform local backup for VM instances, elastic baremetal instances, and data
volumes in the project.- Local Backup
A local ImageStore image storage can act as the Local Backup Server to store scheduled backup data of the local VM instances, elastic baremetal instances, data volumes, and management node databases. Meanwhile, the seamless switchover between the primary local backup server and the secondary local backup server is supported, which effectively ensures your business continuity.
If your local data is mistakenly deleted, or data in the local primary storage is damaged, you can recover the backup data from the local backup server, as shown in Local Backup Scenario-1
图 1. Local Backup Scenario-1 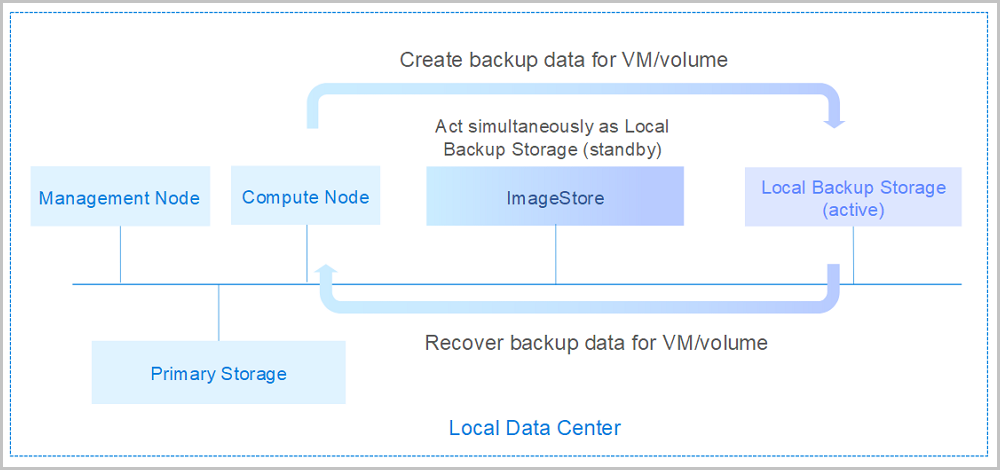
If you encounter a disaster in your local data center, you can rely totally on your local backup server to rebuild your data center and recover your business, as shown in Local Backup Scenario-2.
图 2. Local Backup Scenario-2 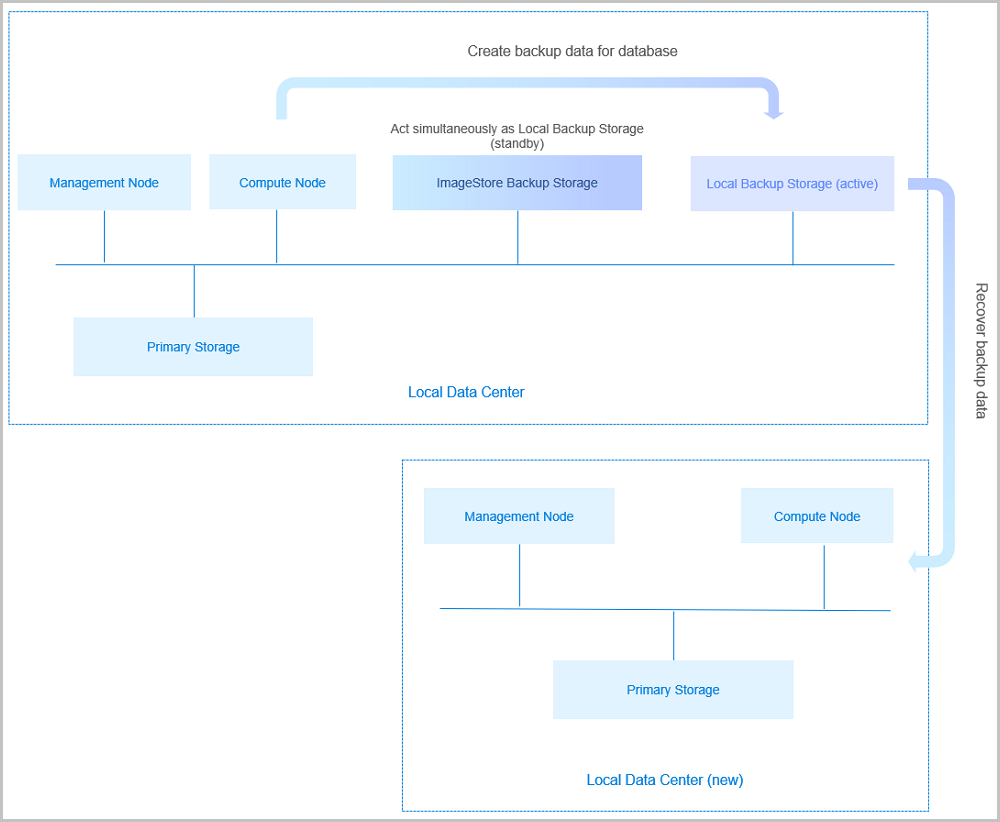
- Remote Backup
A storage server in a remote data center can act as the Remote Backup Server to store the scheduled backup data of the local VM instances, elastic baremetal instances, volumes, and databases. The backup data needs to be synchronized to the remote backup server from the local backup server.
If your local data is mistakenly deleted, or data in the local primary storage is damaged, you can recover the backup data from the remote backup server, as shown in Remote Backup Scenario-1
图 3. Remote Backup Scenario-1 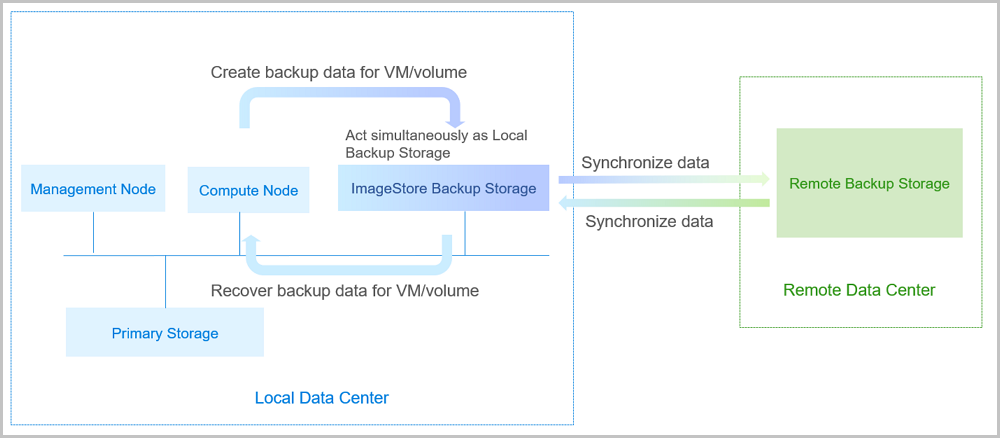
If you encounter a disaster in your data center, you can rely totally on your remote backup server to rebuild your data center and recover your business, as shown in Remote Backup Scenario-2.
图 4. Remote Backup Scenario-2 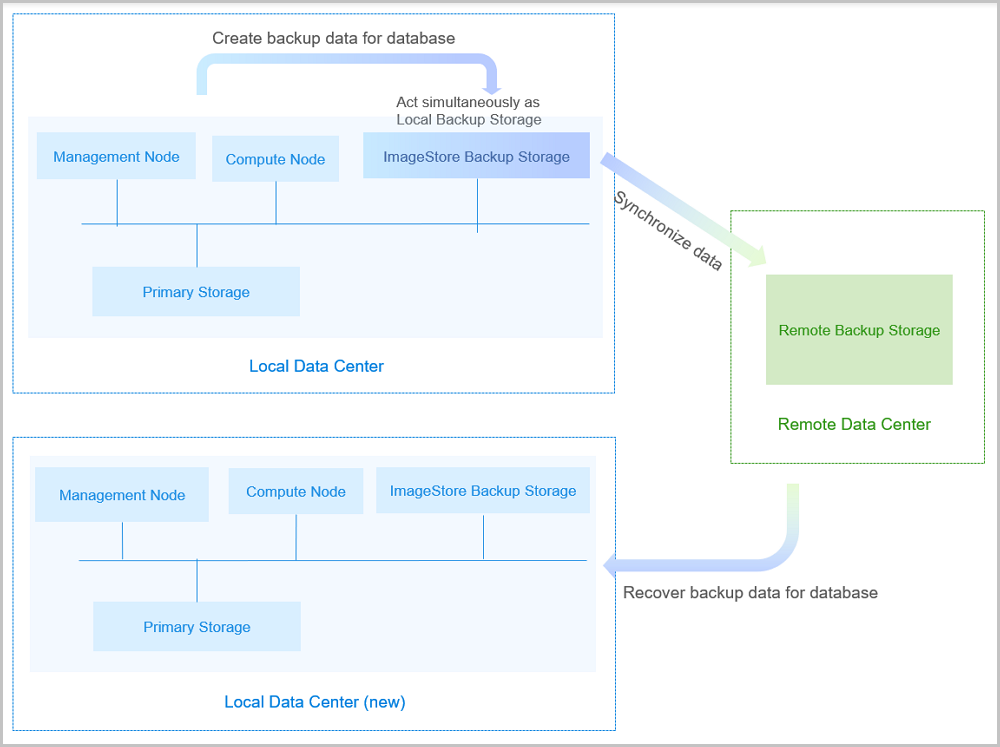
- Public Cloud BackupThe storage server in the Public Cloud can act as the Public Cloud Backup Server to store the scheduled backup data of the local VM instances, volumes, and databases. The backup data can be synchronized to the Public Cloud backup server from the local backup server.Note: The Public Cloud backup feature does not apply to elastic
baremetal instances.
If your local data is mistakenly deleted, or data in the local primary storage is damaged, you can recover the backup data from the Public Cloud backup server, as shown in Public Cloud Backup Scenario-1.
图 5. Public Cloud Backup Scenario-1 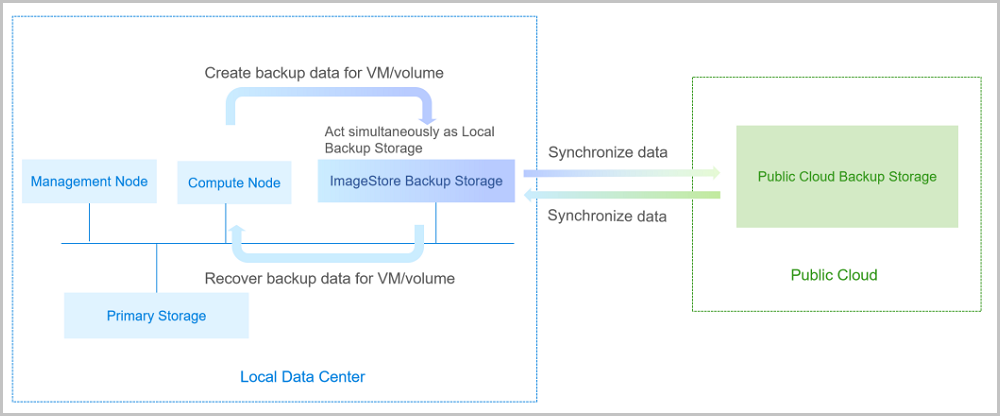
If you encounter a disaster in your data center, you can rely totally on your Public Cloud backup server to rebuild your data center and recover your business, as shown in Public Cloud Backup Scenario-2.
图 6. Public Cloud Backup Scenario-2 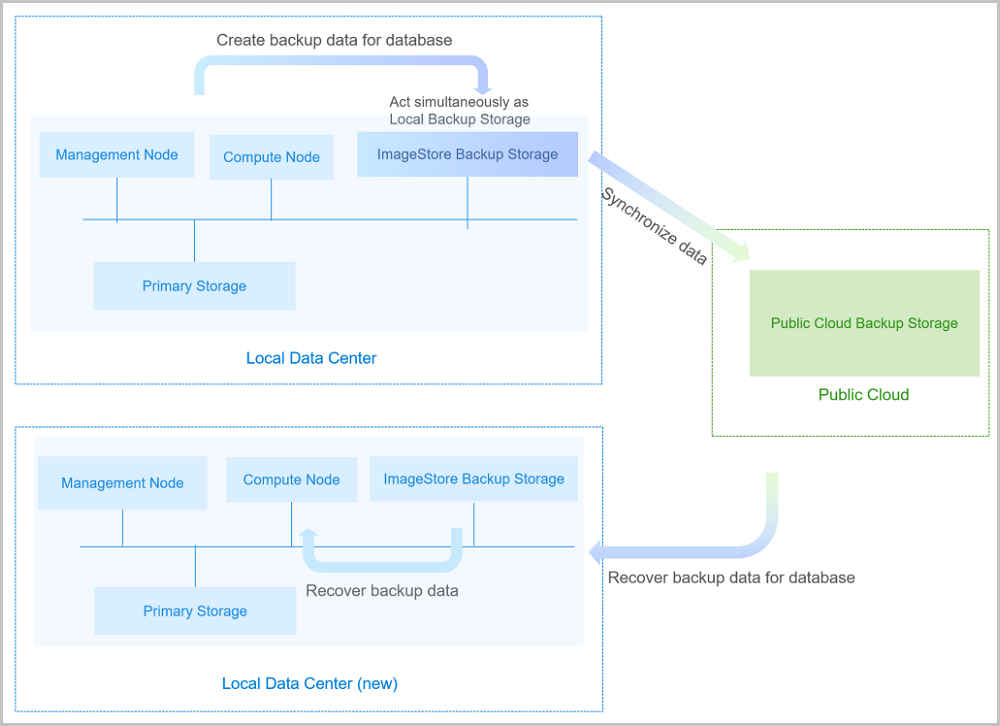
- ZStack Cloud allows you to integrate 3rd-party backup services via CBT interfaces. For details, contact the official technical support.
Backup Job
Backup Job Overview
The backup job overview visually displays the backup job overview, resource overview, and backup job statistics of core resources on the Cloud.
On the main menu of ZStack Cloud, choose . On the Backup Job page, the Overview tab is displayed by default.
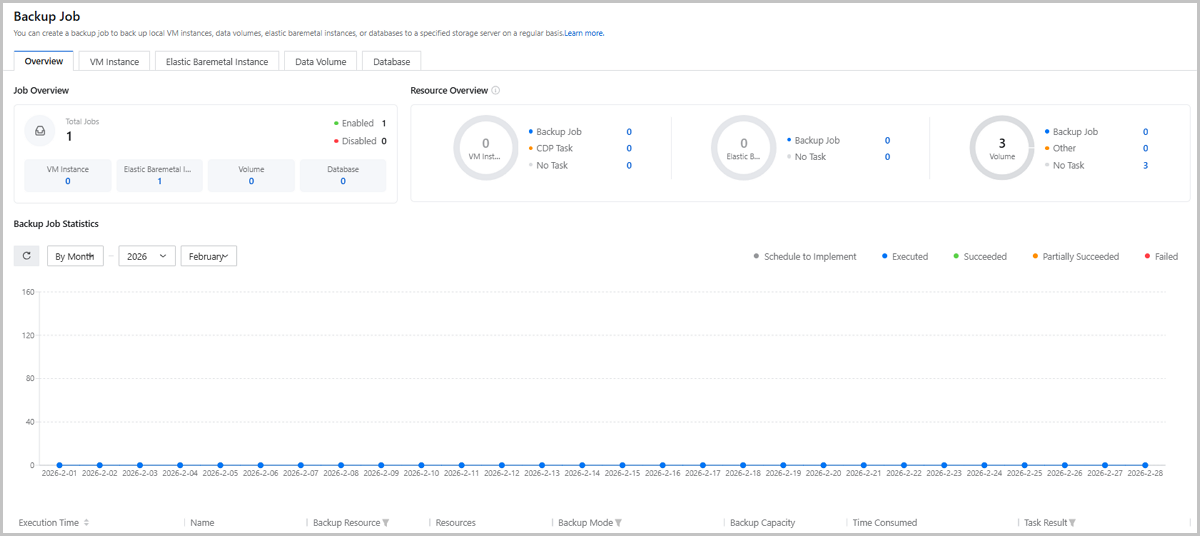
Job Overview
Job overview displays backup job number and state on a card.
- Total jobs: The total number of backup jobs on the Cloud, as well as the number of VM instance, elastic baremetal instance, data volume, and database backup jobs.
- State: The state of backup jobs. Green indicates enabled, while red indicates disabled.
Resource Overview
Resource overview displays the backup and protection information about available VM instances/elastic baremetal instances/datavolumes on the Cloud.
- VM Instance:
- Backup Job: The number of VM instances that have backup jobs on the Cloud.
- CDP Task: The number of VM instances that have CDP tasks on the Cloud.
- No Task: The number of VM instances that have no backup jobs or CDP tasks on the Cloud.
- Elastic Baremetal Instance:
- Backup Job: The number of elastic baremetal instances that have backup jobs in the Cloud.
- No Task: The number of elastic baremetal instances that have no backup jobs in the Cloud.
- Data Volume:
- Backup Job: The number of volumes that have backup jobs on the Cloud.
- Other: The number of volumes attached by VM instances with CDP tasks or VM instances/elastic baremetal instances with backup jobs on the Cloud.
- No Task: The number of volumes that have no backup jobs or CDP tasks on the Cloud.
Backup Job Statistics
Backup job statistics displays the execution of backup jobs in a line chart with time period as the horizontal axis and job number as the vertical axis.
- Blue: The number of executed backup jobs within the selected time period.
- Green: The number of succeeded backup jobs within the selected time period.
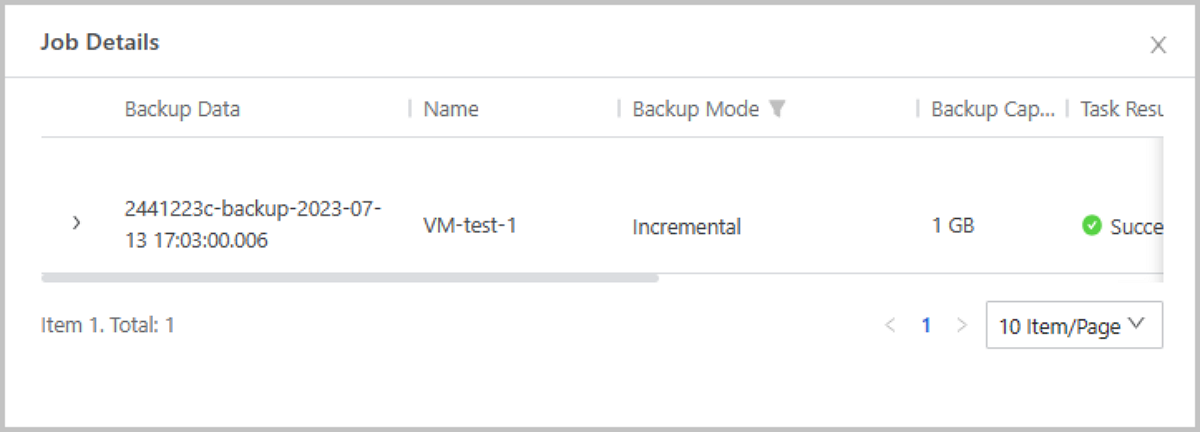
- Yellow: The number of partially succeeded backup jobs within the selected time period. You can view the specific backup job result in the job details.
- Red: The number of failed backup jobs within the selected time period.
- Grey: The number of backup jobs that are scheduled to implement within the selected time period.
Note:
- The time filter applies to both the line chart (backup job statistics) and list (backup record).
- Allows you to view the execution of a backup job on the current date in hover.
Backup Record
Backup record displays the execution record of all backup jobs within the current time period, including execution time, name, backup resource, resources, backup mode, backup capacity, task result and time consumed. You can view the job details of a backup job.
Additional Information
- The backup job overview displays static data that will be updated every time you enter the page.
- Allows you to set an event alarm for a backup job, which triggers an alarm when a backup job fails.
Create a Backup Job
On the main menu of ZStack Cloud, choose . Then the Backup Job page appears. On the page, choose a resource type to be backed up and click Create Backup Job. Then, the Create Backup Job page appears.
- Backup jobs for VM instances/elastic baremetal instances/data volumes
- Backup jobs for the management node database
Create Backup Job for VM Instance/Elastic Baremetal Instance/Data Volume
- Set basic information.
- Name: Enter a name for the backup
job.
The name must be 1 to 128 characters in length and can contain Chinese characters, letters, digits, spaces, hyphens (-), underscores (_), periods (.), parenthesis (), colons (:), and plus signs (+) and cannot begin or end with spaces.
- Description: Optional. Enter a description for the backup job.
- Local Backup Server:
Specify one or more local backup servers.Note:
- You can specify up to two local backup servers for a backup job.
- Before you can specify a local backup server, you need to add the server to ZStack Cloud Private Cloud. For more information, see Add a Local Backup Server.
- If you specify two local backup servers, by default, the first server added to the Cloud is the primary backup server and the second is the secondary backup server.
- If you specify two local backup
servers, these two servers apply the fail-over
mechanism.
- When the primary backup server works as expected, data is backed up on the primary backup server.
- If the primary backup server is disabled, removed, or disconnected, data is backed up on the secondary backup server.
- When the primary backup server resumes working as expected, data backup is auto-switched to the primary backup server.
- Sync to Remote Backup
Server: Choose whether to sync local backup data
to a remote backup server. By default, the checkbox is not selected.Note:
- Before you can sync backup data to a remote backup server, you need to add a remote backup server to the Cloud. Note that you can add only one remote backup server to the Cloud. For more information, see Add a Remote Backup Server.
- You can sync VM instance/data volume backup data to a server that is in another data canter or from a public cloud.
- You can sync elastic baremetal instance backup data to a server that is in another data center.
- Remote Backup Server: Select a remote backup server if you want to sync data to a remote server.
- Set QoS: Optional.
You can set network QoS and disk QoS for the backup job.
- Downstream Bandwidth: Set the maximum downstream bandwidth. Unit: Kbps, Mbps, and Gbps. Valid values: 8 Kbps to 30 Gbps. If you do not specify the downstream bandwidth, this bandwidth is unlimited.
- Upstream Bandwidth: Set the maximum upstream bandwidth. Unit: Kbps, Mbps, and Gbps. Valid values: 8 Kbps to 30 Gbps. If you do not specify the upstream bandwidth, this bandwidth is unlimited.
- Disk Read Speed: Set the maximum read speed. Unit: MB/s and GB/s. Valid values: 1MB/s to 100GB/s. If you do not specify the disk read speed, this speed is unlimited.
- Disk Write Speed: Set the maximum write speed. Unit: MB/s and GB/s. Valid values: 1MB/s to 100GB/s. If you do not specify the disk write speed, this speed is unlimited.
Note: We recommend that you set a QoS
based on your physical network environments and the
concurrent number of implemented backup jobs.
图 1. Set Basic Information 
- Name: Enter a name for the backup
job.
- Select backup resource.
Select VM instances/elastic baremetal instances/data volumes that you need to back up.
- VM Instance/Elastic Baremetal Instance/Data
Volume: Select the resources that you need to
back up.Note:
- VM Instance:
- You can only back up running VM instances.
- You cannot back up a VM instance with a CDP task.
- You cannot backup a VM instance on a Vhost primary storage.
- You can select multiple VM instances that do not exceed the authorized quota of the backup service.
- If the selected VM instance has backup data, creating a backup job for it does not occupy any additional quota of the backup service.
- Elastic Baremetal Instance:
- You can only back up running elastic baremetal instances.
- You can only back up elastic baremetal instances that use block storage volume as system volumes.
- You can select multiple elastic baremetal instances that do not exceed the authorized quota of the backup service.
- If the selected elastic baremetal instance has backup data, creating a backup job for it does not occupy any additional quota of the backup service.
- Data Volume:
- You can only back up data volumes attached to running VM/elastic baremetal instances.
- You cannot back up data volumes attached to VM instances with CDP tasks.
- VM Instance:
- Back up Volume: You can back up all
volumes that are attached to the selected VM/elastic baremetal
instances. By default, this switch is turned on.Note: You cannot
back up shared volumes that are attached to a VM/elastic
baremetal instance.
图 2. Select Backup Resource 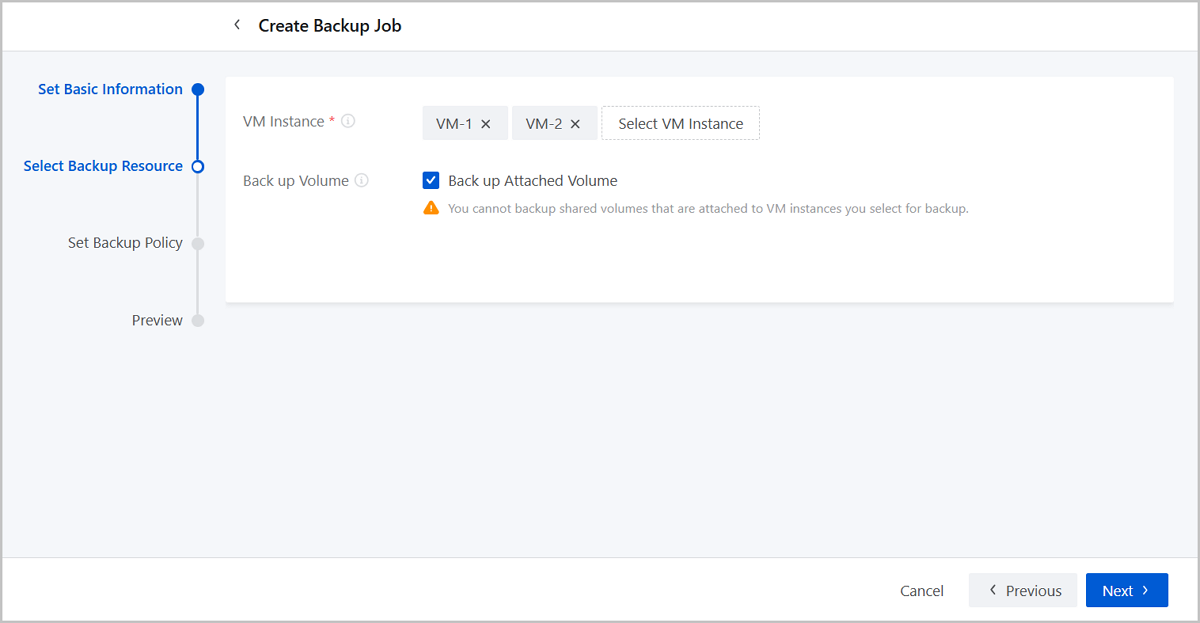
- VM Instance/Elastic Baremetal Instance/Data
Volume: Select the resources that you need to
back up.
- Set backup policy.You can create a backup job in one of the following three backup modes:
- Incremental Backup + Default Full Backup:
- You only need to customize the incremental backup policy, and the full backup policy is set by default by system.
- The Cloud performs incremental backup based on the custom incremental backup policy.
- After the incremental backup is executed 63 times or a customized number of times, the Cloud will implement a full backup, which will delete the incremental backup records without affecting the data security.
- Incremental Backup + Custom Full Backup:
- You need to customize the incremental backup policy and the full backup policy.
- The Cloud performs incremental backup and full backup based on the custom incremental backup policy and full backup policy.
- After the incremental backup is executed 63 times or a customized number of times, the Cloud will implement a full backup, which will delete the incremental backup records without affecting the data security.
- Full Backup Policy:
- You need to customize the full backup policy.
- The Cloud performs full backup based on the custom full backup policy.
On the displayed page, set the following parameters:- Backup Mode: Select a backup mode for a
backup job, including Incremental Backup + Default Full
Backup, Incremental Backup + Custom Full
Backup.
- Incremental Backup + Default Full Backup:
- Incremental Backup
Policy: Customize an incremental
backup policy.
- Backup Cycle: Select a
backup cycle. Options: Backup by Month,
Backup by Week, Backup by Day,
Backup by Hour, and Backup by
Minute.If you select Backup by Month, Backup by Week, or Backup by Day, you can set the backup execution time and schedule the effective time of the backup job to the accuracy of a second.
- Execution Time:
- If you select Backup by Month and set
the execution time to 00:00:00 of the first day of
each month, the incremental backup job is executed
at 00:00:00 of the first day of each
month.Note: If you set the execution time to the
31th day of each month, the incremental backup job
is executed only in the month that has 31
days.
- If you select Backup by Week and set the execution time to 00:00:00 of Sunday and Tuesday of each week, the incremental backup job is executed at 00:00:00 of Sunday and Tuesday of each week.
- If you select Backup by Day and set the execution time to 00:30:00, the incremental backup job is executed at 00:30:00 of each day.
- If you select Backup by Month and set
the execution time to 00:00:00 of the first day of
each month, the incremental backup job is executed
at 00:00:00 of the first day of each
month.
- Schedule Effective
Time: Choose whether to schedule the
time when the backup job takes effect.
If you specify data backup by month, week, or day, you can schedule the time when the backup job takes effect. After the backup job takes effect, data backup is executed based on the specified cycle and time.
- Execution Time:
If you select Backup by Hour or Backup by Minute, you can set a finer-grained incremental backup cycle.- Start Time to
Implement:
- If you choose to back up data every 6 hours and set the start time to 2020-12-30 00:00:00, incremental backup is implemented starting from 00:00:00, Dec 30, 2020 at an interval of 6 hours.
- If you choose to back up data every 30 minutes and the start time to 2020-12-30 00:00:00, incremental backup is implemented starting from 00:00:00, Dec 30, 2020 at an interval of 30 minutes.
Note: The minimum backup interval is 15
minutes.
- Backup Cycle: Select a
backup cycle. Options: Backup by Month,
Backup by Week, Backup by Day,
Backup by Hour, and Backup by
Minute.
- Incremental Backup
Policy: Customize an incremental
backup policy.
- Incremental Backup + Custom Full Backup:
-
- Incremental Backup
Policy: Customize an incremental
backup policy.
- Backup Cycle: Select a
backup cycle. Options: Backup by Month,
Backup by Week, Backup by Day,
Backup by Hour, and Backup by
Minute.If you select Backup by Month, Backup by Week, or Backup by Day, you can set the backup execution time and schedule the effective time of the backup job to the accuracy of a second.
- Execution Time:
- If you select Backup by Month and set
the execution time to 00:00:00 of the first day of
each month, the incremental backup job is executed
at 00:00:00 of the first day of each
month.Note: If you set the execution time to the
31th day of each month, the incremental backup job
is executed only in the month that has 31
days.
- If you select Backup by Week and set the execution time to 00:00:00 of Sunday and Tuesday of each week, the incremental backup job is executed at 00:00:00 of Sunday and Tuesday of each week.
- If you select Backup by Day and set the execution time to 00:30:00, the incremental backup job is executed at 00:30:00 of each day.
- If you select Backup by Month and set
the execution time to 00:00:00 of the first day of
each month, the incremental backup job is executed
at 00:00:00 of the first day of each
month.
- Schedule Effective
Time: Choose whether to schedule the
time when the backup job takes effect.
If you specify data backup by month, week, or day, you can schedule the time when the backup job takes effect. After the backup job takes effect, data backup is executed based on the specified cycle and time.
- Execution Time:
If you select Backup by Hour or Backup by Minute, you can set a finer-grained incremental backup cycle.- Start Time to
Implement:
- If you choose to back up data every 6 hours and set the start time to 2020-12-30 00:00:00, incremental backup is implemented starting from 00:00:00, Dec 30, 2020 at an interval of 6 hours.
- If you choose to back up data every 30 minutes and the start time to 2020-12-30 00:00:00, incremental backup is implemented starting from 00:00:00, Dec 30, 2020 at an interval of 30 minutes.
Note: The minimum backup interval is 15
minutes.
- Backup Cycle: Select a
backup cycle. Options: Backup by Month,
Backup by Week, Backup by Day,
Backup by Hour, and Backup by
Minute.
- Incremental Backup
Policy: Customize an incremental
backup policy.
- Full Backup
Policy: Customize a full backup
policy.
- Backup Cycle: Select a
backup cycle. Options: Backup by Month and
Backup by Week.If you select Backup by Month or Backup by Week, you can set the backup execution time and schedule the effective time of the backup job to the accuracy of a second.
- Execution Time: Set the
time when the backup job is implemented.
- If you select Backup by Month and set
the execution time to 00:00:00 of the first day of
each month, the full backup job is executed at
00:00:00 of the first day of each month.Note: If
you set the execution time to the 31th day of each
month, the full backup job is executed only in the
month that has 31 days.
- If you select Backup by Week and set the execution time to 00:00:00 of Sunday and Tuesday of each week, the full backup job is executed at 00:00:00 of Sunday and Tuesday of each week.
- If you select Backup by Month and set
the execution time to 00:00:00 of the first day of
each month, the full backup job is executed at
00:00:00 of the first day of each month.
- Schedule Effective
Time: Choose whether to schedule the
time when the backup job takes effect.
You can schedule the time at which the backup job takes effect. After the backup job takes effect, data backup is executed based on the specified cycle and time.
- Execution Time: Set the
time when the backup job is implemented.
- Backup Cycle: Select a
backup cycle. Options: Backup by Month and
Backup by Week.
-
- Full Backup Policy:
- Full Backup
Policy: Customize a full backup
policy.
- Backup Cycle: Select a
backup cycle. Options: Backup by Month and
Backup by Week.If you select Backup by Month or Backup by Week, you can set the backup execution time and schedule the effective time of the backup job to the accuracy of a second.
- Execution Time: Set the
time when the backup job is implemented.
- If you select Backup by Month and set
the execution time to 00:00:00 of the first day of
each month, the full backup job is executed at
00:00:00 of the first day of each month.Note: If
you set the execution time to the 31th day of each
month, the full backup job is executed only in the
month that has 31 days.
- If you select Backup by Week and set the execution time to 00:00:00 of Sunday and Tuesday of each week, the full backup job is executed at 00:00:00 of Sunday and Tuesday of each week.
- If you select Backup by Month and set
the execution time to 00:00:00 of the first day of
each month, the full backup job is executed at
00:00:00 of the first day of each month.
- Schedule Effective
Time: Choose whether to schedule the
time when the backup job takes effect.
You can schedule the time at which the backup job takes effect. After the backup job takes effect, data backup is executed based on the specified cycle and time.
- Execution Time: Set the
time when the backup job is implemented.
- Backup Cycle: Select a
backup cycle. Options: Backup by Month and
Backup by Week.
- Full Backup
Policy: Customize a full backup
policy.
- Incremental Backup + Default Full Backup:
- Backup Immediately: Choose whether to back up data immediately after the backup job is created. By default, this option is not selected.
- Local Retention Policy: Set the policy
how the local backup data is reserved. The data can be reserved
by count or by time (day/week/month).
- If by count, a minimum of 1 local backup can be reserved.
- If by time, a minimum of 1 day of local backup can be reserved.
- Remote Retention Policy: Set the policy
how the remote backup data is reserved. The data can be reserved
permanently, by count, or by time (day/week/month).
- If permanently, the remote backup data will not be cleared automatically.
- If by count, a minimum of 1 remote backup can be reserved.
- If by time, a minimum of 1 day of remote backup can be reserved.
图 3. Set Backup Policy 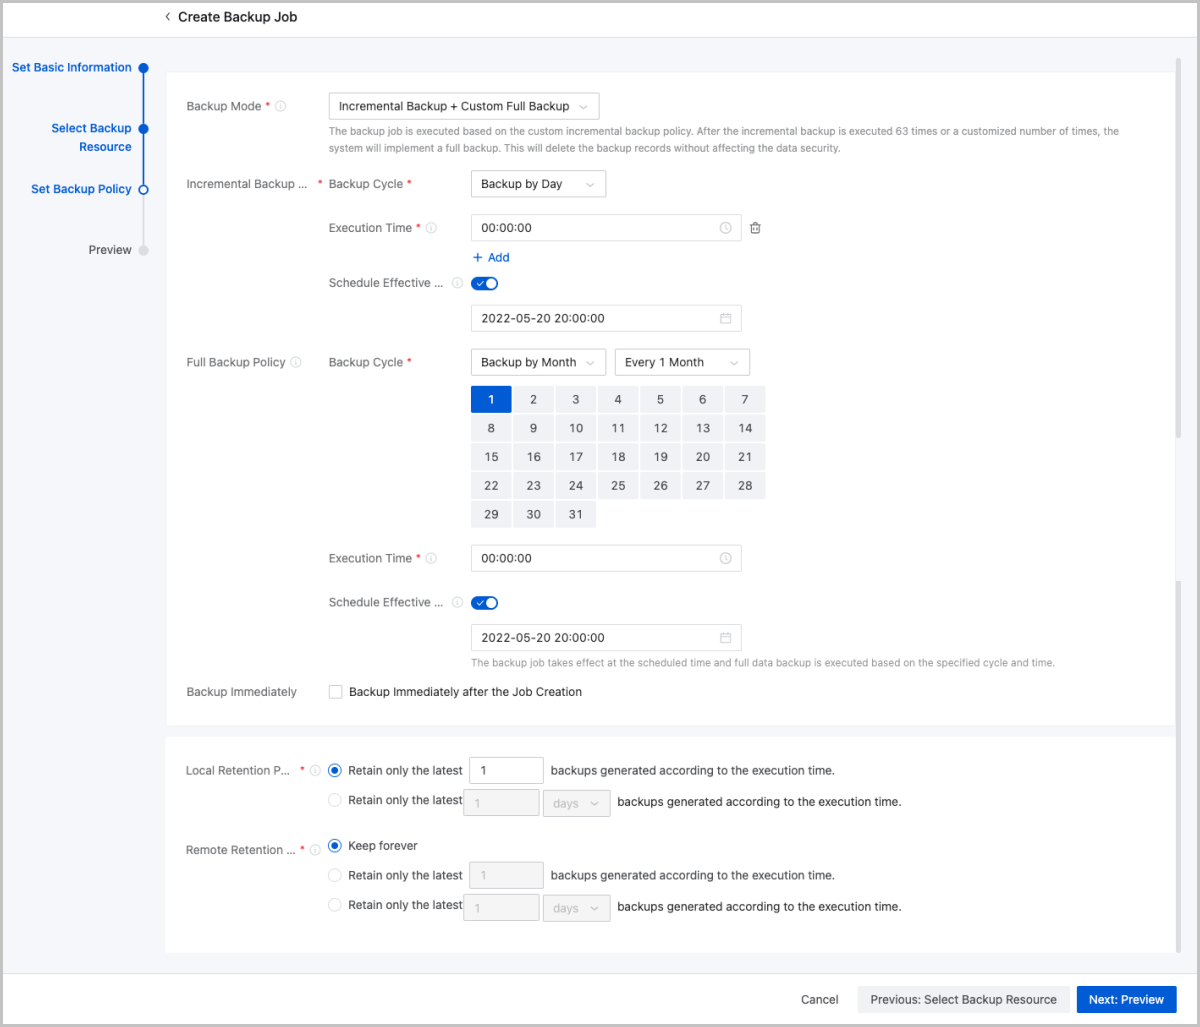
- Incremental Backup + Default Full Backup:
- Preview.
Preview the backup job. You can click the Edit icon to modify the job.
图 4. Preview 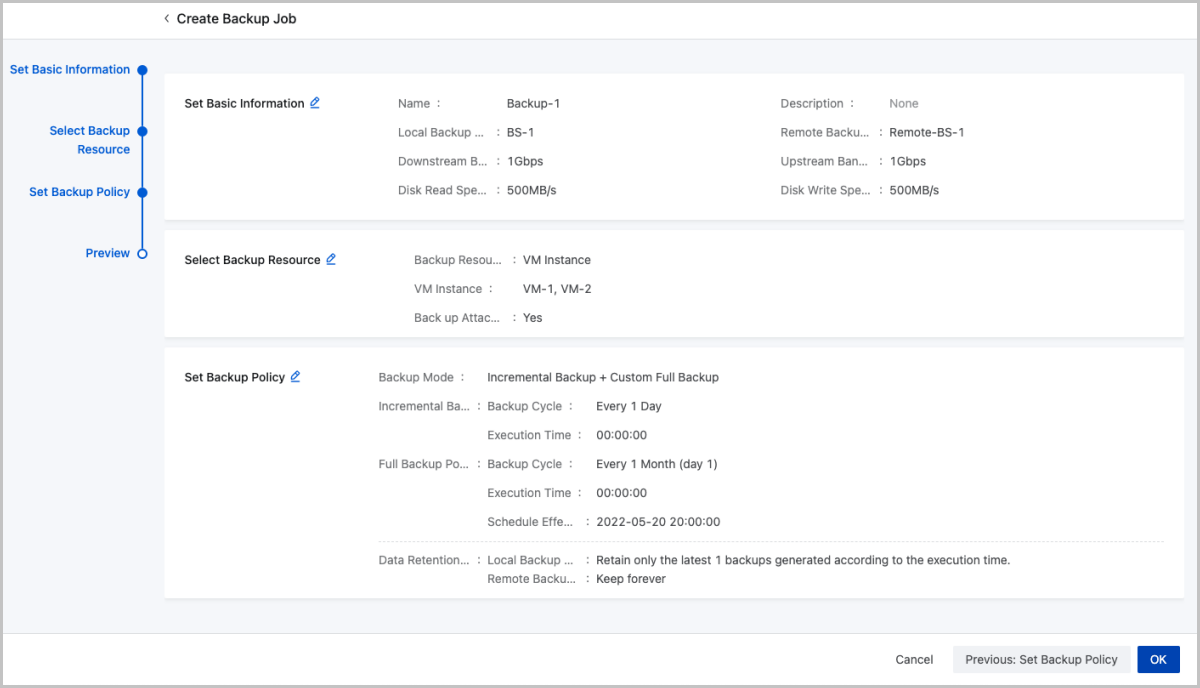
Create Backup Job for Management Node Database
On the main menu of ZStack Cloud, choose . Then the Backup Job page appears. On the page, choose . Then the Create Backup Job page appears.
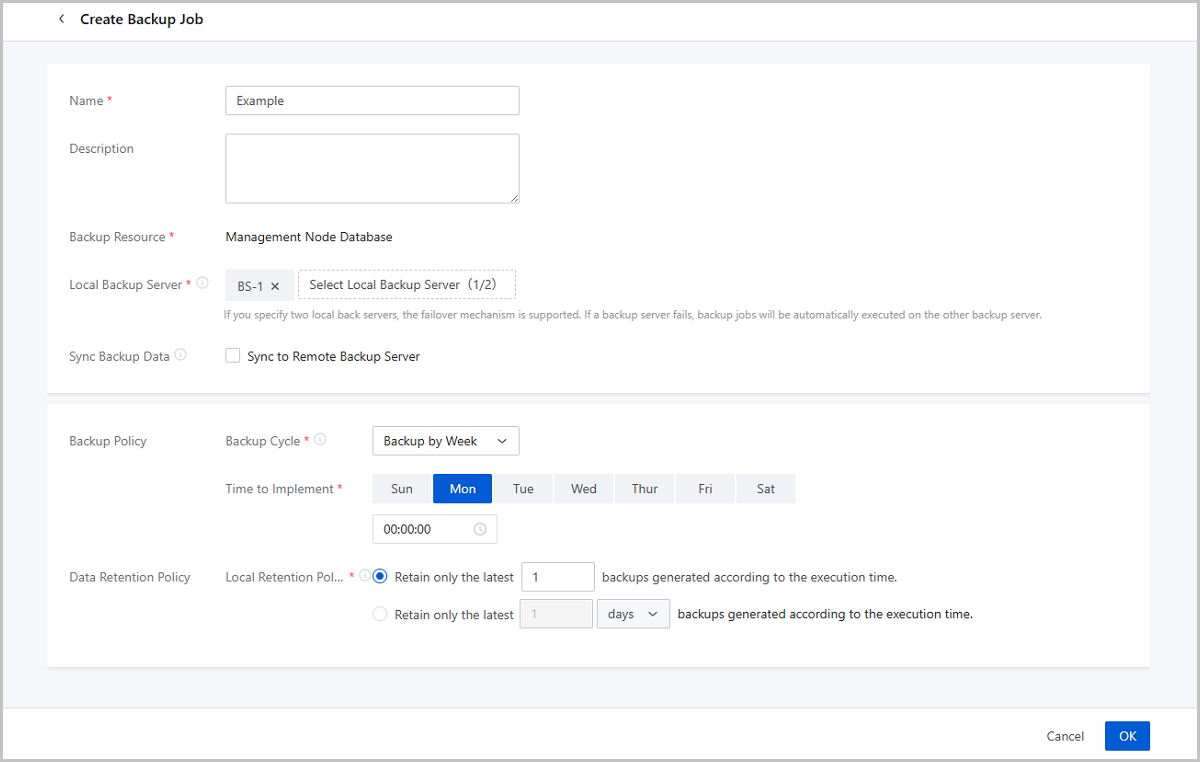
- Name: Enter a name for the backup job.
- Description: Optional. Enter a description for the backup job.
- Backup Resource: The management node database is displayed
- Local Backup Server:
Specify one or more local backup servers.Note:
- You can specify up to two local backup servers for a backup job.
- Before you can specify a local backup server, you need to add the server to ZStack Cloud Private Cloud. For more information, see Add a Local Backup Server.
- If you specify two local backup servers, by default, the first server added to the Cloud is the primary backup server and the second is the secondary backup server.
- If you specify two local backup
servers, these two servers apply the fail-over
mechanism.
- When the primary backup server works as expected, data is backed up on the primary backup server.
- If the primary backup server is disabled, removed, or disconnected, data is backed up on the secondary backup server.
- When the primary backup server resumes working as expected, data backup is auto-switched to the primary backup server.
- Sync to Remote Backup
Server: Choose whether to sync local backup data
to a remote backup server. By default, the checkbox is not selected.Note:
- Before you can sync backup data to a remote backup server, you need to add a remote backup server to the Cloud. Note that you can add only one remote backup server to the Cloud. For more information, see Add a Remote Backup Server.
- You can sync VM instance/data volume backup data to a server that is in another data canter or from a public cloud.
- You can sync elastic baremetal instance backup data to a server that is in another data center.
- Remote Backup Server: Select a remote backup server if you want to sync data to a remote server.
- Backup Policy: Set the backup policy for the backup
job.
- Backup Cycle: Select a backup cycle.
Options: Backup by Week, Backup by Day, and
Backup by Hour.If you select Backup by Week, Backup by Day, you can set the backup execution time of the full backup job to the accuracy of a second.
- Execution Time: Set the time when
the backup job is implemented.
- If you select Backup by Week and set the execution time to 00:00:00 of Sunday and Tuesday of each week, the full backup job is executed at 00:00:00 of Sunday and Tuesday of each week.
- If you select Backup by Day and set the execution time to 00:30:00, the full backup job is executed at 00:30:00 of each day.
If you select Backup by Hour, you can set finer-grained full backup job cycle to the accuracy of a second.
- Interval:
- Backup by the hour, with an interval of 2 hours. The full backup job is executed at an interval of 2 hours.
Note:
- The minimum interval between backup jobs is 1 hour.
- If you select Backup by Hour, you can back up on the hour from the moment the backup task is created.
- Execution Time: Set the time when
the backup job is implemented.
- Backup Cycle: Select a backup cycle.
Options: Backup by Week, Backup by Day, and
Backup by Hour.
- Data Retention Policy: Specify how the local backup
data and remote backup data is reserved.
- Local Retention Policy: Set the retention
policy for local backup data. Options: by count and by time
(day/week/month).
- If by count, a minimum of 1 local backup can be reserved.
- If by time, a minimum of 1 day of local backup can be reserved.
- Remote Retention Policy: Set the retention
policy for remote backup data. Options: permanent, by count, and by
time (day/week/month).
- If permanent, the remote backup data will not be cleared automatically.
- If by count, a minimum of 1 remote backup can be reserved.
- If by time, a minimum of 1 day of remote backup can be reserved.
- Local Retention Policy: Set the retention
policy for local backup data. Options: by count and by time
(day/week/month).
Notes
- By default, the value of
incrementalBackup.maxNumis 64. This value indicates that the Cloud will implement a full backup after the incremental backup is executed 63 times. You can also use zstack-cli to modify the value:[root@localhost ~]# zstack-cli admin>>> LogInByAccount accountName=admin password=password //Log into the system.The default username and password combination is admin/password. admin >>>UpdateGlobalConfig category=volumeBackup name=incrementalBackup.maxNum value=10 //Update the maximum times of incremental backup. { "inventory": { "category": "volumeBackup", "defaultValue": "64", "description": "the maximum numbers of continuous incremental backup", "name": "incrementalBackup.maxNum", "value": "10" }, "success": true } - After you set a data retention policy, only records are deleted for data outside the retention policy, which does not affect data security.
- If a full backup and incremental backup are triggered at the same time, the two backups are executed in queue.
- You can check the incremental backup data and full backup data on the Local Backup Data page. If you have selected Sync to Remote Backup Server, you can check the backup data on the remote backup server.
Manage a Backup Job
On the main menu of ZStack Cloud, choose . Then the Backup Job page appears.
| Action | Description |
|---|---|
| Edit Backup Job | Edit the name and description of a backup job. |
| Enable Backup Job | Enable a backup job. |
| Disable Backup Job | Disable a backup job. If you disable a backup job, data backup will not be implemented for the associated resources. In addition, you cannot create new backup jobs for the resources. |
| Set Backup Policy | Update the backup policy of the backup job. You
can edit the backup mode, backup retention policy, incremental
backup policy, and full backup policy.Note: New backup policies do
not affect backup jobs that have been triggered. |
| Set Backup Server | Configure local backup servers and remote backup servers for the backup job. |
| Backup Now | Implementing a backup job right now will generate
a new backup in the backup chain.Note:
|
| Delete Backup Job | Delete a backup job. If you delete a backup job,
data backup is terminated for the associated resources. You can
create new backup jobs for the resources.Note:
|
| Action | Description |
|---|---|
| Edit Backup Job | Edit the name and description of a backup job. |
| Enable Backup Job | Enable a backup job. |
| Disable Backup Job | Disable a backup job. If you disable a backup job, data backup will not be implemented for the associated resources. In addition, you cannot create new backup jobs for the resources. |
| Backup Now | Implementing a backup job right now will generate a new backup in the backup chain. |
| Delete Backup Job | Delete a backup job. If you delete a backup job, data backup is
terminated for the associated resources. You can create new backup
jobs for the resources.Note:
|
Backup Job Details
Backup Resource
On the main menu of ZStack Cloud, choose . Then, the VM/Volume page appears. Click the backup name to enter its details page and click Backup Resource. Then, the Backup Resource tab is displayed.
View Backup Resource
The backup resource tab lists the detailed information of resource instances in this backup job.
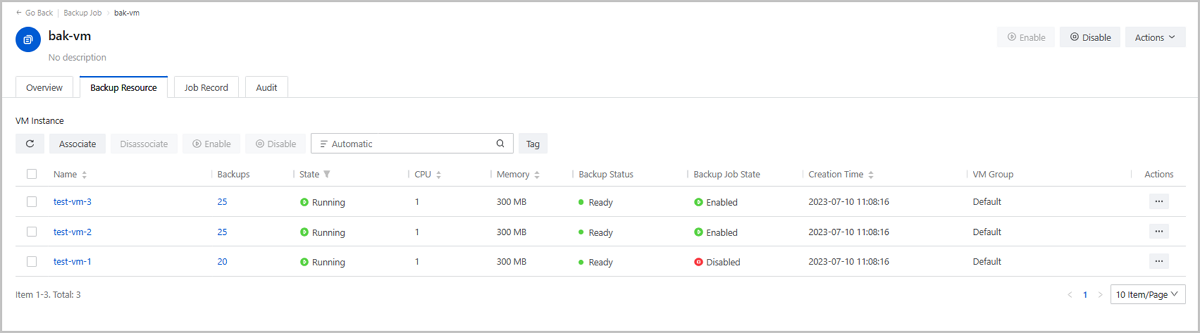
Manage Backup Resource
| Action | Description |
|---|---|
| Associate Backup Resource |
Associate a VM instance with the backup job.
Associate a volume with the backup job.
|
| Disassociate Backup Resource | Disassociate a VM instance/volume from the current backup job. |
| Enable Backup Job | After you enable a backup job, the disabled
VM/volume backup job that has not been performed will be added
to the next backup plan.Note: If you do not enable a disabled
VM/volume backup job, the consequent backup jobs will not
backup this disabled resource. |
| Disable Backup Job | Disable the scheduled VM/volume backup job
that has not been performed.Note: When you disable a VM/volume
backup job that is still in progress, the backup job will
continue to run until the current VM/volume backup job is
completed. |
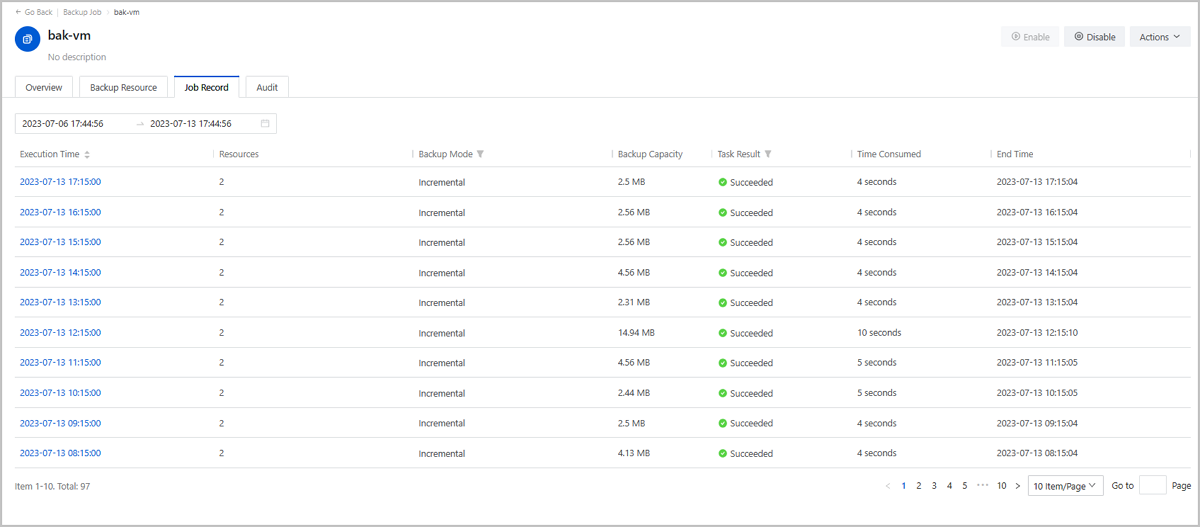
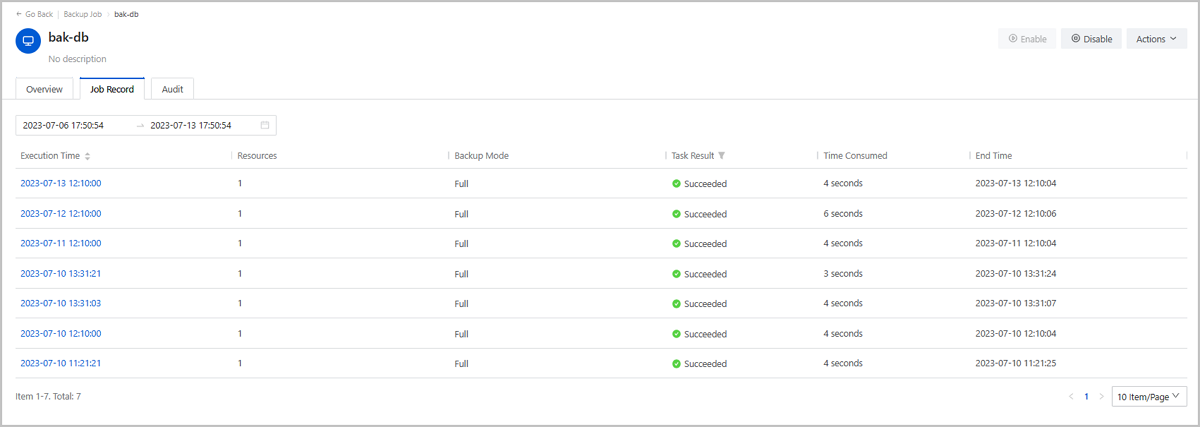
Job Record
On the main menu of ZStack Cloud, choose . Then, the Backup Job page is displayed. Click VM/Volume or Database to enter the corresponding tab. Then, click the backup job name to enter the details page and click Job Record. Then, the Job Record tab is displayed.
View VM/Volume Backup Job Record
The VM/volume backup job record displays all job records, including execution time, resources, backup mode, backup capacity, task result, time consumed, and end time. You can view the job details of a backup job.
View Database Backup Job Record
The database backup job record displays all job records, including execution time, resources, backup mode, task result, time consumed, and end time. You can view the job details of a backup job.
Local Backup Data
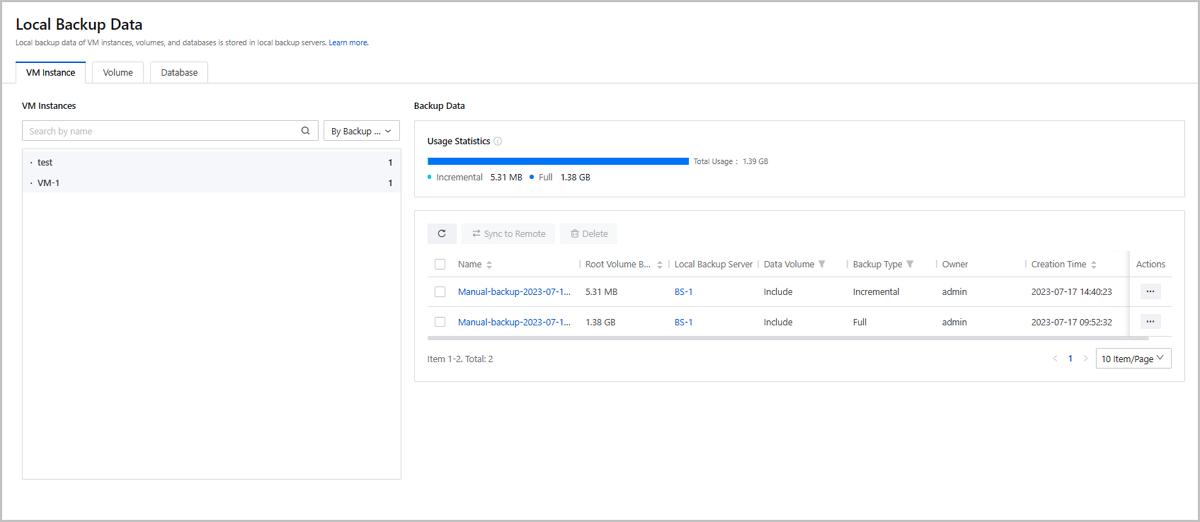
View Local Backup Data
On the main menu of ZStack Cloud, choose . Then, the Local Backup Data page is displayed. You can view the local backup data.
- The local backup data page includes Four tabs: VM instance, Elastic Baremetal Instance, Data Volume, and Database. Each tab page displays the backup data generated based on the backup jobs.
- The backup data is displayed as a folder by resource or database.
- Under each resource or database folder, the backup data of the resource or database is arranged in order based on the latest creation date.
View VM Instance/Elastic Baremetal Instance/Data Volume Local Backup Data
- Usage statistics: Displays the resource backup occupation on the Cloud.
- Dependent Incremental: The dependent data generated by incremental backups. It can be cleared to free up capacity after all incremental backups are deleted.
- Incremental: The data generated by incremental backups.
- Full: The data generated by full backups.
- Backup data list: Allows you to view the detailed backup information, including name, root volume backup size, local backup server, data volume, backup type, owner, and creation time.
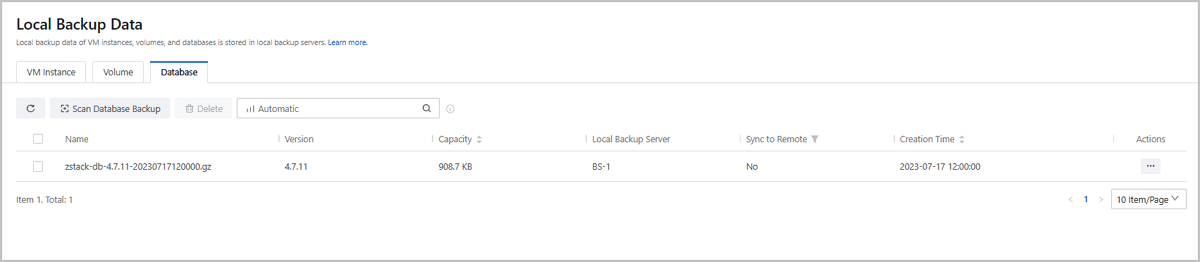
View Database Local Backup Data
Displays the detailed backup data information of the Cloud database, including name, version, capacity, local backup server, sync to remote, and creation time.
Manage Local Backup Data
On the main menu of ZStack Cloud, choose . Then, the Local Backup Data page is displayed.
| Action | Description |
|---|---|
| Restore Backup Data | Recover the local backup data of VM instances/elastic baremetal instances/data volumes. |
| Sync to Remote | Synchronize the local backup data of VM
instances/elastic baremetal instances/data volumes to a specified
remote backup server.Note: Before synchronizing backup data to
remote, you need to add only one remote backup server to
ZStack Cloud. |
| Change Owner | Change the owner of the backup data. |
| Delete Backup Data | Delete the local backup data of VM
instances/elastic baremetal instances/data volumes.Note: By default,
the Cloud only deletes the local backup data. To delete backup
data on the remote backup server, select the Delete
Also Data on Remote Backup Server
checkbox. |
| Action | Description |
|---|---|
| Restore Database Backup | Recover the local backup data of databases.Note:
|
| Scan Database Backup | Scan the local backup server to obtain the latest backup data of databases.Note:
|
| Export Database Backup | Export local backup data of databases to a specified URL path, which is available for download. |
| Sync to Remote | Synchronize the local backup data of databases to a specified
remote backup server.Note: Before synchronizing backup data to
remote, you need to add only one remote backup server to
ZStack Cloud. |
| Delete Database Backup | Delete the local backup data of databases.Note: By default, the
Cloud only deletes the local backup data. To delete backup data
on the remote backup server, select the Delete Also
Data on Remote Backup Server
checkbox. |
Local Backup Server
Add a Local Backup Server
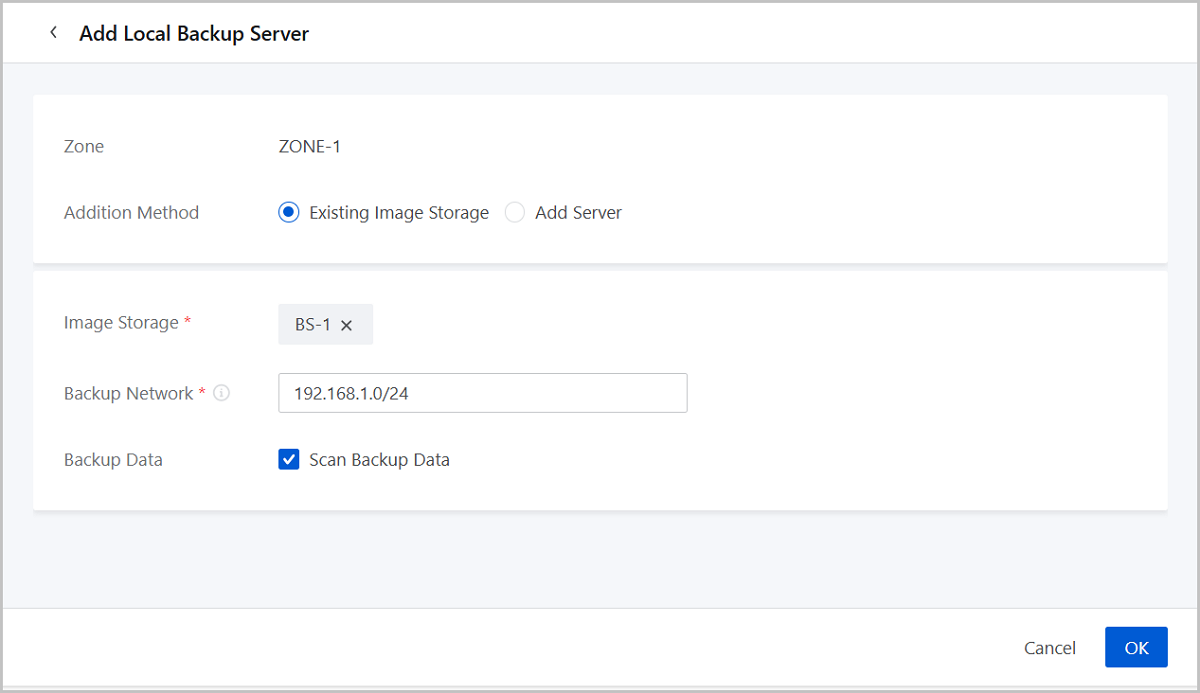
On the main menu of ZStack Cloud, choose . On the Local Backup Server page, click Add Local Backup Server. Then, the Add Local Backup Server page is displayed.
- Use an existing image storage.
- Add a new server.
Use an Existing Image Storage
- Zone: By default, the current zone is displayed.
- Addition Method: Select Existing Image Storage.
- Image Storage: Add an image storage. Only ImageStore
image storage are supported.Note: Make sure that the image storage uses an
operating system consistent with that of the management
node.
- Backup Network: Enter the backup
network CIDR.Note:
- If you deployed a network dedicated to local backup, you can add the network to the Cloud directly.
- In local backup scenarios, this backup network is used for VM, volume, and database backing up and recovery, CDP task creation, and CDP data recovery.
- Using a dedicated network can avoid network congestions and improve the transmission efficiency.
- Backup Data: Optional. Choose whether to scan the
existing backup data.Note: Deleted backup data cannot be restored by this
operation.
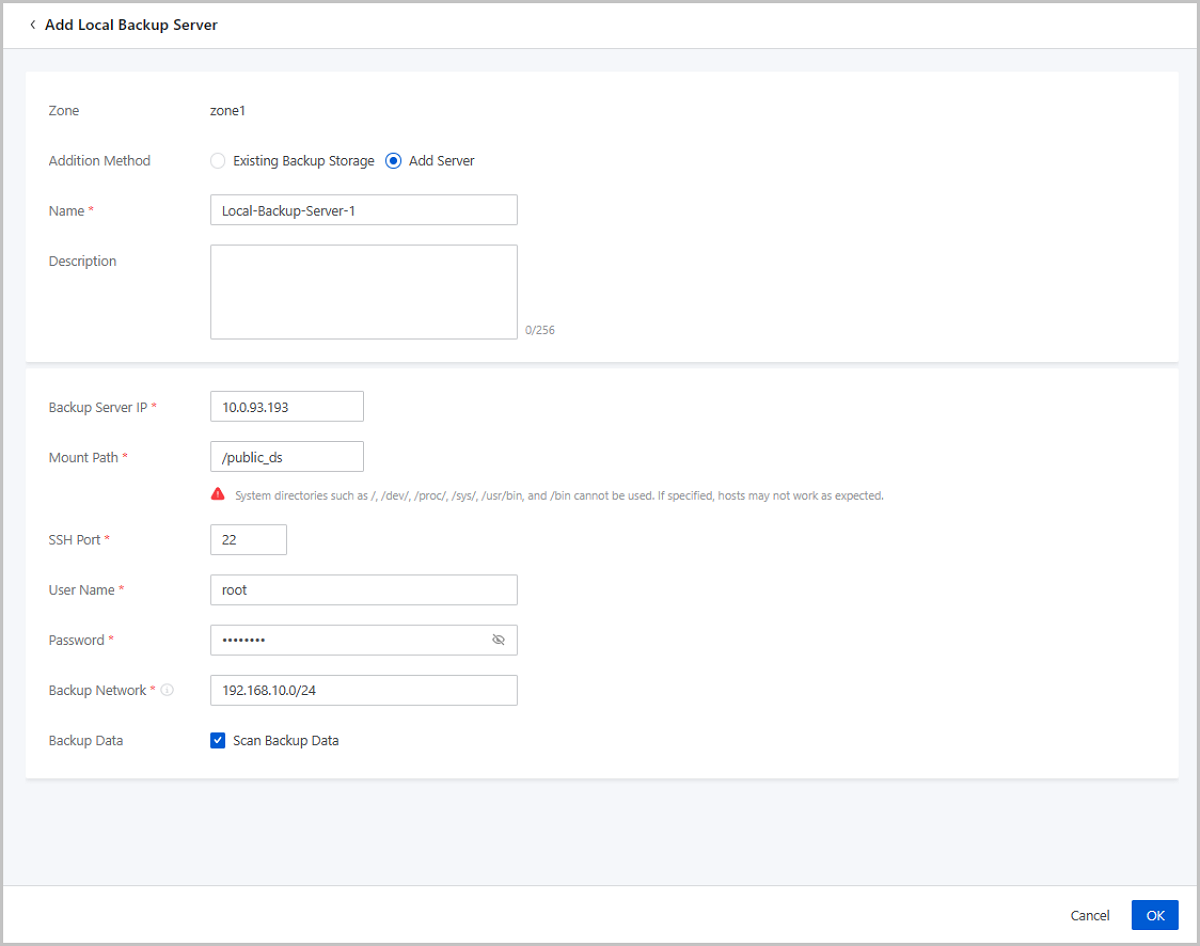
Add a New Server
- Zone: By default, the current zone is displayed.
- Addition Method: Select Add Server to add a new server.
- Name: Enter a name for the local
backup server.
The name must be 1 to 128 characters in length and can contain Chinese characters, letters, digits, spaces, hyphens (-), underscores (_), periods (.), parenthesis (), colons (:), and plus signs (+) and cannot begin or end with spaces.
- Description: Optional. Enter a description for the local backup server.
- Backup Server IP: Enter the IP
address of the local backup server.Note:
- You need to prepare a new storage server in the local data center as a local backup server.
- Make sure that the backup server uses an operating system consistent with that of the management node.
- Mount Path: Enter the path to which the storage is mounted, for example, /mnt/xxx_ds.
- SSH Port: Enter the SSH port. Default: 22.
- User Name: Enter the user name. Default: root.
- Password: Enter the password.
- Backup Network: Enter the backup
network CIDR.Note:
- If you deployed a network dedicated to local backup, you can add the network to the Cloud directly.
- In local backup scenarios, this backup network is used for VM, volume, and database backing up and recovery, CDP task creation, and CDP data recovery.
- Using a dedicated network can avoid network congestions and improve the transmission efficiency.
- Backup Data: Choose whether to
scan the existing backup data.Note: Deleted backup data cannot be restored
by this operation.
Manage a Local Backup Server
On the main menu of ZStack Cloud, choose . Then, the Local Backup Server page is displayed.
| Action | Description |
|---|---|
| Add Local Backup Server | Use an existing image storage (ImageStore only) as the local backup server or add a new server as the local backup server. |
| Enable Local Backup Server | Enable a disabled local backup server. |
| Disable Local Backup Server | Disable an enabled local backup server.Note:
|
| Reconnect Local Backup Server | Reconnecting a local backup server will update the records of the backup data on the local backup server. |
| Scan Backup Data | Scan the existing backup data in the local backup
server and display the backup data records on the Cloud
platform.Note: Deleted backup data cannot be restored by the
scan action. |
| Cleanup Data | Clean up the invalid backup data and expired temporary data that have been completely deleted from the local backup server to free up the storage space. |
| Update Password | Change the password of a local backup server. |
| Delete Local Backup Server | Delete a local backup server.Note: Deleting a
local backup server will stop the backup jobs and CDP tasks on the server. Please exercise
caution. |
Remote Backup Server
Add a Remote Backup Server
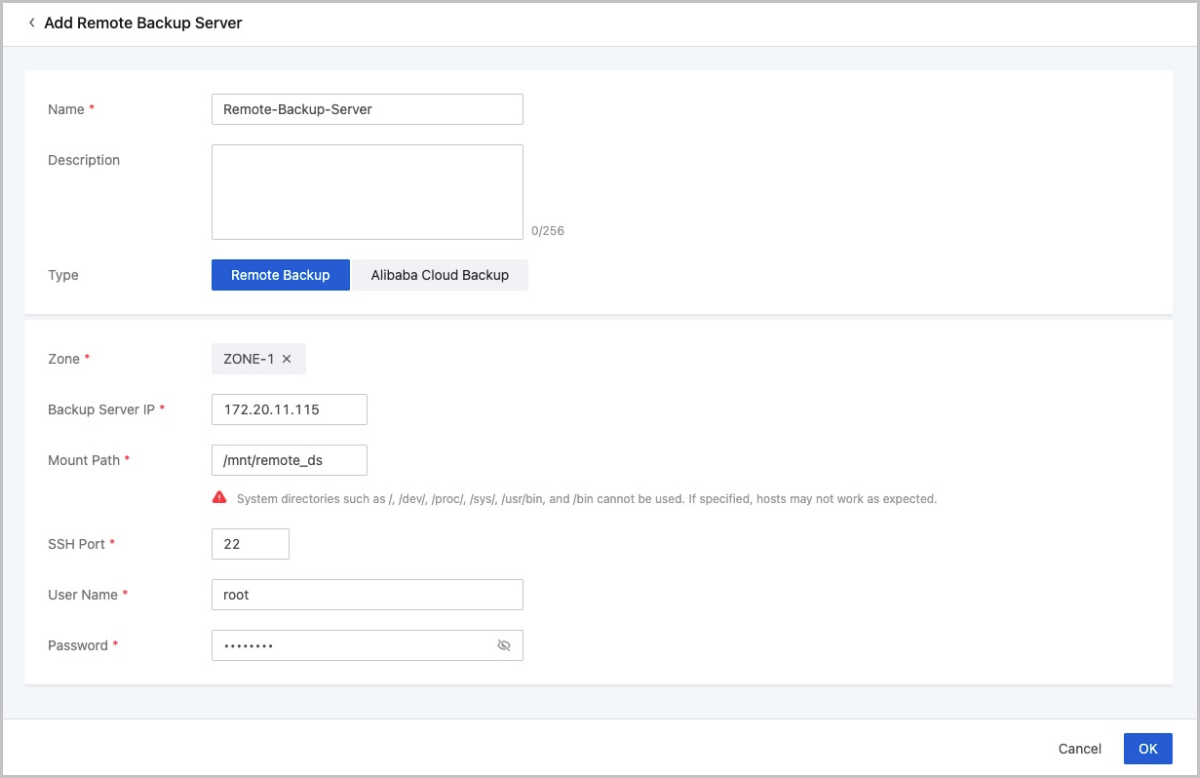
On the main menu of ZStack Cloud, choose . On the Remote Backup Server page, click Add Remote Backup Server. Then, the Add Remote Backup Server page is displayed.
- Add a remote backup server.
- Add an Alibaba Cloud backup server.
Add a remote backup server
- Name: Enter a name for the remote backup server. The name must be 1 to 128 characters in length and can contain Chinese characters, letters, digits, spaces, hyphens (-), underscores (_), periods (.), parenthesis (), colons (:), and plus signs (+) and cannot begin or end with spaces.
- Description: Optional. Enter a description for the remote backup server.
- Type: select Remote Backup here.
- Zone: Select the zone to which the remote backup server is mounted.
- Backup Server IP: Enter the IP address of the remote
backup server.Note:
- You need to prepare a new storage server in the remote data center as a remote backup server.
- Make sure that the backup server uses an operating system consistent with that of the management node of ZStack Cloud.
- Mount Path: Enter the path to which the storage is mounted, for example, /mnt/remote_ds.
- SSH Port: Enter the SSH port. Default: 22.
- User Name: Enter the user name. Default: root.
- Password: Enter the password.
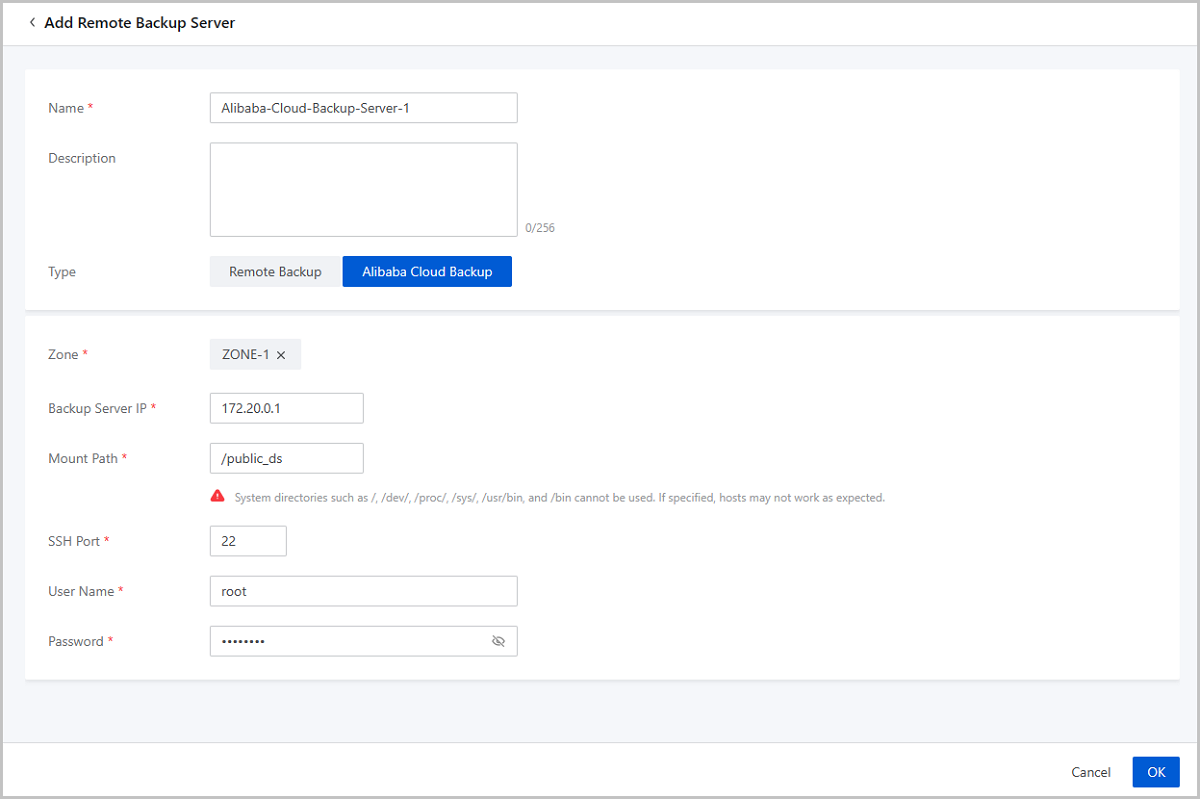
Add an Alibaba Cloud backup server
- Name: Enter a name for the Alibaba Cloud backup
server.
The name must be 1 to 128 characters in length and can contain Chinese characters, letters, digits, spaces, hyphens (-), underscores (_), periods (.), parenthesis (), colons (:), and plus signs (+) and cannot begin or end with spaces.
- Description: Optional. Enter a description for the remote backup server.
- Type: select Alibaba Cloud Backup here.
- Zone: Select the zone to which the Alibaba Cloud backup server is mounted.
- Backup Server IP: Enter the IP address of the Alibaba
Cloud backup server.Note:
You need to prepare a new storage server in the Alibaba Cloud as a remote backup server. Method:
- Download the standard backup service image from the official website of ZStack Cloud.
- Create an ECS instance based on the standard image. Note that a public IP address is required.
- Purchase the NAS storage in the Alibaba Cloud console.
- Mount the NAS storage to the ECS instance.
- Enter the public IP address of the ECS instance as the IP address of the Alibaba Cloud backup server.
- Mount Path: Enter the path to which the NAS storage is mounted, for example, /mnt/remote_ds.
- SSH Port: Enter the SSH port. Default: 22.
- User Name: Enter the user name. Default: root.
- Password: Enter the password.
Manage a Remote Backup Server
On the main menu of ZStack Cloud, choose . Then, the Remote Backup Server page is displayed.
| Action | Description |
|---|---|
| Add Remote Backup Server | Add one remote backup server only. Supported types: remote backup and Alibaba Cloud backup. |
| Enable Remote Backup Server | Enable a disabled remote backup server. |
| Disable Remote Backup Server | Disable an enabled remote backup server.Note: If
a backup job is synced to the remote backup server, after you
disable the remote backup server, the backup job continues to
back up on the local backup server, but it will stop
synchronizing to the remote backup server. |
| Update Password | Change the password of a remote backup server. |
| Reconnect Remote Backup Server | Reconnecting a remote backup server also updates the local record of the backup data on the remote backup server. |
| Data Cleanup | Clean up invalid data that has been expunged and expired temporary data to release storage space. |
| Delete Remote Backup Server | Delete a remote backup server.Note: Deleting a
remote backup server also deletes the local record of backup
data on the server. The real data is not affected. When
re-adding a local backup server, the local records of the backup
data cannot be restored by themselves. |