vCenter
What is vCenter?
VMware Management manipulates VMware vCenter via VMware public APIs and seamlessly integrates some features of VMware vCenter Server to achieve a unified management of multiple virtualization platforms on ZStack Cloud. If you deployed a VMware vCenter Server, you can use VMware Management of ZStack Cloud to take over the VMware vCenter Server. Then you can view vSphere servers and virtual machines managed by the VMware vCenter Server, use VMware vSphere resources in the virtual data center, and perform operations on virtual machines in the VMware vCenter clusters.
- The VMware Management feature is provided in a separate module. Before you can use this feature, you need to purchase the Plus License of VMware Management, in addition to the Base License.
- ZStack Cloud supports multiple vCenter versions, including 5.5, 6.0, 6.5, 6.7, 7.0, and 8.0.
Concepts
- vSphere: an enterprise-class virtualization platform provided by VMware. It can convert a data center into an integrated computing infrastructure that includes compute, storage, and network resources. VMware vSphere consists of a batch of software applications, with ESXi and Center being the two core components.
- ESXi: type 1 hypersivor (bemetal hypervisor) that is installed directly on a baremetal server. It allows the creation and management of multiple virtual machines on an ESXi host.
- vCenter Server: a centralized management platform of physical and virual resources on a VMware vCenter. It allows one-click access and management of ESXi hosts, virtual machines, datastores, networks, and other resources.
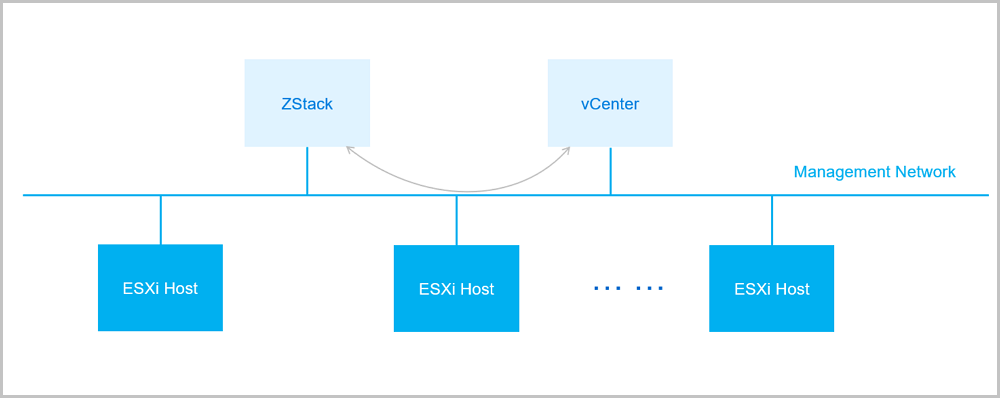
External Access Fundamentals
ZStack Cloud sends cloud resource control requests to a vCenter by using the asynchronous event listening methods and receives the returned event contents. In addition, ZStack Cloud can also receive contents that are intuitively pushed by vCenters. This way, ZStack Cloud achieves bidirectional data synchronization.
vCenter Basic Resource
Add a vCenter Basic Resource
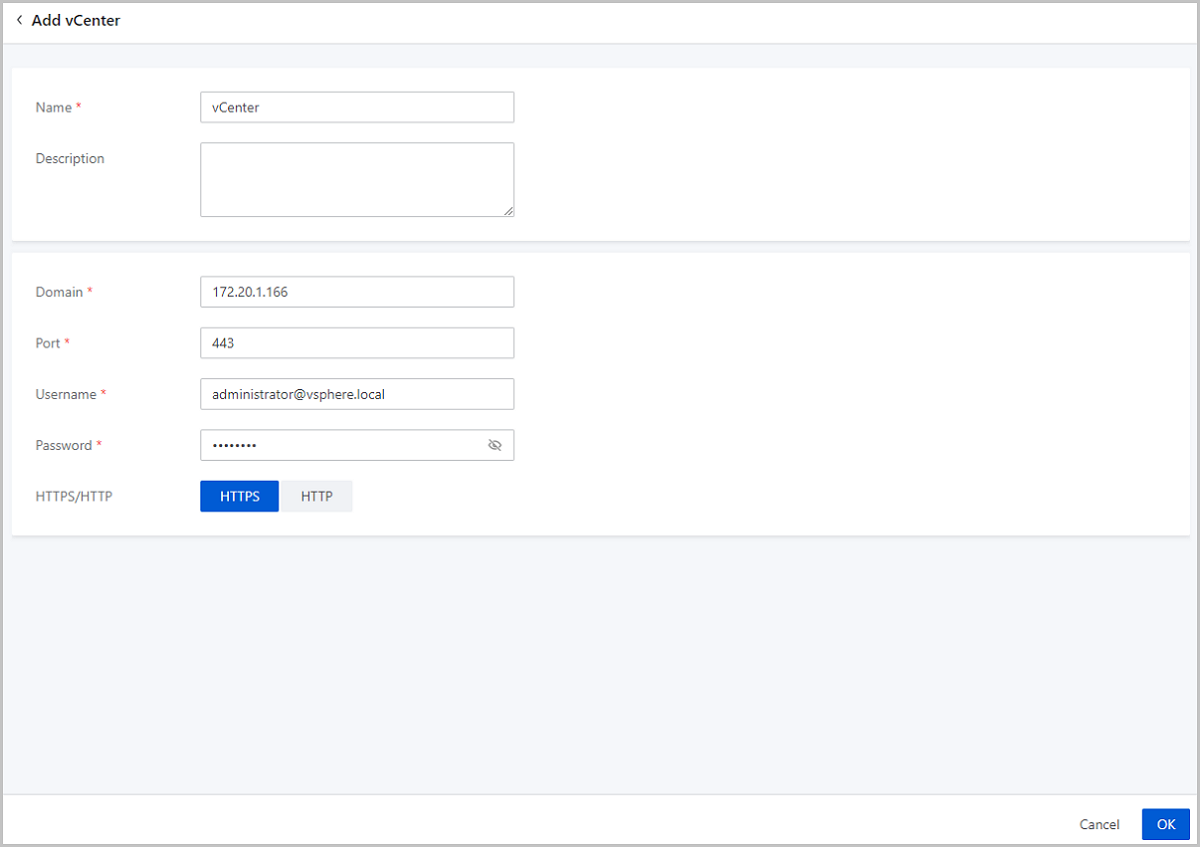
On the main menu of ZStack Cloud, choose . On the Basic Resource page, click Add vCenter. Then, the Add vCenter page is displayed.
- Name: Enter a name for the vCenter.
- Description: Optional. Enter a description for the vCenter.
- Domain: Enter a domain for the vCenter.
The Domain here is a domain name or an IP address used to access the vCenter, for example, 172.20.1.166.
- Port: Enter an available port number of the vCenter.
- User: Enter a user name for the vCenter. The name should include an intact domain.
- Password: Enter the password corresponding to the vCenter user name. The password should match the practical environment and is case-sensitive.
- HTTPS/HTTP: Select a transfer protocol for vCenter synchronization. You can choose either HTTP or HTTPS. Default option: HTTPS.
Consideration
The vCenter basic resource is used by ZStack Cloud for a unified management of vCenter virtualized resources, such as adding a vCenter, synchronizing vCenter data, and deleting a vCenter.
- You can add multiple vCenters to ZStack Cloud for local managements.
- You can filter out undesired resources when importing vCenter resources to ZStack Cloud.
Manage a vCenter Basic Resource
On the main menu of ZStack Cloud, click . Then, the Basic Resource page is displayed.
| Action | Description |
|---|---|
| Add vCenter | Add a vCenter to the current cloud
platform. After you add a vCenter, ZStack Cloud automatically synchronizes its clusters, hosts, VM instances, storage, networks, and other resources to local. You can view all these resources on corresponding pages. |
| Edit vCenter | Edit the name and the description of a vCenter. |
| Sync Data | Synchronize the vCenter resources to local. Note: Note:
|
| Update Password | Modify the password of the vCenter. |
| Delete vCenter | Delete a vCenter. Deleting a vCenter also deletes the local records of the associated resources. The actual resources on the remote vCenter are not affected. |
vCenter VM Instance
Create a vCenter VM Instance
After you add a vCenter, the vCenter VM instances are automatically synchronized to ZStack Cloud. You can also create vCenter VM instances on local.
Note:
- vCenter VM groups are independent from local VM instance group.
- Directory views are only displayed to the admin and platform managers. Sub-accounts cannot see a directory view.
To create vCenter VM instances, you need to set up a vCenter network (public network, flat network, or VPC network) on ZStack Cloud in advance. For detailed method, see Create a vCenter Network.
The following describes how to create a vCenter VM instance on ZStack Cloud.
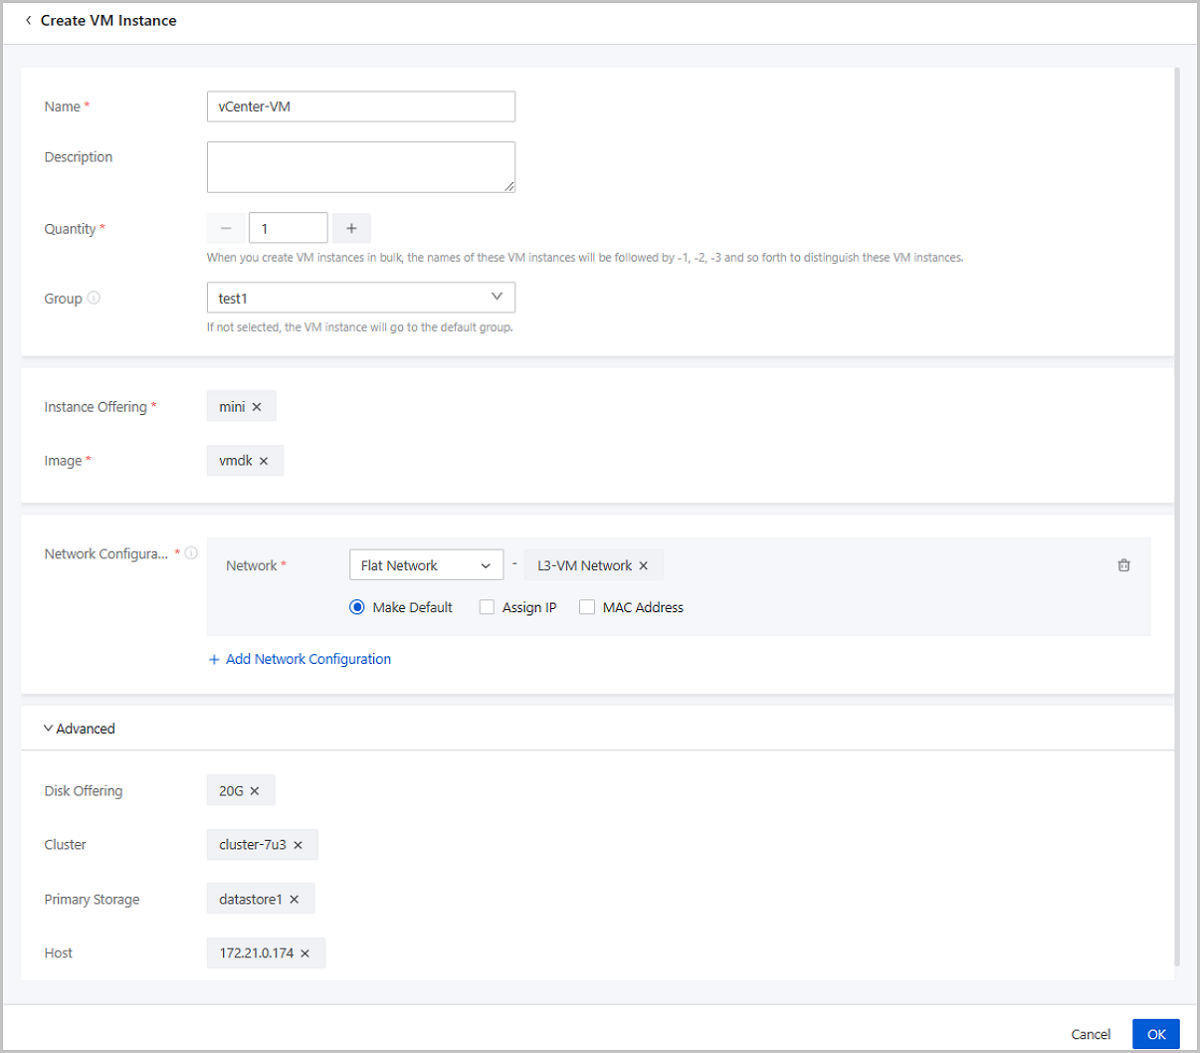
On the main menu of ZStack Cloud, choose . On the VM Instance page, click Create VM Instance. Then, the Create VM Instance page is displayed.
- Name: Enter a name for the vCenter VM instance.Note: The
vCenter VM instance name cannot be identical with the vCenter image
name.
- Description: Optional. Enter a description for the vCenter VM instance.
- Quantity: Select the number of the vCenter VM instances
you want to create. You can create vCenter VM instances in bulk.Note: Please
enter an integer here.
- Group: Optional. Choose a group for the vCenter VM
instance. If you do not set this parameter, the vCenter VM instance goes to the
default group.Note: Sync Data does not synchronize group information in a
vCenter.
- Instance Offering: Select an instance offering for the vCenter VM instance.
- Image: Select an image to create the vCenter VM instance.
- Network Configuration: Select a vCenter public network,
flat network, or VPC network that you created before.
- Make Default: Optional. You can make the network you selected as the default network.
- Assign IP: Optional. You can assign an IP address on the network you selected for the vCenter VM instance.
- MAC Address: Optional. You can assign a MAC address on the network you selected for the vCenter VM instance.
You can click Add Network Configuration to configure another network.
- Advanced:
- Disk Offering: Optional. You can select a disk offering to create a volume and attach it to the vCenter VM instance.
- Cluster: Optional. You can specify a cluster to use the hosts in it to start the vCenter VM instance.
- Primary Storage: Optional. You can specify a primary storage for the vCenter VM instance.
- Host: You can specify a host to start the vCenter VM instance.
Manage a vCenter VM Instance
On the main menu of ZStack Cloud, choose . Then, the VM Instance page is displayed.
| Action | Description |
|---|---|
| Create vCenter VM Instance | Create a vCenter VM instance on ZStack Cloud. |
| Edit vCenter VM Instance | Edit the name and the description of a vCenter VM instance. |
| Change Group | Change the VM group a vCenter VM instance affiliated to. |
| Start vCenter VM Instance | Start a stopped vCenter VM instance. |
| Stop vCenter VM Instance | Stop a running vCenter VM instance.Note: If the
VM instance has HA enabled, you can make the VM instance not
automatically reboot this time after being
stopped. |
| Reboot vCenter VM Instance | Reboot a running vCenter VM instance. |
| Resume vCenter VM Instance | Resume a paused vCenter VM instance. |
| Pause vCenter VM Instance | Pause a running vCenter VM instance.Note: Pausing
the vCenter VM instance does not equal to stopping the VM
instance. Stopping a paused VM instance may influence the
operation of the business. |
| Power Off vCenter VM Instance | Force a running vCenter VM instance into the
stopped state.Note: We recommend that you do not power off a VM
instance in general scenarios. |
| Launch Console | You can enter the operating system of a vCenter
VM instance by launching its console.Note:
|
| Clone vCenter VM Instance | Clone a VM instance that has the identical system
with an existing vCenter VM instance according to its instance
offering.
|
| Migrate vCenter VM Instance | Migrate a vCenter VM instance to another compute
node.
|
| Modify Instance Offering | You can modify the CPU/memory of a vCenter VM instance offline. |
| Change Owner | Change the owner of a vCenter VM
instance.Note: ZStack Cloud supports
multi-account management for the managed vCenters. Normal
accounts and project members can perform
actions on vCenter VM instances. |
| Set VM HA | Set an HA mode for a vCenter VM
instance. NeverStop mode means enabled the HA feature. When a VM instance is shut down due to exceptions, this mode can trigger an automatic VM reboot to improve the VM availability. Note:
Note:
|
| Set Console Password | Set the console password for a vCenter VM
instance.
|
| Attach Volume | Attach an available volume to a vCenter VM instance. |
| Detach Volume | Detach a volume that you attached before from a vCenter VM instance. |
| Delete vCenter VM Instance | Deleting a vCenter VM instance and its local records. In addition, the actual VM instances on the remote vCenter is stopped. |
| Recover vCenter VM Instance | Recover a deleted vCenter VM instance.Note: The
recovered VM instance goes to the VM group it affiliated to
before it was deleted. If the original group has been deleted,
the VM instance goes to the default group. |
| Expunge vCenter VM instance | Expunge a deleted vCenter VM instance. This action expunges the local records and the actual VM instance on the remote vCenter. |
vCenter Network
Create a vCenter Network
On the main menu of ZStack Cloud, choose . On the Network page, click Create Network. Then, the Create Network page is displayed.
- Create a public network.
- Create a flat network.
- Create a VPC network.
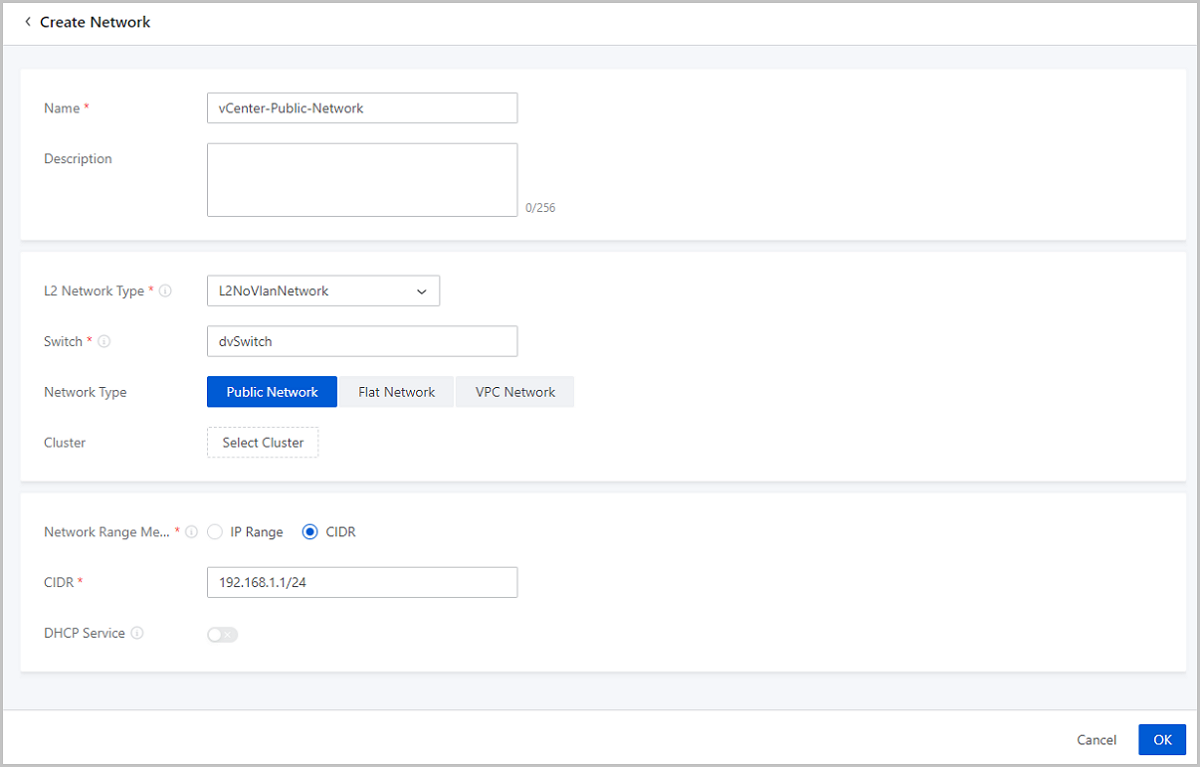
Create a Public Network
- Name: Enter a name for the public network.
- Description: Optional. Enter a description for the public network.
- L2 Network Type: Select an L2 network type as
needed.
- Supported types: L2NoVlanNetwork and L2VlanNetwork.
- If you select L2VlanNetwork, enter the VLAN ID.
- Switch: Enter the dvSwitch name or vSwitch name of the vCenter as needed.
- Network Type: Select Public Network here.
- Cluster: Select a vCenter cluster.
- Network Range Method: Select a method to add a
network range for the public network. You can select IP Range or CIDR.
- IP Range:
- Start IP: Set a start IP address for the network range, for example, 172.20.58.200.
- End IP: Set an end IP address for the network range, for example, 172.20.58.220.
- Netmask: Set a netmask for the network range, for example, 255.255.0.0.
- Gateway: Set a gateway for the network range, for example, 172.20.0.1.
- CIDR: Set a CIDR block for the public network, for example, 192.168.1.1/24.
- IP Range:
- DHCP Service: Optional. Choose
whether to enable the DHCP service.Note: vCenter public network does not
support DHCP services. You need to manually assign an IP address to a VM
instance.
Create a Flat Network
- Name: Enter a name for the flat network.
- Description: Optional. Enter a description for the flat network.
- L2 Network Type: Select an L2 network type as
needed.
- Supported types: L2NoVlanNetwork and L2VlanNetwork.
- If you select L2VlanNetwork, enter a VLAN ID.
- Switch: Enter the dvSwitch name or vSwitch name of the vCenter as needed.
- Network Type: Select Flat Network here.
- Cluster: Select a vCenter cluster.
- Network Range Method: Select a method to add a
network range for the public network. You can select IP Range or CIDR.
- IP Range:
- Start IP: Set a start IP address for the network range, for example, 172.20.58.100.
- End IP: Set an end IP address for the network range, for example, 172.20.58.120.
- Netmask: Set a netmask for the network range, for example, 255.255.0.0.
- Gateway: Set a gateway for the network range, for example, 172.20.0.1.
- CIDR: Set a CIDR block for the flat network, for example, 192.168.1.1/24.
- IP Range:
- DHCP Service: Optional. Choose whether to enable the
DHCP service.Note: vCenter flat network does not support DHCP services. You
need to manually assign an IP address to a VM instance.

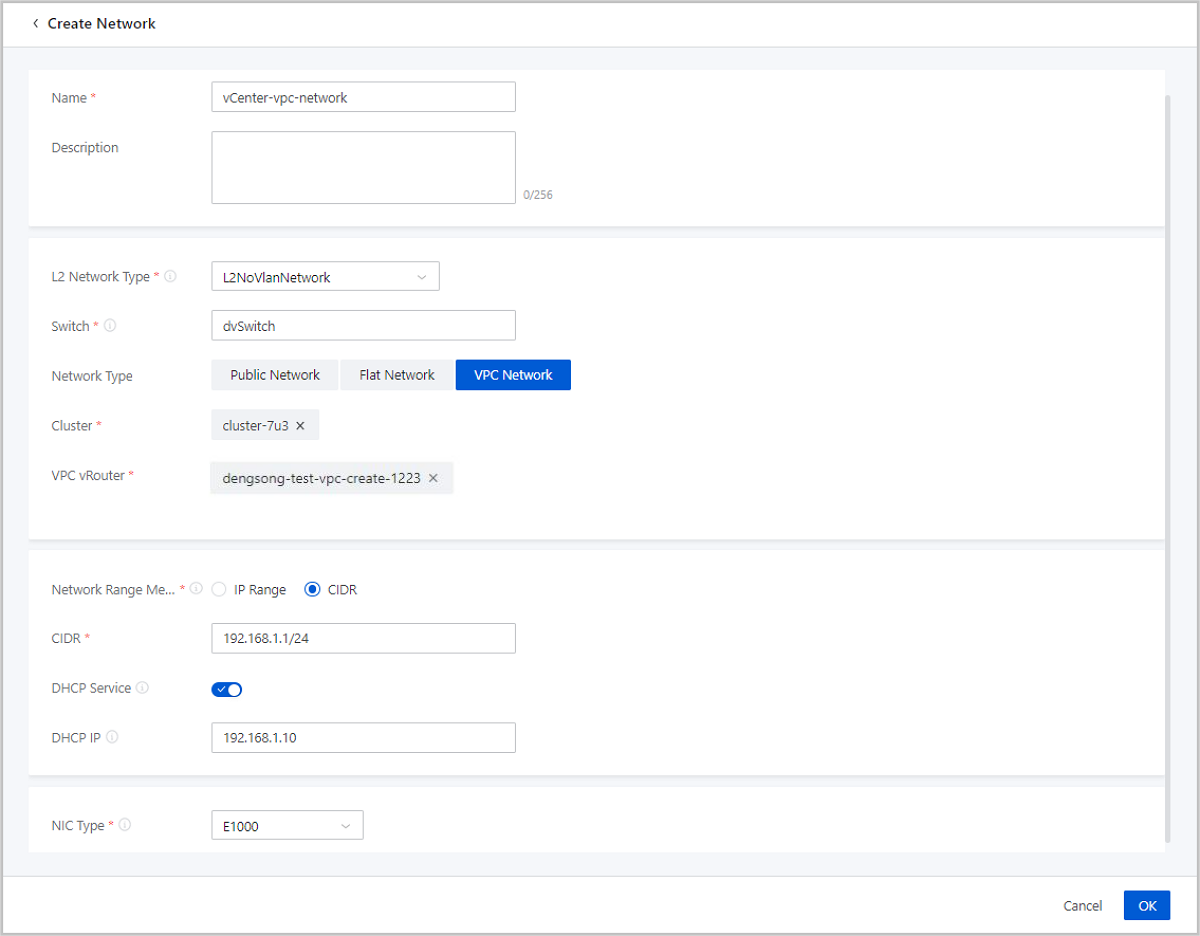
Create a VPC Network
- To create a vCenter VPC network, make sure that a ZStack Cloud management node and a vCenter host can communicate with each other.
- To create a vCenter VPC network, you need to prepare a VPC vRouter in the
Network Resource in
advance.Note: ZStack Cloud provides users
with dedicated vCenter vRouter images. You can find the download address
of the latest vRouter image on the ZStack Cloud
official website.
- Software: ZStack-vRouter-5.5.24.vmdk
- Download address: Click here.
- Name: Enter a name for the VPC network.
- Description: Optional. Enter a description for the VPC network.
- L2 Network Type: Select an L2 network type as
needed.
- Supported types: L2NoVlanNetwork and L2VlanNetwork.
- If you select L2VlanNetwork, enter a VLAN ID.
- Switch: Enter the dvSwitch name or vSwitch name of the vCenter as needed.
- Network Type: Select VPC Network here.
- Cluster: Select a vCenter cluster.
- VPC vRouter: Select a VPC vRouter.
- Network Range Method: Select a method to add a
network range for the public network. You can select IP Range or CIDR.
- IP Range:
- Start IP: Set a start IP address for the network range, for example, 172.20.58.200.
- End IP: Set an end IP address for the network range, for example, 172.20.58.220.
- Netmask: Set a netmask for the network range, for example, 255.255.0.0.
- Gateway: Set a gateway for the network range, for example, 172.20.0.1.
- CIDR: Set a CIDR block for the VPC network, for example, 192.168.1.1/24.
- IP Range:
- DHCP Service: Optional. Choose whether to enable the DHCP service. The DHCP service is enabled by default.
- DHCP IP: Optional. Set an IP address for the DHCP server.
- NIC Type: Select the NIC type for the VPC network.
Manage a vCenter Network
On the main menu of ZStack Cloud, click . Then, the Network page appears.
| Action | Description |
|---|---|
| Create vCenter Network | Create a vCenter network. Network type includes public network, flat network, and VPC network. |
| Edit vCenter Network | Edit the name and description of the vCenter network. |
| Add Network Range | Add a network range for the vCenter network. An IPv4 public network supports IP range and CIDR. Flat networks and VPC networks only support IP range. |
| Set Sharing Mode |
Set the sharing mode of a resource. The
platform provides the following sharing modes:
Note:
|
| Delete vCenter Network | Deleting a vCenter network resource also deletes local records. Your actual network resources on your remote vCenter will not be affected. (Deleting a vCenter network detaches the corresponding NIC from the vCenter VM instance.) |
vCenter Volume
Create a vCenter Volume
On the main menu of ZStack Cloud, choose . On the Volume page, click Create Volume. Then, the Create Volume page is displayed.
- Create a vCenter volume with a disk offering.
- Create a vCenter volume with a volume image.
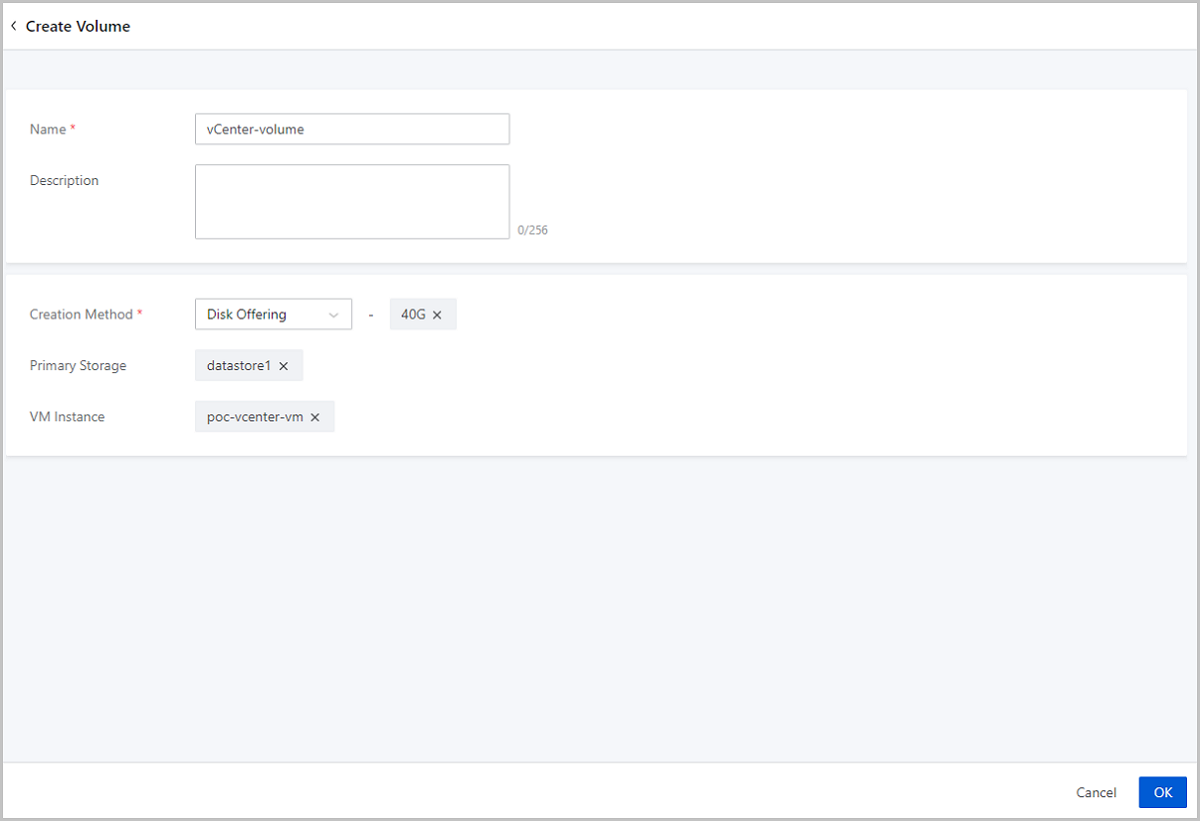
Create a vCenter Volume with a Disk Offering
- Name: Enter a name for the vCenter volume.
- Description: Optional. Enter a description for the vCenter volume.
- Creation Method: Choose Disk Offering, and select a disk offering as needed.
- Primary Storage: Optional. Specify a primary storage for the vCenter volume.
- VM Instance: Optional. Specify a VM instance for the
vCenter volume to attach to.
- If you set neither Primary Storage nor
VM Instance, the volume you create is not
instantiated and is displayed on the
Uninstantiated tab page.Note:
An uninstantiated volume is only a conceptual device that does not occupy an actual space. It is instantiated when you attached it to a VM instance.
- If you set both Primary Storage and VM Instance, the volume is created on the specified primary storage and attached to the specified VM instance.
- If you set only set VM Instance, the volume is created on the primary storage where the VM instance reside.
- If you set only Primary Storage, the volume is created as an available volume on the primary storage and occupies an actual space.
- If you set neither Primary Storage nor
VM Instance, the volume you create is not
instantiated and is displayed on the
Uninstantiated tab page.
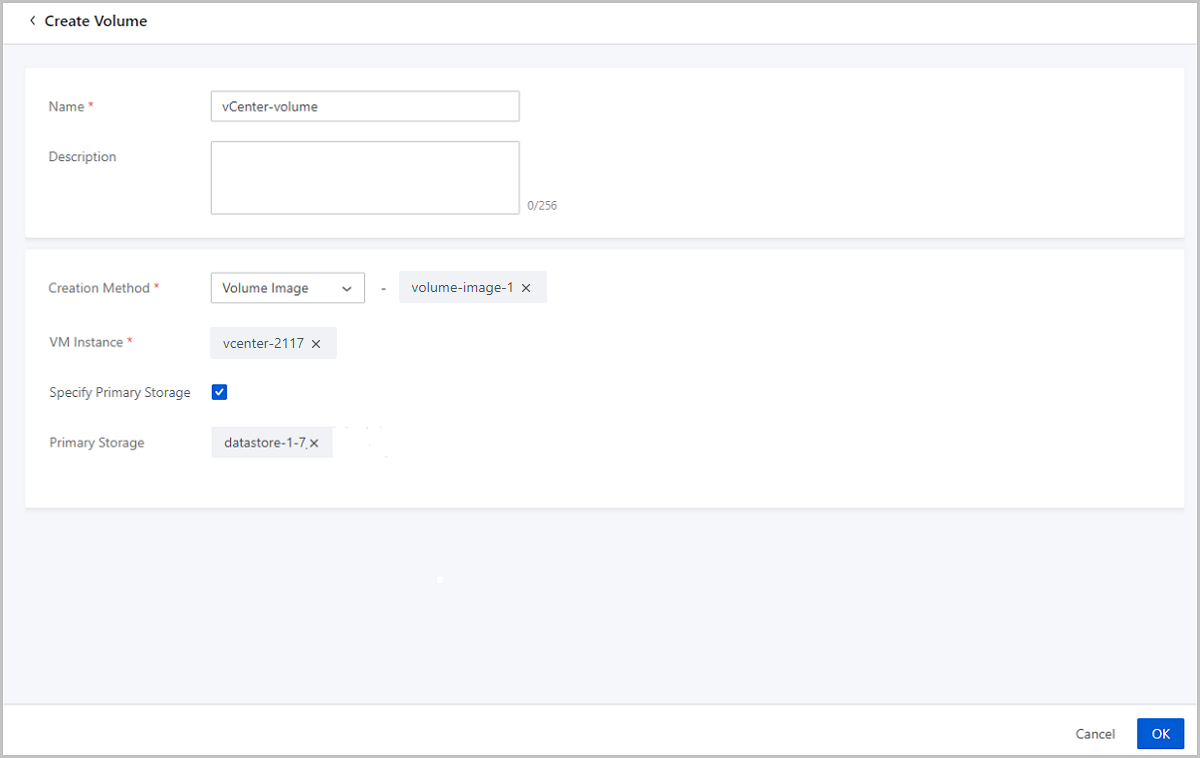
Create a vCenter Volume with a Volume Image
- Name: Enter a name for the vCenter volume.
- Description: Optional. Enter a description for the vCenter volume.
- Creation Method: Choose Volume
Image, and select a volume image as needed.Note: Upload the
needed volume image to the image storage in advance.
- VM Instance: Specify a VM instance for the volume to attach to. The volume is created on the primary storage where the VM instance reside.
- Specify: Optional. Choose whether to specify a primary storage to create the volume.
Manage a vCenter Volume
On the main menu of ZStack Cloud, choose . Then, the Volume page is displayed.
| Action | Description |
|---|---|
| Create vCenter Volume | Create a new vCenter volume via a disk offering or a volume image. |
| Edit vCenter Volume | Edit the name and the description of a vCenter volume. |
| Enable vCenter Volume | Enable a disabled vCenter volume. |
| Disable vCenter Volume | Disable an enabled vCenter volume. |
| Attach vCenter Volume | Attach a vCenter volume to the specified vCenter VM instance as a data volume. |
| Detach vCenter Volume | Detach a vCenter volume from a vCenter VM
instance.Note: Detaching a volume from a running VM instance may
affect the business continuity. Proceed with
caution. |
| Change Owner | Change the owner of a vCenter
volume.Note: ZStack Cloud supports
multi-account management for the managed vCenters. Normal
account and project members can
perform operations on vCenter volumes. |
| Delete vCenter Volume | The deleted vCenter volume is displayed on the
Recycle Bin tab.Note: Deleting a vCenter
volume interrupts data reads/writes of associated VM instances
from/to the volume, and makes the volumes unavailable. You
cannot attach it to any VM instance unless you recover the
volume. |
| Recover vCenter Volume | Recover a deleted vCenter volume. The recovered volume is displayed on the Available Resource tab. |
| Expunge vCenter Volume | Expunge a deleted vCenter volume.Note: This
operation expunges the volume. The expunged volumes cannot be
recovered. Proceed with caution. |
Consideration
- Root Volume: A root volume is yhe system volume of a VM instance. A root volume supports the system running of a VM instance.
- Data Volume: A data volume provides extended storage space for a VM instance.
- Volumes cannot be attached to VM instances with different Hypervisors. For example, a volume attached to a KVM VM instance cannot be attached to a vCenter VM instance.
- You can detach a volume from the VM instance it attached to. The detached volume can be attached to a VM instance with the same Hypervisor with the original VM instance.
- A volume can be attached to a VM instance at one time.
- The space occupied by a volume is calculated as a virtual space. Creating a volume occupies a virtual capacity equal to the volume size and only a small actual space. The actual space a volume occupies increases with more files written into the volume.
- A root volume is an integral part of a vCenter VM instance. You cannot detach a root volume from a VM instance.
vCenter Image
Add a vCenter Image
ZStack Cloud allows you to add local images in the .vmdk format to a vCenter. You can keep local image states consistent with those on the remote vCenter through the data synchronization.
On the main menu of ZStack Cloud, choose . On the Imagepage, click Add Image. Then, the Add Image page is displayed.
- Add a system image.
- Add a volume image.
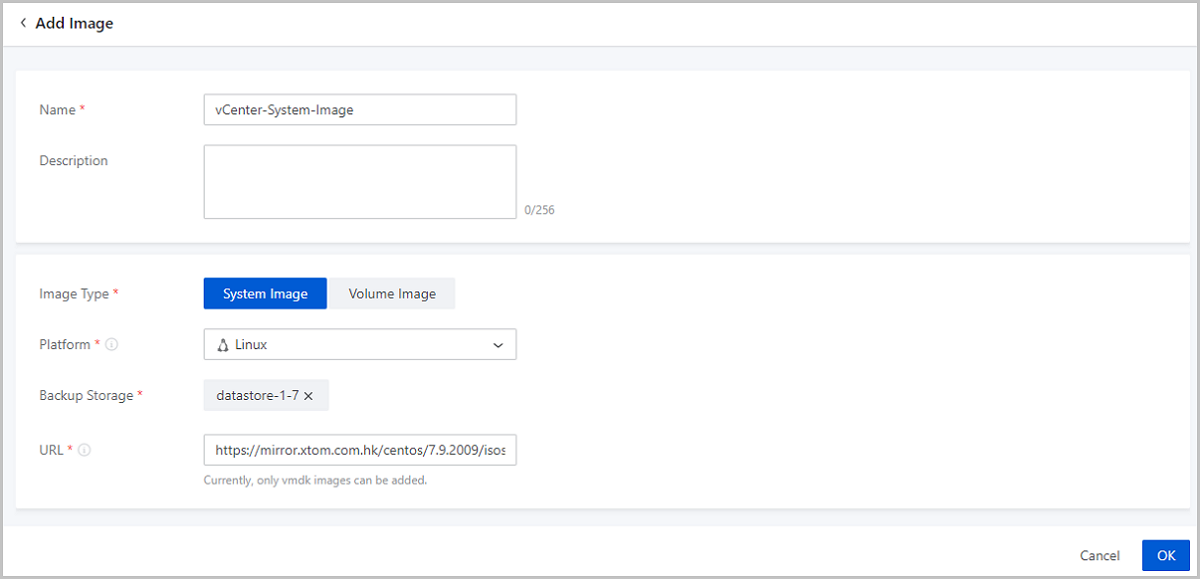
Add a System Image
- Name: Enter a name for the vCenter image.Note: The
vCenter image name cannot be identical with a vCenter VM instance
name.
- Description: Optional. Enter a description for the vCenter image.
- Image Type: Choose System Image.
- Platform: Choose the platform type of the vCenter
system image.The image platform type decides whether the VM instances created from the image use VirtIO drivers, including disk drivers and NIC drivers. Supported platforms: Linux, Windows, and Other.
- Linux: The VM instances created from the image use VirtIO drivers.
- Windows: The operating system encapsulated in the image is not installed with VirtIO. Therefore, the VM instances created from the image do not use VirtIO drivers.
- Other: The operating system encapsulated in the image can be of any types. The VM instances created from the image does not use VirtIO drivers.
- Image Storage: Choose a vCenter image storage.
- URL: Enter the download URL of the vCenter system image.
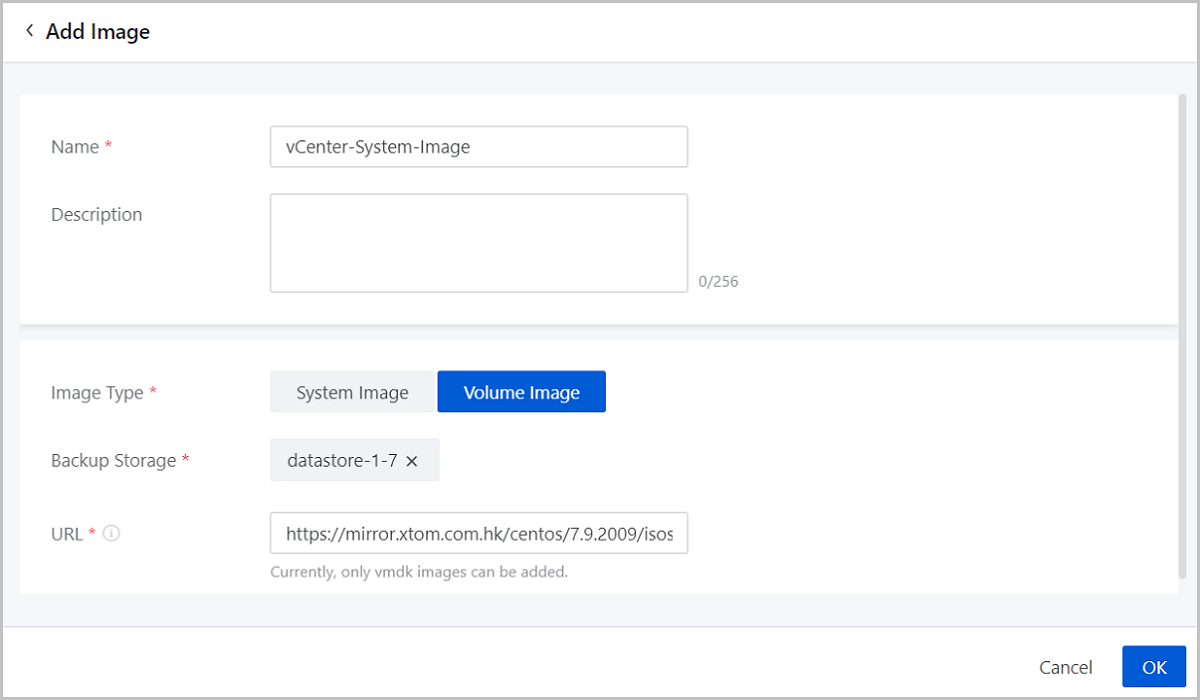
Add a Volume Image
- Name: Enter a name for the vCenter image.Note: The
vCenter image name cannot be identical with a vCenter VM instance
name.
- Description: Optional. Enter a description for the vCenter image.
- Image Type: Choose Volume Image.
- Image Storage: Choose a vCenter image storage.
- URL: Enter the download URL of the vCenter volume image.
Manage a vCenter Image
On the main menu of ZStack Cloud, choose . Then the Image page is displayed.
| Action | Description |
|---|---|
| Add vCenter Image | Add a local image in the .vmdk format to the vCenter. Currently, you cannot add an image of in the .iso format. |
| Edit vCenter Image | Edit the name and the description of a vCenter image. |
| Enable vCenter Image | Enable a disabled vCenter image. After you enable the image, it serves as a backup. |
| Disable vCenter image | Disable an enabled vCenter image. After you disable the image, it no longer serves as a backup. |
| Set Sharing Mode |
Set the sharing mode of a resource. The
platform provides the following sharing modes:
Note:
|
| Change Owner | Change the owner of a vCenter
image.Note: ZStack Cloud supports
multi-account management on managed vCenters. Normal accounts and project members can use the vCenter
images shared by the admin. |
| Delete vCenter Image | Deleting a vCenter image deletes its local records and the actual image on the remote vCenter. |
| Recover vCenter image | Recover a deleted vCenter image. The recovered image appears on the Available tab page. |
| Expunge vCenter Image | Expunge a deleted image. You can only expunge an image in the recycle bin. |
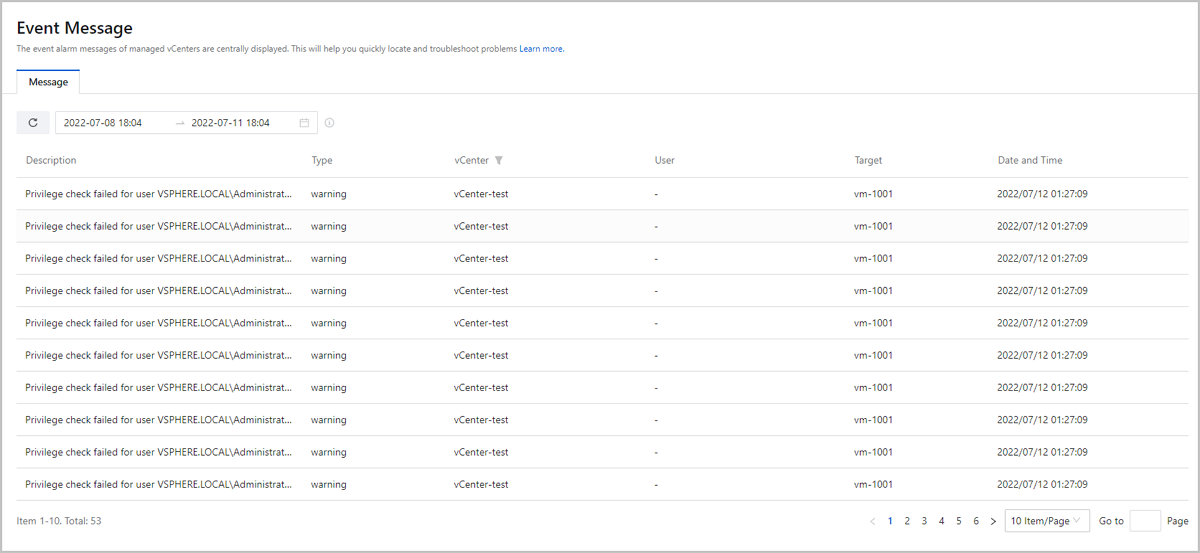
vCenter Event Message
On the main menu of ZStack Cloud, choose . Then, the Event Message page is displayed.
- This page displays up to 300 event messages. You can specify a time range to view the messages occurring during this period.
- You can set the message count displayed on each page and turn pages by clicking the button at the lower right. Options: 10, 20, 50, and 100.