Cloud Monitoring
Performance Analysis
Performance Analysis displays the performance metrics of key resources monitored externally or internally in the Cloud. You can view the performance analysis or export the analysis report as needed to improve the O&M efficiency.
View Performance Analysis
On the main menu of ZStack Cube Ultimate, choose . Then, the Performance Analysis page is displayed.
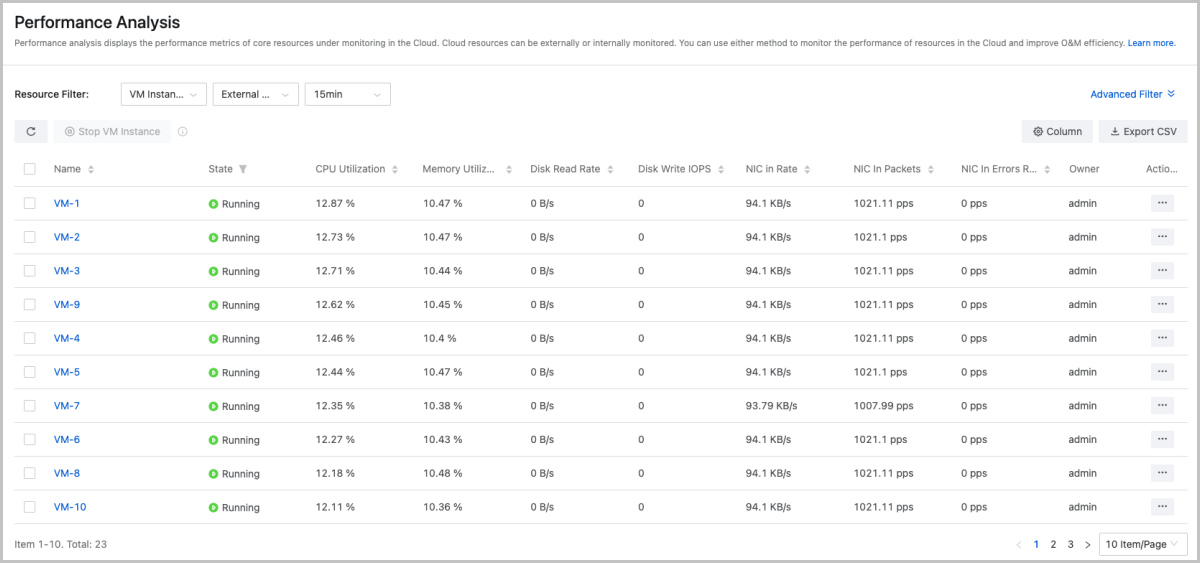
- Filters: Supports basic filtering and advanced filtering.
- Basic filtering: Allows you to filter by resource, monitoring
methods, and time spans.
- Resource: Supports VM instances, VPC vRouters, hosts, image storage, L3 networks, and virtual IPs.
- Monitoring method: Supports external monitoring and internal
monitoring.
- External monitoring: Obtains the VM performance data, such as the CPU, memory, disk I/O, and NIC data from the host by using libvirt.
- Internal monitoring: Obtains the VM performance data, such as the CPU, memory, and disk capacity directly by using the agent and pushes the data to the host. To using internal monitoring, install the agent first.
 Note: The memory data obtained by using internal
monitoring is more accurate than that obtained by
external monitoring. Therefore, we recommend that you
use internal monitoring to monitor the memory
data.
Note: The memory data obtained by using internal
monitoring is more accurate than that obtained by
external monitoring. Therefore, we recommend that you
use internal monitoring to monitor the memory
data. - Time span: You can select a time span to view the monitoring data. Available time spans: 15 minutes, 1 hour, 1 week, and custom.
- Advanced filtering: Allows you to further filter by filter item,
resource scope, and owner scope.
- Filter item: Allows you to sort and view resources based on monitoring metrics and metric values (for example, CPU utilization >= 75%).
- Resource range: Allows you to view the monitoring information of all resources on the Cloud or specify a resource to view its own monitoring information.
- Owner range: Allows you to view the monitoring information of all owners in the Cloud or specify an owner to view the monitoring information.
- Basic filtering: Allows you to filter by resource, monitoring
methods, and time spans.
- Analysis report: Generates an analysis report based on the filter
conditions.
- Allows you to sort the items by resource name or monitoring metric.
- Allows you to export all the report information or export the information on the current page in CSV format.
- Allows you to customize the number of items to be displayed on each page. By default, 10 items are displayed per page.
Note:
- The VM analysis report page allows you to stop a VM instance.
- The VM analysis report page allows you to filter VM instances based on the VM state.
- The VM/VPC vRouter analysis report allows you to customize the columns to be displayed.
- When you export a VM or VPC vRouter analysis report, you can choose to export the average, maximum, or minimum values of the metrics as needed.
| Resource Type | Monitoring Method | Monitoring Metric | Destription |
|---|---|---|---|
| VM Instance/VPC vRouter | External Monitoring | Default IPv4 | Displays the default IPv4 address of each VM
instance in the current zone by default.Note: This metric does
not apply to VPC vRouters currently. |
| Occupy Storage Size | Displays the storage size occupied by the
volumes of each VM instance in the current zone by default,
including the VM root volume and data volumes attached to this
VM instance.Note: This metric does not apply to VPC vRouters
currently. |
||
| Total Volume Capacity | Displays the total volume capacity of each VM
instance in the current zone by default.Note: This metric does
not apply to VPC vRouters currently. |
||
| CPU Utilization | Displays the average CPU utilization of all
the VM instances/VPC vRouters in the current zone by
default.Note: If a VM instance or VPC vRouter has more than
one CPU, the CPU utilization might be greater than
100%. |
||
| Memory Utilization | Displays the average memory utilization of all the VM instances/VPC vRouters in the current zone by default. | ||
| Disk Read Rate | Displays the average disk read speed of all the VM instances/VPC vRouters in the current zone by default. | ||
| Disk Write Rate | Displays the average disk write speed of all the VM instances/VPC vRouters in the current zone by default. | ||
| NIC In Rate | Displays the average NIC in rate of all the VM instances/VPC vRouters in the current zone by default. | ||
| NIC Out Rate | Displays the average NIC out rate of all the VM instances/VPC vRouters in the current zone by default. | ||
| Disk Read IOPS | Displays the average disk read IOPS of all the VM instances/VPC vRouters in the current zone by default. | ||
| Disk Write IOPS | Displays the average disk write IOPS of all the VM instances/VPC vRouters in the current zone by default. | ||
| NIC In Packets | Displays the average number of received NIC packets of all the VM instances/VPC vRouters in the current zone by default. | ||
| NIC Out Packets | Displays the average number of sent NIC packets of all the VM instances/VPC vRouters in the current zone by default. | ||
| NIC In Errors Rate | Displays the average rate of received NIC errors of all the VM instances/VPC vRouters in the current zone by default. | ||
| NIC Out Errors Rate | Displays the average rate of sent NIC errors of all the VM instances/VPC vRouters in the current zone by default. | ||
| Internal Monitoring | Default IPv4 | Displays the default IPv4 address of each VM
instance in the current zone by default.Note: This metric does
not apply to VPC vRouters currently. |
|
| Occupy Storage Size | Displays the storage size occupied by the
volumes of each VM instance in the current zone by default,
including the VM root volume and data volumes attached to this
VM instance.Note: This metric does not apply to VPC vRouters
currently. |
||
| Total Volume Capacity | Displays the volume capacity of each VM
instance in the current zone by default, including the VM root
volume and data volumes attached to this VM instance.Note: This
metric does not apply to VPC vRouters
currently. |
||
| CPU Utilization | Displays the average CPU utilization of all the VM instances/VPC vRouters in the current zone by default. | ||
| CPU Occupancy Rate (System Process) | Displays the average CPU occupancy rate (system process) of all the VM instances/VPC vRouters in the current zone by default. | ||
| CPU Occupancy Rate (User Process) | Displays the average CPU occupancy rate (user process) of all the VM instances/VPC vRouters in the current zone by default. | ||
| CPU Occupancy Rate (Waiting) | Displays the average CPU occupancy rate (waiting) of all the VM instances/VPC vRouters in the current zone by default. | ||
| CPU Idle Rate | Displays the average CPU idle rate of all the VM instances/VPC vRouters in the current zone by default. | ||
| Memory Utilization | Displays the average memory utilization of all the VM instances/VPC vRouters in the current zone by default. | ||
| Memory Idle Rate | Displays the average memory idle rate of all the VM instances/VPC vRouters in the current zone by default. | ||
| Disk Utilization | Displays the average disk utilization of all the VM instances/VPC vRouters in the current zone by default. | ||
| Disk Idle Rate | Displays the average disk idle rate of all the VM instances/VPC vRouters in the current zone by default. | ||
| Host | / | Disk Read IOPS | Displays the disk read IOPS of all the hosts in the current zone by default. |
| / | Disk Write IOPS | SDisplays the write read IOPS of all the hosts in the current zone by default. | |
| / | Used Disk Storage Percentage | Displays the used disk storage percentage of all the hosts in the current zone by default. | |
| / | Disk Usage | Displays the disk usage of all the hosts in the current zone by default. | |
| / | NIC In Rate | Displays the NIC in rate of all the hosts in the current zone by default. | |
| / | NIC Out Rate | Displays the NIC out rate of all the hosts in the current zone by default. | |
| / | NIC In Errors Rate | Displays the NIC in erros rate of all the hosts in the current zone by default. | |
| / | NIC Out Errors Rate | Displays the NIC out errors rate of all the hosts in the current zone by default. | |
| / | CPU Utilization Average | Displays the average CPU utilization of all the hosts in the current zone by default. | |
| / | Memory Utilization | Displays the memory utilization of all the hosts in the current zone by default. | |
| / | Disk Read Speed | Displays the disk read speed of all the hosts in the current zone by default. | |
| / | Disk Write Speed | Displays the disk write speed of all the hosts in the current zone by default. | |
| / | NIC In Speed | Displays the NIC in speed of all the hosts in the current zone by default. | |
| / | NIC Out Speed | Displays the NIC out speed of all the hosts in the current zone by default. | |
| Image Storage | / | Image Storage Capacity Available Percent | Displays the percentage of available capacity of all the image storage in the current zone by default. |
| L3 Network | / | Used IPs (IPv4) | Displays the number of used IPv4 IPs of all L3 networks in the current zone by default. |
| / | Used IP Percentage (IPv4) | Displays the percentage of used IPv4 IPs of all L3 networks in the current zone by default. | |
| / | Available IPs (IPv4) | Displays the number of available IPv4 IPs of all L3 networks in the current zone by default. | |
| / | Available IP Percentage (IPv4) | Displays the percentage of available IPv4 IPs of all L3 networks in the current zone by default. | |
| Virtual IP | / | Inbound Traffic | Displays the inbound traffic of all virtual IP addresses in the current zone by default. |
| / | Inbound Traffic Rate | Displays the inbound traffic rate of all virtual IP addresses in the current zone by default. | |
| / | Outbound Traffic | Displays the outbound traffic of all virtual IP addresses in the current zone by default. | |
| / | Outbound Traffic Rate | Displays the outbound traffic rate of all virtual IP addresses in the current zone by default. |
Export Analysis Report
You can export all the analysis information of a resource or only information on the current page based on the filter conditions. For VM instance and VPC vRouters, you can customize the monitoring metrics to be exported and choose to export their average values, maximum values, or minimum values as needed.
On the main menu of ZStack Cube Ultimate, choose . Then, the Performance Analysis page is displayed. Taking VM instance as an example, on the analysis report area, click Export CSV and choose Current Page or All. Then, the export page is displayed.
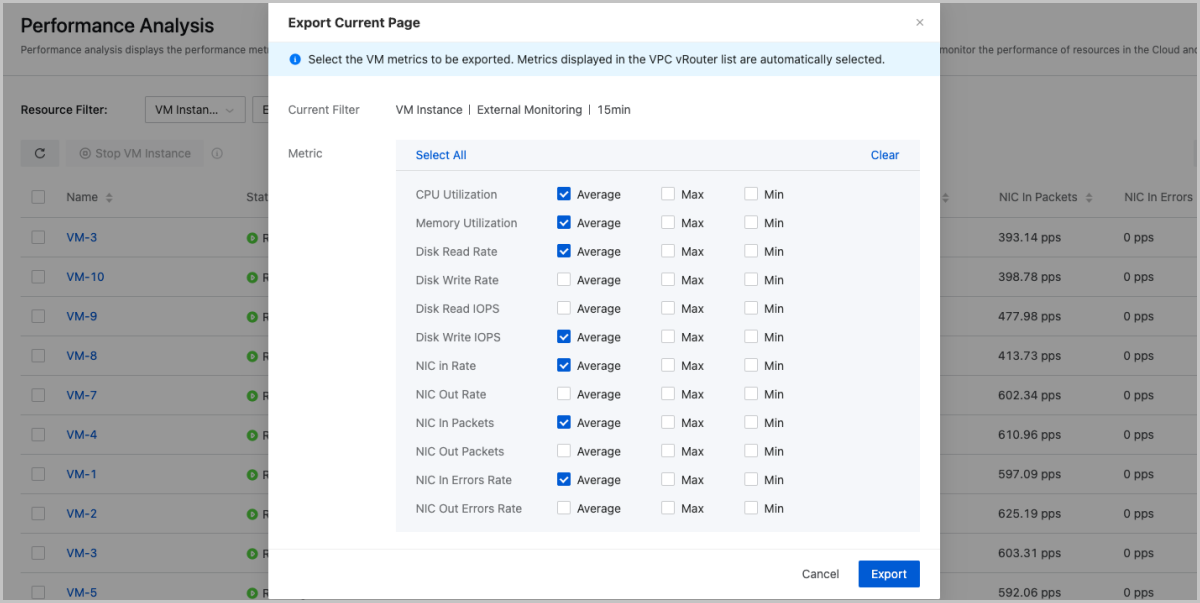
- The export page displays the selected resource, monitoring method, time span, and all the monitoring metrics of the resource.
- By default, metrics displayed in the VM/VPC vRouter list are automatically selected. You can deselect them or select the average, maximum, or minimum value of other metrics.
- You can select all the average, maximum, and minimum values or empty your selections with one click.
Capacity Management
Capacity Management visualizes the capacities and usages of key resources in the Cloud. You can use this feature to improve O&S efficiency.
Capacity Management displays the physical capacities and usages of key resources by using cards, and displays Top 10 resource capacities and usages, providing you a commanding view of your resource usages and greatly improving O&S efficiency.
View Capacity Management
On the main menu of ZStack Cube Ultimate, choose . Then, the Capacity Management page is displayed.

Capacity Management | Overview
- Displays the capacity information of various core resources in card form, including primary storage, image storage, management node, VM instance, data volume, image, snapshot, and compute node.
- Displays the top 10 core resources that have the largest capacity, including host, primary storage, image storage, image, VM instance, data volume, and snapshot.
Note:
- The capacity information displayed on this page are the actual physical capacity of the resources.
- The data displayed on this page are static data. Each time you refresh the page, the latest data will be displayed.
- The following primary storage types are supported: LocalStorage, SharedBlock, Ceph, Vhost, and CBD.
- The following image storage types are supported: ImageStore and Ceph
Management Node Monitoring
Management Node (MN) monitoring allows you to view the health status of each management node when you use multiple management nodes to achieve high availability.
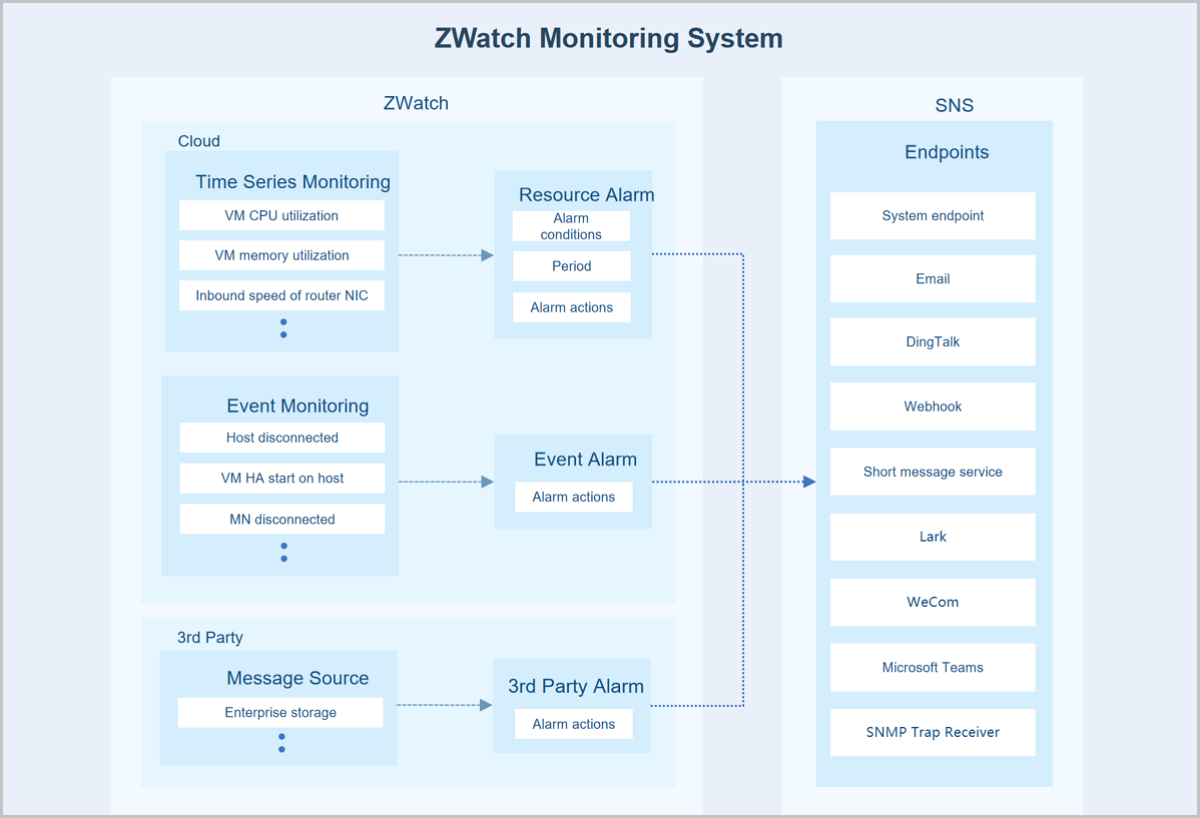
Monitoring and Alarm
The Monitoring and Alarm feature monitors time-series data and events and sends alarm messages to specified endpoints by using SNS. Resource alarms, event alarms, and extended alarms are supported. The supported endpoints include the system, emails, DingTalk, WeCom, Lark, Webhook, SMS, Microsoft Teams, and SNMP trap receiver. For some resource alarms, you need to install the agent before they can work as expected.
Concepts
- Monitoring System:A monitoring system provides the following features:
- Monitor the following two types of time-series data:
- Resource utilizations such as CPU utilization of VM instances and memory utilization of hosts
- Resource capacities such as available number of IP addresses and total number of running VM instances
- Event collection: collects events predefined on the Cloud, such as host disconnection and VM HA enabling.
- Alarm: triggers alarms on time-series data or events.
- Audit: records all operations and allows queries.
- Customization: allows you to customize alarms and message templates
and use predefined alarm templates and resource groups.
- The following three types of alarms are supported:
- Resource alarm: triggers alarms on time-series data. For example, you can configure an alarm for VM instances. If the CPU utilization of a VM instance exceeds 80% by five consecutive minutes, send an alarm message to an email address.
- Event alarm: triggers alarms on events, also called event subscription. For example, you can configure an alarm for host disconnection. If a host is disconnected, an alarm message is sent to DingTalk.
- Extended alarm: receives alarm messages from message sources. For example, if a Ceph Enterprise storage pool is downgraded, an alarm message is sent to the system of the Cloud.
-
A message template specifies the text template of a
resource alarm message or event alarm message sent to an SNS system.
- A message template and message recovery template are provided by the system. If you do not create a template, the system uses the predefined templates.
- You can create multiple message templates and can set only one template as the default template. Messages are formatted by using the default template.
- You can use
${}in a template to quote variables configured in an alarm or event. - You can configure email, DingTalk, WeCom, Lark, SMS, Webhook, and Microsoft Teams as an endpoint in a message template. Messages sent by using email, DingTalk, WeCom, Lark, SMS, Webhook, or Microsoft Teams are sent in the specified format.
- A message source is used to take over extended alarm messages. If you configure alarms for message sources, extended alarm messages can be sent to various endpoints. This enables centralized management of alarm messages and improves O&M efficiencies. You can configure a message source to take over alarm messages of Ceph Enterprise.
- An alarm template is a template of alarm rules. If you associate an alarm template with a resource group, an alarm is created to monitor the resources in the group.
- A resource group consists of resources grouped based on your business needs. If you associate an alarm template with a resource group, the alarm rules specified by the template take effect on all the resources in the group.
- The following three types of alarms are supported:
- Monitor the following two types of time-series data:
- SNS:
SNS sends alarm messages to the specified endpoints. The supported types of endpoints include the system, emails, DingTalk, WeCom, Lark, Webhook, SMS, Microsoft Teams, and SNMP trap receivers.
Endpoints:- The system provides the system-type endpoint. If you associate an alarm with this endpoint, alarm messages will be displayed below the Recent Message button in the top right corner of the UI.
- You can also create an endpoint of the email, DingTalk, Lark, WeCom, Webhook, SMS, Microsoft Teams, or SNMP trap receiver type.
Characteristics
- Provides rich metric items to comprehensively monitor and alarm the core resources as well as events of the Cloud platform.
- Supports types of endpoints including system, emails, DingTalk, WeCom, Lark, Webhook, SMS, Microsoft Teams, and SNMP trap receiver for subscription topics. You can choose an appropriate endpoint to receive alarm messages according to the actual situation.
- One alarm can monitor multiple resources at the same time.
- Emails, DingTalk, WeCom, Lark, SMS, Webhook, and Microsoft Teams support customized alarm message templates. You can set alarm message templates on demand and quickly locate key information from alarm messages.
- Supports for creating a template of alarm rules. If you associate an alarm template with a resource group, an alarm is created to monitor the resources in the group.
Scenarios
The function of monitoring and alarm monitors the core resources and events of the Cloud platform and sets up an alarm receiving mechanism. When core resources are abnormal, the monitoring and alarm will make real-time responses according to the alarm level to help O&M personnel quickly locate and solve the problem.
Global Setting
- Monitoring data is retained locally for 6 months by default, and you can
customize the monitoring data retention period in the basic settings as
follows:
On the main menu of ZStack Cube Ultimate, choose . Then, the Basic tab is displayed. You can set Monitoring Data Retention Period. Enter an integer between 1 and 12. Default: 6. Unit: month.
- Monitoring data is retained locally in a size of 50GB by default, and you can
customize the monitoring data retention size in the basic settings as
follows:
On the main menu of ZStack Cube Ultimate, choose . Then, the Basic tab is displayed. You can set Monitoring Data Retention Size based on your needs. Default: 50 GB.
- ZStack Cube Ultimate supports receiving extended alarm messages. On the main menu, choose . Then, the Advanced tab is displayed. You need to turn on the Extended Alarm Notification switch to use the extended alarm function.
Alarm
Create an Alarm
On the main menu of ZStack Cube Ultimate, choose . Then, the Alarm page is displayed.
- Create a resource alarm
- Create an event alarm
- Create an extended alarm
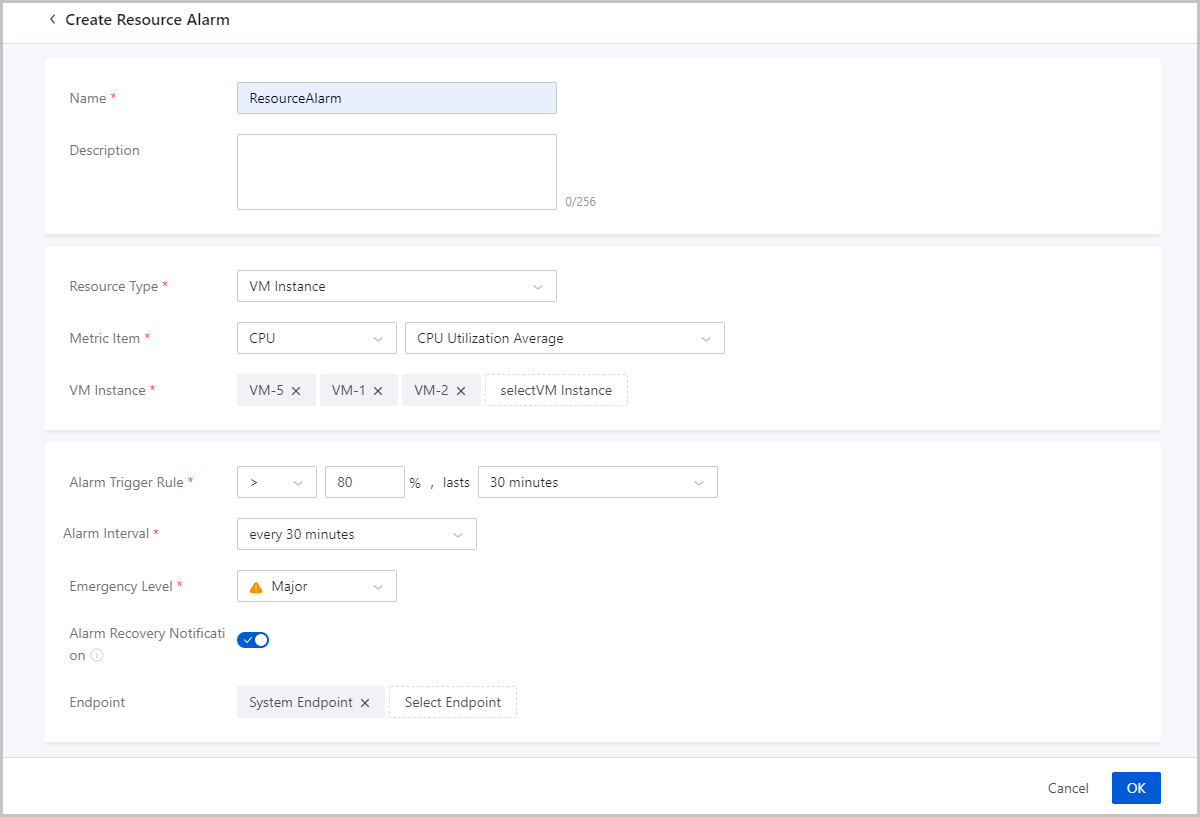
Create Resource Alarm
The system provides default resource alarms. In addition, you can customize resource alarms based on your needs. On the Resource Alarm tab, click Create Resource Alarm. Then, the Create Resource Alarm page is displayed.
- Name: Enter a name for the resource alarm.
- Description: Optional. Enter a description for the resource alarm.
- Resource Type: Select a resource
type. Valid values: VM Instance, Baremetal
Instance, Elastic Baremetal Instance, VPC
vRouter, Image, Image Storage, System Data Directory, Host, L3 Network,
Volume, VIP, Primary Storage, Listener, Management Node, Project Resource,
and CDP Task.
Note that you can select Project Resource and CDP Task only after you have purchased Tenant Management License and Continuous Data Protection (CDP) License, respectively.
- Metric Item: Select a metric item
of the selected resource type.Note:
- Multiple metric items are available for every type of resources. You can select a metric item based on your business needs.
- Some metric items are associated with additional parameter settings. If you select such metric items, you need to configure the additional parameter settings.
- Some metrics items are available only after the agent is installed on the related resource. .
- If you need to monitor memory data, we recommend that you use internal monitoring for this purpose. This is because internal monitoring yields a more accurate memory data than external monitoring.
- You can create resource alarms for key cloud resources such as VM instances, hosts, and primary storage on the details page of the resources.
- Alarm Coverage: Select one or
more resources on which the alarm takes effect.
- If you select multiple resources of the specified type, all the resources for which the alarm is configured are monitored. If the trigger condition of a resource is met, the alarm is triggered.
- If you select only one resource of the specified type, the resource
for which the alarm is configured is monitored. If the trigger
condition of the resource is met, the alarm is triggered.Note:
- You can configure fine-grained alarms for a resource.
- For example, you can configure an alarm to monitor the utilization of a CPU of a VM instance.
- Alarm Trigger Rule: Select a comparison symbol and specify a threshold and duration.
- Alarm Interval: Select an alarm
interval.
- Only 1 time:
- Alarm is triggered only once for a resource.For example,
- Assume that you configure an alarm for multiple
resources. If the trigger condition of a resource
is met, the alarm is triggered. After that, even
if the trigger condition of this resource is met
again, the alarm is no longer triggered.
Assume that you configure an alarm for a resource. If the trigger condition of the resource is met, the alarm is triggered. After that, even if the trigger condition of the resource is met again, the alarm is no longer triggered.
- Assume that you configure an alarm for multiple
resources. If the trigger condition of a resource
is met, the alarm is triggered. After that, even
if the trigger condition of this resource is met
again, the alarm is no longer triggered.
- The alarm message is sent to the endpoint (if specified) for only once. In addition, the alarm message is displayed on Message Center only once.
- If the resource recovers but later meets the trigger condition again, the one-time alarm is triggered again.
- Alarm is triggered only once for a resource.
- Repetitive Alarm:
- Alarm is triggered multiple times for a resource.For example,
- Assume that you configure an alarm for multiple
resources. If the trigger condition of a resource
is met, the alarm is triggered. If the resource
keeps meeting the trigger condition, the alarm is
repetitively triggered based on the alarm
interval.
Assume that you configure an alarm for a resource. If the trigger condition of the resource is met, the alarm is triggered. If the resource keeps meeting the trigger condition, the alarm is repetitively triggered based on the alarm interval.
- Assume that you configure an alarm for multiple
resources. If the trigger condition of a resource
is met, the alarm is triggered. If the resource
keeps meeting the trigger condition, the alarm is
repetitively triggered based on the alarm
interval.
- Each time the alarm is triggered, the alarm message is sent to the endpoint (if specified). In addition, every alarm message is displayed on Message Center.
- Alarm is triggered multiple times for a resource.
- Only 1 time:
- Emergency Level: Set an emergency level. Valid values: Emergent, Major, and Info. Alarms of different emergency levels correspond to alarm messages of different emergency levels.
- Alarm Recovery Notification: Optional. If enabled, when a resource monitored by a resource alarm recovers from alarmed status, the system receives a notification. The recovery notification is sent according to the default recovery message template. You can customize the message content on the Message Template page.
- Endpoint: Optional. If specified,
alarm messages are sent to the specified endpoint.Note:
- You can specify multiple endpoints.
- You can specify the system endpoint or customize an endpoint.
Create Event Alarm
The system provides default event alarms. In addition, you can customize event alarms based on your needs. On the Event Alarm tab, click Create Event Alarm. Then, the Create Event Alarm page is displayed.
- Resource Type: Select a resource
type. Valid values: VM Instance, VPC vRouter, Image Storage, Management
Node, Host, Primary Storage, vCenter, Backup Job, Project Resource, and CDP
Task.
Note that you can select Project Resource and CDP Task only after you have purchased Tenant Management License and Continuous Data Protection (CDP) License, respectively.
- Metric Item: Select a metric item of the selected resource type.
- Emergency Level: Set an emergency level. Valid values: Emergent, Major, and Info. Alarms of different emergency levels correspond to alarm messages of different emergency levels.
- Endpoint: Optional. If specified,
alarm messages are sent to the specified endpoint.Note:
- You can specify multiple endpoints.
- You can specify the system endpoint or customize an endpoint.
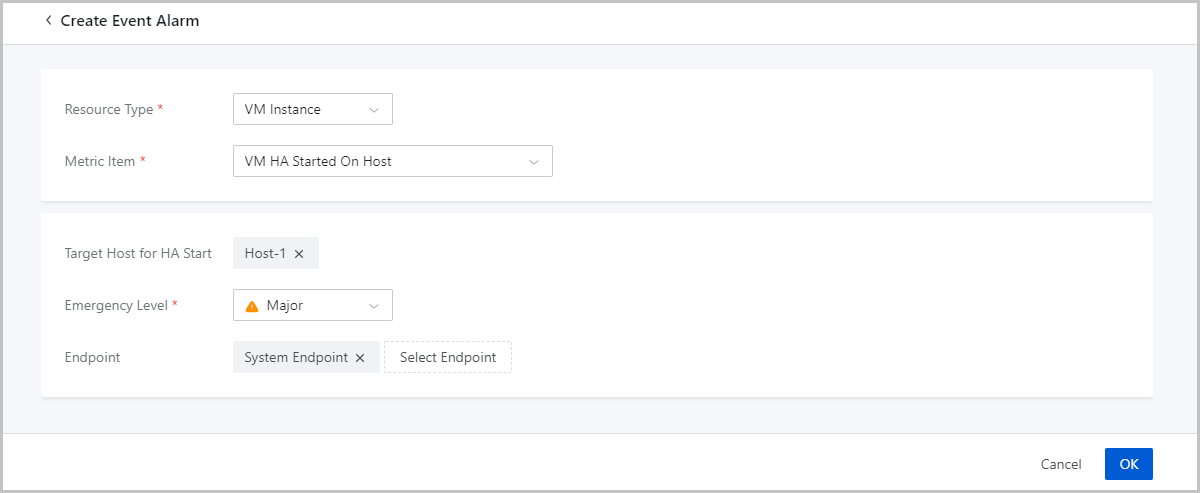 Note:
Note:
- An event alarm is triggered only when the configured event occurs. The repetitive alarm mechanism is not available for event alarms.
- When a resource monitored by an event alarm recovers from alarmed status, the system receives a notification. The recovery notification is sent according to the default recovery message template. You can customize the message content on the Message Template page.
- If the configured event occurs again, the event alarm is triggered again.
Create Extended Alarm
Before you can create an extended alarm, you need to enable the extended alarm feature. To do this, choose and turn on the Extended Alarm Notification switch.
- Name: Enter a name for the extended alarm.
- Message Source: Select a source where you need to receive alarm messages.
- Endpoint: Optional. If specified,
alarm messages are sent to the specified endpoint.Note:
- You can specify multiple endpoints.
- You can specify the system endpoint or customize an endpoint.

One-click Alarm
A one-click alarm integrates multiple metrics of a resource. You can create one-click alarms for multiple resources to monitor these resources.
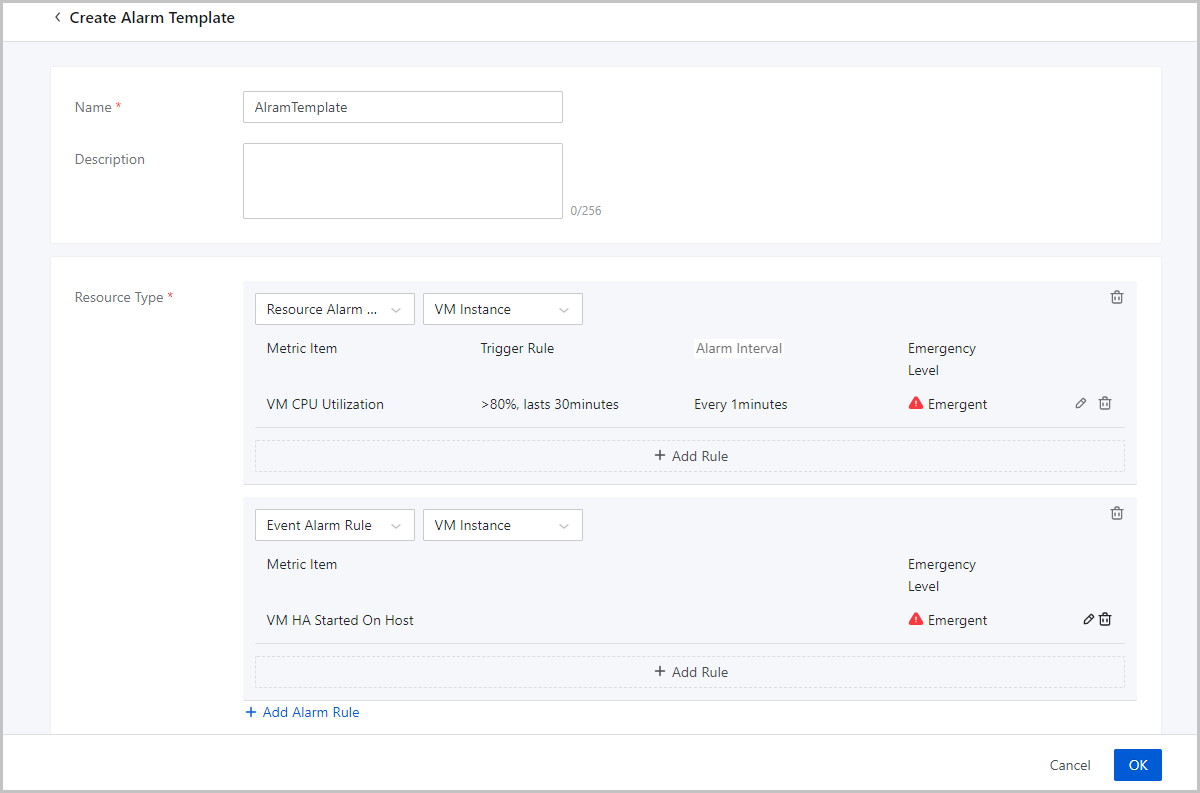
Alarm Template
Create an Alarm Template
On the main menu of ZStack Cube Ultimate, choose . On the Alarm Template page, click Create Alarm Template. Then, the Create Alarm Template page is displayed.
- Name: Enter a name for the alarm template.
- Description: Optional. Enter a description for the alarm template.
- Resource Type: add an alarm rule to the template.
- Alarm Type: Select resource alarm or event alarm.
- Resource Type: Select a resource type.
- If you create a resource alarm rule, you can select the following resource types: VM Instance, Baremetal Instance, Elastic Baremetal Instance, VPC vRouter, Image Storage, Host, L3 Network, VIP, Primary Storage, Listener, and License.
- If you create an event alarm rule, you can select the following resource types: VM Instance, VPC vRouter, Image Storage, Host, and Primary Storage.
- Add Rule: Add an alarm rule for the selected resource.
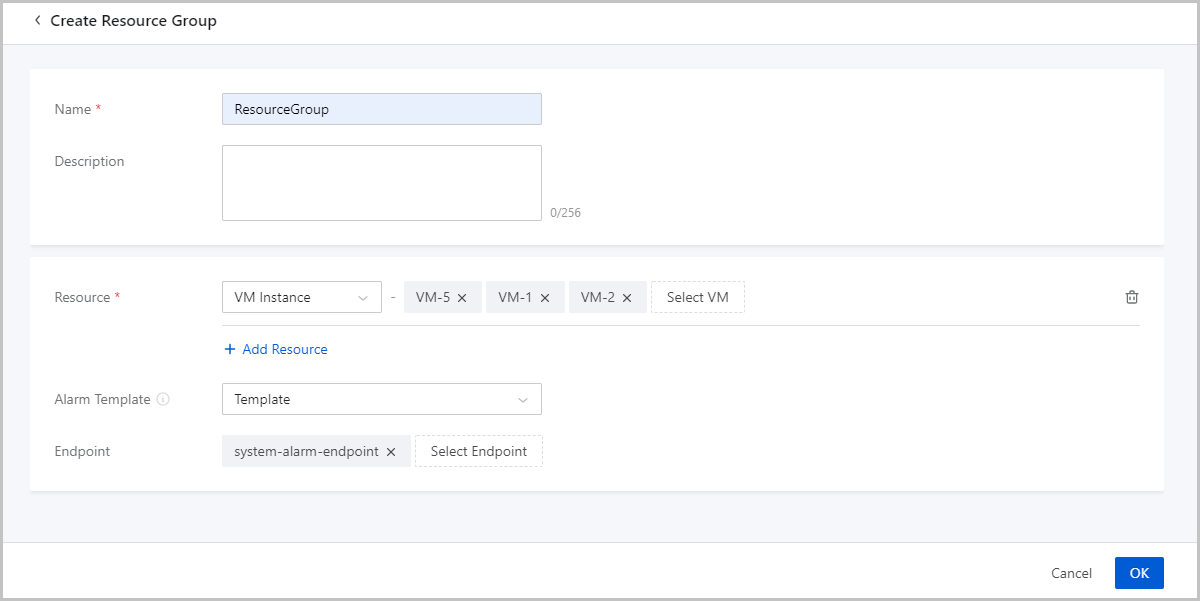
Resource Group
Create a Resource Group
On the main menu of ZStack Cube Ultimate, choose . On the Resource Group page, click Create Resource Group. Then, the Create Resource Group page appears.
- Name: Enter a name for the resource group.
- Description: Optional. Enter a description for the resource group.
- Resource: Add a resource to the resource group.
- Alarm Template: Optional. Associate a resource group with
an alarm template. Then the alarm template applies to all resources in the
group. You can also associate an alarm template after the resource group is
created.Note: You can associate a resource group with only one alarm
template.
- Endpoint: Optional. If specified,
alarm messages are sent to the specified endpoint.Note:
- You can specify multiple endpoints.
- You can specify the system endpoint or customize an endpoint.
Message Template
Create a Message Template
On the main menu of ZStack Cube Ultimate, choose . On the Message Template page, click Create Message Template. Then, the Create Message Template page is displayed.
Create an Email Message Template
- Name: Enter a name for the message template.
- Description: Optional. Enter a description for the message template.
- Type: Choose Email.
- Alarm Type: Choose an alarm type to which the message template applies. Valid values: Resource Alarm and Event Alarm.
- Alarm Message Title: Set a template for alarm message titles.
The system provides a sample template. You can refer to it and enter the information you
need.
- A message title sample (resource alarm):
Alarm ${ALARM_METRIC} ${ALARM_COMPARISON_OPERATOR} ${ALARM_THRESHOLD} ${ALARM_CURRENT_STATUS} - A message title sample (event
alarm):
${EVENT_NAME} alarm occurs.
- A message title sample (resource alarm):
- Alarm Message Text: Set a template for the alarm details. The
system provides a smaple template. You can refer to it and enter the information you
need.
- A message text sample (resource
alarm):
Alarm ${ALARM_METRIC} ${ALARM_COMPARISON_OPERATOR} ${ALARM_THRESHOLD} ${ALARM_CURRENT_STATUS} Alarm Details: UUID: ${ALARM_UUID} Resource Type: ${ALARM_NAMESPACE} Trigger Condition: ${ALARM_METRIC} ${ALARM_COMPARISON_OPERATOR} ${ALARM_THRESHOLD} Trigger Condition Duration: ${ALARM_DURATION} seconds Alarm Trigger Time: ${ALARM_TIME} Emergency Level: ${ALARM_EMERGENCY_LEVEL} Provious Status: ${ALARM_PREVIOUS_STATUS} Current Value: ${ALARM_CURRENT_VALUE} Tag: ${ALARM_LABELS.join(",")} Alarm Resource IP: ${ALARM_RESOURCE_IP} Cluster UUID: ${ALARM_RESOURCE_CLUSTER_UUID} Cluster Name: ${ALARM_RESOURCE_CLUSTER_NAME} - A message text sample (event
alarm):
${EVENT_NAME} alarm occurs.

Event Details:
Name: ${EVENT_NAME}
Resource Type: ${EVENT_NAMESPACE}
Emergency Level: ${EVENT_EMERGENCY_LEVEL}
Resource UUID: ${EVENT_RESOURCE_ID}
Resource Name: ${EVENT_RESOURCE_NAME}
Alarm Trigger Time: ${EVENT_TIME}
Event Subscription UUID: ${EVENT_SUBSCRIPTION_UUID}
Error: ${EVENT_ERROR}
Alarm Resource IP: ${EVENT_RESOURCE_IP}
Cluster UUID: ${EVENT_RESOURCE_CLUSTER_UUID}
Cluster Name: ${EVENT_RESOURCE_CLUSTER_NAME}
- A message text sample (resource
alarm):
- Recovery Message Title: When a monitored resource recovers from
an alarm status, the system sends a recovery message to corresponding endpoints. You can
customize a title template for recovery messages. The system provides a sample template.
You can refer to it and enter the information you
need.
Alarm ${ALARM_METRIC} ${ALARM_COMPARISON_OPERATOR} ${ALARM_THRESHOLD} ${ALARM_CURRENT_STATUS} - Recovery Message Text: Set a template for recovery message
details. The system provides a sample template. You can refer to it and enter the
information you
need.
Alarm ${ALARM_NAME} ${TITLE_ALARM_RESOURCE_NAME}${ALARM_CURRENT_STATUS} Alarm Recovery Details: UUID: ${ALARM_UUID} Resource Type: ${ALARM_NAMESPACE} Recovery Condition: ${ALARM_METRIC} ${ALARM_COMPARISON_OPERATOR_REVERSE} ${ALARM_THRESHOLD} Emergency Level: ${ALARM_EMERGENCY_LEVEL} Previous Status: ${ALARM_PREVIOUS_STATUS} Current Value: ${ALARM_CURRENT_VALUE} Alarm Resource UUID: ${ALARM_RESOURCE_ID} Alarm Resource Name: ${ALARM_RESOURCE_NAME} Alarm Resource IP: ${ALARM_RESOURCE_IP} Cluster UUID: ${ALARM_RESOURCE_CLUSTER_UUID} Cluster Name: ${ALARM_RESOURCE_CLUSTER_NAME} - Default Template: Choose whether to set this template as a default template. The system sends alarm message according to a default template.
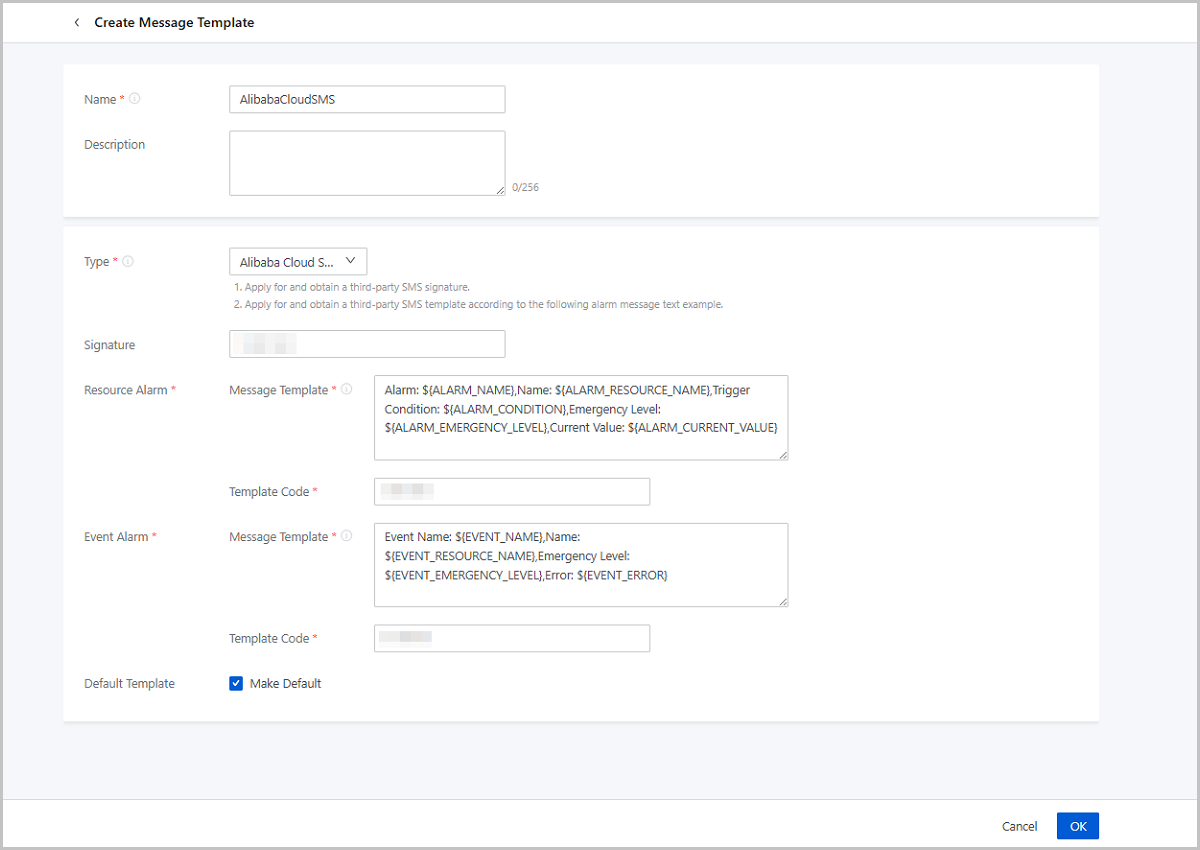
Create an Alibaba Cloud SMS Message Template
Alibaba Cloud SMS message template applies to Alibaba Cloud SMS endpoints. Before you create an Alibaba Cloud SMS message template, apply the SMS signature and template from Alibaba Cloud. Make sure that the template you apply is consistent with that you set on ZStack Cube Ultimate. For more details, refer to Resource Alarm Message Template Sample and Event Alarm Message Template Sample.
- Name: Enter a name for the template.
- Description: Optional. Set a description for the template.
- Type: Choose Alibaba Cloud SMS.
- Signature: Enter the name of the SMS signature you apply from Alibaba Cloud.
- Resource Alarm - Message Template: Set a template for resource
alarm messages. The system provides a template sample. You can refer to it and enter the
information you
need.
Alarm: ${ALARM_NAME},Name: ${ALARM_RESOURCE_NAME},Trigger Condition: ${ALARM_CONDITION},Emergency Level: ${ALARM_EMERGENCY_LEVEL},Current Value: ${ALARM_CURRENT_VALUE} - Resource Alarm - Template Code: Enter the resource alarm template code.
- Event Alarm - Message Template: Set a template for event alarm
messages. The system provides a template sample. You can refer to it and enter the
information you
need.
Event Name: ${EVENT_NAME},Name: ${EVENT_RESOURCE_NAME},Emergency Level: ${EVENT_EMERGENCY_LEVEL},Error: ${EVENT_ERROR} - Event Alarm - Template CODE: Enter the event alarm template code.
- Default Template: Choose whether to set this template as a default template. The system sends alarm message according to a default template.
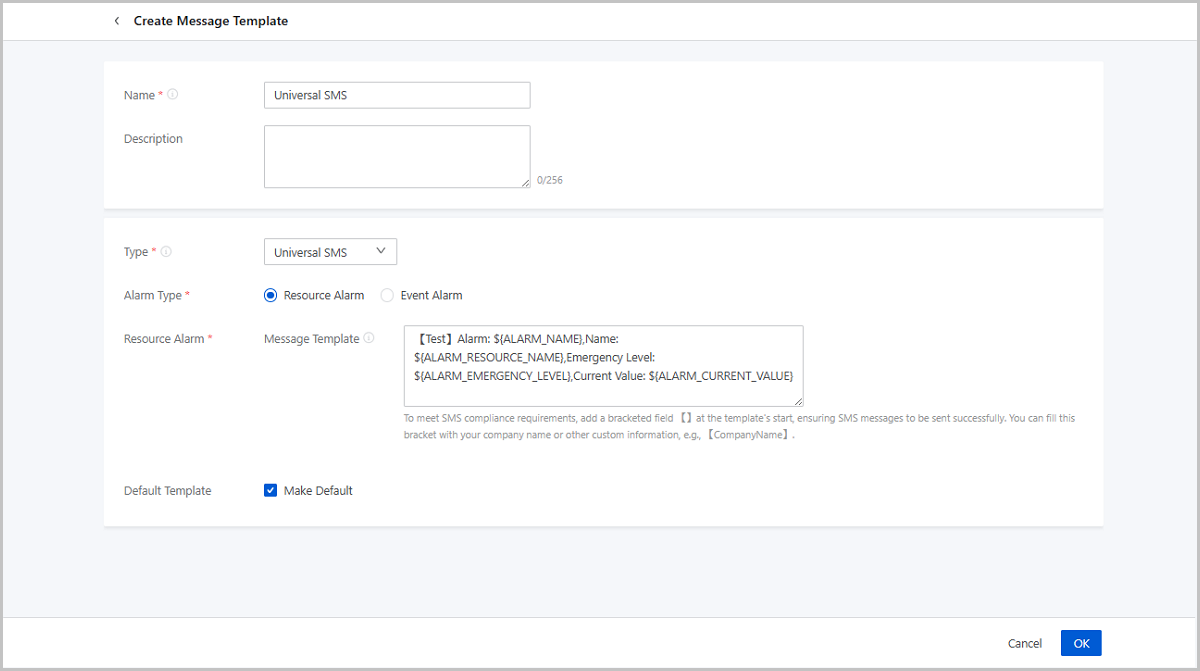
Create an Universal SMS Message Template
Universal SMS message template applies to SMS endpoints except Alibaba Cloud SMS endpoints, such as Emay Softcom SMS endpoints.
- Name: Enter a name for the template.
- Description: Optional. Set a description for the template.
- Type: Choose Universal SMS.
- Alarm Type: Choose an alarm type which the template applies to. Valid values: Resource Alarm and Event Alarm
- Resource Alarm - Message Template: Set a template for resource
alarm messages. The system provides a template sample. You can refer to it and enter the
information you
need.
Alarm: ${ALARM_NAME},Name: ${ALARM_RESOURCE_NAME},Trigger Condition: ${ALARM_CONDITION},Emergency Level: ${ALARM_EMERGENCY_LEVEL},Current Value: ${ALARM_CURRENT_VALUE} - Event Alarm - Message Template: Set a template for event alarm
messages. The system provides a template sample. You can refer to it and enter the
information you
need.
Event Name: ${EVENT_NAME},Name: ${EVENT_RESOURCE_NAME},Emergency Level: ${EVENT_EMERGENCY_LEVEL},Error: ${EVENT_ERROR}Note: To
meet SMS compliance requirements, add a bracketed field【】at the template's start,
ensuring SMS messages to be sent successfully. You can fill this bracket with your
company name or other custom information, e.g., 【CompanyName】. - Default Template: Choose whether to set this template as a default template. The system sends alarm message according to a default template.
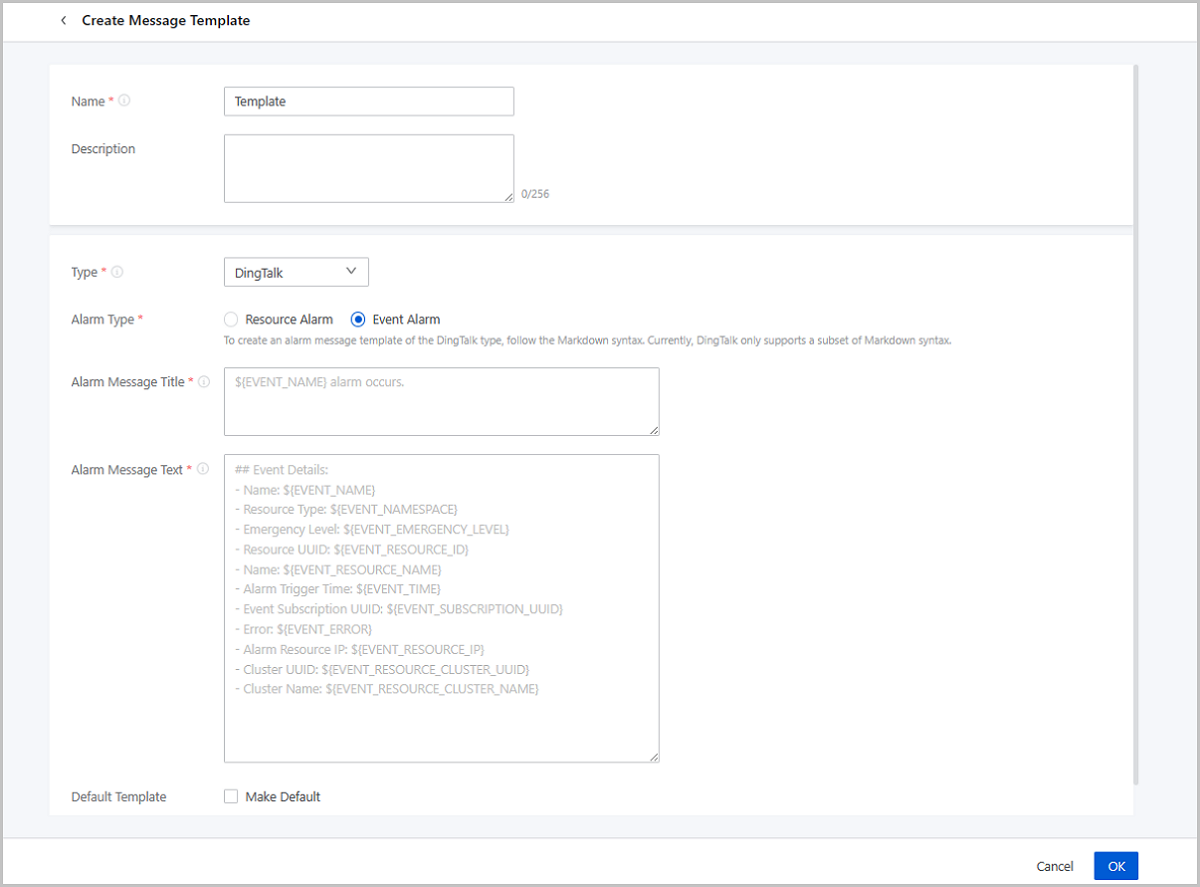
Create a DingTalk Message Template
- Name: Enter a name for the template.
- Description: Optional. Enter a description for the template.
- Type: Choose DingTalk.
- Alarm Type: Choose an alarm type to which the message template applies. Valid values: Resource Alarm and Event Alarm.
- Alarm Message Title: Set a template for alarm message titles.
The system provides a template sample. You can refer to it and enter the information you
need.
- A title template sample (resource
alarm):
Alarm ${ALARM_METRIC} ${ALARM_COMPARISON_OPERATOR} ${ALARM_THRESHOLD} ${ALARM_CURRENT_STATUS} - A title template sample (event
alarm):
${EVENT_NAME} occurs.
- A title template sample (resource
alarm):
- Alarm Message Text: Set a template for alarm message details.
The system provides a template sample. You can refer to it and enter the information you
need.
- A text template sample (resource
alarm):
## Alarm Details: - UUID: ${ALARM_UUID} - Resource Type: ${ALARM_NAMESPACE} - Trigger Condition: ${ALARM_METRIC} ${ALARM_COMPARISON_OPERATOR} ${ALARM_THRESHOLD} - Trigger Condition Duration: ${ALARM_DURATION} seconds - Alarm Trigger Time: ${ALARM_TIME} - Emergency Level: ${ALARM_EMERGENCY_LEVEL} - Previous Status: ${ALARM_PREVIOUS_STATUS} - Current Value: ${ALARM_CURRENT_VALUE} - Tag: ${ALARM_LABELS.join(",")} - Alarm Resource IP: ${ALARM_RESOURCE_IP} - Cluster UUID: ${ALARM_RESOURCE_CLUSTER_UUID} - Cluster Name: ${ALARM_RESOURCE_CLUSTER_NAME} - A text template sample (event
alarm):
## Event Details:
- Name: ${EVENT_NAME}
- Resource Type: ${EVENT_NAMESPACE}
- Emergency Level: ${EVENT_EMERGENCY_LEVEL}
- Resource UUID: ${EVENT_RESOURCE_ID}
- Resource Name: ${EVENT_RESOURCE_NAME}
- Alarm Trigger Time: ${EVENT_TIME}
- Event Subscriotion UUID: ${EVENT_SUBSCRIPTION_UUID}
- Error : ${EVENT_ERROR}
- Alarm Resource IP: ${EVENT_RESOURCE_IP}
- Cluster UUID: ${EVENT_RESOURCE_CLUSTER_UUID}
- Cluster Name: ${EVENT_RESOURCE_CLUSTER_NAME}
- A text template sample (resource
alarm):
- Recovery Message Title: When a monitored resource recovers from
an alarm status, the system sends a recovery message to corresponding endpoints. You can
customize a title template for recovery messages. The system provides a sample template.
You can refer to it and enter the information you
need.
Alarm ${ALARM_NAME} ${TITLE_ALARM_RESOURCE_NAME}${ALARM_CURRENT_STATUS} - Recovery Message Text: Set a template for recovery message
details. The system provides a template sample. You can refer to it and enter the
information that you
need.
## Alarm Recovery Details - UUID: ${ALARM_UUID} - Resource Type: ${ALARM_NAMESPACE} - Recovery Condition: ${ALARM_METRIC} ${ALARM_COMPARISON_OPERATOR_REVERSE} ${ALARM_THRESHOLD} - Emergency Level:${ALARM_EMERGENCY_LEVEL} - Pervious Status:${ALARM_PREVIOUS_STATUS} - Current Value:${ALARM_CURRENT_VALUE} - Alarm Resource UUID:${ALARM_RESOURCE_ID} - Alarm Resource Name:${ALARM_RESOURCE_NAME} - Alarm Resource IP:${ALARM_RESOURCE_IP} - Cluster UUID: ${ALARM_RESOURCE_CLUSTER_UUID} - Cluster Name: ${ALARM_RESOURCE_CLUSTER_NAME} - Default Template: Choose whether to set the template as a default template. The system sends alarm messages according to a default template.
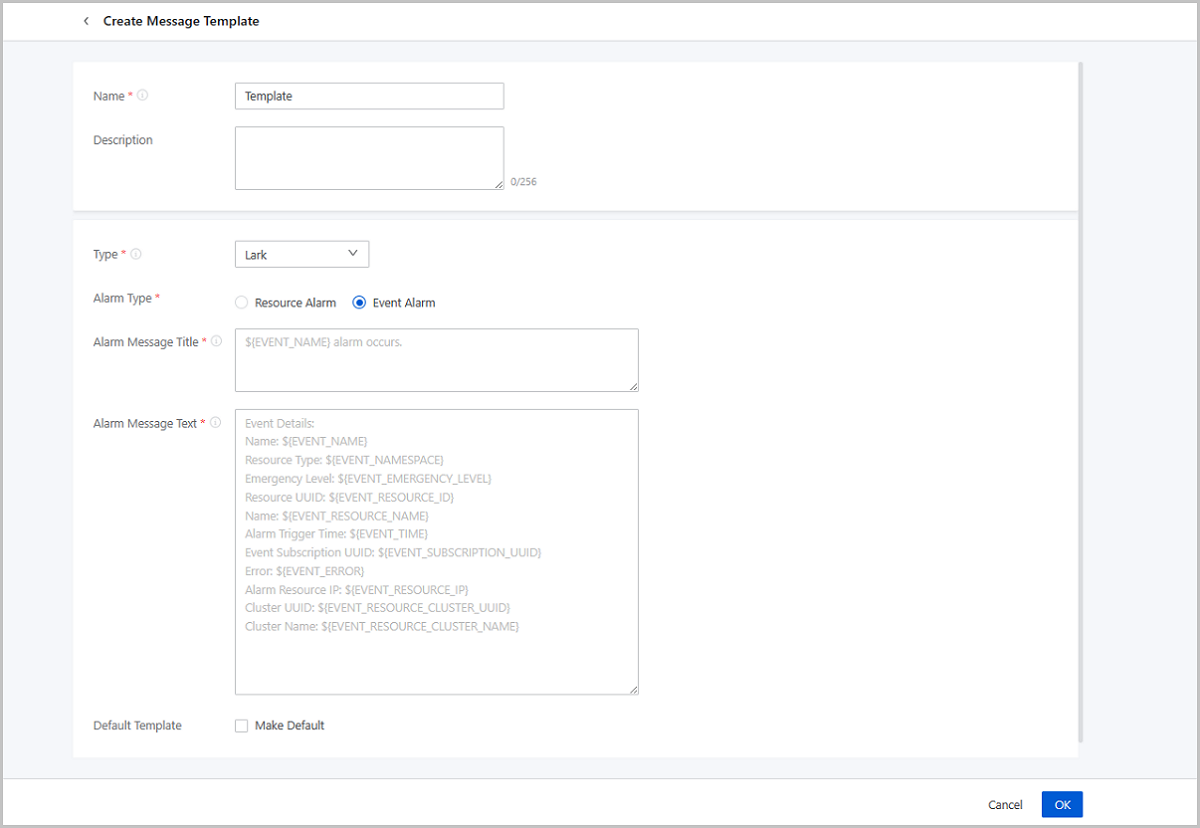
Create a Lark Template
- Name: Enter a name for the template.
- Description: Optional. Enter a description for the template.
- Type: Choose Lark.
- Alarm Type: Choose an alarm type to which the template applies. Valid values: Resource Alarm and Event Alarm.
- Alarm Message Title: Set a template for alarm message titles.
The system provides a template sample. You can refer to it and enter the information you
need.
- A title template sample (resource
alarm):
Alarm ${ALARM_METRIC} ${ALARM_COMPARISON_OPERATOR} ${ALARM_THRESHOLD} ${ALARM_CURRENT_STATUS} - A title template sample (event
alarm):
${EVENT_NAME} occurs.
- A title template sample (resource
alarm):
- Alarm Message Text: Set a template for alarm message details.
The system provides a template sample. You can refer to it and enter the information you
need.
- A text template sample (resource
alarm):
## Alarm Details: - UUID: ${ALARM_UUID} - Resource Type: ${ALARM_NAMESPACE} - Trigger Condition: ${ALARM_METRIC} ${ALARM_COMPARISON_OPERATOR} ${ALARM_THRESHOLD} - Trigger Condition Duration: ${ALARM_DURATION} seconds - Alarm Trigger Time: ${ALARM_TIME} - Emergency Level: ${ALARM_EMERGENCY_LEVEL} - Previous Status: ${ALARM_PREVIOUS_STATUS} - Current Value: ${ALARM_CURRENT_VALUE} - Tag: ${ALARM_LABELS.join(",")} - Alarm Resource IP: ${ALARM_RESOURCE_IP} - Cluster UUID: ${ALARM_RESOURCE_CLUSTER_UUID} - Cluster Name: ${ALARM_RESOURCE_CLUSTER_NAME} - A text template sample (event
alarm):
## Event Details:
- Name: ${EVENT_NAME}
- Resource Type: ${EVENT_NAMESPACE}
- Emergency Level: ${EVENT_EMERGENCY_LEVEL}
- Resource UUID: ${EVENT_RESOURCE_ID}
- Resource Name: ${EVENT_RESOURCE_NAME}
- Alarm Trigger Time: ${EVENT_TIME}
- Event Subscriotion UUID: ${EVENT_SUBSCRIPTION_UUID}
- Error : ${EVENT_ERROR}
- Alarm Resource IP: ${EVENT_RESOURCE_IP}
- Cluster UUID: ${EVENT_RESOURCE_CLUSTER_UUID}
- Cluster Name: ${EVENT_RESOURCE_CLUSTER_NAME}
- A text template sample (resource
alarm):
- Recovery Message Title: When a monitored resource recovers from
an alarm status, the system sends a recovery message to corresponding endpoints. You can
customize a title template for recovery messages. The system provides a sample template.
You can refer to it and enter the information you
need.
Alarm ${ALARM_NAME} ${TITLE_ALARM_RESOURCE_NAME}${ALARM_CURRENT_STATUS} - Recovery Message Text: Set a template for recovery message
details. The system provides a template sample. You can refer to it and enter the
information that you
need.
Alarm Details: UUID: ${ALARM_UUID} Resource Type: ${ALARM_NAMESPACE} Trigger Condition: ${ALARM_METRIC} ${ALARM_COMPARISON_OPERATOR} ${ALARM_THRESHOLD} Trigger Condition Duration: ${ALARM_DURATION} seconds Alarm Trigger Time: ${ALARM_TIME} Emergency Level: ${ALARM_EMERGENCY_LEVEL} Previous Status: ${ALARM_PREVIOUS_STATUS} Current Value: ${ALARM_CURRENT_VALUE} Tag: ${ALARM_LABELS.join(",")} Alarm Resource IP: ${ALARM_RESOURCE_IP} Cluster UUID: ${ALARM_RESOURCE_CLUSTER_UUID} Cluster Name: ${ALARM_RESOURCE_CLUSTER_NAME} - Default Template: Choose whether to set the template as a default template. The system sends alarm messages according to a default template.
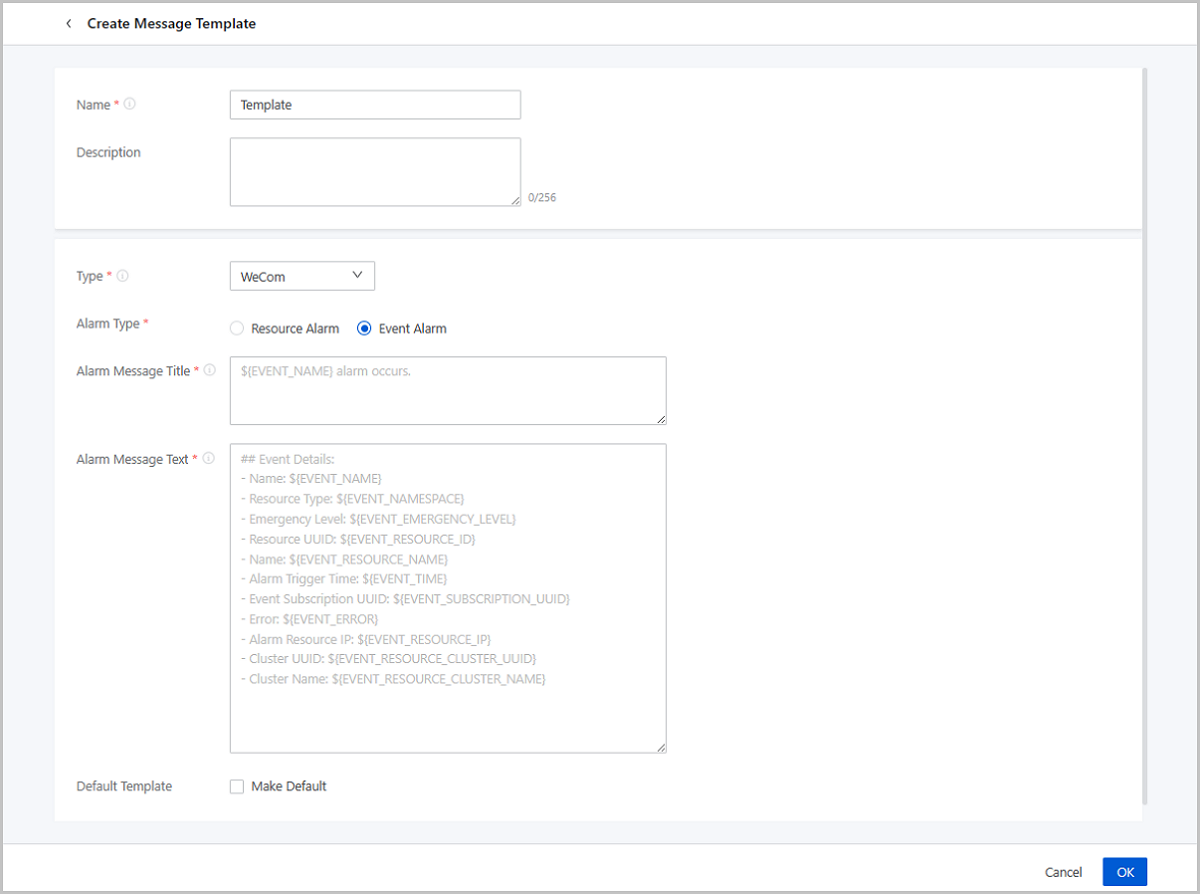
Create a WeCom Message Template
- Name: Enter a name for the template.
- Description: Optional. Enter a description for the template.
- Type: Choose Lark.
- Alarm Type: Choose an alarm type to which the template applies. Valid values: Resource Alarm and Event Alarm.
- Alarm Message Title: Set a template for alarm message titles.
The system provides a template sample. You can refer to it and enter the information you
need.
- A title template sample (resource
alarm):
Alarm ${ALARM_METRIC} ${ALARM_COMPARISON_OPERATOR} ${ALARM_THRESHOLD} ${ALARM_CURRENT_STATUS} - A title template sample (event
alarm):
${EVENT_NAME} alarm occurs.
- A title template sample (resource
alarm):
- Alarm Message Text: Set a template for alarm message details.
The system provides a template sample. You can refer to it and enter the information you
need.
- A text template sample (resource
alarm):
## Alarm Details: - UUID: ${ALARM_UUID} - Resource Type: ${ALARM_NAMESPACE} - Trigger Condition: ${ALARM_METRIC} ${ALARM_COMPARISON_OPERATOR} ${ALARM_THRESHOLD} - Trigger Condition Duration: ${ALARM_DURATION} seconds - Alarm Trigger Time: ${ALARM_TIME} - Emergency Level: ${ALARM_EMERGENCY_LEVEL} - Previous Status: ${ALARM_PREVIOUS_STATUS} - Current Value: ${ALARM_CURRENT_VALUE} - Tag: ${ALARM_LABELS.join(",")} - Alarm Resource IP: ${ALARM_RESOURCE_IP} - Cluster UUID: ${ALARM_RESOURCE_CLUSTER_UUID} - Cluster Name: ${ALARM_RESOURCE_CLUSTER_NAME} - A text template sample (event
alarm):
## Event Details:
- Name: ${EVENT_NAME}
- Resource Type: ${EVENT_NAMESPACE}
- Emergency Level: ${EVENT_EMERGENCY_LEVEL}
- Resource UUID: ${EVENT_RESOURCE_ID}
- Name: ${EVENT_RESOURCE_NAME}
- Alarm Trigger Time: ${EVENT_TIME}
- Event Subscription UUID: ${EVENT_SUBSCRIPTION_UUID}
- Error: ${EVENT_ERROR}
- Alarm Resource IP: ${EVENT_RESOURCE_IP}
- Cluster UUID: ${EVENT_RESOURCE_CLUSTER_UUID}
- Cluster Name: ${EVENT_RESOURCE_CLUSTER_NAME}
- A text template sample (resource
alarm):
- Recovery Message Title: When a monitored resource recovers from
an alarm status, the system sends a recovery message to corresponding endpoints. You can
customize a title template for recovery messages. The system provides a sample template.
You can refer to it and enter the information you
need.
Alarm ${ALARM_NAME} ${TITLE_ALARM_RESOURCE_NAME} ${ALARM_CURRENT_STATUS} - Recovery Message Text: Set a template for recovery message
details. The system provides a template sample. You can refer to it and enter the
information that you
need.
## Alarm Recovery Details: - UUID: ${ALARM_UUID} - Resource Type: ${ALARM_NAMESPACE} - Recovery Condition: ${ALARM_METRIC} ${ALARM_COMPARISON_OPERATOR_REVERSE} ${ALARM_THRESHOLD} - Emergency Level:${ALARM_EMERGENCY_LEVEL} - Previous Status:${ALARM_PREVIOUS_STATUS} - Current Value:${ALARM_CURRENT_VALUE} - Alarm Resource UUID:${ALARM_RESOURCE_ID} - Alarm Resource Name:${ALARM_RESOURCE_NAME} - Alarm Resource IP:${ALARM_RESOURCE_IP} - Cluster UUID: ${ALARM_RESOURCE_CLUSTER_UUID} - Cluster Name: ${ALARM_RESOURCE_CLUSTER_NAME} - Default Template: Choose whether to set the template as a default template. The system sends alarm messages according to a default template.
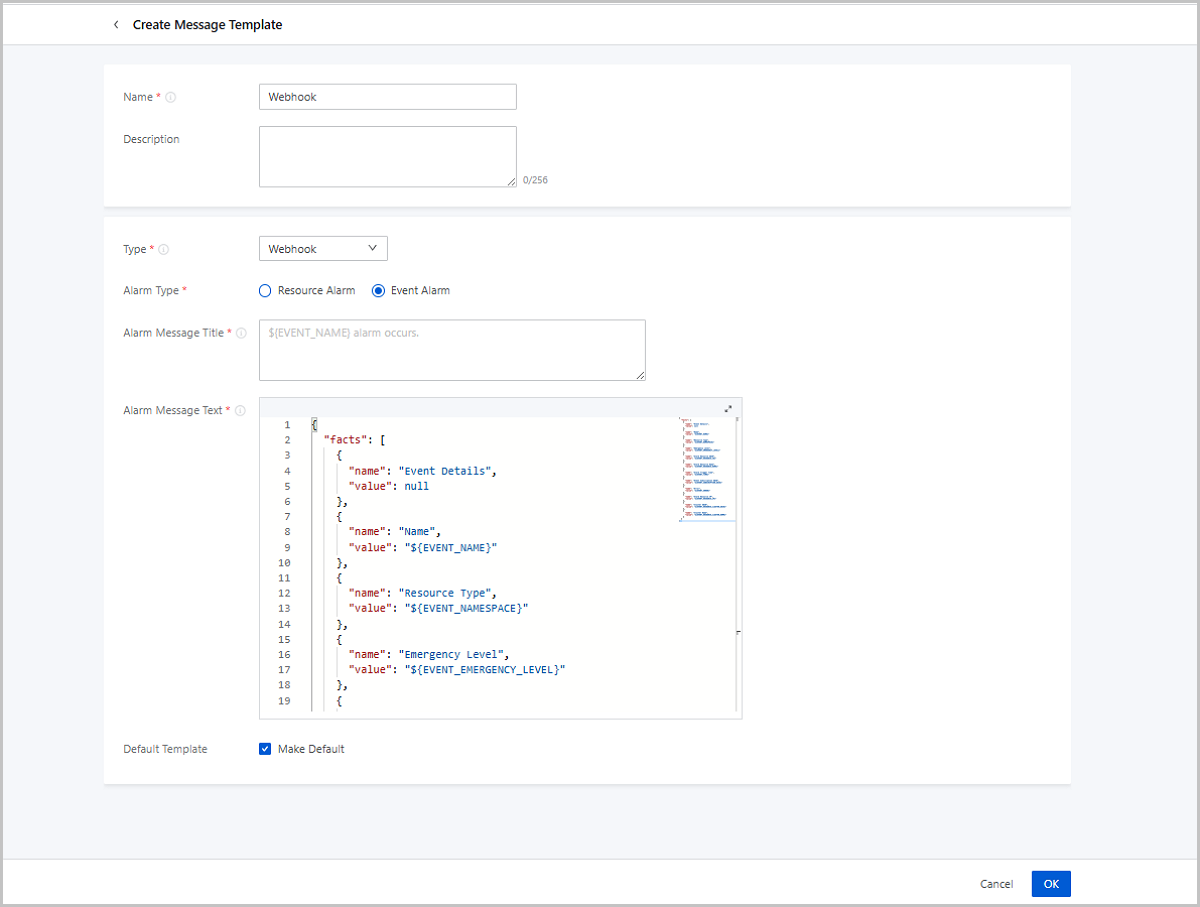
Create a Webhook Message Template
- Name: Enter a name for the template.
- Description: Optional. Enter a description for the template.
- Type: Choose Webhook.
- Alarm Type: Choose an alarm type to which the template applies. Valid values: Resource Alarm and Event Alarm.
- Alarm Message Title: Set a template for alarm message titles.
The system provides a template sample. You can refer to it and enter the information you
need.
- A title template sample (resource
alarm):
Alarm ${ALARM_METRIC} ${ALARM_COMPARISON_OPERATOR} ${ALARM_THRESHOLD} ${ALARM_CURRENT_STATUS} - A title template sample (event
alarm):
${EVENT_NAME} alarm occurs.
- A title template sample (resource
alarm):
- Alarm Message Text: Set a template for alarm message details.
The system provides a template sample. You can refer to it and enter the information you
need.
- A text template sample (resource
alarm):
{ "facts": [ { "name": "Alarm Details", "value": null }, { "name": "UUID", "value": "${ALARM_UUID}" }, { "name": "Resource Type", "value": "${ALARM_NAMESPACE}" }, { "name": "Trigger Condition", "value": "${ALARM_METRIC} ${ALARM_COMPARISON_OPERATOR} ${ALARM_THRESHOLD}" }, { "name": "Trigger Condition Duration", "value": "${ALARM_DURATION} seconds" }, { "name": "Previous Status", "value": "${ALARM_PREVIOUS_STATUS}" }, { "name": "Current Value", "value": "${ALARM_CURRENT_VALUE}" }, { "name": "Alarm Resource UUID", "value": "${ALARM_RESOURCE_ID}" }, { "name": "Alarm Trigger Time", "value": "${ALARM_TIME}" }, { "name": "Alarm Resource Name", "value": "${ALARM_RESOURCE_NAME}" }, { "name": "Emergency Level", "value": "${ALARM_EMERGENCY_LEVEL}" }, { "name": "Tag", "value": "${ALARM_LABELS.join(\",\")}" }, { "name": "Alarm Resource IP", "value": "${ALARM_RESOURCE_IP}" }, { "name": "Cluster UUID", "value": "${ALARM_RESOURCE_CLUSTER_UUID}" }, { "name": "Cluster Name", "value": "${ALARM_RESOURCE_CLUSTER_NAME}" } ] } - A text template sample (event
alarm):
{
  "facts": [
    {
      "name": "Event Details",
      "value": null
    },
    {
      "name": "Name",
      "value": "${EVENT_NAME}"
    },
    {
      "name": "Resource Type",
      "value": "${EVENT_NAMESPACE}"
    },
    {
      "name": "Emergency Level",
      "value": "${EVENT_EMERGENCY_LEVEL}"
    },
    {
      "name": "Alarm Resource UUID",
      "value": "${EVENT_RESOURCE_ID}"
    },
    {
      "name": "Alarm Resource Name",
      "value": "${EVENT_RESOURCE_NAME}"
    },
    {
      "name": "Alarm Trigger Time",
      "value": "${EVENT_TIME}"
    },
    {
      "name": "Event Subscription UUID",
      "value": "${EVENT_SUBSCRIPTION_UUID}"
    },
    {
      "name": "Error",
      "value": "${EVENT_ERROR}"
    },
    {
      "name": "Alarm Resource IP",
      "value": "${EVENT_RESOURCE_IP}"
    },
    {
      "name": "Cluster UUID",
      "value": "${EVENT_RESOURCE_CLUSTER_UUID}"
    },
    {
      "name": "Cluster Name",
      "value": "${EVENT_RESOURCE_CLUSTER_NAME}"
    }
  ]
}
- A text template sample (resource
alarm):
- Recovery Message Title: When a monitored resource recovers from
an alarm status, the system sends a recovery message to corresponding endpoints. You can
customize a title template for recovery messages. The system provides a sample template.
You can refer to it and enter the information you
need.
Alarm ${ALARM_NAME} ${TITLE_ALARM_RESOURCE_NAME} ${ALARM_CURRENT_STATUS} - Recovery Message Text: Set a template for recovery message
details. The system provides a template sample. You can refer to it and enter the
information that you
need.
{ "facts": [ { "name": "Alarm Recovery Details", "value": null }, { "name": "UUID", "value": "${ALARM_UUID}" }, { "name": "Resource Type", "value": "${ALARM_NAMESPACE}" }, { "name": "Recovery Condition", "value": "${ALARM_METRIC} ${ALARM_COMPARISON_OPERATOR_REVERSE} ${ALARM_THRESHOLD}" }, { "name": "Previous Status", "value": "${ALARM_PREVIOUS_STATUS}" }, { "name": "Current Value", "value": "${ALARM_CURRENT_VALUE}" }, { "name": "Alarm Resource UUID", "value": "${ALARM_RESOURCE_ID}" }, { "name": "Alarm Trigger Time", "value": "${ALARM_TIME}" }, { "name": "Emergency Level", "value": "${ALARM_EMERGENCY_LEVEL}" }, { "name": "Alarm Resource Name", "value": "${ALARM_RESOURCE_NAME}" }, { "name": "Alarm Resource IP", "value": "${ALARM_RESOURCE_IP}" }, { "name": "Cluster UUID", "value": "${ALARM_RESOURCE_CLUSTER_UUID}" }, { "name": "Cluster Name", "value": "${ALARM_RESOURCE_CLUSTER_NAME}" } ] } - Default Template: Choose whether to set the template as a default template. The system sends alarm messages according to a default template.
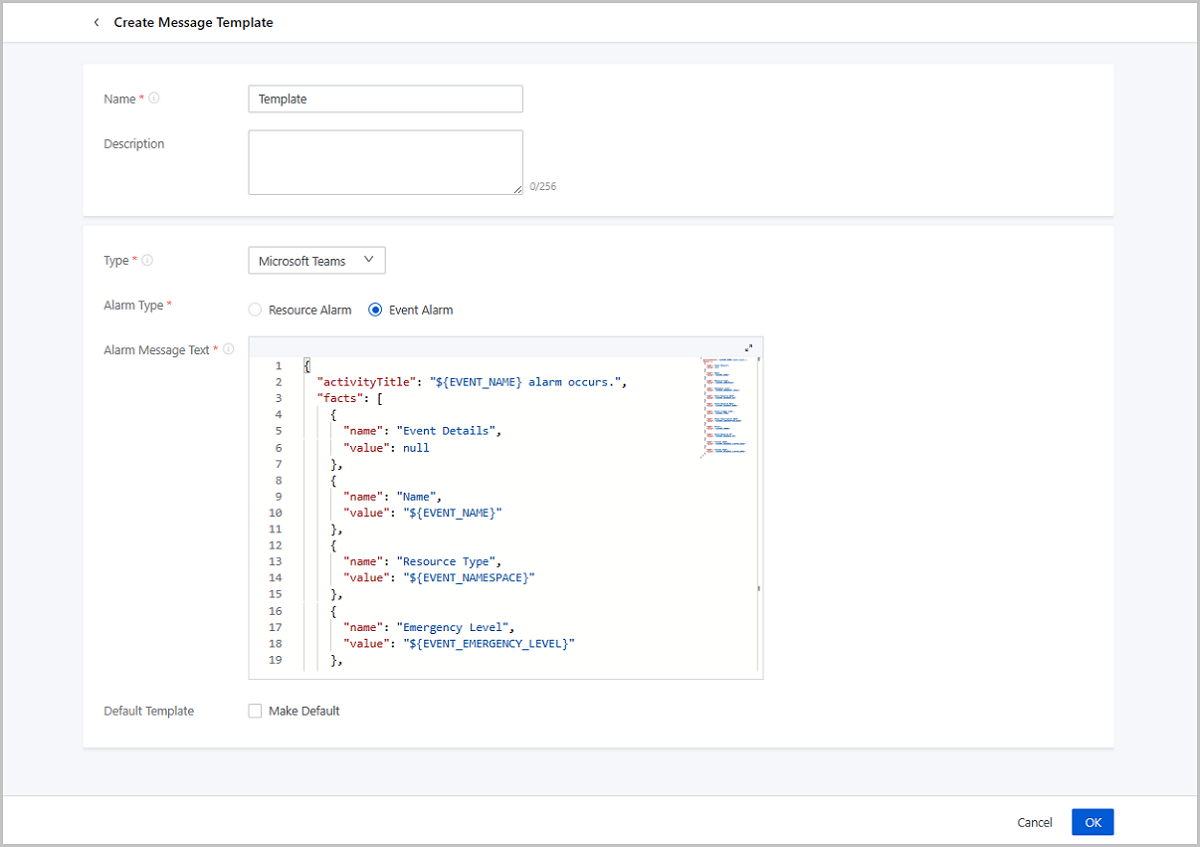
Create Microsoft Teams Message Template
- Name: Enter a name for the template.
- Description: Optional. Enter a description for the template.
- Type: Choose Lark.
- Alarm Type: Choose an alarm type to which the template applies. Valid values: Resource Alarm and Event Alarm.
- Alarm Message Text: Set a template for alarm message details.
The system provides a template sample. You can refer to it and enter the information you
need.
- A text template sample (resource
alarm):
{ "facts": [ { "name": "Alarm Details", "value": null }, { "name": "UUID", "value": "${ALARM_UUID}" }, { "name": "Resource Type", "value": "${ALARM_NAMESPACE}" }, { "name": "Trigger Condition", "value": "${ALARM_METRIC} ${ALARM_COMPARISON_OPERATOR} ${ALARM_THRESHOLD}" }, { "name": "Trigger Condition Duration", "value": "${ALARM_DURATION} seconds" }, { "name": "Previous Status", "value": "${ALARM_PREVIOUS_STATUS}" }, { "name": "Current Value", "value": "${ALARM_CURRENT_VALUE}" }, { "name": "Alarm Resource UUID", "value": "${ALARM_RESOURCE_ID}" }, { "name": "Alarm Trigger Time", "value": "${ALARM_TIME}" }, { "name": "Alarm Resource Name", "value": "${ALARM_RESOURCE_NAME}" }, { "name": "Emergency Level", "value": "${ALARM_EMERGENCY_LEVEL}" }, { "name": "Tag", "value": "${ALARM_LABELS.join(\",\")}" }, { "name": "Alarm Resource IP", "value": "${ALARM_RESOURCE_IP}" }, { "name": "Cluster UUID", "value": "${ALARM_RESOURCE_CLUSTER_UUID}" }, { "name": "Cluster Name", "value": "${ALARM_RESOURCE_CLUSTER_NAME}" } ] } - A text template sample (event
alarm):
{
  "facts": [
    {
      "name": "Event Details",
      "value": null
    },
    {
      "name": "Name",
      "value": "${EVENT_NAME}"
    },
    {
      "name": "Resource Type",
      "value": "${EVENT_NAMESPACE}"
    },
    {
      "name": "Emergency Level",
      "value": "${EVENT_EMERGENCY_LEVEL}"
    },
    {
      "name": "Alarm Resource UUID",
      "value": "${EVENT_RESOURCE_ID}"
    },
    {
      "name": "Alarm Resource Name",
      "value": "${EVENT_RESOURCE_NAME}"
    },
    {
      "name": "Alarm Trigger Time",
      "value": "${EVENT_TIME}"
    },
    {
      "name": "Event Subscription UUID",
      "value": "${EVENT_SUBSCRIPTION_UUID}"
    },
    {
      "name": "Error",
      "value": "${EVENT_ERROR}"
    },
    {
      "name": "Alarm Resource IP",
      "value": "${EVENT_RESOURCE_IP}"
    },
    {
      "name": "Cluster UUID",
      "value": "${EVENT_RESOURCE_CLUSTER_UUID}"
    },
    {
      "name": "Cluster Name",
      "value": "${EVENT_RESOURCE_CLUSTER_NAME}"
    }
  ]
}
- A text template sample (resource
alarm):
- Recovery Message Text: Set a template for recovery message
details. The system provides a template sample. You can refer to it and enter the
information that you
need.
{ "facts": [ { "name": "Alarm Recovery Details", "value": null }, { "name": "UUID", "value": "${ALARM_UUID}" }, { "name": "Resource Type", "value": "${ALARM_NAMESPACE}" }, { "name": "Recovery Condition", "value": "${ALARM_METRIC} ${ALARM_COMPARISON_OPERATOR_REVERSE} ${ALARM_THRESHOLD}" }, { "name": "Previous Status", "value": "${ALARM_PREVIOUS_STATUS}" }, { "name": "Current Value", "value": "${ALARM_CURRENT_VALUE}" }, { "name": "Alarm Resource UUID", "value": "${ALARM_RESOURCE_ID}" }, { "name": "Alarm Trigger Time", "value": "${ALARM_TIME}" }, { "name": "Emergency Level", "value": "${ALARM_EMERGENCY_LEVEL}" }, { "name": "Alarm Resource Name", "value": "${ALARM_RESOURCE_NAME}" }, { "name": "Alarm Resource IP", "value": "${ALARM_RESOURCE_IP}" }, { "name": "Cluster UUID", "value": "${ALARM_RESOURCE_CLUSTER_UUID}" }, { "name": "Cluster Name", "value": "${ALARM_RESOURCE_CLUSTER_NAME}" } ] } - Default Template: Choose whether to set the template as a default template. The system sends alarm messages according to a default template.
Message Source
Create a Message Source
Before you can create a message source, you need to enable the extended alarm feature. To do this, choose and turn on the Extended Alarm Notification switch.
On the main menu of ZStack Cube Ultimate, choose . On the Message Source page, click Create Message Source. Then, the Create Message Source page appears.
- Name: Enter a name for the message source.
- Description: Optional. Enter a description for the message source.
- Message Source Type: Select the type of message source. Currently, only Ceph Enterprise, Ceph Professional, and ZStone are supported.
- Login Address and Token: Enter the login address of the
message source and the access token obtained on the message source page.
- Format (Ceph Enterprise or ZStone):
http://{Message Source IP Address}:{Port}/v1/alerts/?token={Access Token} - Format (Ceph Professional):
http://{Message Source IP
                                Address}:{Port}/v1/alert-infos/?token={Access Token}
- Format (Ceph Enterprise or ZStone):
- Alarm Message Conversion Template: Convert third-party
alarm messages into alarm messages that conform to the format required on the
Cloud. The system provides a conversion template that you can use to customize
the parameters.Example:
{
    "product":"Ceph Enterprise",
    "service":"Ceph Enterprise",
    "message":"${resource_type + '[' + resource_name+'] ' + group + ' ' + alert_value}",
    "metric":"${resource_type + '::' + group}",
    "alertLevel":"${level == 'info' ? 'Normal' : level == 'warning' ? 'Important' : 'Emergent'}",
    "alertTime":"${create}",
    "dimensions":"{'resource_name':'${resource_name}'}",
    "dataSource":"Ceph Enterprise"
}
Endpoint
Create an Endpoint
On the main menu of ZStack Cube Ultimate, choose . On the Endpoint page, click Create Endpoint. Then, the Create Endpoint page appears.
- Create Endpoint of Email Type
- Create Endpoint of DingTalk Type
- Create Endpoint of WeCom Type
- Create Endpoint of Lark Type
- Create Endpoint of Webhook Type
- Create Endpoint of Alibaba Cloud SMS Type
- Create Endpoint of Emay Softcom SMS Type
- Create Endpoint of Microsoft Teams Type
- Create Endpoint of SNMP Trap Receiver Type
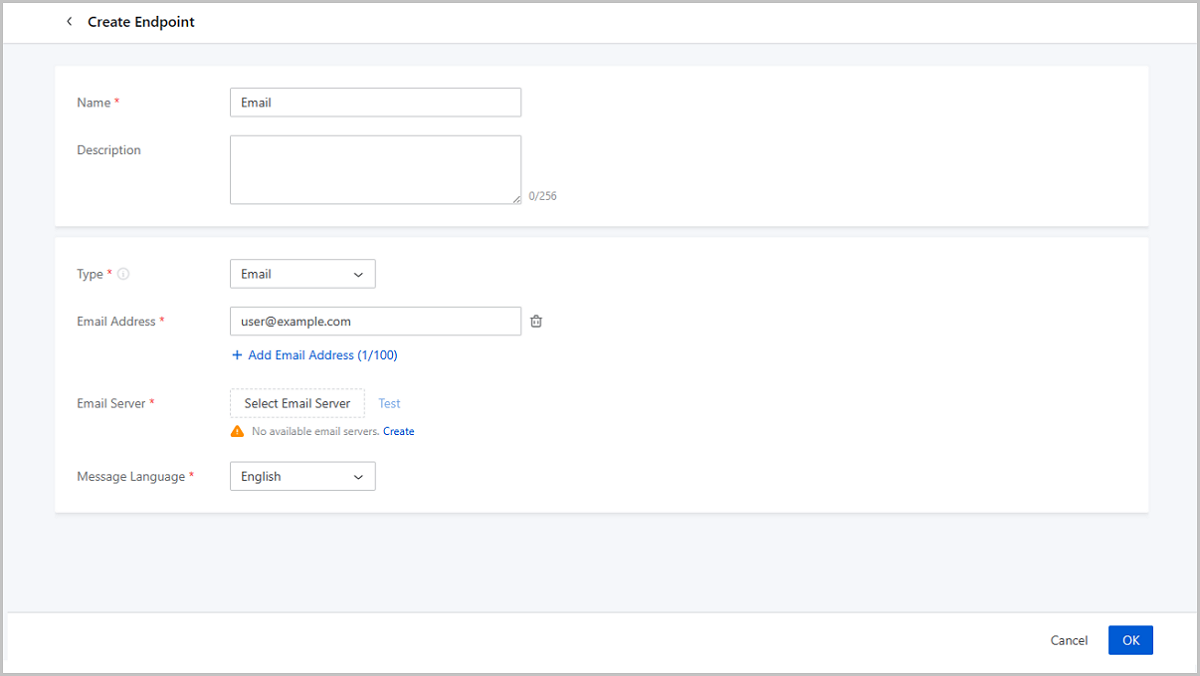
Create Endpoint of Email Type
- Messages sent to topics are sent to the specified email address via an email server.
- You can customize a message template to send email messages in a unified format. If you do not customize one manually, email messages are sent according to a system message template.
- You need to add an email server to the Cloud and test the availability of the server before you can use the email server to send messages.
- Name: Enter a name for the endpoint.
- Description: Optional. Enter a description for the endpoint.
- Type: Select Email.
- Email Address: Enter one or more email addresses. You can enter a maximum of 100 email addresses.
- Email Server: Enter an email server that is added to the Cloud.
- Message Language: Select a language for alarm messages. Valid values: Simplified Chinese and English.
Then, click Send Test Message. After the test message is sent successfully, click OK to create the endpoint.
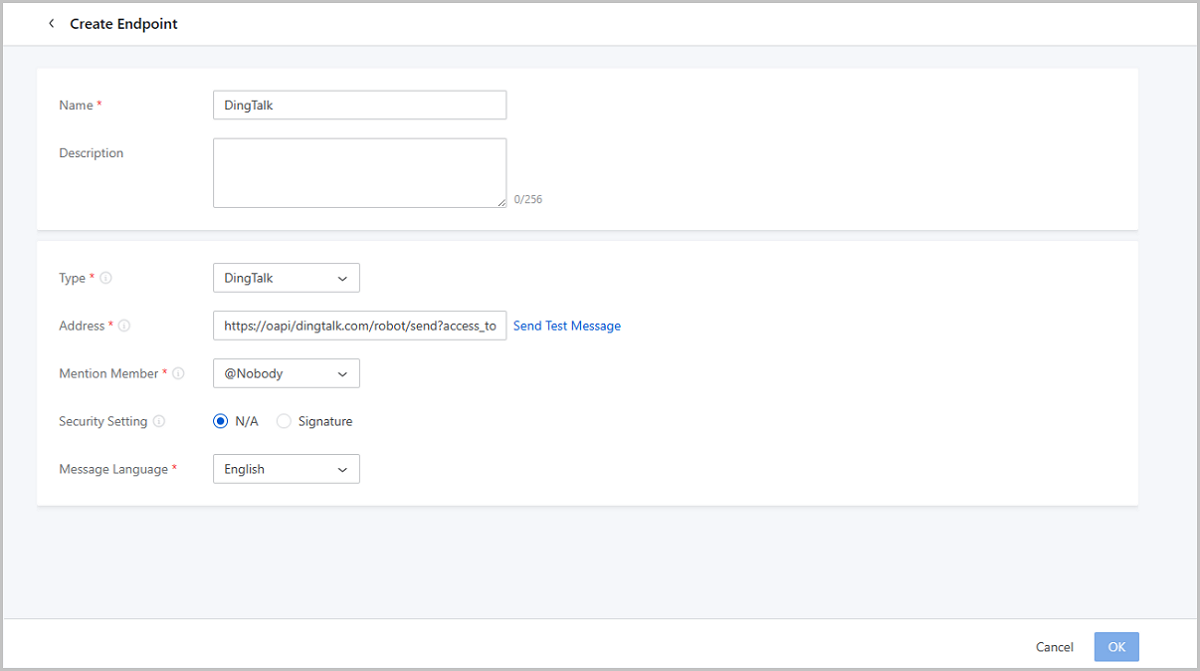
Create Endpoint of DingTalk Type
- Messages sent to topics are sent to the specified DingTalk robot address via
DingTalk. Note: A DingTalk robot can receive up to 20 messages per minute. If
this limit is exceeded, there will be a 10-minute flow control. For more
information, see DingTalk official website.
- You can customize a message template to send DingTalk messages in a unified format. If you do not customize one manually, DingTalk messages are sent according to a system message template.
- Name: Enter a name for the endpoint.
- Description: Optional. Enter a description for the endpoint.
- Type: Select DingTalk.
- Address: Enter a DingTalk robot webhook address.
- Mention Member: Choose whether to @ somebody to pay
attention to the alarm messages sent by the robot.
- @Nobody: When an alarm is triggered, the robot only sends a message in the group without @ anyone.
- @All: When an alarm is triggered, the robot sends a message in the group and @ all group members to pay attention to the message.
- @Specified Member: When an alarm is triggered, the robot
sends a message in the group and @ specified members to pay
attention to the message. If you choose this option, you need to set
the following parameters to specify there members:
- Phone Number: Enter the phone number of the specified user.
- Remark: Optional. Set a remark for the specified user.
- Security Setting: Mark the security policy you set
for the robot on the DingTalk platform. Following are instructions:
- If you do not configure a security policy for the robot on the DingTalk platform, choose N/A here.
- If you set configure an IP allowlist for the robot on the DingTalk platform, choose N/A here, and make sure that you have added the Cloud management node IPs and VIPs to the robot allowlist in advance.
- If you set a signature for the robot on the DingTalk platform, choose Signature here and paste the signature key below.
- We recommend that you do not set a custom keyword for the robot on the DingTalk platform. Otherwise, alarm messages may fail to be sent and received properly.
- Message Language: Choose a language for alarm messages. Valid values: Simplified Chinese and English.
Then, click Send Test Message. After the test message is sent successfully, click OK to create the endpoint.
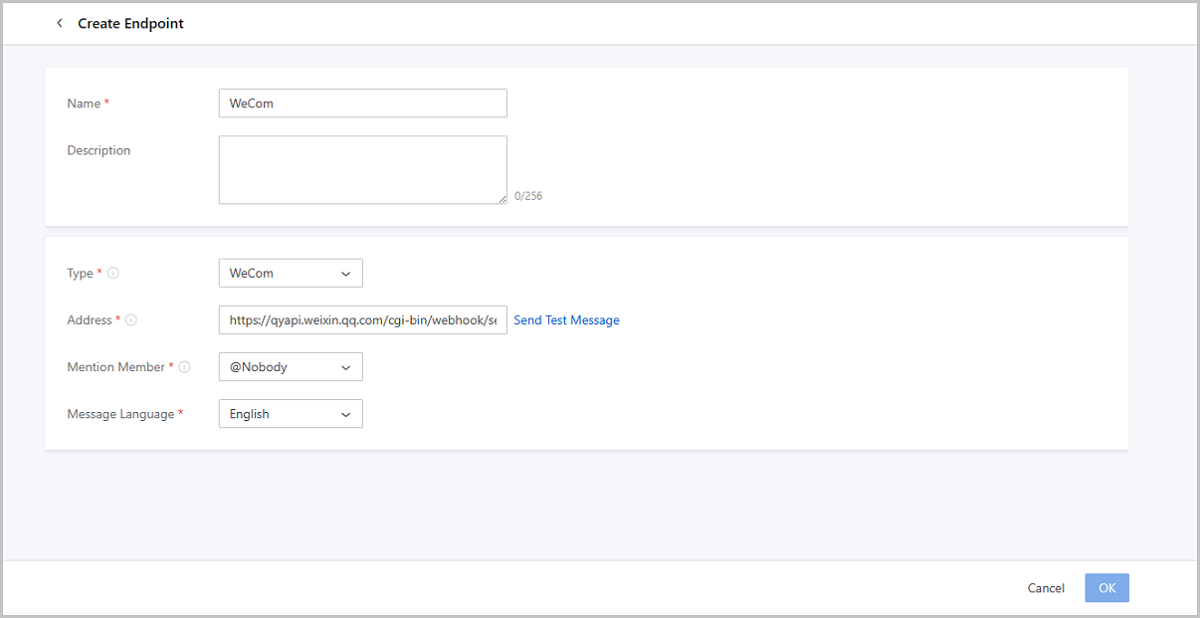
Create Endpoint of WeCom Type
- Messages sent to topics are sent to the specified WeCom robot address via WeCom.
- You can customize a message template to send WeCom messages in a unified format. If you do not customize one manually, WeCom messages are sent according to a system message template.
- Name: Enter a name for the endpoint.
- Description: Optional. Enter a description for the endpoint.
- Type: Select WeCom.
- Address: Enter a WeCome robot webhook address.
- Mention Member: Choose whether to @ somebody to pay
attention to the alarm messages sent by the robot.
- @Nobody: When an alarm is triggered, the robot only sends a message in the group without @ anyone.
- @All: When an alarm is triggered, the robot sends a message in the group and @ all group members to pay attention to the message.
- @Specified Member: When an alarm is triggered, the robot
sends a message in the group and @ specified members to pay
attention to the message. If you choose this option, you need to set
the following parameters to specify there members:
- User ID: Enter the ID of the specified user.
- Remark: Optional. Set a remark for the specified user.
- Message Language: Choose a language for alarm messages. Valid values: Simplified Chinese and English.
Then, click Send Test Message. After the test message is sent successfully, click OK to create the endpoint.
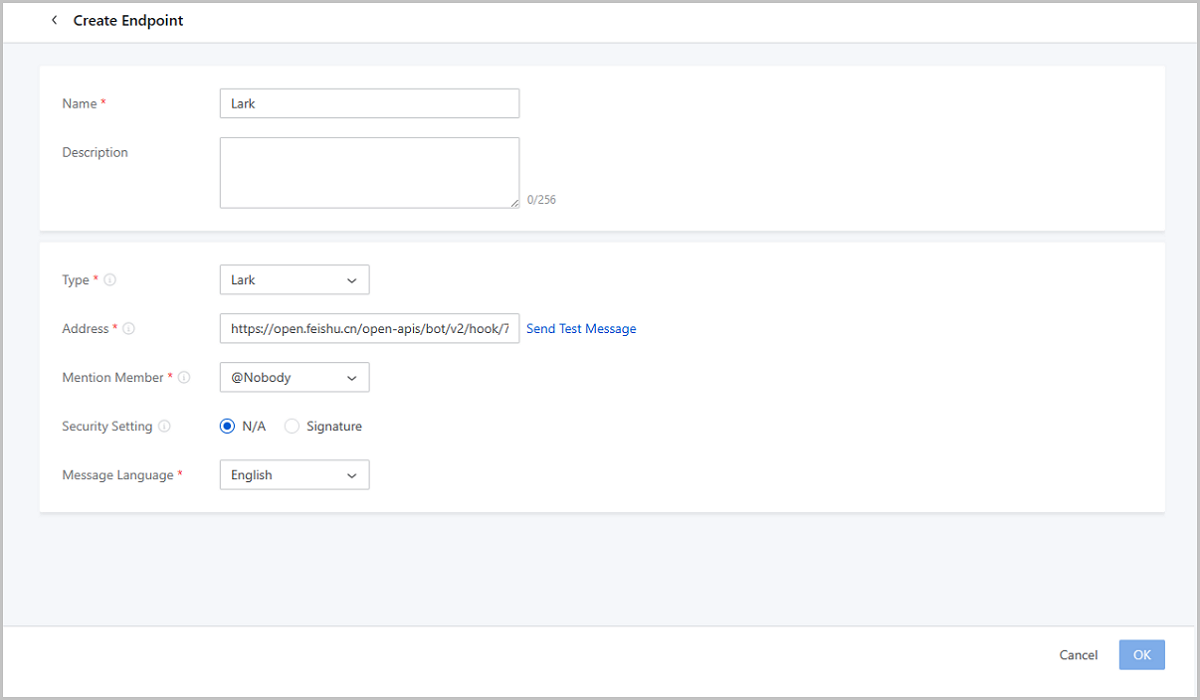
Create Endpoint of Lark Type
- Messages sent to topics are sent to the specified Lark robot address via Lark.
- You can customize a message template to send Lark messages in a unified format. If you do not customize one manually, Lark messages are sent according to a system message template.
- Name: Enter a name for the endpoint.
- Description: Optional. Enter a description for the endpoint.
- Type: Select Lark.
- Address: Enter a Lark robot webhook address.
- Mention Member: Choose whether to @ somebody to pay
attention to the alarm messages sent by the robot.
- @Nobody: When an alarm is triggered, the robot only sends a message in the group without @ anyone.
- @All: When an alarm is triggered, the robot sends a message in the group and @ all group members to pay attention to the message.
- @Specified Member: When an alarm is triggered, the robot
sends a message in the group and @ specified members to pay
attention to the message. If you choose this option, you need to set
the following parameters to specify there members:
- User ID: Enter the ID of the specified user.
- Remark: Optional. Set a remark for the specified user.
- Security Setting: Mark the security policy you set
for the robot on the Lark platform. Following are instructions:
- If you do not configure a security policy for the robot on the Lark platform, choose N/A here.
- If you set configure an IP allowlist for the robot on the Lark platform, choose N/A here, and make sure that you have added the Cloud management node IPs and VIPs to the robot allowlist in advance.
- If you set a signature for the robot on the Lark platform, choose Signature here and paste the signature key below.
- We recommend that you do not set a custom keywords for the robot on the Lark platform. Otherwise, alarm messages may fail to be sent and received properly.
- Message Language: Choose a language for alarm messages. Valid values: Simplified Chinese and English.
Then, click Send Test Message. After the test message is sent successfully, click OK to create the endpoint.
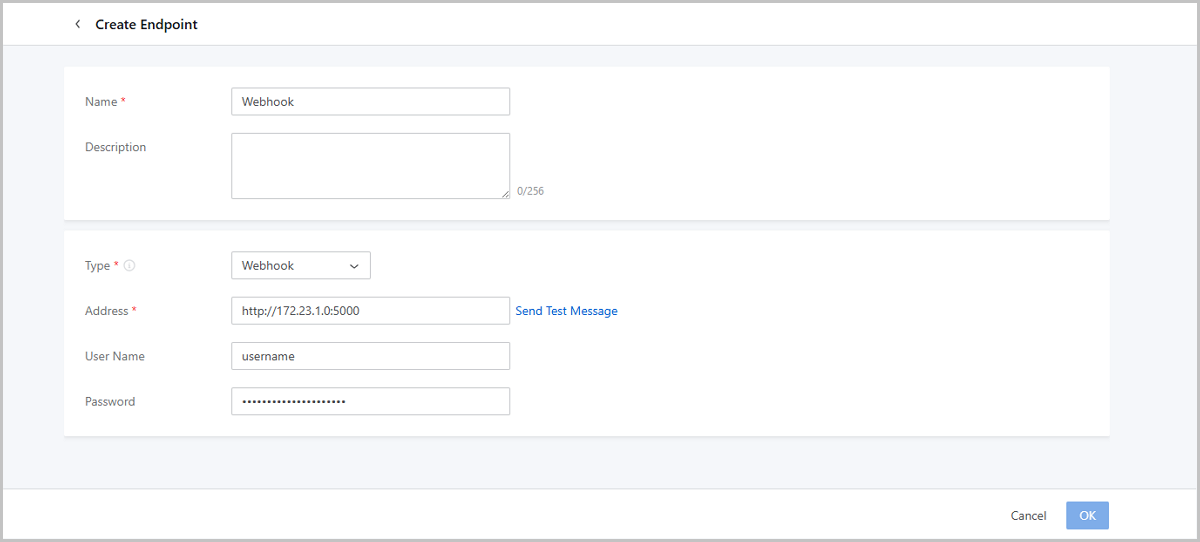
Create Endpoint of Webhook Type
- Messages sent to topics are sent to the specified Webhook address by using the HTTP POST method.
- If you set a username and password for the specified Webhook, enter the username and password for the endpoint.
- You can customize a message template to send Webhook messages in a unified format. If you do not customize one manually, Webhook messages are sent according to a system message template.
- Name: Enter a name for the endpoint.
- Description: Optional. Enter a description for the endpoint.
- Type: Select Webhook.
- Address: Enter the Webhook address.Note:
- If the Webhook application is managed by a single management node, the IP address is 127.0.0.1 by default.
- If the Webhook application is managed in a dual-MN environment, the IP address is a VIP.
- User Name: Optional. Enter the username of the Webhook.
- Password: Optional. Enter the password of the Webhook.
Then, click Send Test Message. After the test message is sent successfully, click OK to create the endpoint.
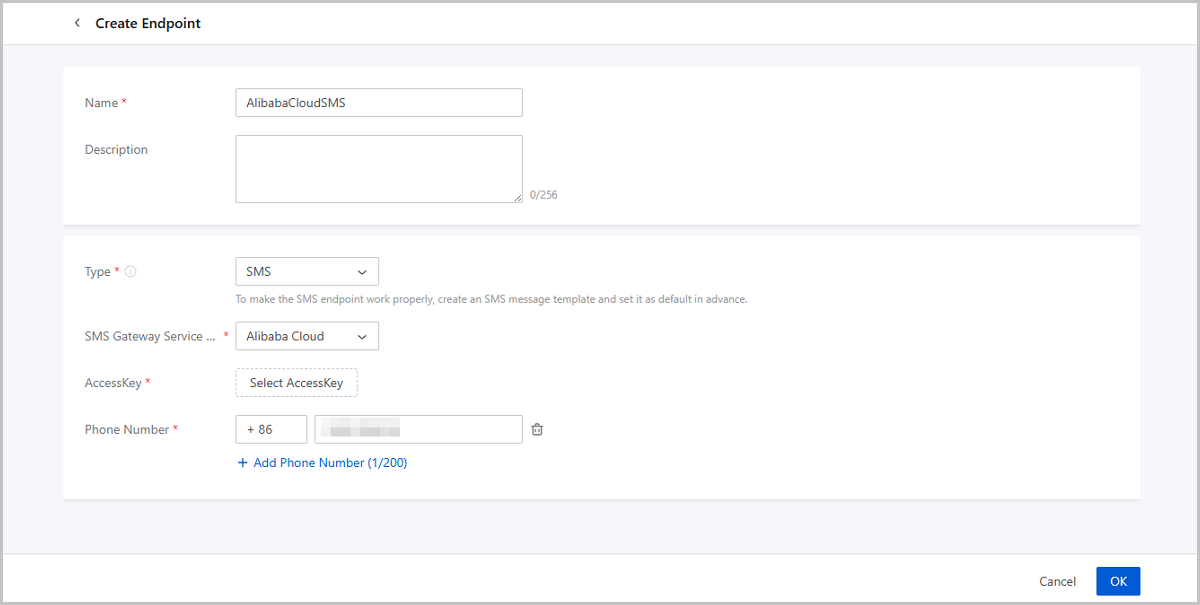
Create Endpoint of Alibaba Cloud SMS Type
- Messages sent to topics are sent to the specified phone numbers as text messages via the Alibaba Cloud SMS gateway.
- You need to create an Alibaba Cloud SMS message template and set it as the default template. Then text alarm messages are sent according to the template. If you do not create an universal SMS message template, Emay Softcom SMS messages cannot be sent properly.
- Name: Enter a name for the endpoint.
- Description: Optional. Enter a description for the endpoint.
- Type: Select SMS.
- SMS Gateway Service Provider: Select Alibaba Cloud.
- AccessKey: Select an Alibaba Cloud AccessKey pair.
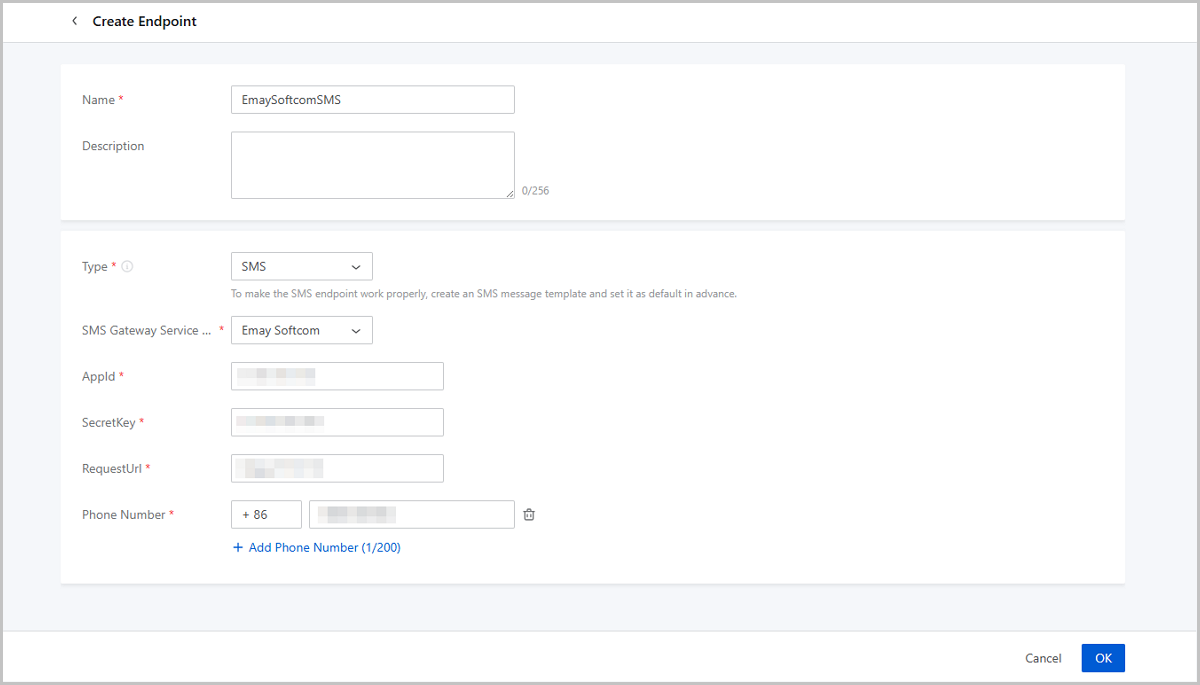
Create Endpoint of Emay Softcom SMS Type
- Messages sent to topics are sent to the specified phone numbers as text messages via the Emay Softcom SMS gateway.
- You need to create an universal SMS message template and set it as the default template. Then text alarm messages are sent according to the template. If you do not create an Universal SMS message template, SMS messages cannot be sent properly.
- Name: Enter a name for the endpoint.
- Description: Optional. Enter a description for the endpoint.
- Type: Select SMS.
- SMS Gateway Service Provider: Select Emay Softcom.
- AppId: Enter the AppId applied from Emay Softcom.
- SecretKey: Enter the SecretKey applied from Emay Softcom.
- RequestUrl: Enter the RequestUrl.
- Phone Number: Enter the phone numbers that receive text messages.
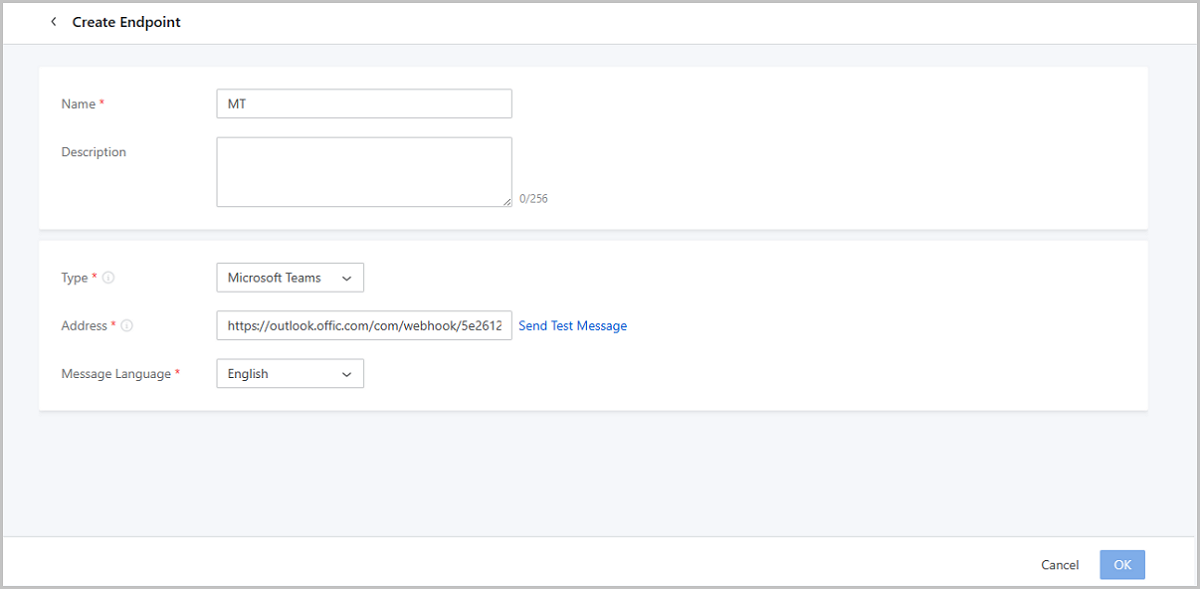
Create Endpoint of Microsoft Teams Type
- Messages sent to topics are sent to the specified Microsoft Teams via Webhook.
- You can customize a message template to send Microsoft Teams messages in a unified format. If you do not customize one manually, Microsoft Teams messages are sent according to a system message template.
- Name: Enter a name for the endpoint.
- Description: Optional. Enter a description for the endpoint.
- Type: Select Microsoft Teams.
- Address: Enter the Webhook address obtained in the Microsoft Teams.
- Message Language: Select a language for alarm messages. Valid values: Simplified Chinese and English.
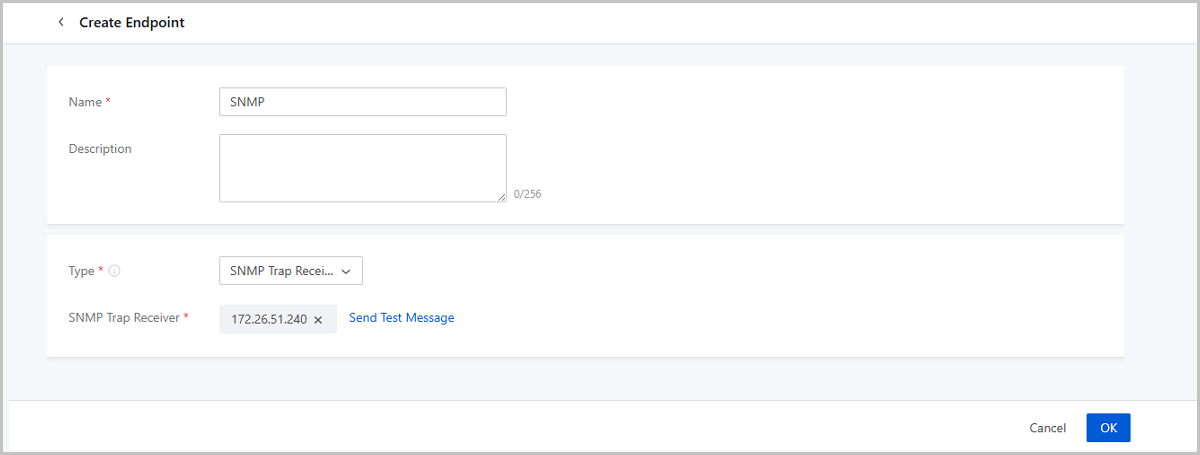
Create Endpoint of SNMP Trap Receiver Type
- Messages sent to topics are sent to the specified SNMP trap receiver as trap messages.
- Enable SNMP Management and add an SNMP trap receiver in advance.
- Name: Enter a name for the endpoint.
- Description: Optional. Enter a description for the endpoint.
- Type: Choose SNMP Trap Receiver.
- SNMP Trap Receiver: Choose an SNMP trap receiver.