Continuous Data Protection (CDP)
What is CDP?
Continuous Data Protection (CDP) provides second-level and fine-grained continuous backups for important business systems in VM instances, allowing users to restore VM data to a specific time state, and retrieve files without restoring the system. ZStack Cube Ultimate provides automated solutions on resuming all applications if a hardware or operating system failure occurs.
The Continuous Data Protection (CDP) service is a separate feature module. To use this service, purchase both the Base License and the Plus License of Continuous Data Protection (CDP). The Plus License cannot be used independently.
Concepts
- CDP task: You can create a CDP task to continuously back up your VM data to a specified backup server to achieve continuous data protection and recovery.
- Recovery task: A recovery task helps you quickly restore data by specifying a CDP task and recovery point, and allows you to view the recovery progress and logs in a more friendly way.
- CDP data: The backup data generated from continuous data protection on VM instances is stored in local backup servers.
- Recovery point: A recovery point is a data point generated during continuous data protection. A recovery point corresponds to a data record within the recovery point interval specified by the user.
- Locked recovery point: You can lock or unlock a recovery point as needed. After a recovery point is locked, data of the recovery point will not be automatically cleared or deleted.
How CDP Works
ZStack Cube Ultimate provides block-level continuous data protection. You can restore CDP data according to a specified time point.
- CDP backup
After continuous data protection is performed on a VM instance, the CDP server first performs a full copy of the VM data, continuously captures I/O data changes, and timestamps, and saves the I/O data of each change, thereby achieving continuous data backup.
图 1. CDP Backup 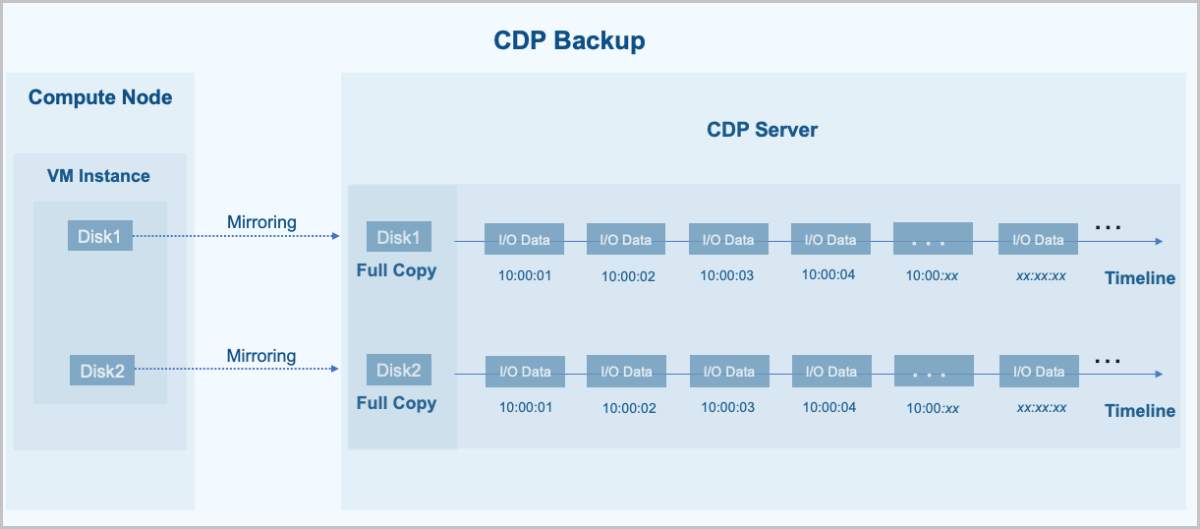
- CDP recovery
When data recovery is performed, the CDP server exposes the CDP data as a block device and then restores the I/O data at a specified time to the disk or file system of a primary storage.
图 2. CDP recovery 
Advantages
- Simple:
- The software-defined solution we provide is hardware-independent and scalable.
- You can preview the backup files without restoring the system. Supported file formats: pictures (.png, .jpg, .bmp, .gif, etc.), PDF files, and text files (equal to or smaller than 10 MB).
- When you create a CDP task for the first time, the Cloud intelligently recommends the desired capacity required by a CDP task based on an algorithm, helping you to plan the backup space reasonably.
- You can restore data through a wizard-style process.
- Strong:
- Agentless backup: To use the CDP service, you do not need to install agents for your VM instances or couple with other applications. This helps reduce the configuration complexity, lower the VM performance loss, and guarantee the business security.
- Second-level RPO: Provides second-level fine-grained continuous data protection for VM instances.
- Instant recovery: Supports instant recovery with the RTO in seconds, which helps to ensure the business continuity.
- Primary storage support: The CDP service applies to VM instances in different primary storage scenarios, including local storage, NFS, SharedBlock, Ceph, and CBD.
- Flexible:
- Flexible RPO settings: Provides second/minute-level RPO settings.
- Multiple recovery levels: Supports entire recovery and file-level
recovery.
- Entire recovery: You can restore data to the original VM instance or to a newly-created VM instance.
- File-level recovery: You can retrieve files without restoring the system. Both Windows and Linux file system formats are supported.
- Flexible data display and search:
- The CDP data page displays hourly data changes of a VM instance, which provides a reference for backup capacity planning.
- The CDP data page also provides a recovery point calendar, which identifies the dates with recovery points with colors. This helps you locate a recovery point quickly.
- Reliable:
- Unified O&M: You can view the critical CDP information on the CDP overview page, including the CDP task status, recovery task status, backup server usage, and unread CDP alarms.
- You can restore CDP data to the original VM instance by creating a volume for the VM instance. All of the volumes before recovery can be retained and attached to the VM instance again, which ensures the data security to the maximum extent and facilitates post-fault analysis.
- The "Create VM instance" recovery policy allows you to create a new VM instance from the selected recovery point without affecting the original VM instance. You can finish the recovery after you confirm that the data is correct. This helps to meet the recovery drill requirements.
- You can mark and lock recovery points to retain the recovery point data in long term.
- The Cloud provides a list of recovery tasks, allowing you to view the recovery records and progress in a more friendly way.
- The RPO latency policy and alarm help to effectively relieve data transmission pressure of backup servers in heavy I/O scenarios.
Scenarios
- Continuous protection of critical business data
You can use the CDP service to continuously back up and protect critical business data, such as banking system data and financial transaction data, minimizing data loss and ensuring your business continuity.
- Anti-virus and data recovery
In case of virus invasion, such as a ransomware attack, you can use CDP to restore data to any point in time to reduce the loss caused by the virus.
Limits
Currently, if a VM instance has volumes not stored on the Ceph primary storage, you could not clone the VM instance or create snapshots or images for the VM instance during CDP.
CDP Dashboard
The overview page displays the critical CDP information on different cards, including the number and status of CDP tasks and recovery tasks, the CPU and memory utilization of backup servers, top 5 backup server usage, the total disk I/O of backup servers, and unread alarm statistics in recent 7 days.
On the main menu of ZStack Cube Ultimate, choose . Then, the CDP Dashboard page is displayed.
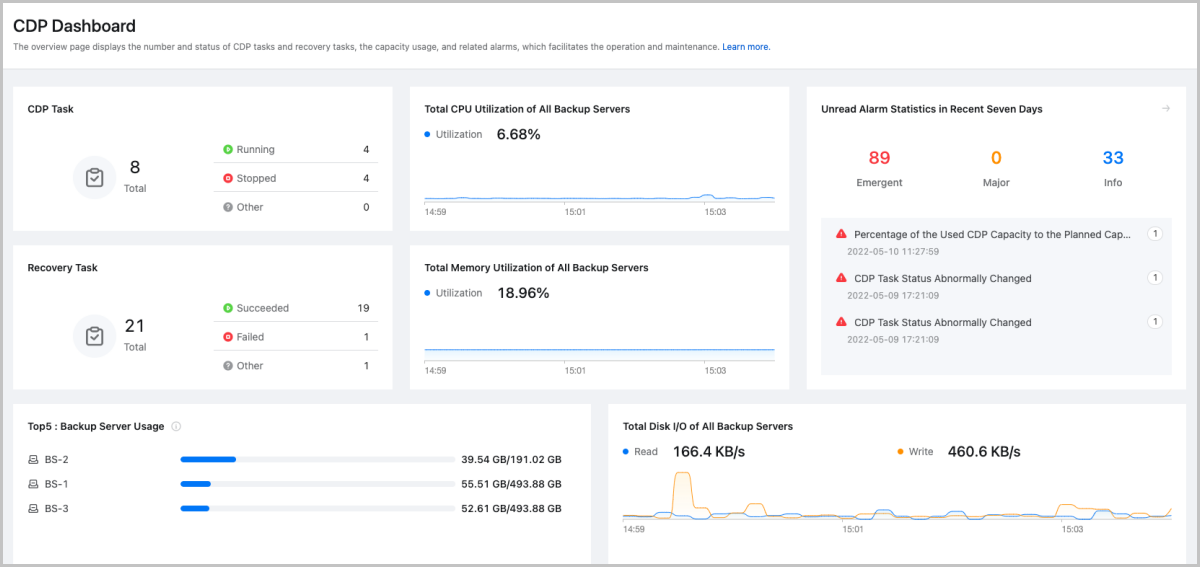
- CDP Task:
- This card displays the number and status of CDP tasks in the Cloud.
- Task status includes running, stopped, and other (starting, running, unknown, and failed).
- You can click the number on the card to enter the CDP task page to view more information.
- Recovery Task:
- This card displays the number and status of recovery tasks in the Cloud.
- Task status includes succeeded, failed, and other (waiting, paused, recovering, canceling, and canceled).
- You can click the number on the card to enter the recovery task page to view more information.
- Total CPU Utilization of All Backup Servers: This card displays the CPU utilization of all backup servers in the Cloud.
- Total Memory Utilization of All Backup Servers: This card displays the memory utilization of all backup servers in the Cloud.
- Top 5 Backup Server Usage:
- This card displays the used capacity and total size of each backup server.
- The usage of each backup server is displayed in descending order.
- You can click the backup server name on the card to enter the details page of the backup server.
- Total Disk I/O of All Backup Servers: This page displays the disk I/O of all backup servers in the Cloud.
- Unread Alarm Statistics in Recent Seven Days:
- This card displays unread alarm statistics in recent 7 days, including the emergency level, number of alarms, and alarm name.
- You can click the More icon in the upper right corner to enter the alarm message page.
- You can view and handle the alarm messages and copy the alarm details.
- Alarm messages that you already read are not displayed here again.
CDP Task
Create a CDP Task
On the main menu of ZStack Cube Ultimate, choose . On the CDP Task page, click Create CDP Task. Then, the Create CDP Task page is displayed.
- Set the basic information.On the displayed page, set the following parameters:
- Name: Enter a name for the CDP task.
The name must be 1 to 128 characters in length and can contain Chinese characters, letters, digits, spaces, hyphens (-), underscores (_), periods (.), parenthesis (), colons (:), and plus signs (+) and cannot begin or end with spaces.
- Description: Optional. Enter a description for the CDP task.
- VM Instance: Select the VM instance to be
protected.
 Note:
Note:
- You create CDP tasks in bulk by choosing multiple VM instances.
- When you choose multiple VM instances, the names of CDP tasks will be followed by -1, -2, -3 and so forth to distinguish these tasks.
- The Cloud supports only one VM instance per CDP task.
- After you create a CDP task for a VM instance, the Cloud performs a full backup on the VM instance.
- Shared volumes (if any) of a VM instance will not be backed up.
- You could not create a CDP task for VM instances with running backup jobs.
- You could not create a CDP task for VM instances with a scheduled snapshot job.
- If a VM instance is in the stopped state, the CDP task created for the VM instance is also in the stopped state and can start with the VM instance.
- You cannot create a CDP task for VM instances whose primary storage type is Vhost.
- Local Backup Server:
Specify a local backup server to store CDP data.Note:
- Before you can specify a local backup server, add one to ZStack Cube UltimatePrivate Cloud.For more information, see Add a Local Backup Server.
- To ensure the continuity of CDP tasks, we recommend that you do not reuse the backup server as a host.
- Make sure that the capacity of the selected backup server is greater than the maximum capacity required for full backups.
图 1. Set Basic Information 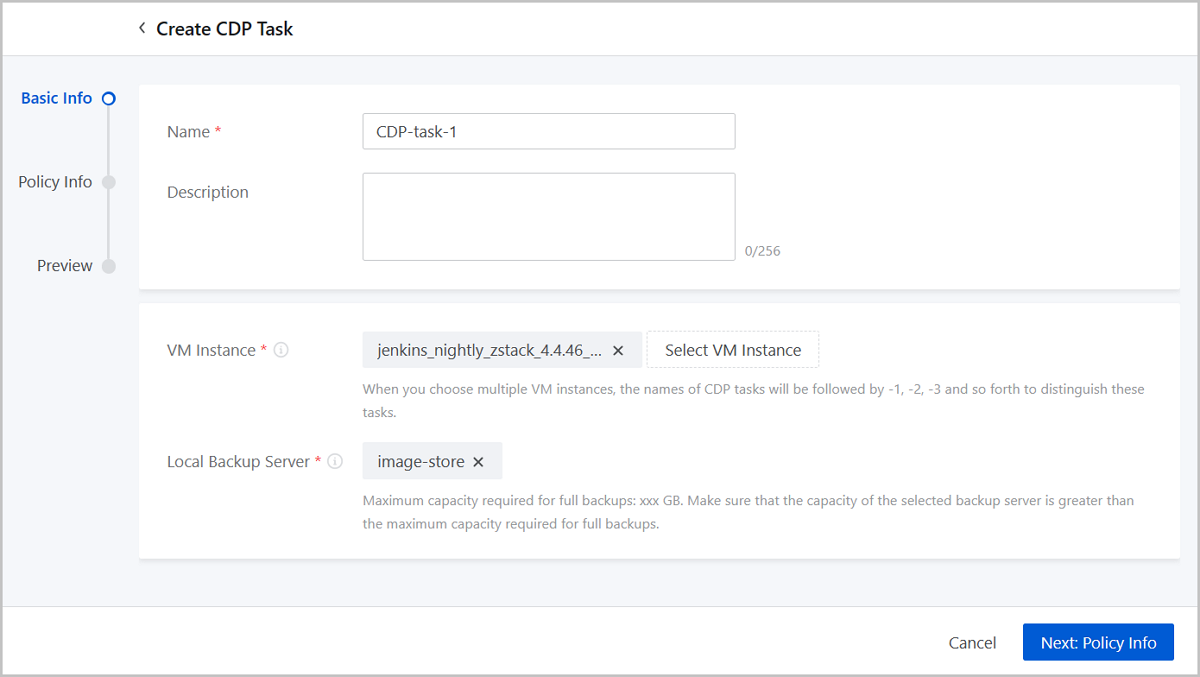
- Name: Enter a name for the CDP task.
- Set the policy information.Set the following parameters:
- Protection Policy: Set the protection policy,
including the recovery point interval, backup aggregation frequency,
recovery point retention policy, and backup rate.
- Recovery Point Interval: Select the interval for generating recovery points. Unit: second, minute. By default, a recovery point is generated at an interval of 3 seconds.
- Backup Aggregation Frequency: Set the
interval for aggregating full backups. Valid range: 1–7
days, integer. By default, a full backup is aggregated every
7 days.Note: To ensure the health of the backup chain, the
Cloud automatically aggregates full backup data on the
backup server according to the value you set here. This
will not consume the bandwidth resources.
- Recovery Point Retention policy: Set
the retention time and retention interval for recovery
points. Up to 3 policies can be set.Note:
- Retention time: You can set how long the recovery points are retained. Valid values: 1–30, integer.
- Retention interval: You can retain all the
recovery points generated in the specified time or
retain the recovery points by hour or by day.
- If by hour, only the recovery points generated at the sharp time are retained.
- If by day, only the recovery points generated at 00:00 are retained.
- Retaining recovery points by hour or by day will save the backup space, but it increase the I/O pressure on the backup server during data merging, which might cause interruptions in generating recovery points.
- Backup Rate: Optional. You can limit the upstream bandwidth of each volume. Unit: Mbps/Gbps. If not set, the bandwidth is not limited.
- Task Running Policy: Set the desired size and
RPO policy for a CDP task.
- Desired Size: Set the desired size
for a CDP task. The CDP task will be stopped if the desired
size is exceeded. By default, the total backup server size
is entered and the Cloud provides a suggested size based on
an algorithm.Note:
- The desired size must be greater than or equal to the total volume size and smaller than or equal to the total backup server size.
- The Cloud provides a recommended size according
to the following formula:Recommended size = Maximum production data size X Number of full backups X 1.1 + Daily changed data size X Recovery point retention time X 1.5
- Maximum production data size: The maximum data size generated by your VM instance for one full backup. This value cannot exceed the total volume size of your VM instance.
- Number of full backups: Recovery point retention time ÷ Regular backup frequency.
- Daily changed data size: We recommend that you estimate the size of daily changed data based on your actual business scenario. For example, if the data of your VM instance increases by 1 GB per month, you can set the daily changed data size to 35 MB.
- Recovery point retention time: The maximum retention time you set on the UI.
- Maximum production data size X Number of full backups X 1.1: During the data retention period, the CDP task will perform more than one full backup. Some cases, such as VM restart, will also trigger a full backup. Therefore, the actual number of full backups will increase according to a certain proportion. (The coefficient here is 1.1, which can be adjusted according to the actual situation.)
- Daily changed data size X Recovery point retention time X 1.5: The size occupied by snapshot volumes is approximately 1.5 times the actual size of data changes.
- The formula above is for your reference in initial backup capacity planning. We recommend that you pay continuous attention to your backup server size changes, and expand the capacity in a timely manner according to the actual situation.
- RPO Policy: Set the CDP task running policy to deal with data replication latency in heavy I/O scenarios. By default, the CDP task will be stopped if the latency exceeds 10 minutes. After the data replication is synchronized, the CDP task will go back to the running status automatically.
- Desired Size: Set the desired size
for a CDP task. The CDP task will be stopped if the desired
size is exceeded. By default, the total backup server size
is entered and the Cloud provides a suggested size based on
an algorithm.
图 2. Set Policy Information 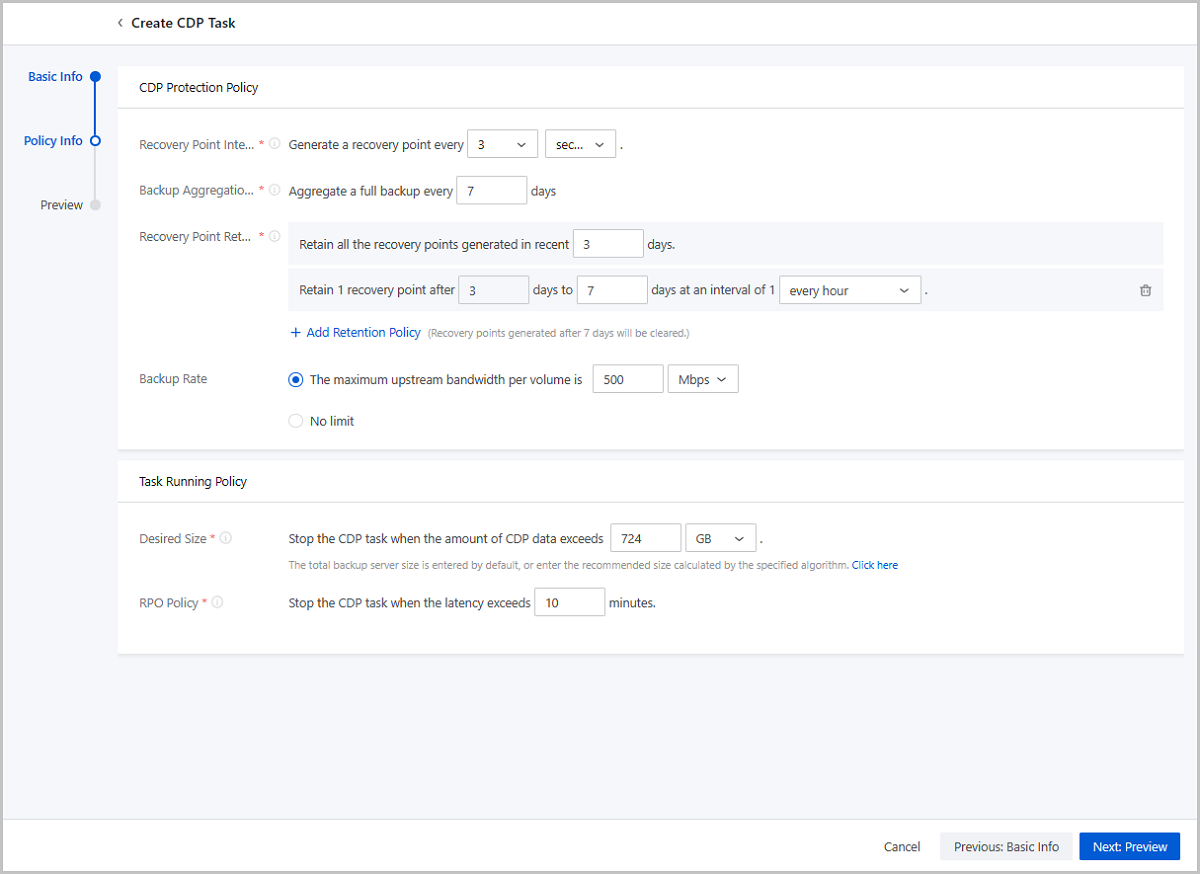
- Protection Policy: Set the protection policy,
including the recovery point interval, backup aggregation frequency,
recovery point retention policy, and backup rate.
- Confirm the information.
View the information about the CDP task. You can edit the information by clicking the Edit icon.
图 3. Confirmation Information 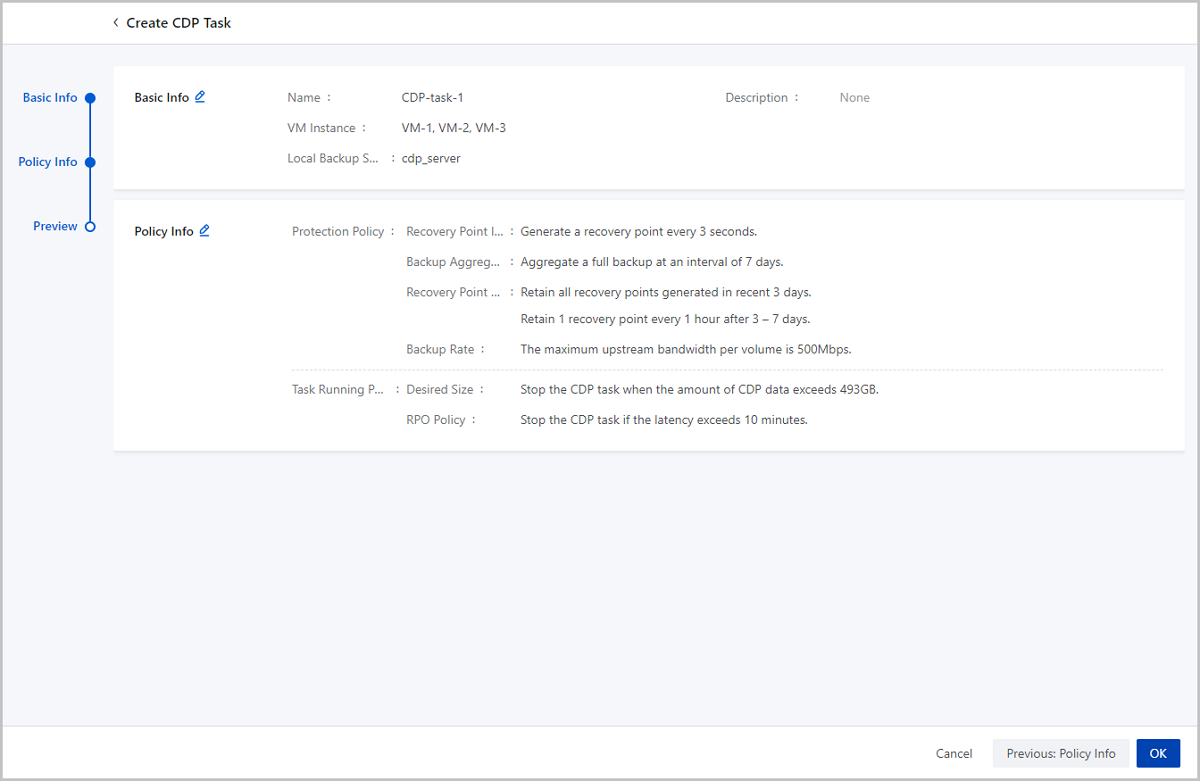
Manage a CDP Task
On the main menu of ZStack Cube Ultimate, choose . Then, the CDP Task page is displayed.
| Action | Description |
|---|---|
| Create CDP Task | Create a CDP task for a VM instance to protect
the VM instance continuously.Note:
|
| Edit CDP Task | Edit the name and description of a CDP task. |
| Enable CDP Task | Enable a disabled CDP task. |
| Disable CDP Task | Disable an enabled CDP task. Then, the continuous data protection is stopped for the VM instance. |
| Modify Protection Policy | Modify the protection policy of a CDP task,
including the recovery point interval, backup aggregation frequency,
recovery point retention policy, and the backup rate.Note:
|
| Modify Task Running Policy | Modify the desired size and RPO policy for the
CDP task.Note:
|
| Delete CDP Task | Delete a CDP task. Deleting a CDP task also
deletes all the CDP data generated from the task and stops data
protection. Please exercise caution.Note: After you delete the CDP
task of a VM instance, you can create a new one for the VM
instance. |
CDP Task Detail
On the main menu of ZStack Cube Ultimate, choose . On the CDP Task page, locate a CDP task and enter its details page.
- The Overview tab displays the basic information and policy
information of the CDP task.
- Basic Info: Display the state, task status, VM instance, local backup server, UUID, creation time, and last operation time of the CDP task.
- Policy Info: Display protection policy and task running policy of the
CDP task.
- Protection Policy: Display the recovery point interval, backup aggregation frequency, and recovery point retention policy. You can modify the protection policy of a disabled CDP task by clicking the Edit icon on the upper-right of the card.
- Task Running Policy: You can modify the task running policy by clicking the Edit icon on the upper-right of the card.
- The CDP Data tab displays the basic information and running
status of the CDP task.
- Basic Info: Display the CDP status, the name of the VM instance, the name of the local backup server, the number of the locked recovery point, and the generated data size. You can enter the corresponding details pages by clicking the name of the VM instance, the name of the local backup server, or the arrow icon next to the number of the locked recovery point.
- CDP Running Status: Display the CDP running status in charts and tables
and support custom viewing.
- Display hourly data changes so that you can plan the backup capacity more reasonably.
- By default, the CDP data of the latest day is displayed. You can view the CDP running status by specifying a time span. Supported time span: Last 1 Day, Last 7 Days, and Custom.
- Provides a recovery point calendar, which identifies the dates with recovery with colors and help you to locate recovery points quickly.
- The Audit tab displays the relevant operation records of a CDP task, including the API name, time consumed, task result, operator, start time, and completion time. You can specify a time period to search for what you want.
CDP Data
View CDP Data
On the main menu of ZStack Cube Ultimate, choose . Then, the CDP Data page is displayed.
- VM instance list on the left of the page displays the name and CDP status of all
VM instances that use the CDP service.
- VM Name: You can search by the VM instance name and click the name of the VM instance to view the CDP details.
- CDP Status: You can identify the CDP status by the color of the icon. Green indicates protected while red indicates interrupted.
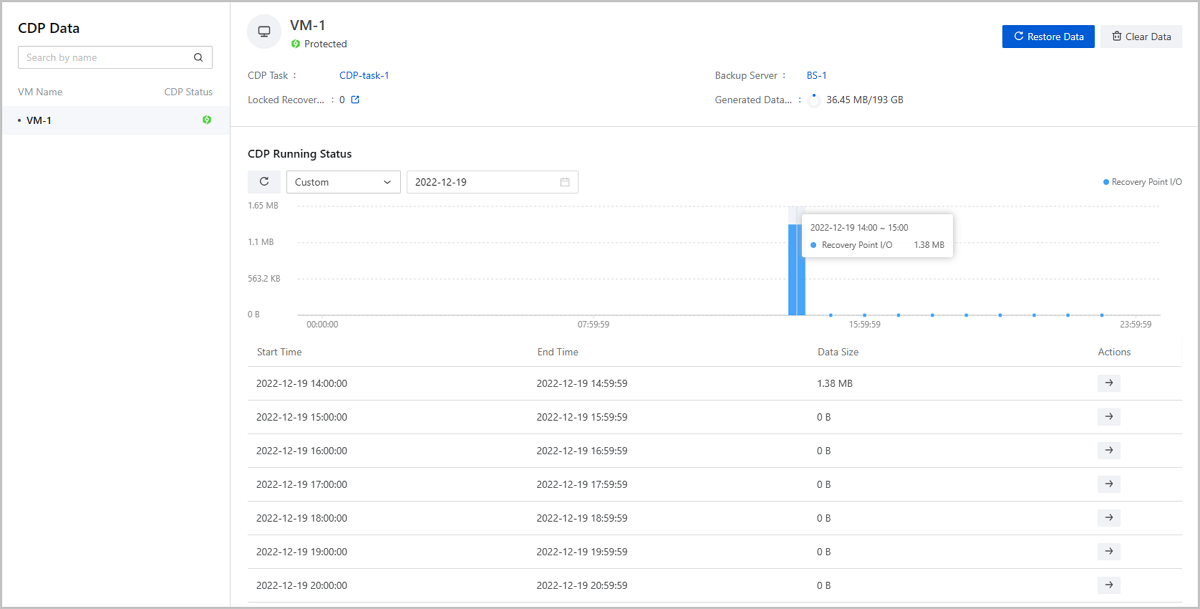
- The CDP details on the right of the page displays the CDP basic information and
CDP running status of the VM instance.
- CDP basic information: Display the name of the CDP task, the name of the backup server, the number of the locked recovery point, and the generated data size. You can enter the corresponding details pages by clicking the name of the CDP task, the name of the backup server, or the arrow icon next to the number of the locked recovery point.
- CDP running status: Display the CDP running status in charts and tables
and support custom viewing.
- Display hourly data changes so that you can plan the backup capacity more reasonably.
- By default, the CDP data of the latest day is displayed. You can view the CDP running status by specifying a time span. Supported time span: Last 1 Day, Last 7 Days, and Custom.
- Provides a recovery point calendar, which identifies the dates with recovery with colors and help you to locate recovery points quickly.
View Recovery Point List
Click the blue column in the chart of the CDP running status, and the corresponding row in the table is highlighted with blue color. Click the arrow icon in the table and the Recovery Point List page is displayed.
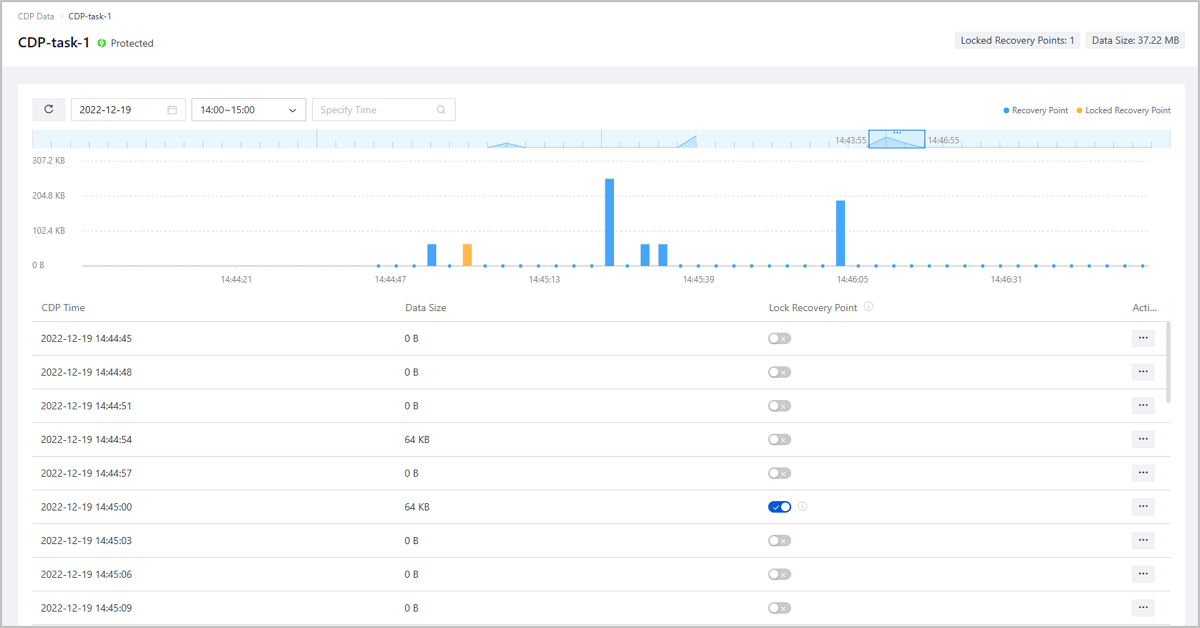
- The recovery point list displays the basic information of the recovery points (locked recovery points included) within the selected hour.
- A time selection slider is provided on top of the chart. You can drag the slider to select a time range with 3 minutes as the interval.
- You can specify a time range by date, by hour (one hour as the interval), and by second to display the recovery point list.
- You can lock or unlock a recovery point. Data of the locked recovery point will not be automatically cleared or deleted. We recommend that you clear the data in time to prevent backup space from being over-occupied.
- After a recovery point is selected, you can directly restore data based on the selected recovery point.
Manage CDP Data
On the main menu of ZStack Cube Ultimate, choose . Then, the CDP Data page is displayed.
| Action | Description |
|---|---|
| Restore Data | Restore the CDP data. The Cloud supports two
restoration policies: Create VM Instance and Restore to Original VM
Instance.
Note:
|
| Clear Data | Clear the CDP data.Note:
|
| Lock Recovery Point | You can lock or unlock a recovery point as needed.Note:
|
| Retrieve File | Retrieve a file without restoring the system.Note:
|
Recovery Task
Create a Recovery Task
On the main menu of ZStack Cube Ultimate, choose . On the Recovery Task page, click Create Recover Task. Then, the Create Recover Task page is displayed.
- Create VM instance
- Restore to original VM instance
Create VM Instance
- Configure recovery policy.Set the following parameters:
- CDP Task: Select a CDP task. You can select a recovery point based on the selected CDP task.
- Recovery Point: Select a recovery point.
The recovery task restores data based on the selected recovery
point.Note: You can select a recovery
point from the recovery point list or from the locked
recovery point list.
- The recovery point list allows you to search for a
recovery point by date, hour, and minute/second.
- When you search by date, the Cloud provides a recovery point calendar, where dates with recovery points are marked in green for quick identification.
- When you search by hour, you can choose between hours with one hour as the interval.
- When you search by minute/second, we recommend that you specify a time based on the recovery point interval you set before.
- The locked recovery point list displays all the locked recovery points by default and allows you to search by date.
- The recovery point list allows you to search for a
recovery point by date, hour, and minute/second.
- Recovery Task Name: Set a name for the
recovery task. You can modify the default name according to your
need.Note: By default, recovery tasks
are named in the format of VM Name-Recovery Point Time, for
example, VM-1-2022-04-27-11:00:00.
- Recovery Task Description: Optional. Enter a description of the recovery task.
- Recovery Policy: Select Create
VM Instance.Note: The
Cloud supports two restoration policies: Create VM Instance
and Restore to Original VM Instance.
- Create VM Instance:
- This method will create a VM instance from the current recovery point. The original one will not be affected.
- The newly created VM instance will quickly start up for business recovery.
- During the recovery, the newly created VM instance will be in the Restoring Data state. In this case, the VM instance can normally provide services and you can read data from and write data into this VM instance. However, the VM's own operations are limited to Launch Console only.
- Restore to Original VM Instance:
- You can restore the CDP data to the original VM instance by creating new volumes or overwriting the current volumes.
- After this operation is performed, the original VM instance will quickly start up for business recovery. During the recovery, the original VM instance will be in the Restoring Data state. In this case, the VM instance can normally provide services and you can read data from and write data into this VM instance. However, the VM's own operations are limited to Launch Console only.
- Create VM Instance:
- Recovery Rate: Optional. You can limit the upstream bandwidth of each volume. Unit: Mbps/Gbps. If not set, the bandwidth is limited at 500Mbps. You can select no limit.
图 1. Recovery Policy Configuration 
- Configure target VM.Set the following parameters:
- Name:
Set a name for the target VM instance. You can modify the
default name according to your need.Note: By default, target VM instances are named in the format of
VM Name-Recovery Point Time, for example,
VM-1-2022-04-27-11:00:00.
- Description: Optional. Enter a description for the target VM instance.
- Tag: Optional. You can attach tags to the target VM instance.
- Instance Offering: Select an instance offering for the target VM instance. By default, the original instance offering is selected.
- Network Configuration: Set network configurations for the target VM instance. By default, the original network configuration is used.
- Primary Storage: Optional. Select a
primary storage for the target VM instance. By default, the
original primary storage is selected.Note: If a volume of Shared Block primary storage is attached to
the target VM instance, when restoring data, the thick
provisioning method is used by default.。
- Host: Select a host the target VM instance. By default, the original host is selected.
图 2. Target VM Instance Configuration 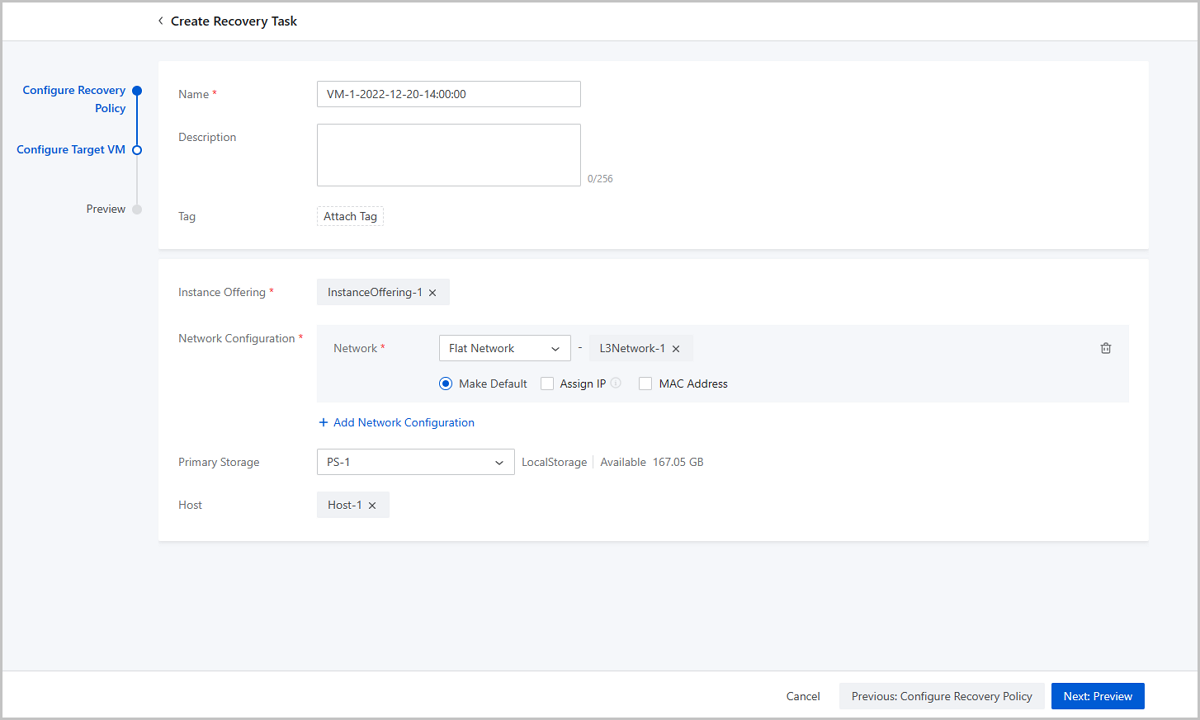
- Name:
Set a name for the target VM instance. You can modify the
default name according to your need.
- Preview.
Preview the recovery task. You can modify the configuration by clicking the Edit icon.
图 3. Preview 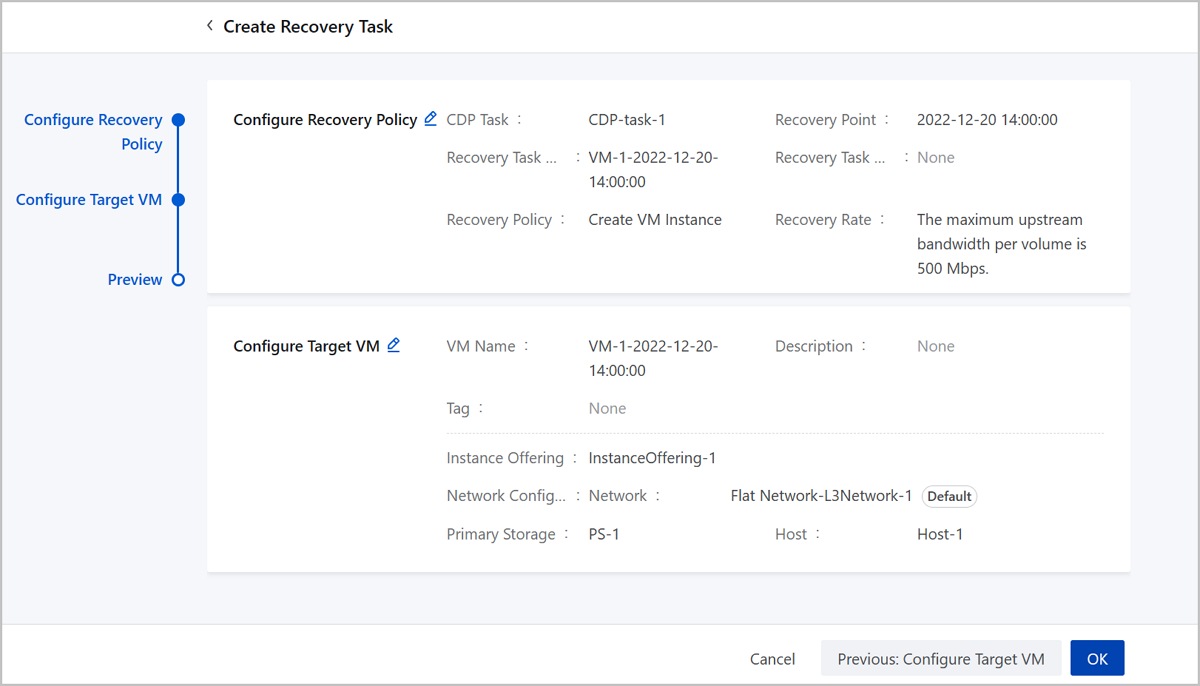
Restore to Original VM Instance
- Configure recovery policy.Set the following parameters:
- CDP Task: Select a CDP task. You can select a recovery point based on the selected CDP task.
- Recovery Point: Select a recovery point.
The recovery task restores data based on the selected recovery
point.Note: You can select a recovery point from the
recovery point list or from the locked recovery point
list.
- The recovery point list allows you to search for a
recovery point by date, hour, and minute/second.
- When you search by date, the Cloud provides a recovery point calendar, where dates with recovery points are marked in green for quick identification.
- When you search by hour, you can choose between hours with one hour as the interval.
- When you search by minute/second, we recommend that you specify a time based on the recovery point interval you set before.
- The locked recovery point list displays all the locked recovery points by default and allows you to search by date.
- The recovery point list allows you to search for a
recovery point by date, hour, and minute/second.
- Recovery Task Name: Set a name for the
recovery task. You can modify the default name according to your
need.Note: By default, recovery tasks are named in the
format of VM Name-Recovery Point Time, for example,
VM-1-2022-04-27-11:00:00.
- Recovery Task Description: Optional. Enter a description of the recovery task.
- Recovery Policy: Select
Restore to Original VM
Instance.Note: The Cloud supports two
restoration policies: Create VM Instance and Restore to
Original VM Instance.
- Create VM Instance:
- This method will create a VM instance from the current recovery point. The original one will not be affected.
- The newly created VM instance will quickly start up for business recovery.
- During the recovery, the newly created VM instance will be in the Restoring Data state. In this case, the VM instance can normally provide services and you can read data from and write data into this VM instance. However, the VM's own operations are limited to Launch Console only.
- Restore to Original VM Instance:
- You can restore the CDP data to the original VM instance by creating new volumes or overwriting the current volumes.
- After this operation is performed, the original VM instance will quickly start up for business recovery. During the recovery, the original VM instance will be in the Restoring Data state. In this case, the VM instance can normally provide services and you can read data from and write data into this VM instance. However, the VM's own operations are limited to Launch Console only.
- Create VM Instance:
- Recovery Method: Select a recovery
method. You can restore the CDP data to the original VM instance
by creating new volumes or overwriting the current volumes. By
default, the Create Volumes is
selected.
- Create Volumes:
- This method will create new volumes to replace the current volumes. Data in the current volumes will be retained.
- This method will detach the current volumes. You can view the newly created and detached volumes on the configuration tab page of the VM instance.
- After you confirm that the restored data is reliable, you can manually delete the detached volumes to release the storage space.
- Overwrite Current Volumes:
- This method will overwrite the original data in the VM instance. Proceed with caution
- This method will keep the snapshots in the current volumes.
- Create Volumes:
- Recovery Rate: Optional. You can limit the upstream bandwidth of each volume. Unit: Mbps/Gbps. If not set, the bandwidth is limited at 500Mbps. You can select no limit.
图 4. Recovery Policy Configuration 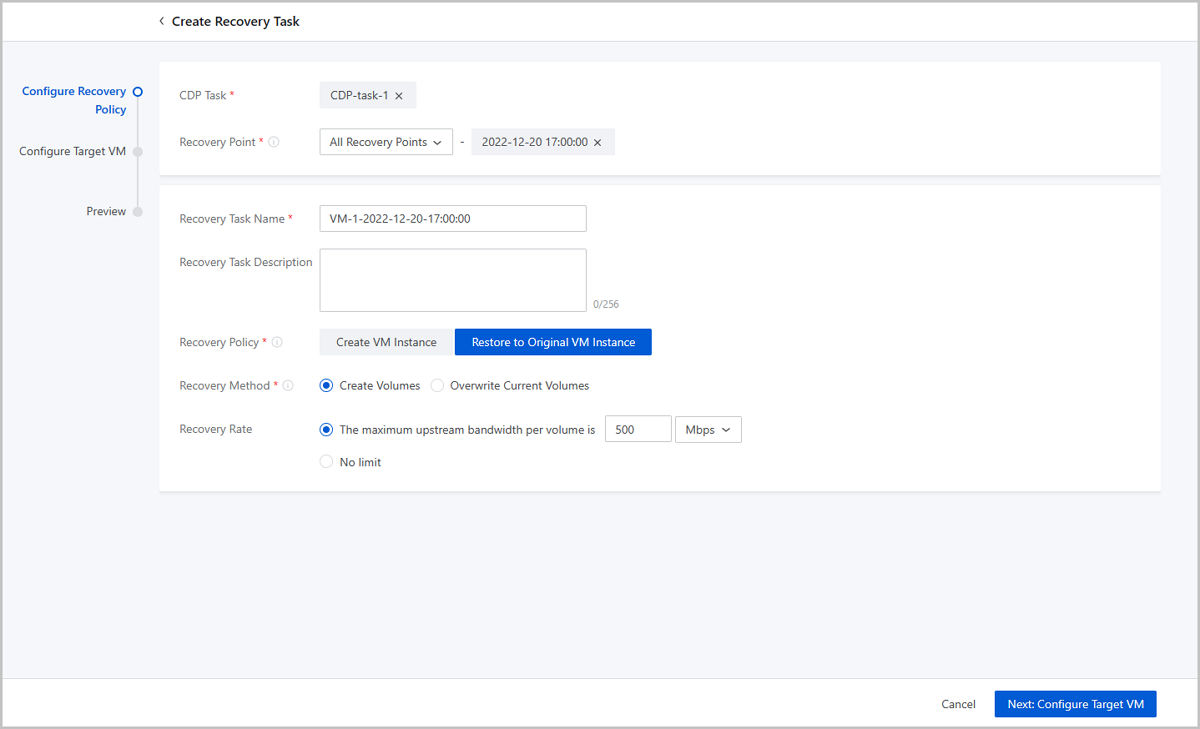
- Configure target VM.Set the following parameters:
- Name: By default, the original VM instance name is displayed.
- Description: Optional. Enter a description for the target VM instance.
- Primary Storage: Optional. Select a
primary storage for the target VM instance. By default, the
original primary storage is selected.Note: If a volume of Shared
Block primary storage is attached to the target VM instance,
when restoring data, the thick provisioning method is used
by default.
- Host: Select a host for the target VM instance. By default, the original host is selected.
图 5. Target VM Instance Configuration 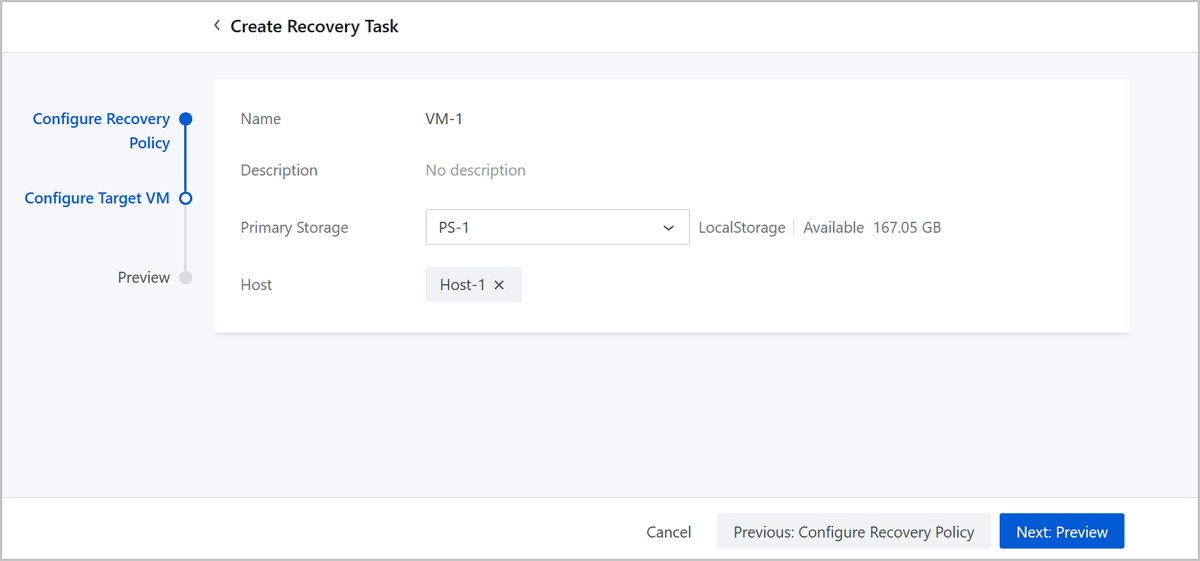
- Preview.
Preview the recovery task. You can modify the configuration by clicking the Edit icon.
图 6. Preview 
Manage a Recovery Task
On the main menu of ZStack Cube Ultimate, choose . Then, the Recovery Task page is displayed.
| Action | Description |
|---|---|
| Create Recovery Task | Create a recovery task to quickly restore data. |
| Edit Recovery Task | Edit the name and description of a recovery task. |
| Redo Recovery Task | Redo a recovery task.Note: You can run a failed
or canceled recovery task again. |
| Cancel Task | Cancel a recovery task.Note:
|
| Delete Recovery Task | Delete a recovery task.Note: Deleting a failed or
canceled recovery task also deletes the intermediate data
generated during the recovery process. |
Recovery Task Details
On the main menu of ZStack Cube Ultimate, choose . On the Recovery Task page, click the name of a recovery and enter its details page.
- The Overview tab displays the basic information of the
recovery task, recovery point information, and target VM instance
information.
- Basic Info: Display the task status, recovery rate, time consumed, recovery task UUID, creation time, and last operation time.
- Recovery Point Info: Display the name of the CDP task, recovery point time, recovery policy, and recovery method.
- Target VM Info: Display the name, description, instance offering, network configuration, primary storage, and host of the target VM instance.
- The Audit tab displays the relevant operation record of a recovery task, including the API name, time consumed, task result, operator, start time, and completion time. You can specify a time period to search for what you want.
Local Backup Server
Add a Local Backup Server
On the main menu of ZStack Cube Ultimate, choose . On the Local Backup Server page, click Add Local Backup Server. Then, the Add Local Backup Server page is displayed.
- Use an existing image storage.
- Add a new server.
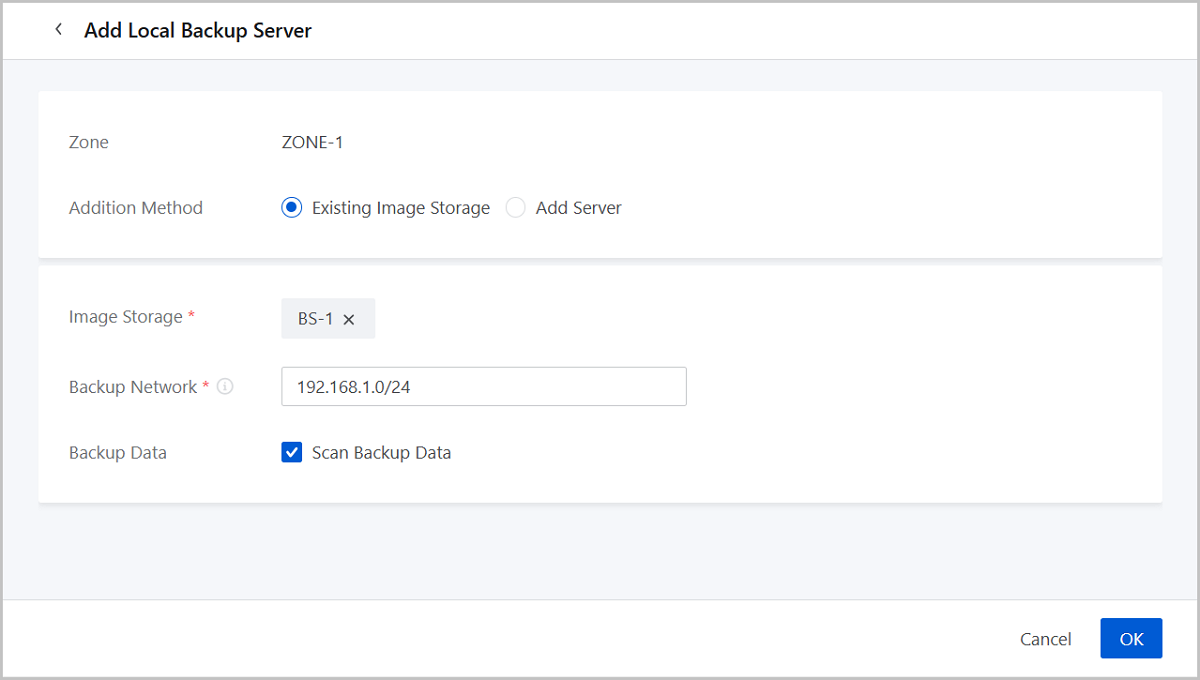
Use an Existing Image Storage as the Local Backup Server
- Zone: By default, the current zone is displayed.
- Addition Method: Select
Existing Image Storage.Note:
- Currently only ImageStore image storage is supported.
- You need to use standard ISO.
- After addition, you can modify the name and backup network on the details page of the local backup server.
- If the image storage you select uses network file system as the mount path, make sure it uses a NFS path.
- Backup Network: Optional. Set the
backup network. If you deployed a network dedicated to CDP, enter the
network CIDR.Note:
- If you deployed a network dedicated to CDP, you can add the network to the Cloud directly.
- In local backup scenarios, local VM instances, volumes, or databases are backed up to local backup servers by using the backup network. Local backup data is restored to the local environment by using the management network.
- Using a dedicated network can avoid network congestions and improve the transmission efficiency.
- If you do not specify a backup network, the management network is used by default.
- Backup Data: Optional. Choose
whether to scan the existing backup data.Note:
- If you have installed the Plus License of Backup Service, you can scan the undeleted backup data of VM instances, volumes, and databases.
- If you have not installed the Plus License of Backup Service, this option does not affect the CDP data.
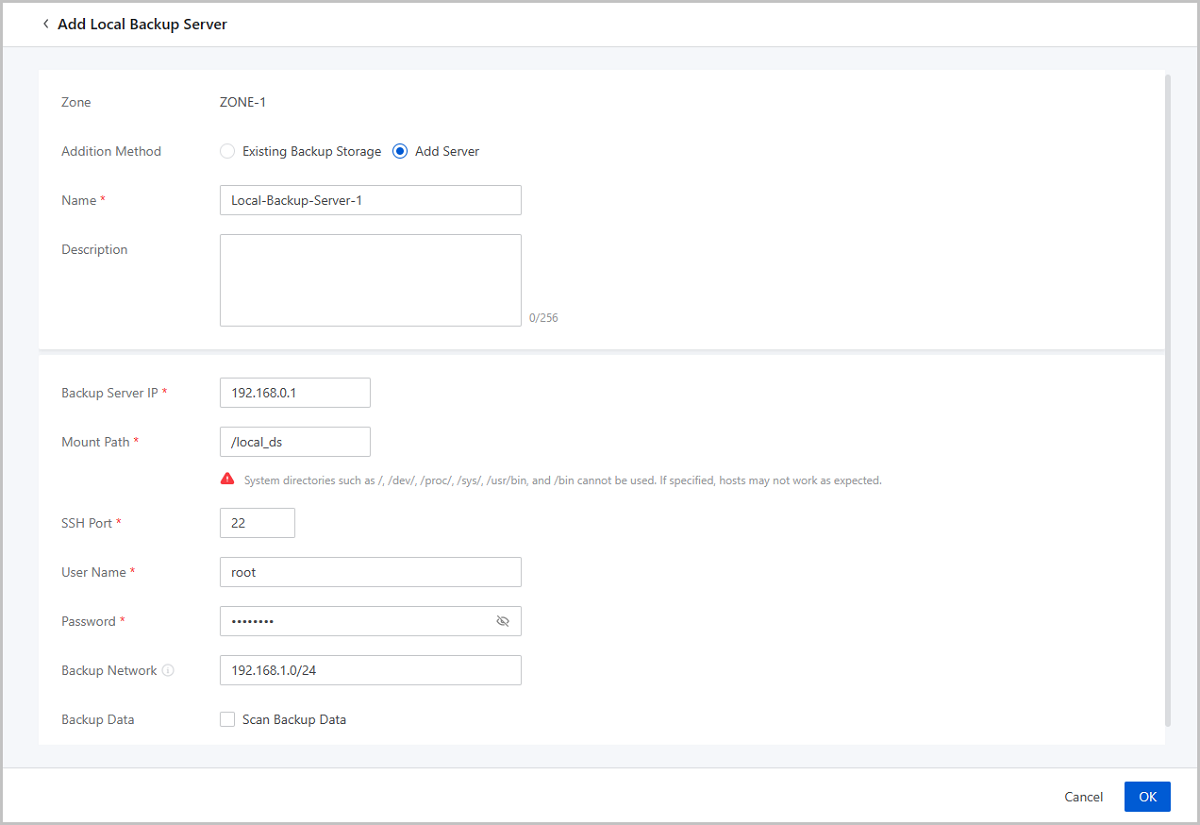
Add a New Server as the Local Backup Server
- Zone: By default, the current zone is displayed.
- Addition Method: Select Add Server to add a new server.
- Name: Enter a name for the local
backup server.
The name must be 1 to 128 characters in length and can contain Chinese characters, letters, digits, spaces, hyphens (-), underscores (_), periods (.), parenthesis (), colons (:), and plus signs (+) and cannot begin or end with spaces.
- Description: Optional. Enter a description for the local backup server.
- Backup Server IP: Enter the IP
address of the local backup server.Note:
- You need to prepare a new storage server in the local data center as a local backup server.。
- To ensure the continuity of CDP tasks, we recommend that you deploy the backup server separately from the host server.
- Mount Path: Enter the path to
which the storage is mounted, for example,
/mnt/xxx_ds.Note: If you want to use a network file
system for the backup server, you can only use a NFS path.
- SSH Port: Enter the SSH port. Default: 22.
- User Name: Enter the user name. Default: root.
- Password: Enter the password.
- Backup Network: Optional. Set the
backup network. If you deployed a network dedicated to CDP, enter the
network CIDR.Note:
- If you deployed a network dedicated to CDP, you can add the network to the Cloud directly.
- In local backup scenarios, local VM instances, volumes, or databases are backed up to local backup servers by using the backup network. Local backup data is restored to the local environment by using the management network.
- Using a dedicated network can avoid network congestions and improve the transmission efficiency.
- If you do not specify a backup network, the management network is used by default.
- Backup Data: Optional. Choose
whether to scan the existing backup data.Note:
- If you have installed the Plus License of Backup Service, you can scan the undeleted backup data of VM instances, volumes, and databases.
- If you have not installed the Plus License of Backup Service, this option does not affect the CDP data.
Manage a Local Backup Server
On the main menu of ZStack Cube Ultimate, choose . Then, the Local Backup Server page is displayed.
| Action | Description |
|---|---|
| Add Local Backup Server | Use an existing image storage as the local backup
server or add a new server as the local backup server.Note: To
ensure the continuity of CDP tasks, make sure that the backup
server is not reused as a host. |
| Enable Local Backup Server | Enable a disabled local backup server. |
| Disable Local Backup Server | Disable an enabled local backup server. After a local backup server is disabled, it cannot be used for newly created CDP tasks. |
| Reconnect Local Backup Server | Reconnect a local backup server.Note: When
reconnecting a local backup server, the CDP task status may
change to unknown. |
| Scan Backup Data | Scan the existing CDP data in the local backup
server.Note: Deleted backup data cannot be restored by the scan
action. |
| Cleanup Data | Clean up the invalid data in the local backup
server to free up storage space.Note:
|
| Update Password | Change the password of a local backup server. |
| Delete Local Backup Server | Delete a local backup server.Note:
|